Hi all, hopefuly someone can help me further. I have a bricked BIOS on my Asus zenbook issued by an automatic BIOS update out of windows 10. Laptop was switched off during update by accident.
I tried to repair the BIOS by my own and flashed it with a programmer in-circuit but without success. Still doesn’t boot. Only black screen. Attached the dump file I read out of the Winbond 25Q64JV (8MByte SPI flash). I don’t know which BIOS version was installed before and which windows tried to install.
Additional Information: The belonging Bios files from Asus Homepage are only 6MB. I think this is a partial update. What I did is to take the first 2MB of the bricked file and merged it manually with a hex editor with the 6MB file I downloaded from Asus page. I was able to flash the resulting 8MB file but unfortunately PC doesn’t boot. Just a black screen. Can not enter BIOS or do anything. It as well doesn’t beep. I attached the newest downloaded file (v312) from Asus HP as well.
Does anyone have a suggestion? This would be very nice
@Lem - I need the dump of your BIOS BEFORE you did anything to try and repair it. Is this what you have above in first attachment, or is that a dump after you tried to fix it?
YOu may need to use Colibri or ASProgrammer to write to the BIOS chip, this may be why your attempts failed, possibly. That’s not the correct way to do things and you would loose your serial, UUID and probably LAN MAC ID too, but if done properly it should have booted at least, so may be failed writes due to W25W64JV chip ID is not in software as a choice
* Edit, please also confirm what is your exact model, your title does not match the stock BIOS name/version you attached >> UX3410UA in title vs UX410UAK attached file - Never mind, I see this is Asus’s idea of a good way to not confuse people
Do you have ANY older BIOS backups? This BIOS dump only contains one NVRAM volume, and possibly your board specific data, but I’m not sure if everything is here, so if you have some old backup that would be good, if not we can move forward with this.
yes, the first file “backupBIOSUX3410UAbricked” is the file I read out of the SPI flash right after laptop lost power during automatic BIOS update out of windos. As you can see, it is 0xFF from some address on.
I have a CH341 programmer andCH341A_C.exe version 1.29. I think the read / write and veryfiy did work so far from HW side.
Unfortunately I dont have older backups. And yes, UX3410 is the same like UX410 for which reason ever
There is no “Think” it worked, only it worked or not, and if you did the edit you mentioned correctly it should boot. The reason I mentioned the chip ID is because this ID is not in CH341A or ASProgrammer chip ID lists We’ve dealt with this recently, you need to use software called colibri, you can download it from the site linked here on post #388 - [Guide] Using CH341A-based programmer to flash SPI EEPROM (26)
It’s too bad you didn’t want for help before trying to erase/write too, there may have been more on chip than what you dumped with those versions 1.30 or 1.34 would have been more ideal to use to dump with, but it’s too late now. Here’s package for you to use later (not on this chip), with all versions - http://s000.tinyupload.com/index.php?fil…257455007472602 Or ASProgrammer - https://github.com/nofeletru/UsbAsp-flash/releases/
All writes will fail if you do not use that Colibri app, or we’ve not tested ASProgrammer 1.40 or 1.41, it may write OK too. CH341A software will not, 1.18-1.34 has been tested and failed. Read/write/verify means nothing if it’s not compatible with the chip, this is why there is a chip ID selection list in all apps, it can read/write all FF or all 00 and then say it’s verified. You can test if you want, write something, then dump it and compare in hex, it wont match
OK, please wait, I’ll make you BIOS now. Please see my edits above, if you have older BIOS backup, from any time, please upload for me.
Ok,understand. Unfortunately no older one available. I wil use the tools you mentioned and look forward for your reconstructed version. Many thanks for your support
If you can find your LAN MAC ID (Ethernet) in your router logs that would be good, if not it may be lost and you wont be able to use it. Serial and UUID may be lost as well, some info is in there, but I can’t confirm it’s valid, I’ll insert block as an initial test, then you will find out or not. Once you download colibri software, please upload a copy for me to some free file host, thanks!
If you can’t register to download that latest version of Colibri linked above, here is the only version I could find to download when searching previously. Choose FV or BV for CHIP ID, there is no JV here either, but it’s tested and working per above link, not this version but newer one, so that may not be good either. I do suggest you download the one linked above as it’s confirmed tested and working with JV chips - http://www.filedropper.com/colibriprogram-10161-ch341a
Intel WIFI is WIFI, this not LAN MAC (Ethernet = cable) - this what I needed you to check, but that would only be possible if you connected the ethernet to it recently probably (if it even has ethernet LAN, it may not)
No, the laptop has no cable ethernet (RJ45). Only wifi and bluetooth by an intel combined chip.
I tried out to flash my reconstructed file via colibri you linked. It is the same result like flashing it with CH341 tool: battery led blinks green twice and is off for 5sec, then blinks green twice again and so on… After half a minute fan runs up and continue to run. Black screen all the time. I think my reconstructed file is not correct as you already assumed…
Edit: Attached the file I flashed.
Edit#2: sorry I have not seen that you already uploaded a new bios… I’ll try it out imediately
---------------------------
I flashed FX1NV.bin with Colibri. Unfortunatelly the same behavior:
Battery led blinks green twice and is off for 5sec, then blinks green twice again and so on… After half a minute fan runs up and continue to run. Black screen all the time and it is not posible to enter BIOS. No beep, nothing.
Yes, sorry you missed that, I posted BIOS for you long ago and tagged you on the edit
Looks like you did the edit OK to me! I did the same, well similar, but I also cut out padding area with system details and put back in BIOS, and unlocked FD and updated ME FW too in case it was bad. However, I did use dumped ME FW as settings source, may need to use some other confirmed OK dump to redo this again.
Maybe you need EC FW fixed too! Please find and dump the other BIOS-looking chip, it should be 1MB or less chip, do not erase or write anything to it until I tell you to and give you a file etc. Some BIOS only work with some EC FW, so few things here, you may need to use whatever older BIOS you were on before, if old EC FW is on the chip still, or if chip is blank/corrupted, it may need new EC FW put on there. Do you know what BIOS you were using before this update happened?
Also, that calibri version I uploaded may not work, only the newer version I linked you to thread to download from other link, was confirmed to work with the 128JV, so you may need that newer version for 65JV too. Dump BIOS and compare with what you wrote as mentioned below, then you;ll know if the write is OK
Try to write my file with ASProgrammer 1.41 and choose chip ID with BV at end. Also, always be sure you erase chip first, then blank check, then write/verify. And if you want to be 100% sure the write is happening properly, after you write/verify, dump the chip contents and compare in hex editor to the file you wrote, it should be 100% match, if not then write is failing.
Have you tried standard Asus laptop recovery method? It may not work, since BIOS was so badly messed up, but we’ve replaced that, if it at least wrote in much of what we gave it. If you put renamed copy (to >> UX410UAK.BIN) of stock BIOS on root of small cheap USB formatted to FAT32, and plug it in, with system shut off. Press Ctrl+Home and hold that, then power on, does anything change? If you see no change, try the same, but power up first then press Ctrl+Home at same time. Also, try same with original system driver CD in CD/DVD drive if you have it, and it has a CD drive.
Thanks, LOST_N_BIOS. Need some time to try out all your suggestions. I don’t know which BIOS version was installed before and can’t find any more 8 pin SOIP chips on the pcba. Maybe on the other side. Therefore I would need to demount everything.
----------------------
@Lost_N_BIOS : flashing your file with ASProgrammer 1.41 did not succeed. Same behavior. I compared your file with the file I read out of the SPI flash with beyondcompare afterwards. This is 100% identical. So flashing itself succeeded. After some seconds again the fan started. Is fan controlled by Embedded Controller ? Think this might be a small Atmel or something else ?
@Lem - Also, try what I mentioned with the stock BIOS file name >> AMIBOOT.ROM I forgo to mention this above
So, you wrote my file again, then dumped that chip and compared the dump with the file I sent you and it’s 100% match? If yes, then good, at least we know your write with ASProgrammer is going in properly. If yes, it could be ME FW, something was bad in it that got copied over during the update process, lets try again without using your dump as the ME settings source, new file will be below.
If still same after writing this new file, then it must be EC FW was blanked, or is still older version and that version not compatible with this BIOS. To figure that out, you need to know what the old BIOS version was, or we could try whatever older EC and newer EC FW I can find, but first you need to find the chip and see what’s on it.
System is running, but not booting, could always be either ME FW messed up, EC FW messed up/not matching, or graphics card dead and system actually running but no display output (unlikely, but always possible) Test external monitor on all slots to be sure nothing is coming on screen at any time.
Also, try booting once with ram removed, then put ram back in and try again, sometimes this will reset things. Also, try holding F4, and power on system, this can sometimes reset EC FW from a internal BIOS copy (not sure what all systems this applies to, or if this system even has EC FW, it may not) Confirmed, there is EC FW, I see it mentioned in update notes BIOS change logs for some BIOS downloads (Now removed from Asus site, versions too old -200) and I found where users have posted EC FW mods to change various things for this model. So you need to find this chip and dump it’s contents so we can see if it’s old or new, blank, or corrupted etc
I need litle bit more time to test all these issues due to work… But what I found out in the meantime is following by using your FX1NV file: I crosschecked by reading out the flash with ASProgrammer. The flashed file and your file is 100% identical → I can confirm that flashing works properly.
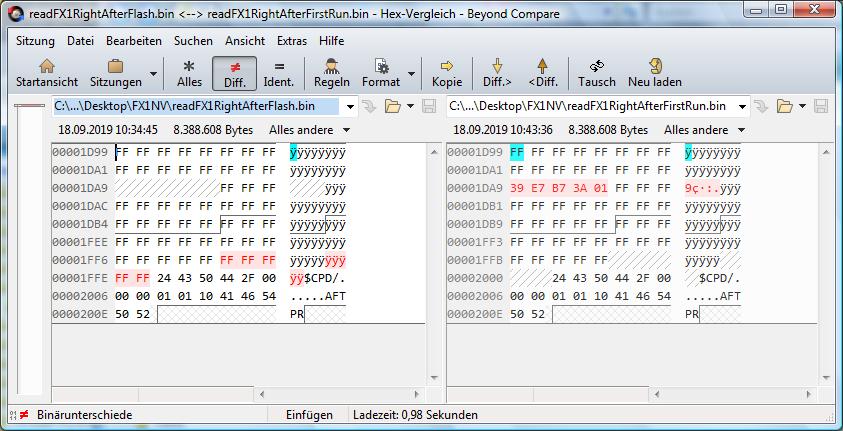
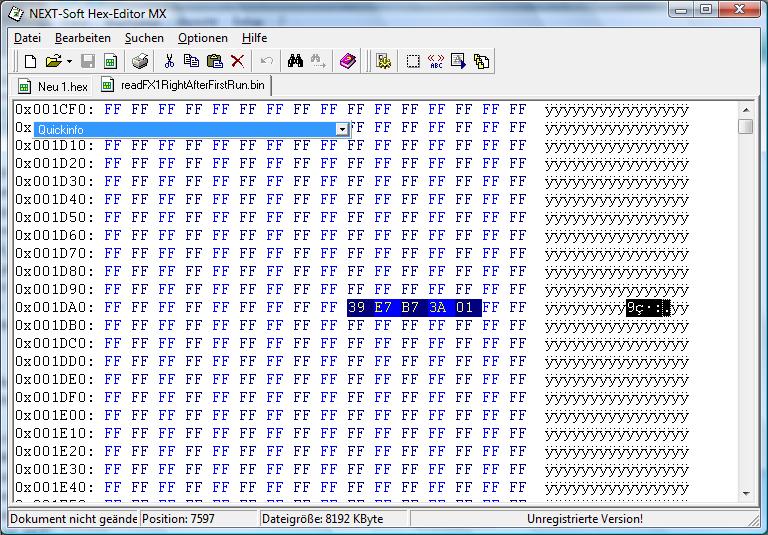
But: Reading out the flash after laptop runs once I get a slightly different result on reading out the flash as you can see in the attached pic. Left is your original file (and the content right after flashing) and right is the file after laptop was switched on. So someone (the EC ?) has overwritten some data.
2nd insight: Flashing FX2NV leads to the same result. Black screen, fan runs etc…
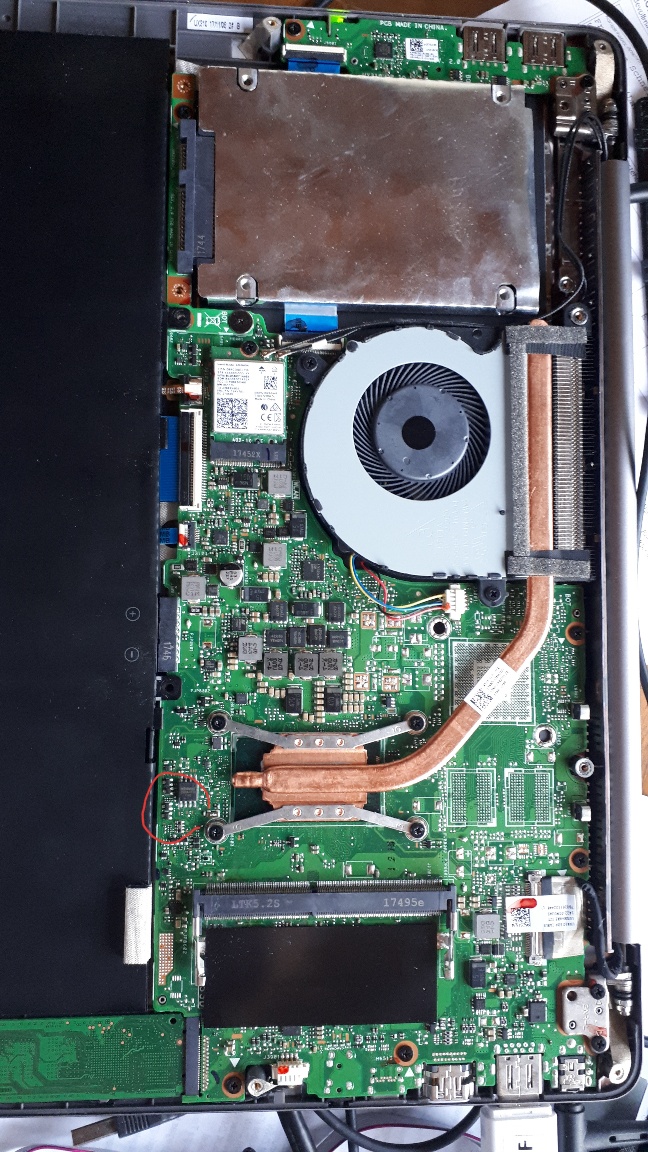
I did the following without success: 1. RAM can not be removed as it is soldered 2. FAT32 USB Stick with "UX410UAK.bin" on it and pressing Ctrl+HOME on power on 3. FAT32 USB Stick with "AMIBOOT.rom" on it and pressing Ctrl+HOME on power on (I renamed the 312 version of store BIOS to that) 4. Holding F4 on power on 5. only other graphics output is HDMI. I tried that. Monitor says "no signal" at powering on time and after 6. When you have a look at the pic… I marked the BIOS chip but can not find another Chip in this format. Does it realy looks similar or can this be a different package as well ? If It is a Microcontroller then it definitely looks different. But in that case I can not do a dump. Or it is on the other side?
1+2 I did with your latest version flashed (FX2NV)
=> Last chance is to try out other BIOS versions ? What do you think?
It could be a different package, but normally it would be same as BIOS package. Could be on other side, could be under black fiber protection part at memory slot area, could be under WIFI card It may be in WSON package, but if not that then I assume it’s not used as a separate chip but only contained within the BIOS itself.
Did you make sure all connectors are reconnected as they originally were? Remove any/all USB and tried that way yet? I see in google this green LED blinking twice for Asus can be something connected that’s bad or shorted, you forgot to reconnect something, or bad PSU What “Green” light it is specifically?
Tried with and without main battery? With and without PSU, so only main battery?
Hold power button in for 20 seconds, what is outcome? Remove HDD, what is outcome on boot attempt
Remove anything external you have connected, like monitor/HDMI Cables etc
Press enter key while green LED is flashing? Maybe it’s in standby
No, other BIOS versions wont matter, all would = same/same, what I sent you should be booting, provided write was correct and nothing else is wrong with the board.