I finally managed to upgrade to full AMT support.
First a few notes from what I observed:
For HP Prodesk 600 G4 it does not seem to be possible to change Flash/SPI Descriptor region Master permissions, since they are restored to original values after each boot.
Also I have not found a way to boot with FDO (Flash Descriptor Override) so the only remaining option was to use flash programmer.
I have used:
-
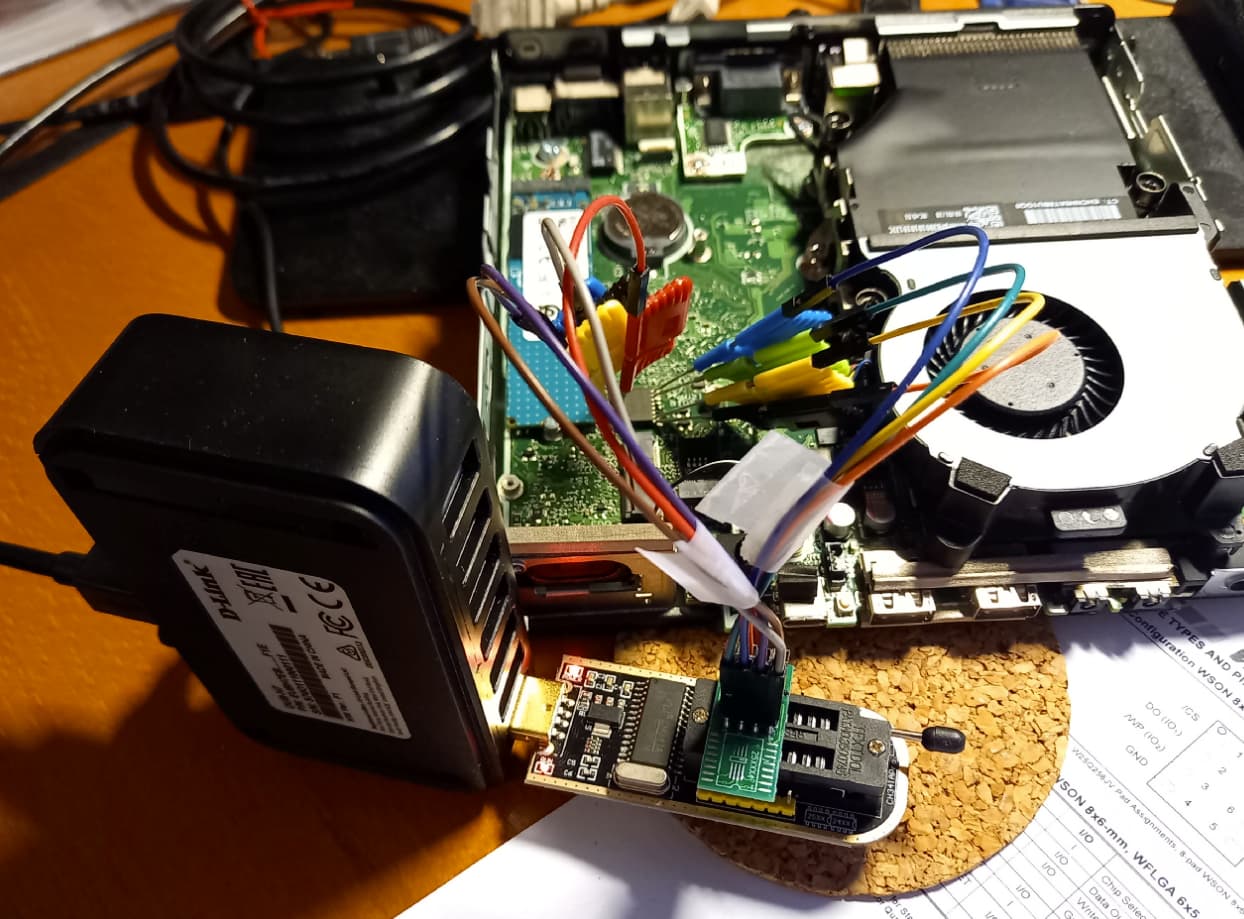
CH341A based programmer → this one https://www.aliexpress.com/item/33054397283.html (careful to select correct set with all the needed additions. I used “CH341A And 1 Board” - in retrospect I should have ordered version with 3.3V → 1.8V adapter in case I ever need to program 1.8V chips - this HP flash is 3.3V. If in doubt get the full set with all the additions)
-
clip set of 10 Micro IC clamp SOP to connect to programmer → this one 9.57£ 49% OFF|Original 10pcs/set Micro IC clamp SOP/SOIC/TSSOP/TSOP/SSOP/MSOP/PLCC/QFP /TQFP/LQFP/ SMD IC MINI Test Chip Pin Adapter Socket| | - AliExpress
-
a bunch of wires to connect clips to programmer (sourced locally)
-
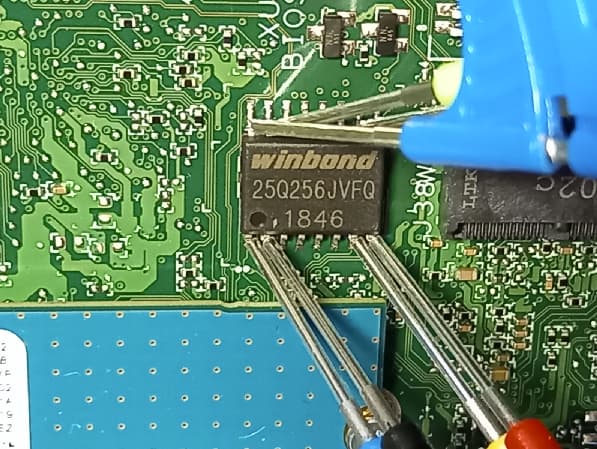
download and read Winbond W25Q256JV documentation to get the pin layout for the flash chip.
-
MEAnalyzer from GitHub - platomav/MEAnalyzer: Intel Engine & Graphics Firmware Analysis Tool
-
Windows driver for CH341A programmer (linked from threads below)
-
NeoProgrammer software (google it) instead of usually suggested CH341A programmer software. NeoProgramme version is 2.2.0.10 (15.10.2021) with chiplist.dat version:30.12.2023 - this worked for me.
CH341A programmer software I tried had issues with failing verification after reading 25% of flash’s content and also was not able to consistently read full flash dump. I assume it was not able to support W25Q256JV correctly, but NeoProgrammer had no problems.
To be on the safe side, I used powered USB hub and connected CH341A programmer to USB hub directly, since most of the motherboard will get power directly from CH341A programmer.
Also when you connect CH341A to the flash chip - power LED which is usually white will start flashing red, so do not be alarmed by it - I didn’t see any ill effect from this.
Once flashing is completed and Intel AMT is active, remote video will only be shown when there is a monitor connected to display port, otherwise the image from remote computer will be blank.
To fully support remote management without connected monitor you need to use dummy Display Port plug which emulates connected monitor.
And final warning - do not share or reuse full SPI/flash .bin files created with these instructions, since they are specific to the system in question and contain system IDs and MAC addresses.
Now for the steps:
-
download CSME System Tools v12 r38 and read instructions from thread
[Guide] Clean Dumped Intel Engine (CS)ME/(CS)TXE Regions with Data Initialization
[Guide] Clean Dumped Intel Engine (CS)ME/(CS)TXE Regions with Data Initialization - #2 by plutomaniac -
Download CSME 12.0 Repository r33 (linked from the thread)
Intel (CS)ME, (CS)TXE, (CS)SPS, GSC, PMC, PCHC, PHY & OROM Firmware Repositories - Intel Management Engine - Win-Raid Forum -
Identifiy needed “Unconfigured” Management Engine .bin file.
In my case I used:
12.0.81.1753_COR_H_BA_PRD_EXTR-Y.bin -
Open ME .bin file with ME Analyzer and check that “File System State” is Unconfigured.
-
From Prodesk computer, use FPT Flash Programming Tool to dump full SPI/flash image and save it somewhere safe in case you need to restore it.
CSME System Tools v12 r38\Flash Programming Tool\WIN64>FPTW64.exe -d fulldump.bin -
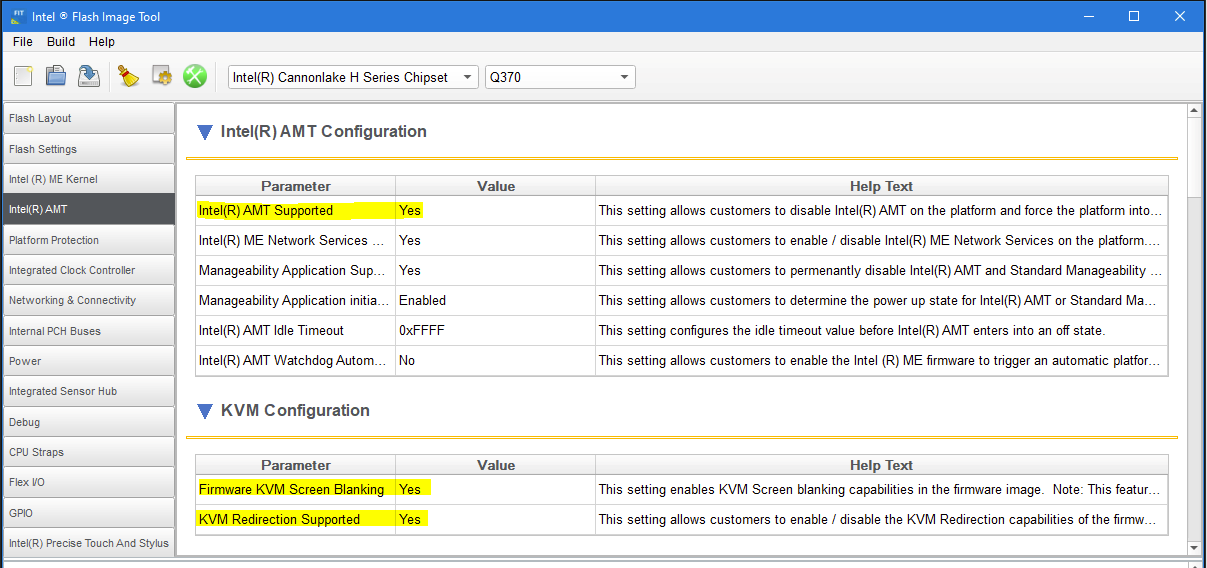
Start Flash Image Tool (fit.exe) and open dumped fulldump.bin file
Change these settings for AMT support:
Intel(R) AMT → Intel(R) AMT Parameter Configuration → Intel(R) AMT Supported = YES
Intel(R) AMT → KVM Configuration → Firmware KVM Screen Blanking = YES
Intel(R) AMT → KVM Configuration → KVM Redirection supported = YES
-
Save this new configuration as .xml file and close Intel Flash Tool
-
In the directory where fit.exe is locate there should now be a sub-directory “Decomp” containing “ME Sub Partition.bin” file.
CSME System Tools v12 r38\Flash Image Tool\WIN32\fulldump\Decomp\ME Sub Partition.bin
This file needs to be replaced/overwritten with the appropriate Unconfigured ME .bin file which is renamed to “ME Sub Partition.bin”
-
Open FIT tool again and loaded previously saved .xml file
-
Build new .bin image: Build → Build Image
You will be prompted for:
"Boot Guard Profile Configuration " is set to “Boot Guard Profile 0 - No_FVME”.
The Boot Guard feature will be disabled on the platform.
Select Yes to continue
Are you sure you want to set “Intel(R) PTT Supported [FPF]” to “No”?
This will cause Intel (R) PTT to be disabled permanently in HW.
Select Yes to continue
You will get “outimage.bin” file created - this is the .bin image that needs to be flashed on the chip using programmer.
-
open “outimage.bin” with MEAnalyzer and check that “File System State” is shown as Configured now.
-
Power down and disconnect all cables from Prodesk computer. Press and hold power button for 5 seconds to clear all resident electrical charge.
Open the computer and connect flash programmer onto Winbond flash chip (it is located below SATA hard disk cage so remove it first).
Make sure to connect pins correctly to avoid damaging the system board.
-
If not done before install CH341A drivers on Windows
-
Start NeoProgrammer and connect programmer to computer USB port. Prodesk power button should now flash red from time to time.
Press Detect in NeoProgrammer - and from the selected list of possible flash chips select W25Q256JV [3.3V]
Open “outimage.bin” file.
Select operations in NeoProgrammer in the following order:
- Erase IC
- Write IC
- Verify IC
(this takes around 15 minutes)

Once Verification completes with Success programming is done.
Disconnect programmer from the flash chip
-
Before booting Prodesk clear CMOS. If you do not do this it might not boot properly.
Hold for 5 seconds CMOS reset button (it’s a small white button between C-type USB and USB A-type connectors on the front of the system board) -
Boot computer, enter BIOS and change settings as required (e.g. increase boot time wait to 5 or 10 seconds)
-
In Windows go to “Flash Programming Tool” directory and issue ME reset command
fptw64.exe -greset
Computer will reboot now
- Select in the boot menu (press ESC key during boot) option to enter ME Setup.
Here you should finally see that Intel AMT is now enabled.
Configure Intel AMT as needed and enable AMT networking and you’re done.
Feel free to update HP BIOS to the latest available version after this and AMT should continue to work as expected.