Thank you. I will try it tomorrow. I’m recovering the BIOS by shorting pins 1 and 6 of main BIOS if board is bricked ![]() the Dual BIOS is not always working automatically, but it works in any case s long as the content of the second BIOS is not invalid (I have F9c there)
the Dual BIOS is not always working automatically, but it works in any case s long as the content of the second BIOS is not invalid (I have F9c there)
BTW. On this board I can run most of EP43/EP45 BIOS’es from boards with 4 phase VRM ![]() OFC the problem is in CPU voltage regulation for example, so it is not useful when I want overclock CPU.
OFC the problem is in CPU voltage regulation for example, so it is not useful when I want overclock CPU.
As I have told you, not unrelated, still I did not hear about Award bios flashing parameters, so it will remain!
This is a thread about how to modify an Award/Phoenix BIOS and not about how to flash such BIOS.
By the way - there are no Award BIOS flashing parameters. The mainboard manufacturers offer their own BIOS flash tool.
I have a question about the checksum-16 for minit module ,since we don’t change anything inside the minit module, according to you tutorial the checksum-16 of the selected area should be same , isn’t it ?
You are probably not familiar with the MINIT module Answer: No. Try moving MINIT to other locations from the main location.
Great tutorial about adding fake.bin to avoid minit checksum-16 problem.
You are right.I have tried to follow your tutorial,I use cbrom198f ,and the checksum-16 result same as yours.Thank you.
There are no problem to use your method to check MEMINITENTRYPOINT & FIXBIOS in Gigabye EP45 ,EP43 series mother board bios.I have problem when try to mod Gigabyte X58AUD3R.F8A , the offset MEMINITENTRYPOINT are shown in the fig. 2, 80 A0 EB FF ,so ,where is the location of this in the bios ? The checksum-16 for minit module is 42 41 in fig1. and it was same as offset after FIXBIOS in the fig2.
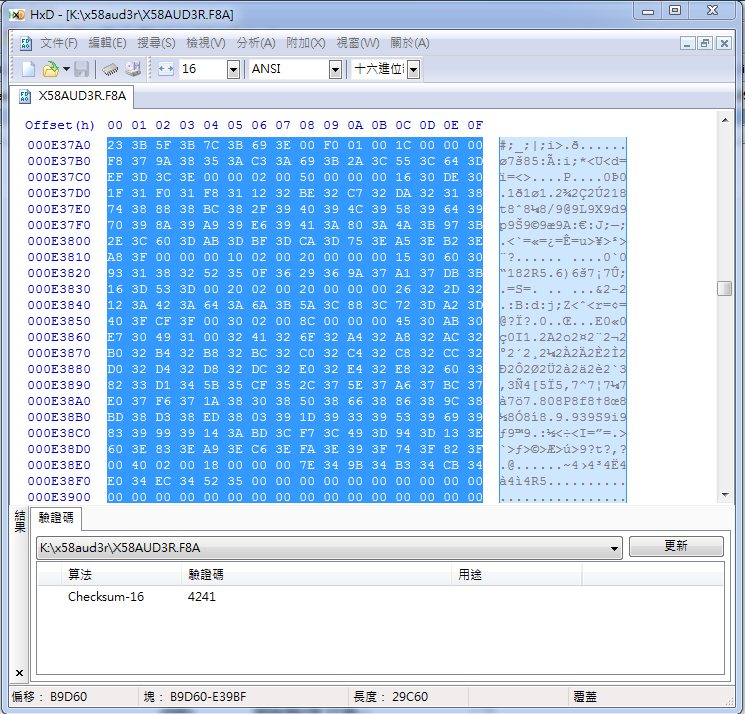
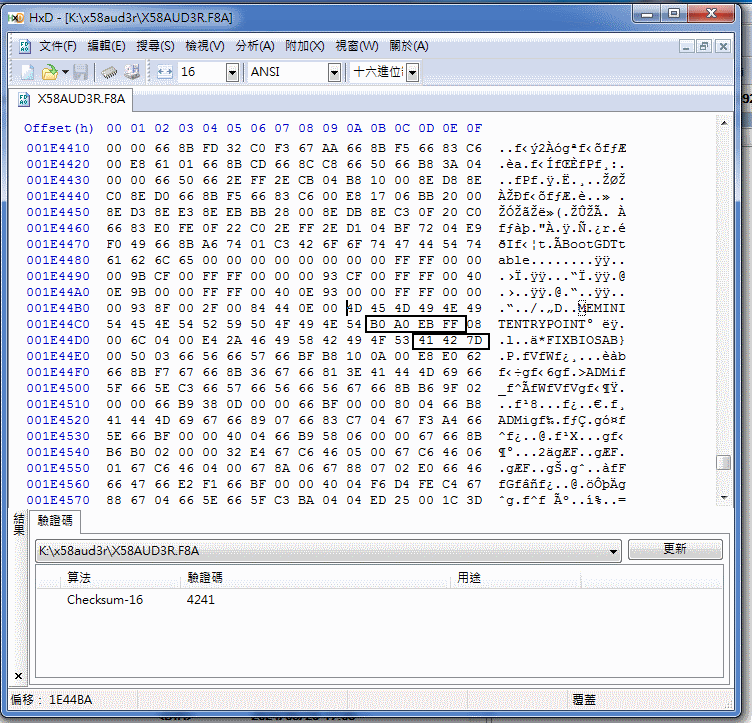
MEMINITENTRYPOINT in your case, at address B0 A0 EB FF (in HxD 000BA0B0) line
(E8 EB FE FF FF CB E8 99 56 00 00 CB E8 39 42 02)
although I think it should be B0 A0 FB FF.
cbrom works slightly incorrectly with BIOS 2 megabytes
Thank you for your answer.
@limurphy
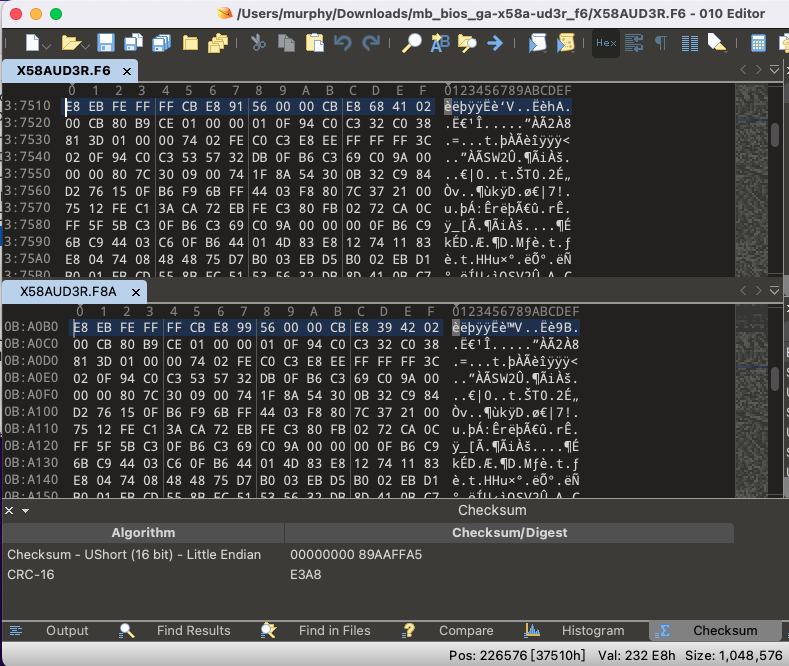
By the way, I opened bios X58AUD3R.F6 which is 1024 kb and MEMINITENTRYPOINT - 10 75 F3 FF.
In X58AUD3R.F7L which is 2048 kb and MEMINITENTRYPOINT - E0 9F EB FF.
I think that MEMINITENTRYPOINT in BIOS X58AUD3R.F8A is B0 A0 EB FF due to the increase in BIOS to 2048 kb
I totally agree with you. I also check the MEMINITENTRYPOINT - 10 75 F3 FF in the bios X58AUD3R.F6. The content are almost same as in BIOS X58AUD3R.F8A at the offset B0 A0 EB FF .
I used CBROM v1.98 to extract the RAID ROM of two Award BIOS based Gigabyte boards. One board uses the Intel X38 chipset, and the other one uses the Intel X58 chipset. But the extracted ROMs are of different size.
| Chipset | RAID ROM | Size |
|---|---|---|
| X38 | ICH9RAID.BIN | 64.0 KB (65,536 bytes) |
| X58 | RAID_OR.BIN | 76.5 KB (78,336 bytes) |
I tried to replace the smaller ROM of X38 with the bigger (and newer) ROM of X58.
X:\Gigabyte>CBROM.EXE x38dq6.f9j /pci RAID_OR.BIN
CBROM.EXE V1.98 [08/27/08] (C)Phoenix Technologies 2001-2008
Adding RAID_OR.BIN ......... 60.1%
Adding MEMINIT.BIN  100.0%

X:\Gigabyte>
The following files were created in the parent folder.
- bios.rom
- bios2.rom
- FILE_BUF2.BIN
- tempMemI.bin
- original.tmp
Although the original BIOS file has been modified, this looks like a failed replacement! Correct? So is it true that you can’t replace a smaller ROM with a bigger ROM? Then how do you proceed? Give up and do something more useful and less frustrating?..
You mean the CBROM syntax and command line reference? I wanted to expand a little on this guide by adding a few examples of my own. Sadly I hit a roadblock.
If you want to know more about the usage of the CBROM tool, you should look into the start post of >this< thread.
Sorry, I didn’t see your comment before I posted. Is this Gigabyte guide created because Gigabyte boards need special procedures? I know you mentioned that some of them may require version 1.55 of CBROM. Coincidentally, I also picked an X58 board, just like in your guide. I will look into that guide.
@Masato
I have moved your latest posts into this much better matching thread.
By reading the start post of this thread you may get answers to some of your questions.
Here are some notes:
- The size of an Option ROM module depends on its version. Older mainboards may prefer an older Option ROM version, whereas newer mainboard should get a newer (later compiled) Option ROM version.
- The BIOS contains compressed parts. This way it is possible to get a bigger size module inserted without increasing the size of the complete BIOS. A stronger compression compensates the size increase of a certain module.
Edit suggestion: Before you start with the BIOS modding procedure, it is strongly recommended to carefully read the separately published chapter “BIOS Modding: Introduction and Preparations”
Edit suggestion: Execute the following command (without the angle brackets, but with the complete name of the mainboard BIOS file, using uppercase or lowercase letters)
Question: By “matchinig” you mean if the CBROM version is compatible with the BIOS file so that it can read it? I know you mentioned in the introduction that the Award BIOS of some Gigabyte boards require CBROM version 1.55 while others will work with version 1.98.
Edit suggestion: Only PCI ROM files with the exact same name will be completely replaced.
Question: So if file name of the original PCI ROM that I want to replace is ICH9RAID.BIN, and I have a RAID_OR.BIN file with a newer firmware version, then I should rename RAID_OR.BIN to ICH9RAID.BIN, before I try to replace the original?
Question: How will I know if I’m seeing a complete list or not?
Edit suggestion: Now you just have to type the shown letter of the desired PCI ROM module (example: B) and then hit “Enter”.
Edit suggestion: After having done that, you will usually see the name and the version of the PCI ROM module on the top right side of the Editor window
Edit suggestion: This picture shows that the extracted PCI ROM module was the Intel MSM RAID ROM v8.0.0.1038, when I made the examples for this guide.
Edit suggestion: The only difference is, that you have to replace the word “PCI” by the short name of the related module you see on the left side of the BIOS structure overview
Question: Where is this? I don’t see it in the screenshot.
Question: How or where do we see these holes?
I like Forum members, who really want to know, what they are doing, but my advice for you is: Please read the available information, which are offered within this Forum, before you ask questions.
On the other hand you should consider, that I have written all my guides more than ten years ago. Within the last decade there were not only severe changes regarding the BIOS structure and modding options, but a change of my age as well (I am now 80 years old).
3 Likes
I’m sorry, I don’t mean to give you a hard time. I’m not even half your age and I feel burned out. I’m all too curious, and too much of a perfectionist. It’s not a healthy combination. So I will take your advice. Maybe at a later time I can turn what I have learned into a guide of my own. Thank you for staying active and sharing your knowledge and experience.
1 Like
By reading the first post in full, I found some answers and some clues.
Yes. As per,
If you want to replace it by another RAID ROM version, you should customize the name of your prepared RAID ROM file. Only PCI ROM files with the exact similar name will be completely replaced.
and,
To prevent any problem during the PCI ROM module replacement you have to make sure, that the new PCI ROM file has exactly the same name as the old one, which has been within the BIOS file before.
I have also verified this in my own testing.
I would say that’s more true than false. This is supposedly solvable by some automated compression magic trick that I have no understanding of or control over.
As per,
The BIOS contains compressed parts. This way it is possible to get a bigger size module inserted without increasing the size of the complete BIOS. A stronger compression compensates the size increase of a certain module.
and,
Within a certain bandwidth it is possible to replace a smaller sized PCI ROM module by a bigger one. The tool CBROM will compensate the size difference by its dynamic compression ability.
I have not found any CBROM command line option to take control over and dictate the compression level. I only found options to not compress at all, with options like /nc_cpucode (which will “Add non-compress cpu code”). These are options for avoiding compression, which is far from what I want!
The option /CALS is kind of interesting. It will “Calculate ROM Compress size but not add ROM in BIN file”. I’m not sure I understand how this is useful, but it sounds like something you would use to check your code optimization work as a BIOS programmer to see if it will fit on the chip, before you make an attempt.
The only true solution to this problem lies in making a sacrifice! Get rid of the things you can live without and still have a functional system. Things like the boot logo.
As per,
If the the new PCI ROM module is too big and there is not enough place within the BIOS file, you will get an adequate CBROM message.
Tip: Maybe you can create the needed space by removing an unneeded module like the OEM LOGO before you restart the PCI ROM replacement procedure.
As opposed to crossing your fingers and hoping for compression magic to take care of it, this is a much better approach. I can confirm that this method works. It’s logical too: you make room by removing what’s in the way. This is the only way I was able to replace a 64.0 KB ROM with a 76.5 KB ROM. I did that by releasing (i.e. removing) a 30.83 KB LOGO (300.76 KB uncompressed). It worked because 30.83 > (76.5 - 64.0) = 12.5.
You will know it when you can’t see what you expect to see in the list of modules, such as the RAID ROM, and you know for a fact or by inference that it exists within the selected BIOS file.
This was the source of my confusion:
If you should be able to open the BIOS by using the above mentioned CBROM command, but cannot see the complete list of the included modules (incl. the PCI ROM ones), you may find >here< a guide about how to show (and to modify) the related BIOS components.
This however appears to be an exception, rather than a rule, an edge case scenario for only one Gigabyte board: the GA-H57M-USB3.
At the link above, BigDook wrote:
I have a Gigabyte GA-H57-USB3 mobo, and i need to upgrade it’s RAID so it can “hopefully” detect some new 4TB drives properly (currently only being detected as 1.6TB each in the RAID setup (pre Windows boot)
…
Now from your guides, i’m supposed to see various modules (inc the RAID) but here…am only seeing 2? That look right? Or am i doing something wrong?
What other boards have this problem? Only this Gigabyte board has this problem? Why is this a problem?
Fernando wrote:
As you have already verified, it is not possible to update any module of your Gigabyte mainboard BIOS by opening the entire BIOS file with CBROM. The reason is, that Gigabyte has blown up the size of the BIOS to 8 MB, although the BIOS modules themselves only are using 1 MB.
But I wonder if it’s because Gigabyte made their BIOS images 8 MB in size or because CBROM can’t handle files larger than 1 MB? How big is the BIOS chip on this board? 16 Mbit?
So this partial listing of modules requires partial editing and then stitching the edited part back in its right place.