Full text is below
TL;DR
1. What does “boot from file” mean(I did it thru clover shell but that’s all I know)?
2. Where do I get BootDisk Utility v2.1.2018.023b?
3. What the heck is a boot manager? Is it something windows made?
4. Where is the boot section of the config.plist file?
5. Whats the formating required to add the UUID into the config.plist file?
6. Is there a clover manual ( I just now thought of that)?
I can install onto the NVMe thru Clover shell and without clover shell. Instalation media is shown in Clover as well. I used an older CloverISO but not an older BDU.
Full text of my post:
SO yeah, I have a lot of questions and I’ll answer some questions others asked(thank you for your support). I think most importantly is what does “boot from file” mean? They only way I was able to follow #613 directions was to enter the shell of Clover. When I exit clover I get options like, boot manager, boot from file, and something else, but they all go to a black screen and freezes.
I was able to get the black screen with red text like #822. However, when I tried to follow #823 directions, I could not find anywhere on the internet BootDisk Utility v2.1.2018.023b. I belive that I did use Clover 4961 or something older than the presant(I forget which post told me to do that) Moreover, #820 says that I have to manually enter the UUID of the volume, (not actual drive) of my NVMe drive into the config.plist file boot section. I cannot find this boot section and, lol, I wouldn’t know how to enter the values in it even if I did know. Sorry @sibliss T.T
Anyways, to answer some questions, I can successfully install ubuntu by loading the bootx64.efi file from clover shell. Actually, I can install it without it as well. But, of course, does not show up in Clover. I don’t even think it shows up in the shell. it just says fs0:, Blk0:, Blk2:. both the blk entries say file not found when I type “dir”. I have it put in my PCIe x16 slot. (is that what a graphics card usually goes into, i think that’s what it’s called)
@Morbius Clover does pick up my installation media within the GUI.
Someone else asked something I think: I did not install windows thru clover but it shows my windows install (that’s not on the NVMe, just a HDD).
@CutieJelly
lets start with the easy ones…
2. you can find the link to the BDU in the what to download section of post #1 at the very start of this thread.
6. i am not aware of any manuals that would be nice, the best i can do is point you to the wiki i found linked in my post #493
5. the config.plist is all xml i briefly touched on how all xml parameters should look in post #826 (note the opening and closing tags on the line)
4. open the config.plist file with a text editor and look for this line that denotes the start of the boot section “<key>Boot</key>”
1. i have no idea what that is or why that would be required… at that point you should just be able to use your boot media i think
3. i’m going to assume thats just a reference to the built in utility for managing boot devices in clover or windows (i’m not sure what we are referencing here)
here is an example of the default boot key in the boot section of the config.plist yours should look similar
<key>DefaultVolume</key>
<string>2DACF133-8378-43FB-AC0F-560172D350FF</string>
anything else let me know,
Sibliss
I friggin did it!
Thanks a lot for your reply sibliss but @Morbius said that I needed BDU 2018 version not the 2020 version. crazy, right?
I also found out that i did not use cloverISO v4961.
I finally found the BDU 2018 version on some random vietnamese website. so, im going to try clover ISO v4961 However it did not work. I had to use BDU 2018 version 024b not 023b. This worked even on boot6 and i did not have to install ubuntu(as i previous did before) it just worked.
Moreover, @sibliss , I cannot add the guid into the config.plist as your instruction. i have to write it as a string, otherwise it errors out and skips it.
<key>DefaultVolume</key>
<string> guid of volume </string> you said to do guid
Even so, clover did not pick up the dirve, even when i went into shell and did map -r
I’m going to write step by step what i did. Then post on here. Everything I have learned. Also i’ll post the files i got so that others don’t have to look for them as i did.
Holy crap, this project gave me a few white hairs. However, I, of course, did nothing special. The real heros are the Dev team. Thanks again. Here’s some coffee.[orange]
@CutieJelly
ah sorry i should have stated the <guid> tag is used in the other part of the file in relation to hiding drives thing not in the default boot section if i recall correctly, that was just a reference example to xml structure.
moving on i wonder what the 2020 bdu lacks that made it not work for you?
alas i am pleased to hear you got it working.
ooo, one more question @sibliss , um, how do i make Clover boot into my OS automatically. When I set the timout to 0 it still takes me into Clover, same when I set fast to true Not sure what im not getting here.
Edit: I’m going to reinstall ubuntu through clover to see if that’s the issue.
Re-edit: I did it. I could not boot by writing out the UUID, nor the directive (nvmeOn1p1), nor LastBootedVolume, nor the full path (HD(1,GPT, uuid, some hex number , some hex nubmer) but i looked at what my drive was called when i booted up clover and it was called EFI??? don’t know why it was called that but it’s calld EFI so i put that in DefaultVolume and volia
I feel like a million bucks. I’d buy both you guys some coffee if i could. ^.^
@CutieJelly
I read in your post #830 that you did it. Congratulations !
Nevertheless, I will answer the important question you asked in your post #828 as it could be useful to others.
The answer is : you get it … from me !
I have attached to this post the 2 files I used for successfully creating a Clover key that works :
• BDUtility.exe (v2.1.2018.023b)
• CloverISO-4961.tar.lzma
(compressed in the CLOVER.zip file attachment. You need to decompress it)
Instructions I followed to create a Clover key in Windows
Make sure the above 2 files are in the same folder.
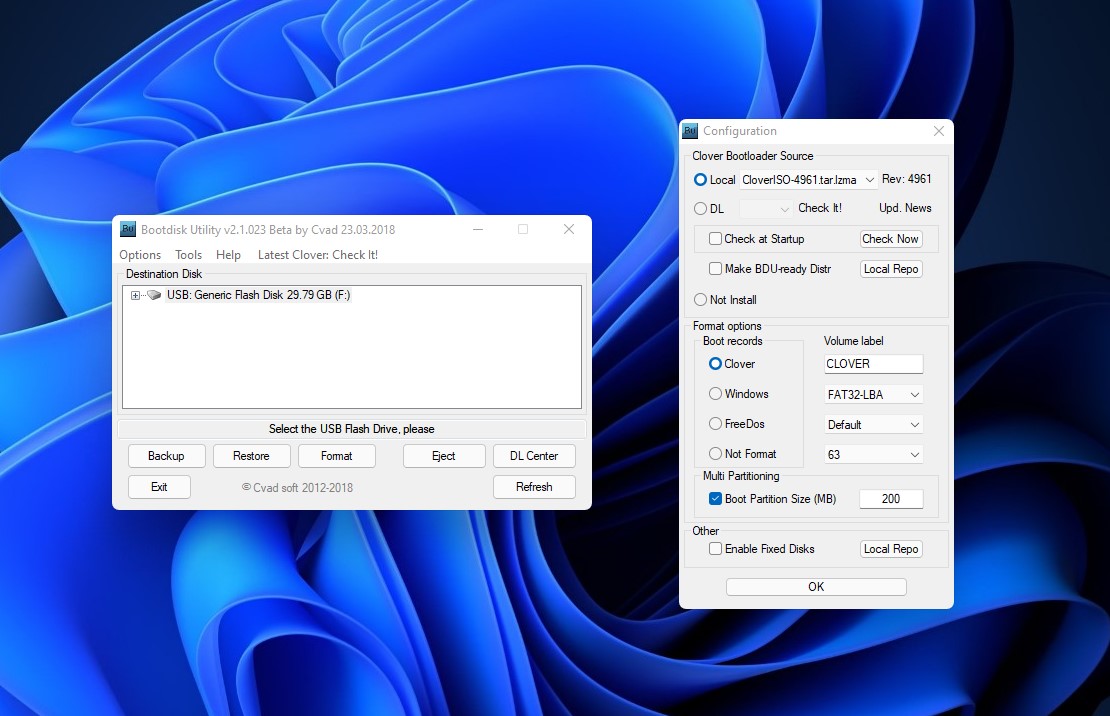
Start BDUtility.exe.
Click Options → Configuration.
Under Clover Bootloader Source:
. Local and CloverISO-4961.tar.lzma should be selected and Rev: should indicate 4961.
Under Format Options / Boot records:
. Clover should be selected. The Format option should be FAT32 or FAT32-LBA.
Under Multi Partitioning:
. Boot Partition should be selected with a size of 200 MB.
Click OK.
Insert a USB drive. It should appear in Destination Disk.
Click Format, and then OK. The Clover key creation process starts.
Wait until the ‘All Done’ message is displayed (it can take a few minutes…).
The Clover key has been created, and you can close BDUtility.
But one last action remains to be done on the newly created Clover key before you can use it to install an OS on an NVMe SSD:
Copy the ‘EFI/CLOVER/drivers-Off/drivers64UFI/NvmExpressDxe-64.efi’ driver to:
• ‘EFI/CLOVER/drivers64’
and to:
• ‘EFI/CLOVER/drivers64UEFI’
Once this is done, you can start to use the Clover key.
By the way, which CloverISO version did you use ?
In your post, you also wrote :
I am a little puzzled here.
Did you actually install Ubuntu on your NVMe SSD or not ?
And, if you did, can you boot on it through the Clover key you made ?
CLOVER.zip (4.05 MB)
Hi all! I followed the instructions and was able to successfully install Ubuntu on my NVMe drive, but it won’t boot. Clover comes up ok, but it doesn’t show any options for booting into the OS. When I press F3, it shows a button that kicks me back into Clover. When I go into the Shell, it shows the 3 NVMe partitions that Ubuntu created during the install, but doesn’t show anything in them. I tried modifying the config.plist to directly call out each of the partitions, but it still doesn’t boot. I’m sure I must have something in the config.plist file wrong. (Maybe lots of somethings) This is my first time doing this, so it is entirely possible that I missed a step or installed Ubuntu incorrectly, but the installation proceeds fine.
I don’t think the problem is with the NVMe drivers, since I can see the NVMe drive when I map from the Clover shell, but I could be wrong.
I attached the .plist file as a .txt so you could look at it. I figured it was easier that way.
System:
- CPU: AMD Phenom II X4 955 Black Edition
- Mobo: ASUS M4A79T Deluxe
- SSD: WD Blue SN550 NVMe M.2 2280 250GB 3D NAND WDS250G2B0C
config.txt (32.6 KB)
@YME2019
Welcome to the forum !
I notice that, coincidentally, you have the same CPU than me (mine is from year 2009 !). As you can see in my post #817, I succeeded in installing 4 OSs with Clover in my NVMe SSD, and boot to each of them. So I hope I might be able to help you.
I won’t be able to tell you much what might be wrong from your .plist file. I am far from understanding all the info/data from this file. Perhaps someone else will…
However, what I can do is to explain you with as many details as you wish what I did to create a Clover key that works, and then install OSs which you can later boot to from it. It is up to you if you wish to follow my guidelines.
First, I notice that you used Clover v.5145. This version of Clover never worked for me. The only version that worked for me is v.4961. I created my Clover key with BootDisk Utility v2.1.2018.023b (and not with the latest BDUtility).
I have detailed the instructions I followed to create my Clover key in post #833.
I have also attached a copy of the files I used to that post (BDUtility.exe (v2.1.2018.023b) and CloverISO-4961.tar.lzma).
Could you indicate which version of Ubuntu you tried to install ?
If you could provide a link to the page from where you took the image file of the Ubuntu you tried to install, I could create an installation disk and try to install Ubuntu (the same one you’re trying to install) on my system, and let you know the result.
@Morbius Thanks for the welcome! I will try the previous version of Clover and BDU.
I installed Ubuntu Server 20.04 from ubuntu.com/download/server. I selected Option 2, then hit the download button. Once I had the ISO, I made a bootable USB using Rufus. (Sorry for no link. I don’t have enough posts yet…)
I’m so sorry @Morbius. i thought i posted this earlier. 

Well, i did use clover v4961 but it did not work with the BDU v2.1.2018.023b. I had to use DBU v2.1.2018.024b. This version the local directory was not greyed out. I did install ubuntu, but i could install it with any version of clover.
Since I had installed it already on previous attemps, when I tried clover v4961 it immedially picked up the drive, or rather the installed ubuntu OS. I was even able to have it autoboot since clover named the drive ‘EFI’.
I will try to post the entire process i used to do it, everything i learned. what worked for me and what didn’t, whenever I have time.
My system Lenovo x230, “1vyra.in” mod. BIOS, two SSD(Sata+mSata), i5-3320M, bios in UEFI , bootloader Clover 4961
How to install Windows on SSD Samsung 980 using connecting via adapter ExpressCard to NVMe. I have used Clover to boot by copying the ‘EFI/CLOVER/drivers-Off/drivers64UFI/NvmExpressDxe-64.efi’ driver to:
• 'EFI/CLOVER/drivers64’
and to:
• ‘EFI/CLOVER/drivers64UEFI’
but when attempting to start to install Windows from under CLOVER from a USB drive the installation can’t continue, I suppose, because no integrating NVMe SSD driver from Samsung into Windows setup image, as for Samsung NVMe SSD controller represent a special class of devices alike Intel RSTe RAID controller.
I have cloned Windows on this Samsung, but when booting via Clover appears BSOD -disk is inaccessible. Using Windows TO GO on this disk as an external USB SSD was enough acceptable.
In additional, if by extracting .sys, .inf and .cat files from driver installation Samsung_NVM_Express_Driver_3.3 .exe file it can be fixed? But again is this driver suitable for such a purpose and in what way to extract .sys, .inf, and .cat files from the driver installation .exe file? I have tried “FlashBoot Pro” for integration, but without success.
I’d be grateful for the advice or assitance in this matter.
@CutieJelly
I am really puzzled to read that you could not use BDU v2.1.2018.023b because v.4961 was greyed out !
I am just wondering which version of BDU v2.1.2018.023b you used…
Probably not the one I attached in my post #833 since you first mentioned you had a problem with this BDU version in your post #830, … that is earlier !
I can assure you, and anyone else here, that when I use the 2 files I attached in my post #833 (which must be in the same folder), the local directory is not greyed out (see attached image), and I can create a Clover key that works !
Anyway, since you mentioned that it finally worked for you, you solved your problem !
And I am glad to read that, at the end, CloverISO v.4961 which I had mentioned earlier worked for you as well ! Congratulations !
@YME2019
I have good news for you !
I succeeded in installing Ubuntu Server 20.04.4 through Clover on my NVMe SSD, and I can boot from it through the Clover key !
These are the steps I followed :
1. I created a bootable USB drive from the ubuntu-20.04.4-live-server-amd64.iso from the link you mentioned. For this, I used the Balena Etcher flash utility, and not Rufus. I usually use Etcher for flashing USB drives with images of Linux installation drives, and I use Rufus with MS Windows installation drives.
2. I inserted the Clover drive in my system and booted from it. As soon as Clover starts to load, I then inserted the Ubuntu Server installation drive I created in Step 1.
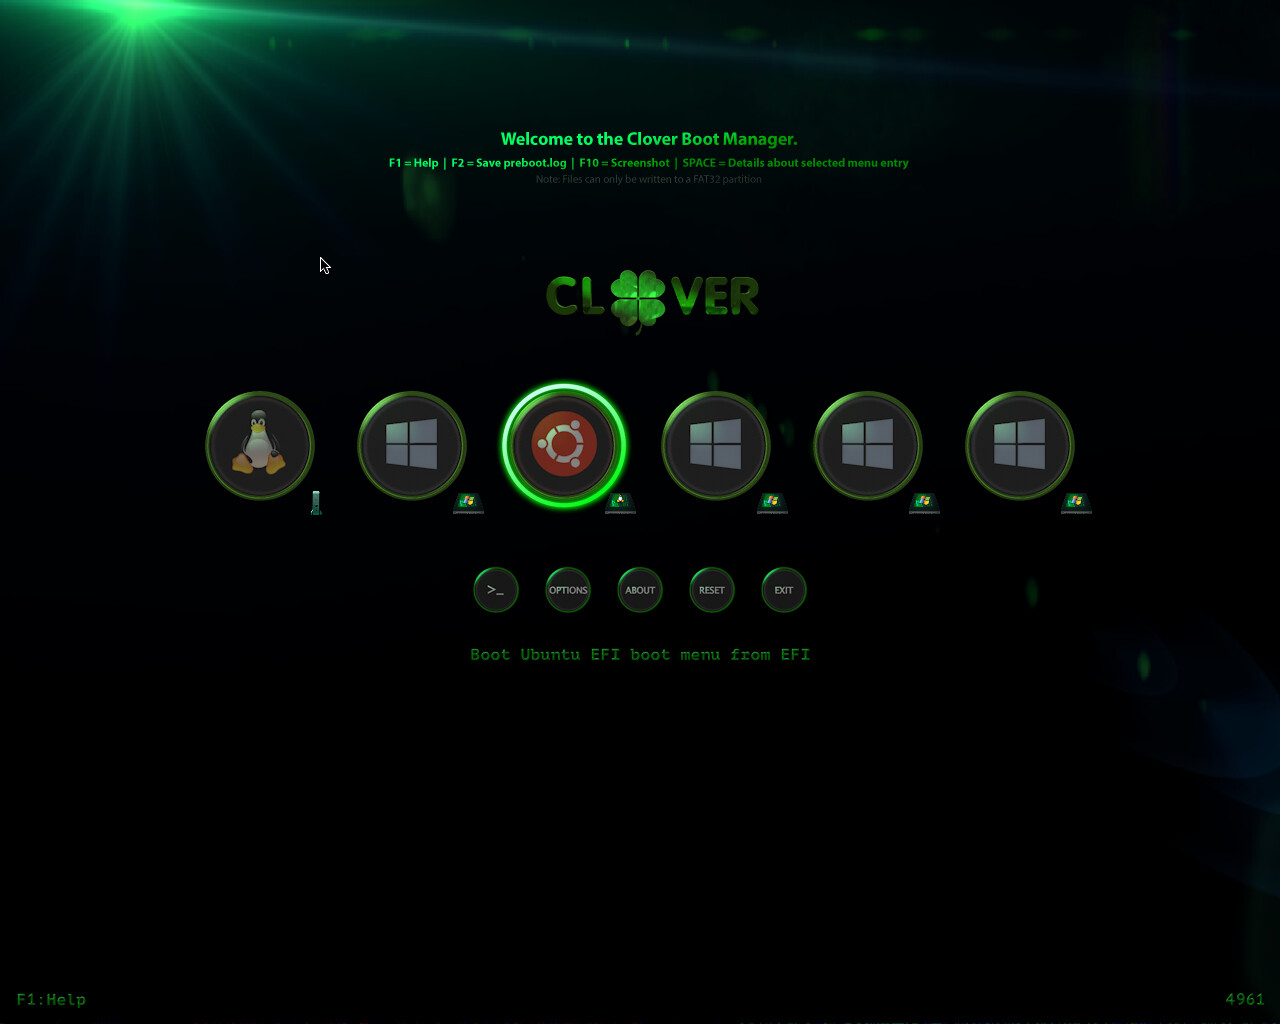
[Edit : I think that you can also insert the Ubuntu Server installation drive once the Clover bootloader menu has been displayed. Then, you will see a new icon pop up in the screen. This is the icon you need to select to start the installation process in Step 3]
3. In the Clover bootloader menu, I selected the ‘Boot UEFI optical from CDROM’ icon with the left/right arrow keys, and then pressed ENTER. Doing this made the Ubuntu Server installation process start.
4. Once the Ubuntu Server installation process was completed, I removed the Ubuntu Server installation key, and I restarted the system.
5. The Clover bootloader menu now shows an new icon/entry for the Ubuntu Server. I selected this entry, to start the Ubuntu Server. Once it has completed to load, it shows a command line.
During the Ubuntu Server installation process in Step 3, I choose a custom installation for the storage selection, since I already have Kali Linux and Windows 11 installed on my NVMe SSD. But, for you, you may like to select an installation on the entire disk if you don’t intend to install any other OS. Well, it’s your choice.
Good luck ! And please let us know the result !
@olekor
Hello and welcome to the forum !
Can your BIOS see the NVMe SSD installed on the PCIe adapter ?
If the answer is ‘yes’, have you tried to install Windows directly on it ? So you would not need Clover.
OK, so, you want to use Clover.
Could you give details on what you mean by "the installation can’t continue" ?
If the installation processed started, and then stalled, at which point exactly was it ? And what happened ?
You cloned Windows from another Windows installed where ? On another of your SSDs (SATA ?) ?
I have no idea if doing this is possible… Maybe some others will have an answer…
As for me, I did a fresh/new installation of Windows on my NVMe SSD, and then I copied the data I needed from a HDD.
By the way, which version of Windows are you trying to install ?
@Morbius It worked, but only after I reinstalled Ubuntu with the USB I created with balenaEtcher instead of the one I created with Rufus. I really appreciate the help! Thank you!
thanks for your response.
First of all, I have used a simple PCIe-NVME adapter it’s not like the "ThinkMods NVME" adapter, which has used @Franzl_Lang for Lenovo T400 mentioned in the post #822
Secondly, the Samsung NVMe SSD controller represents a special class of devices. These devices are fully compatible with Windows but with correct integration of their drivers into Windows Setup,
so I will think to install Sabrent 1TB Rocket NVMe PCIe M.2, but it will be enough expensive toy.
Answers to questions:
A: No
A: from under Clover installation from flash drive stops when a choice disk in the table of present disks
A: I have cloned windows 11 installed on my ThinkPad x230 by using "EaseUS Partition Master"
Congratulations ! Glad that you made it.
Which version of Clover and BDUtility did you finally use to create your Clover key ?
@olekor
If you wish to install Windows 11 on your Samsung NVMe SSD, the best advice I can give you is :
1. Delete everything you have installed on this drive earlier when you tried to clone Windows 11 from another drive
2. Make a fresh installation of Windows 11 on it through Clover (you will need an installation disk for Windows 11, and, of course, a Clover key)
3. Transfer all the data you need from your previous Windows installation, and reinstall all the applications you need.
It’s a tedious task but, at least, it will work.
For your information, I have Windows 11 installed on my NVMe SSD through Clover. It works perfect !
believe me, I tried all the options, got acquainted with the experience of using Samsung disks, and everywhere it is mentioned about integrating Samsung drivers, even if the BIOS has supported NVME. Maybe if using the "ThinkMods NVME" adapter, which has comes with an embedded bootloader, which can be booted from any stock BIOS. It contains Clover, pre-configured with special NVMe drivers that can then boot your SSD, even without stock BIOS support or use Coreboot, which has its own NVMe support, you can instead boot directly to the SSD without touching Clover, but all of this requires additional attempts and expenses.
@Morbius I used the version of Boot Disk Utility you posted as well as the version of Clover you recommended. When I only used those versions of BDU and Clover, it didn’t work. I had to reinstall Ubuntu with the new USB I created with BalenaEtcher. Not sure which one worked or if it required both changes. Thanks again for the help. Probably going to set it up to auto-boot now, since I don’t intend to install any other OS on this machine.