I need some of the options under Chipset (which show up under the devices tab when in the bios)
It’s confusing me, because a lot of the ‘chipset’ options in AMIBCP I don’t really need… but I’m seeing options that would be under ‘Devices’ (when in Bios) and i’m not seeing a ‘devices’ section in AMIBCP. It looks like the options from the Devices tab (in bios) are all under the Chipset section (in AMIBCP). So i kind of don’t know how to answer the question
Can you just change the power settings to what I have them set to, and then remove the ‘power’ tab ?
After Power Loss: Power Off
Enhanced Power Saving mode : Enabled
Smart Power On: Disabled
Intelligent cooling engine : Better Thermal Performance
^ Those are the only options that I need selected in ‘Power’. I will not need to change them at a later date so that tab won’t important to me once those options are set.
@missingsince - Ok, that sounds confusing, please clarify  Stuff under “Chipset” wouldn’t be shown at all in “Devices” unless duplicated there or something. Great, if you don’t need “Chipset” as you see it in AMIBCP then we don’t need to add or worry about that.
If you see stuff in “Devices” in AMIBCP, that you don’t see in BIOS, great, I would make all that visible anyway on final approach (all hidden things, settings or submenus, in already visible menu sections is simple edit)
Stuff that is in Devices, that you also see in Chipset, would be much less in Devices vs what would be available in the full submenu area of chipset. BUT, if you only need what you see inside devices in AMIBCP, which may be hidden from you now, and don’t need chipset, we can just make all that visible too instead.
So, aside from the above Devices/Chipset confusion, here’s the rest  So, when you say " I’m seeing options that would be under ‘Devices’" but your not seeing Devices in AMIBCP, how are you "seeing options that would be under ‘Devices’"
Sounds like you are maybe a little confused like me too It’s OK, we’ll sort
In AMIBCP, here is where you can find “Devices” section as you see it in your BIOS (all hidden settings/submenus are there as well). Which I also now see “Chipset” inside devices, more confusion, nah, I just didn’t see this until now 
Anyway, now I see this, that can be used to simply enable, make visible and give you full chipset access too, without having to do the swap or pick/choose which you wanted that I mentioned before.
So, after seeing this, no need to remove/replace anything now, I can leave original Advanced in place, add new advanced tab, AND give you full access to chipset through that hidden entry already in place at Devices section.
This chipset entry as it is though, may take us a few test BIOS to sort visibility/access, because I’d like to not hack it but rather enable it to be visible to you through the built in method
It’s hidden based on another hidden settings value inside Main, so maybe take 1-2 test to see if changing that allows you to see or not. Then if not, I would do usual force visibility for you.
I’d love to do it all at once, so you’d only have to use programmer as little as possible, but it may take a few tries to sort all out best way, sorry. I will try though!
It’s a generally funky BIOS construction/layout, probably on purpose to mess with people like me playing around in there 
Please wait, I will work on this and get you a BIOS shortly, hopefully with everything all at once 
When opening the same bios file I sent you on Post #11 with the images of my BIOS pages (m720latestdump) I don’t see ‘Devices’ as an option, but instead ‘Chipset’ where it would be…
I was assuming you were using that dump, but now realise you’re probably not ? I don’t know…the entire list of contents looks completely different.
Whilst I wait, would be good to pick your brain about a few things. I didn’t think I’d find ever find BIOS’s so interesting.
I moved the jumper back into ME_DIS and tried the three ‘-d’ commands you suggest a few days ago ( desc / gbe / me ) as well as using the ‘-f’ command afterwards to flash the dumped files.
All three were dumps/flashes were successful so I took the ME_DIS jumper off and tried them again, no luck with any of them which confirms that the ME_DIS jumper does actually allow me to flash those ‘regions’ (?)
The ‘-bios -f biosreg.bin’ command doesn’t work no matter if the jumper is in or not. I was wondering if this issue is something you’ve seen before.
Would using one of the three commands (desc / gbe / me) with a modified file allow us to bypass the Protected Range Register issue ?
Also, since I have nothing better to do, with ch341a I dumped the entire BIOS from another identical system (M720q) which hadn’t been messed around with.
I then Flashed that dump onto the system that we’re working on and it still shows 0.0.0.0 under Intel Management Engine FW, which is odd right? Because the system I took the dump from from had working ME. I know/assume that it flashed correctly as the other serial number was showing up in BIOS as well as the Bios version which was different.
Going into Windows with that ‘other’ Bios and running MEInfo tells me Error 198: ME Disabled. Tried all the usual suggestions of removing battery and draining power, no luck. Same Error of ‘ME Disabled’ every time, with and without the jumper in place.
Also, if it isn’t too long to explain… what are you specifically doing in AMIBCP to get these hidden menu’s to show up. I’m assuming that changing options under an already visible Menu to USER/Supervisor will make them show up
… but how do you go about enabling the actual Menu’s. Is there a resource/guide I could follow to understand the process a little more ? Unfortunately, I’m one of those curious people that always has to ask WHY / HOW everything works
Also, I found out that there’s a ‘maintenance’ jumper position on the board, for flashing BIOS after a bad update/failure either via CD or Bootable USB. Since it’s used to flash BIOS when the computer won’t POST , do you think that we could bypass PRR this way?
Anyway, I flashed back to the original ‘m720latestdump’ that I sent you in Post #11 (with CH341a) just so that we’re on the same page again, lol.
Hey again,
Sorry about my previous lengthy post, I’ve been reading around on the forums to try and understand a little more.
Did you manage to make any modifications to the Bios or is it quite problematic? Let me know!
If you send a couple of different files I can flash them one by one to see which works. I can do this without removing the test clip so that I don’t have to worry about losing contact
*bump
------------------
So I’ve been tinkering around and followed this guide : http://forum.notebookreview.com/threads/…options.830993/
It’s for a different system but everything seemed familiar so i followed the guide, i have made some sort of progress as after flashing the modded bios i have new tabs/options.
But these new options have replaced the original tabs / options! Make’s no sense because I didn’t make any modifications to ‘link’ or ‘point’ the bios to those tabs.
My default Bios tabs:
MAIN
DEVICES
ADVANCED
POWER
SECURITY
STARTUP
EXIT
My new bios tabs:
SIO Configuration
Global acoustic configuration
Nvme controller and drive information
PCI subsystem settings
It’s weird because (as per following the guide) I added an extra Bios Tab in HEX (to point to FORM: Advanced, Form ID: 0x2715)
Im pretty glad that I’ve at least made some progress but am now at wits end.
Please, Any help would be appreciated.
I’m unable to run my Hackintosh until I have this resolved (as the OS trys to run the CPU at it’s default power / frequency settings).
@missingsince - Sounds like you made a mess there Sorry I’ve been buried and haven’t replied until now! Your BIOS is a mess as mentioned all along, you can’t follow any guide like that
There is multiple formID’s for each menu (ie two advanced, two main etc), and simply swapping isn’t ideal unless it’s the option we decide to do at end.
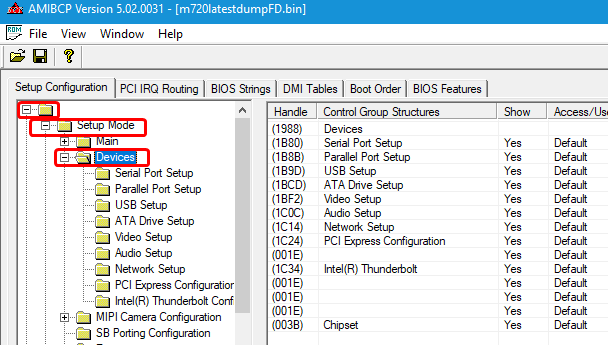
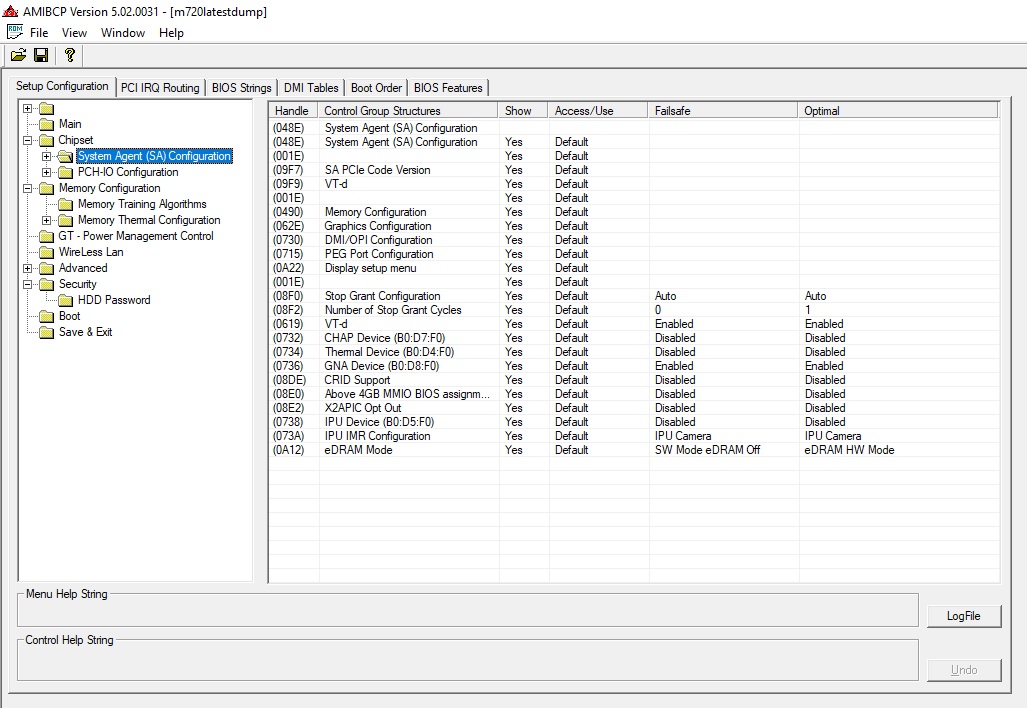
On your first reply, about our AMIBCP images?? Ohh, I see, you have to expand the top most menu entry first, then you will see what I was showing you Look closely at my image vs yours on the left menu tree area
I have open in my image, the exact same BIOS you have open (but with added unlocked FD, unrelated to what we see in AMIBCP)
Your BIOS region flashing stuff, once you remove jumper, reboot twice to windows, then reboot again and on third bootup use FPT (same as once you put in place, reboot twice to windows, then once more before using FPT on third bootup)
I am unlocking FD for you, so with programmer or jumper in place, once you write in the unlocked FD, all will be unlocked after that going forward. Unless some other lock is blocking BIOS region write (I need to see error of that, AFTER you flash in unlocked FD)
Ahh, I see we already attempted to fix this error 167 before, I can try some more but it’s risky and I may not be able to find.
Up to you, since you have programmer you can always recover, so if you want I can send you a few more BIOS to try and bypass 167 (but, you did this already with jumper in place, so it’s really a waste of time on both our ends)
Right, at the times you can dump and write FD and ME region, can’t you also dump and write BIOS region too??
I don’t know what you mean about “Other” BIOS, but any time you have jumper in place ME = Disabled and or N/A or 0.0.0.0
Ohh, also, maybe you mentioned that before your reply above, because I have fixed ME BIOS for you too - below with next edit test
I am not using AMIBCP for anything except to show you images and look at things. But yes, you can sometimes change some settings access level to user/super and they’ll show up, but ONLY in a menu that’s already visible to you.
Hackintosh?? You just need a few settings changed, and maybe a module or two edited, I can do that easily without a advanced mod BIOS like you wanted here.
Is that all you really need, or do you want the mod BIOS menu?
For now, here, please test in following order, stop once you can see change. Can you see chipset in Devices now?
Contents inside chipset do not matter for this test, only wanting to know if you can see chipset inside devices, and if you can enter it or not (if not, test BIOS 2-3)
1. SetO
2. SetAMITSDU
3. SetAMITSDS
http://s000.tinyupload.com/index.php?fil…236998656638114
Also, after you program in the first BIOS from this set, remove power plug, remove main battery, and CMOS battery if you can easily, then press and hold case power on switch for 15 seconds, then let system sit for 1+ minute with zero power.
Then put batteries back, plug in and start up. This will reset ME State, since we update ME FW in these BIOS, and you have corrupted ME FW now I think.
And yes, once done, I can tell you what all edits were done and send you before/after mod files and my notes so you can see how to do. For now, this is not ideal since it’s mid-progress
Thanks for the reply…words cannot express how relieved i am right now!
I downloaded the three bios files, the first one worked as I can now see Chipset as an option in Devices. Also Intel ME is restored!
Does this mean it’ll be a breeze to get the rest of the options in?
------------------------------------------------
As for the hackintosh thing i mentioned, I’ll give you a bit of context even though it’s might be a little boring lol.
The system was running perfectly fine as a hackintosh as the required BIOS settings were all available. The issue arose when i swapped out the original low tdp cpu (i5 8400T) for a regular tdp cpu (i7 8700)
The motherboard recognized the cpu fine and I could boot into both Windows and Mac OS however both OS’s would crash/BSOD. I googled the ‘error code’ and found out it was because of not enough voltage to power the CPU properly. I turned off Turboboost and was able to run Windows without any issues, checking HWinfo verified that turboboost was disabled, just like i set it in the bios. However, in MacOS it would ignore my ‘disable turboboost’ bios setting and still run the CPU with turboboost enabled (which would lead to crashes).
I set out to find a way to change the BIOS settings so that I could provide enough voltage/power to the CPU. Looking at HWinfo showed me that the motherboard was supplying around 0.7 volts on average to the CPU. I know that a regular 8th Gen CPU would usually be somewhere around the 1.1 / 1.2V mark.
I played around with Throttlestop settings (in Windows) and changed voltage / offset …added some PL1 and PL2 limits and found a sweet spot where I was able to run the CPU with turboboost enabled stable (although only at 4.0ghz, instead of the maximum 4.6ghz…still better than 3.2ghz with turboboost disabled).
--------------------------------------------------------------
The reason for the bios mod request is so that I can dial in those settings I made in ThrottleStop into the Bios so that MacOS would run without crashing!
@missingsince - You’re welcome! Sorry if I worried you not replying, if/when that happens feel free to send me a PM, I get buried and lost here often so sometimes you may have to PM me I try to keep tabs open on certain stuff, but often even then I’ll miss a reply by not refreshing 
Thank you for the test report back! So, good to see Chipset showed at BIOS #1, but that may mean we need to do a test 1-2 BIOS later for individual settings, since this didn’t get tested in above, and wouldn’t be able to be tested with those files since #1 edit is included in 2-3
Anyway, we’ll cross that road shortly
Great to hear ME FW is back, I knew it would be And yes, BIOS edit is easy once I have you test a few things to see which way to go for your BIOS, so no worries
Hackintosh! Great, so you didn’t need any specific hackintosh edits to BIOS, normally I’m used to having to disable a setting (CFG Lock / MSR 0x2E edit) or hard mod a module to disable power functions etc.
So yes, once we unlock it all you can do as you wanted, and then can also hopefully get back closer to your original 4.6 too
So, it’s cool that chipset inside devices worked like I was expecting, and nice to see it was that easy too!
Now, I can do the original edit I mentioned, but updated thoughts as I laid out at post #22 when I noticed chipset inside devices (= leave original Advanced in place, add new advanced #2 tab + you already have chipset now ).
Before I do anything further, please show me images of ALL contents inside ALL submenus in chipset, so I can see everything, in case something missing you might want I will make it visible too in next round of edits.
Just a note to anyone involved in doing this. The 65w processors are fully supported by Lenovo. I have had a P330 Tiny and M720 and M920, all same motherboard basically.
You need the copper heatsink 01MN631 from the Lenovo P330 Tiny or M920x with the 65w CPU. This heatsink not only cools the processor better, it cools the VRM with some thermal pads on the underside.

Thanks for the work unlocking this, I can use it in future. I have already put an i7 8700 in my M720 Tiny. But I am making a NAS with P330 SFF motherboard into M710T case and am looking for bifurcation settings to get more NVMe Optane installed.
Apologies for resurrecting the thread.
Hi All,
Noob here, i’ve never done this before, I have a Lenovo M720q running the latest BIOS, I would like to unlock it so it can run Non T CPU’s can someone help me with the step by step instructions on how to do this without bricking the system?
Thanks in advance.
Hey did you get the mod bios ?