Hi,
I read a lot in that fantastic forum about BIOS, as software and hardware developer I’m not new to that. But one thing has proved to be difficult:
Updating the BIOS of an ASUS ROG G20CB (Intel H170) board, to support 7th gen I7 CPUs. Originally it fits 6th gen CPUs.
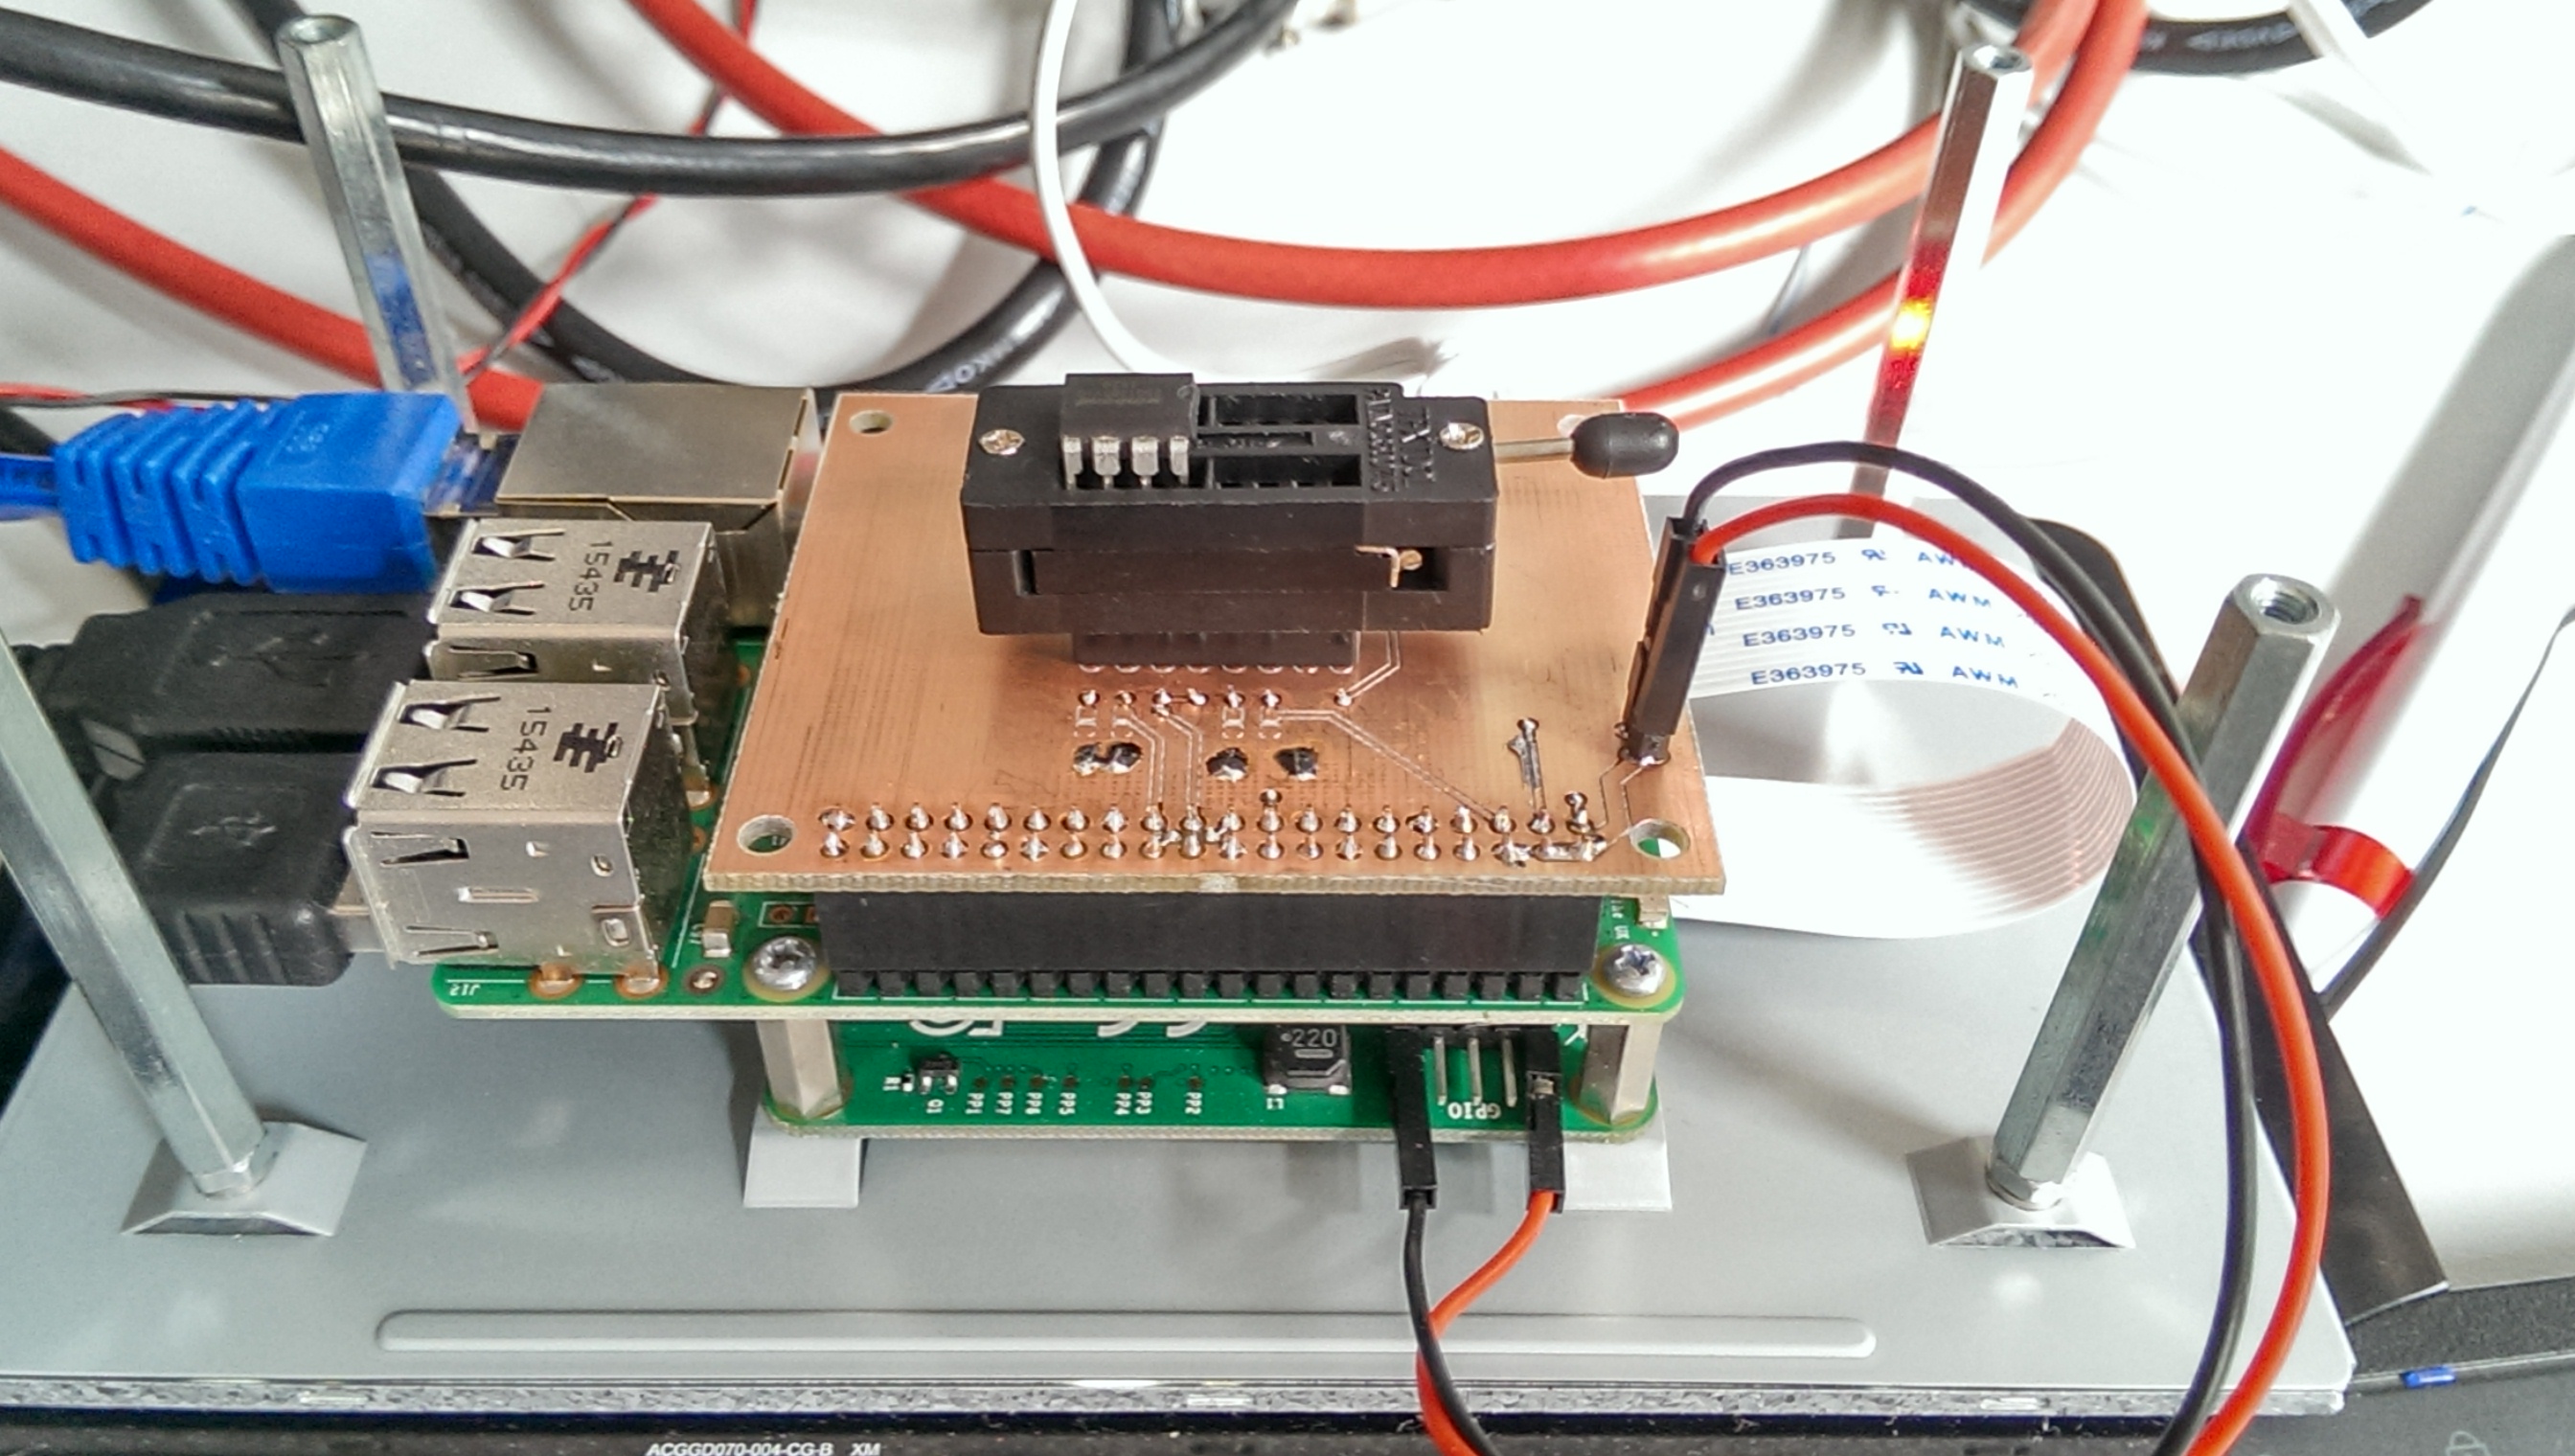
Of course I made a backup of the BIOS-Chip and have a second identical chip to play with. My programming tool is a Raspberry Pi with a custom made board with a DIL-Holder and using Flashrom. CH341A BlackEdition is a mess, everytime I try to verify the new contents, it reads back something different.
It doesn´t matter if I brick something, because the board is a new board, that will be mounted in my G20AJ (4th gen I7), if it ever will boot.
Ok, I tried everything I found here in that forum, UBU, BMP, MMTool… several versions of (CS)ME, VBIOS, and of course the microcodes. I can create images, but the board denies to boot. I can switch it on, but there is no graphics thru onboard HDMI or dedicated graphics card.
I read, that ASUS boards can be tricky… but it shouldn´t impossible. … I think.
Are there any experiences with ASUS H170 Boards swapping from 6th to 7th gen CPUs?
summary of techspecs:
ASUS G20CB H170 Board (Rev.1.06)
Intel I7 7700
2x 16GB DDR4 RAM
Everything is present to switch on the board, without mounting that thing into the case.
reactive
Edit by Fernando: Thread title customized
Try 1.29 or 1.3 version software for your CH341A if you haven’t already, here’s a copy of both - http://www.filedropper.com/ch341a129-130
Since you aren’t able to program, then dump and verify without errors, the software may never be writing correct image to the rom so that may be the only reason why it’s never booting for you with your edited files.
Although I am not familiar with doing this via Raspberry Pi, so the above software may be useless to you?
If that method does not use windows based tools, try to find some other versions of the program you are using to rule that out if possible because what you describe is always what happens with windows versions when wrong software version messes it all up.
I believe CPU Microcode and ME update should be all that’s needed for this type of upgrade, at least I think that’s all that’s necessary.
I checked, and the desktop H170 boards were initially spec’d out for 6th gen too and still say 6th gen on overviews, but got BIOS update for 7th Gen later (And ME 11.6 then too)
So you may just need ME 11.6 and microcode insertion, along with working method to either flash the BIOS while using older CPU, or working method for your programmer.
Hold-up! I see you will also need SKL-KBL vBIOS too.
If “USB Flashback” methods don’t work for that setup, you can update modified BIOS to Asus boards following few methods here in the Asus section (AFU or AISuite), if you end up not being able to get the programmer working properly
[Guide] How to flash a modded AMI UEFI BIOS
If you want I can make BIOS for you to try? In the meantime, can you try confirming a non-edited BIOS being programmed to the board with your programmer, or have you already considered that and it still failed testing that too?
Once you can confirm that it’s working to program, then you’ll know only the BIOS modifications are causing the problems. If you already tried that, and it failed, then it’s software or method of the flash programmer.
If you want a BIOS made I can make one with a cleaned latest ME version based of 11.6 or whatever the guide here suggests per the current one, and updated microcodes + updated insert microcode for CPUID 906E9 - 7700K (And SKL-VBL vBIOS)
Thanks for your reply.
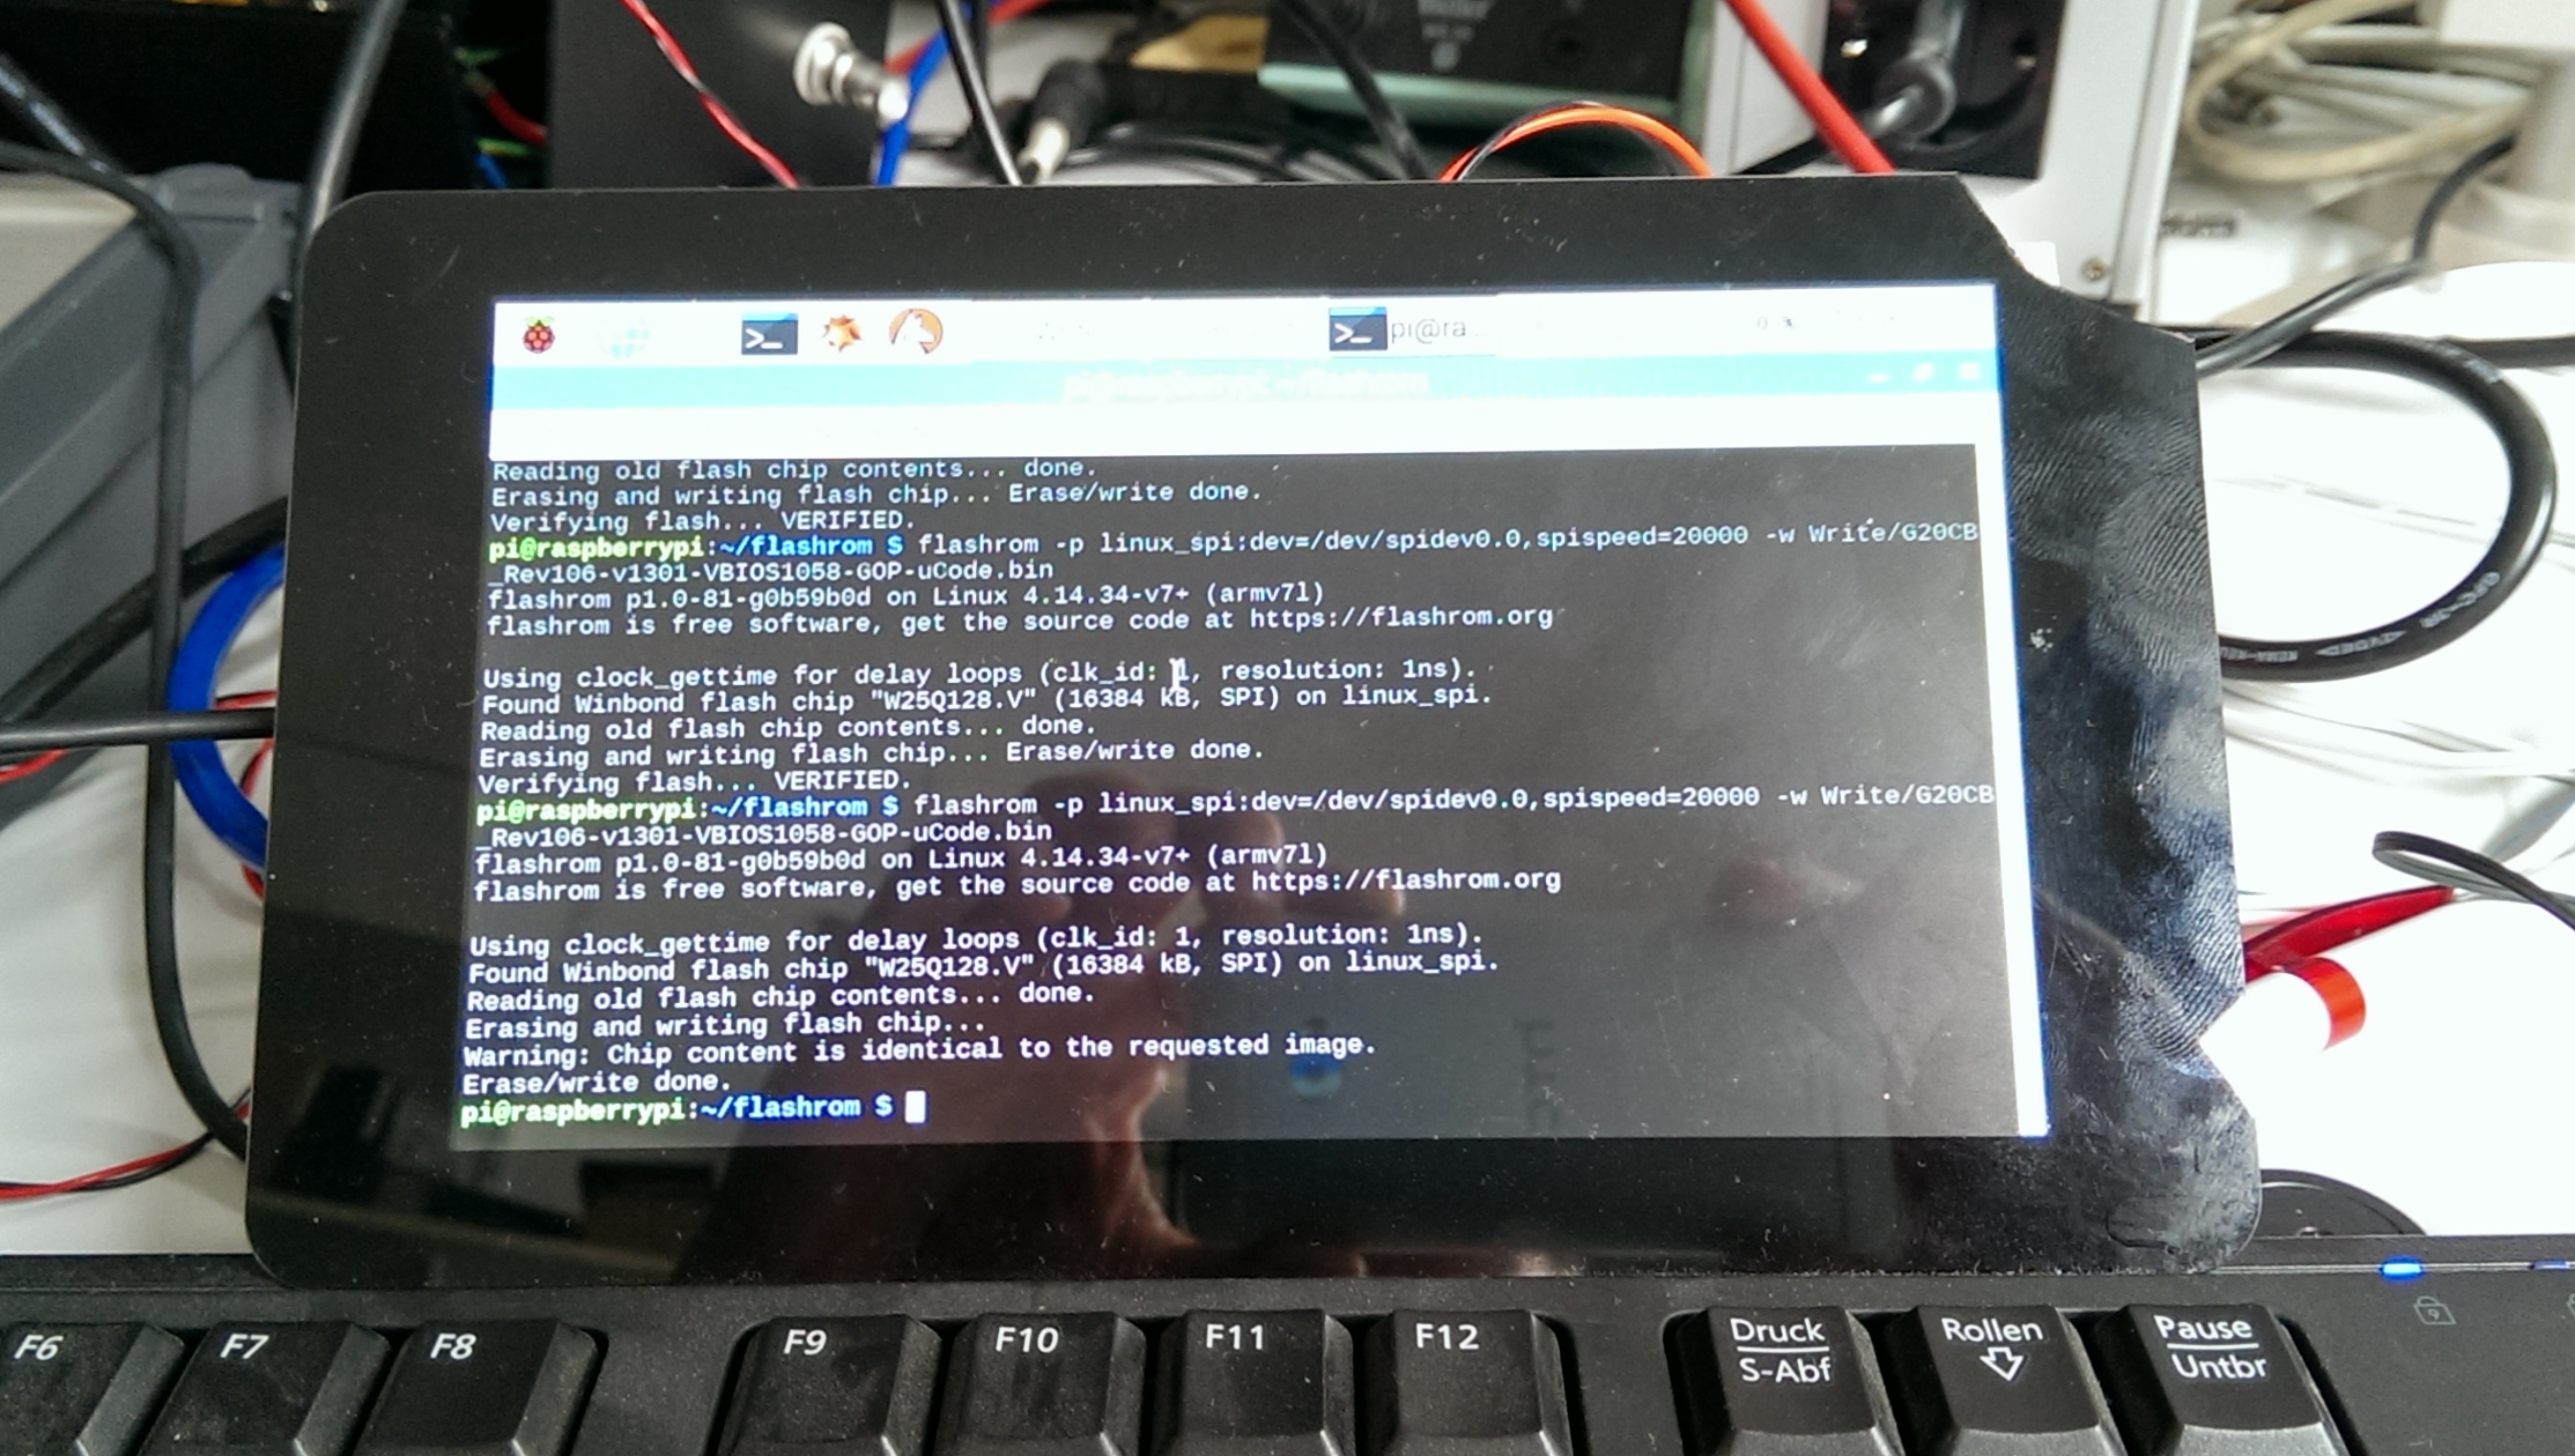
You misunderstood some things. I am able to write the correct image to the FLASHchip. I am using a Linux tool named FLASHROM. My FlashIC is connected to the SPI interface of a Raspberry PI. I can read the image, modify the image and flash a new image, including verification of the new image.
I tried 1.29, but it failed too. Made some Hardware tweaks on CH341A Board for a better signal integrity, but didn´t helped.
But Flashrom works 100%
I am using all Windowstools on a Windowsmachine mentioned in this Forum. Linux (FLASHROM) is for flashing only!
What I did, is upgrading to ME11.8, vBIOS 1055, later vBIOS 1058, changed Microcodes thru UBU, later thru MMTool to keep the 6th gen uCodes. Of course following every guide I found here.
that are the versions I tried, after I readout 2x the Flashimage from the chip and compared it each other, to verify that flashrom is working correct.
1. uCode Update only for 06e9 (current version) -> fail
2. uCode and VBIOS (current versions) -> fail
3. ME 11.8, uCode and VBIOS (current versions) -> fail
4 - xxx. many other tries with GOP Update… -> fail
I will try ME11.6 now, VBIOS 1058, and uCodes.
Unfortunately i can´t test a 6th gen CPU because i haven´t one. If I fail a few more times, i will shoot one on e***.
I have the original chip with the original BIOS in spare. A second one (identical part numbers) i am using for programming. The chip is socketed, so i am not doing ISP.
here you can see my programmer setup…
If I fail again, i can send you my original bios file… I do not want to rule out that I am doing something wrong.
I will be back in a few minutes
ME11.6, VBIOS 1058 and uCodes did not boot. No screen output on int. HDMI or dedicated graphics card (plugged in as a second step).
I see, your other Raspberry programmer works but the CH341A is what fails to verify, gotcha now sorry I missed that! 1.30 may work better for you if 1.29 failed.
Sometimes I think errors depend on the flash roms themselves too not just the software version, like some chips might be ok 1.18 or 1.29, but it fails for other chips, then some might be OK 1.16 and 1.30 but fails on different roms.
Did you try older versions of the modules? Getting correct vBIOS and ME should be first, since both of those updates modules are compatible with 6th gen so can be updated and verified working with the older CPU.
Once those are correct and working properly with the old CPU so you know it’s OK, then the microcode can be inserted for final move over to 7th gen.
Ahhhhhhhhhhhhhhhh, no 6th gen CPU! So, that’s making this tough to shoot at, you may have already had it sorted out sooner if you did. I’m sure it can be done without, just will take more attempts.
I was reading and getting ready to do mod, and had decided to stick to 11.6 first off for the ME, since that is what Asus has in their current H170-P (Pro and gaming etc), which is this same model board. And once that confirmed working, could be updated later
vBIOS I hadn’t looked at versions yet, will do this afternoon, but would probably start with the version in H170-PRO-GAMING-3016 (I just checked, it’s 9.0.1052) same as where I looked for ME changeover when Kaby support was added.
Microcodes and UBU being tricky sometimes ![]() When it acts like it does in this instance, I let it update the skylake codes (removing ES/QC codes and leaving only few), save and take the BIOS to MMtool.
When it acts like it does in this instance, I let it update the skylake codes (removing ES/QC codes and leaving only few), save and take the BIOS to MMtool.
There I remove all skylake, update all those and put back updated originals too, then add in the new Kaby.
That may not be necessary to do that way, but I find it works easiest with less problems.
Looks like you know what you are doing, and I wasn’t thinking otherwise, just didn’t fully understand where you were, what you had tried and how deep you dove already.
I can see you’re all setup properly, just held back a little by having to do this blindly without older CPU. More stabs and you’ll get it right!
I’ll make a BIOS for you to try later today or tonight when I get a chance. More eyes, minds, and BIOS files made to try the better, especially since you can recover anytime.
I am certain this can be done, no reason at all why not after looking at the same exact models for mainstream desktops launched and still spec’s at 6th gen but updated later to 7th gen via BIOS changes just like this.
Really, since you have a programmer, Board/BIOS ID checks are not holding you back at all, you can easily program in Asus H170-Pro (Probably closest match board) or Plus-D3 or H170M-Plus, you’d have to look at each board compared to yours visually and see which is closer
I only mention this for a quick verify board functionality test only, in case you hadn’t thought of that to verify it’s all working, then get this fixed properly eventually too.
Original dumped SPI would be great to build on, so I can transfer over settings when cleaning and creating a ME file to use.
So yes, please send over an original SPI dump from the board. Always keep a few copies of that too, so you don’t loose UUID, DTS key & MAC Address
Yeah, that´s right, no 6th gen CPU… I know that´s a really deep jump into darkness without any possibility to check whether the 6th gen boots. As someone said "challenge accepted!"
I desoldered that holder from the CH341A programmer, so I will use my RPI Programmer for further programming… an advantage: it is really fast! currently it reads and programs with 20MHz. The CH341A is really slow against that.
Okay, I´ll send you my bios file. Let´s see if that version works. Meanwhile I will have a look on the Board you mentioned. But I think I have to transfer my VBIOS settings to one of that, don´t think, that ASUS used the same HDMI port on all that series boards.
Oh, already I dove deep and learned a lot interesting things especially from that great guides, and from the tools FIT, BMP… and what settings for each new board have to be set, to get that brick working. Fascinating!
btw. Boot Guard is disabled on that board.
had a look on the H170Pro. There are incompatibilities in the ME-Region. My uses Consumer-H D0, the H170Pro-Board has Corporate-H D0. Direct flash without changing anything does not boot… as expected. Also transferring VBIOS Settings does not work.
Did another tries, with several ME-Versions, every time with checking each setting in the FIT tool, because a new ME resets some parameters.
I will try more versions…
I thought it looked like you borrowed the holder from your CH341A to Frankenstein to the RPI programmer.
You may have to look at each of those Asus H170 boards, but surely one is close enough to boot and work for simple testing, I think I saw 3-5 models that could be same/similar but I couldn’t see what board is inside the system you have.
I know asus use same exact PCB a lot if different models. Corporate ME should be OK to boot with on your board, as long as it’s the same looking layout of your board. I’ve used either on a B75 once during testing, and it initially came with corporate, both booted fine for simple testing.
I would test each one from Asus directly without any editing, that matches a similar looking board as yours, same PCIE/PCI count and layout, main PCB looks same etc, not too much worry for the rear graphic output, one of the same would at least work surely each time.
But if no luck, oh well, I thought maybe it would be good for a quick hardware test since I’d done it before a few times across different boards and brands.
You’re right, lots of great information and guides here!
Was the system booting and working when you initially received it? That was my main concern, making sure all the hardware (board for sure) was in working order so you knew it should be working aside from getting a good BIOS going
* Just realized I spent an hour making BIOS from 1301 you sent, updating stuff, but forgot to start by changing all in latest 2101 BIOS instead as planned.
Hoped to have you a BIOS here for now to play with until I got back later, but now I’ll have to do again later tonight, bummed but it’s OK, should be much quicker to redo on new version BIOS now anyway.
* Oh well, I’ll make two anyway, one new BIOS and one based on old version.
I meant to ask earlier and forgot, does your board have single BIOS or is there two roms on there? Some boards with two do NOT have both actual BIOS, not main and backup I mean.
Some with two one is BIOS and other is EC/ME or other data. So if there is two, please send dump from both, and label them in a way so you’ll know which dump goes to which chip.
I’ll be back tonight and get some BIOS posted for you to try, good luck in the meantime!
You´re right… it is a Frankenstein RPI Programmer 
Here is an image of the board. I think it is easy to see, that crossflashing will never ever work on that thing.
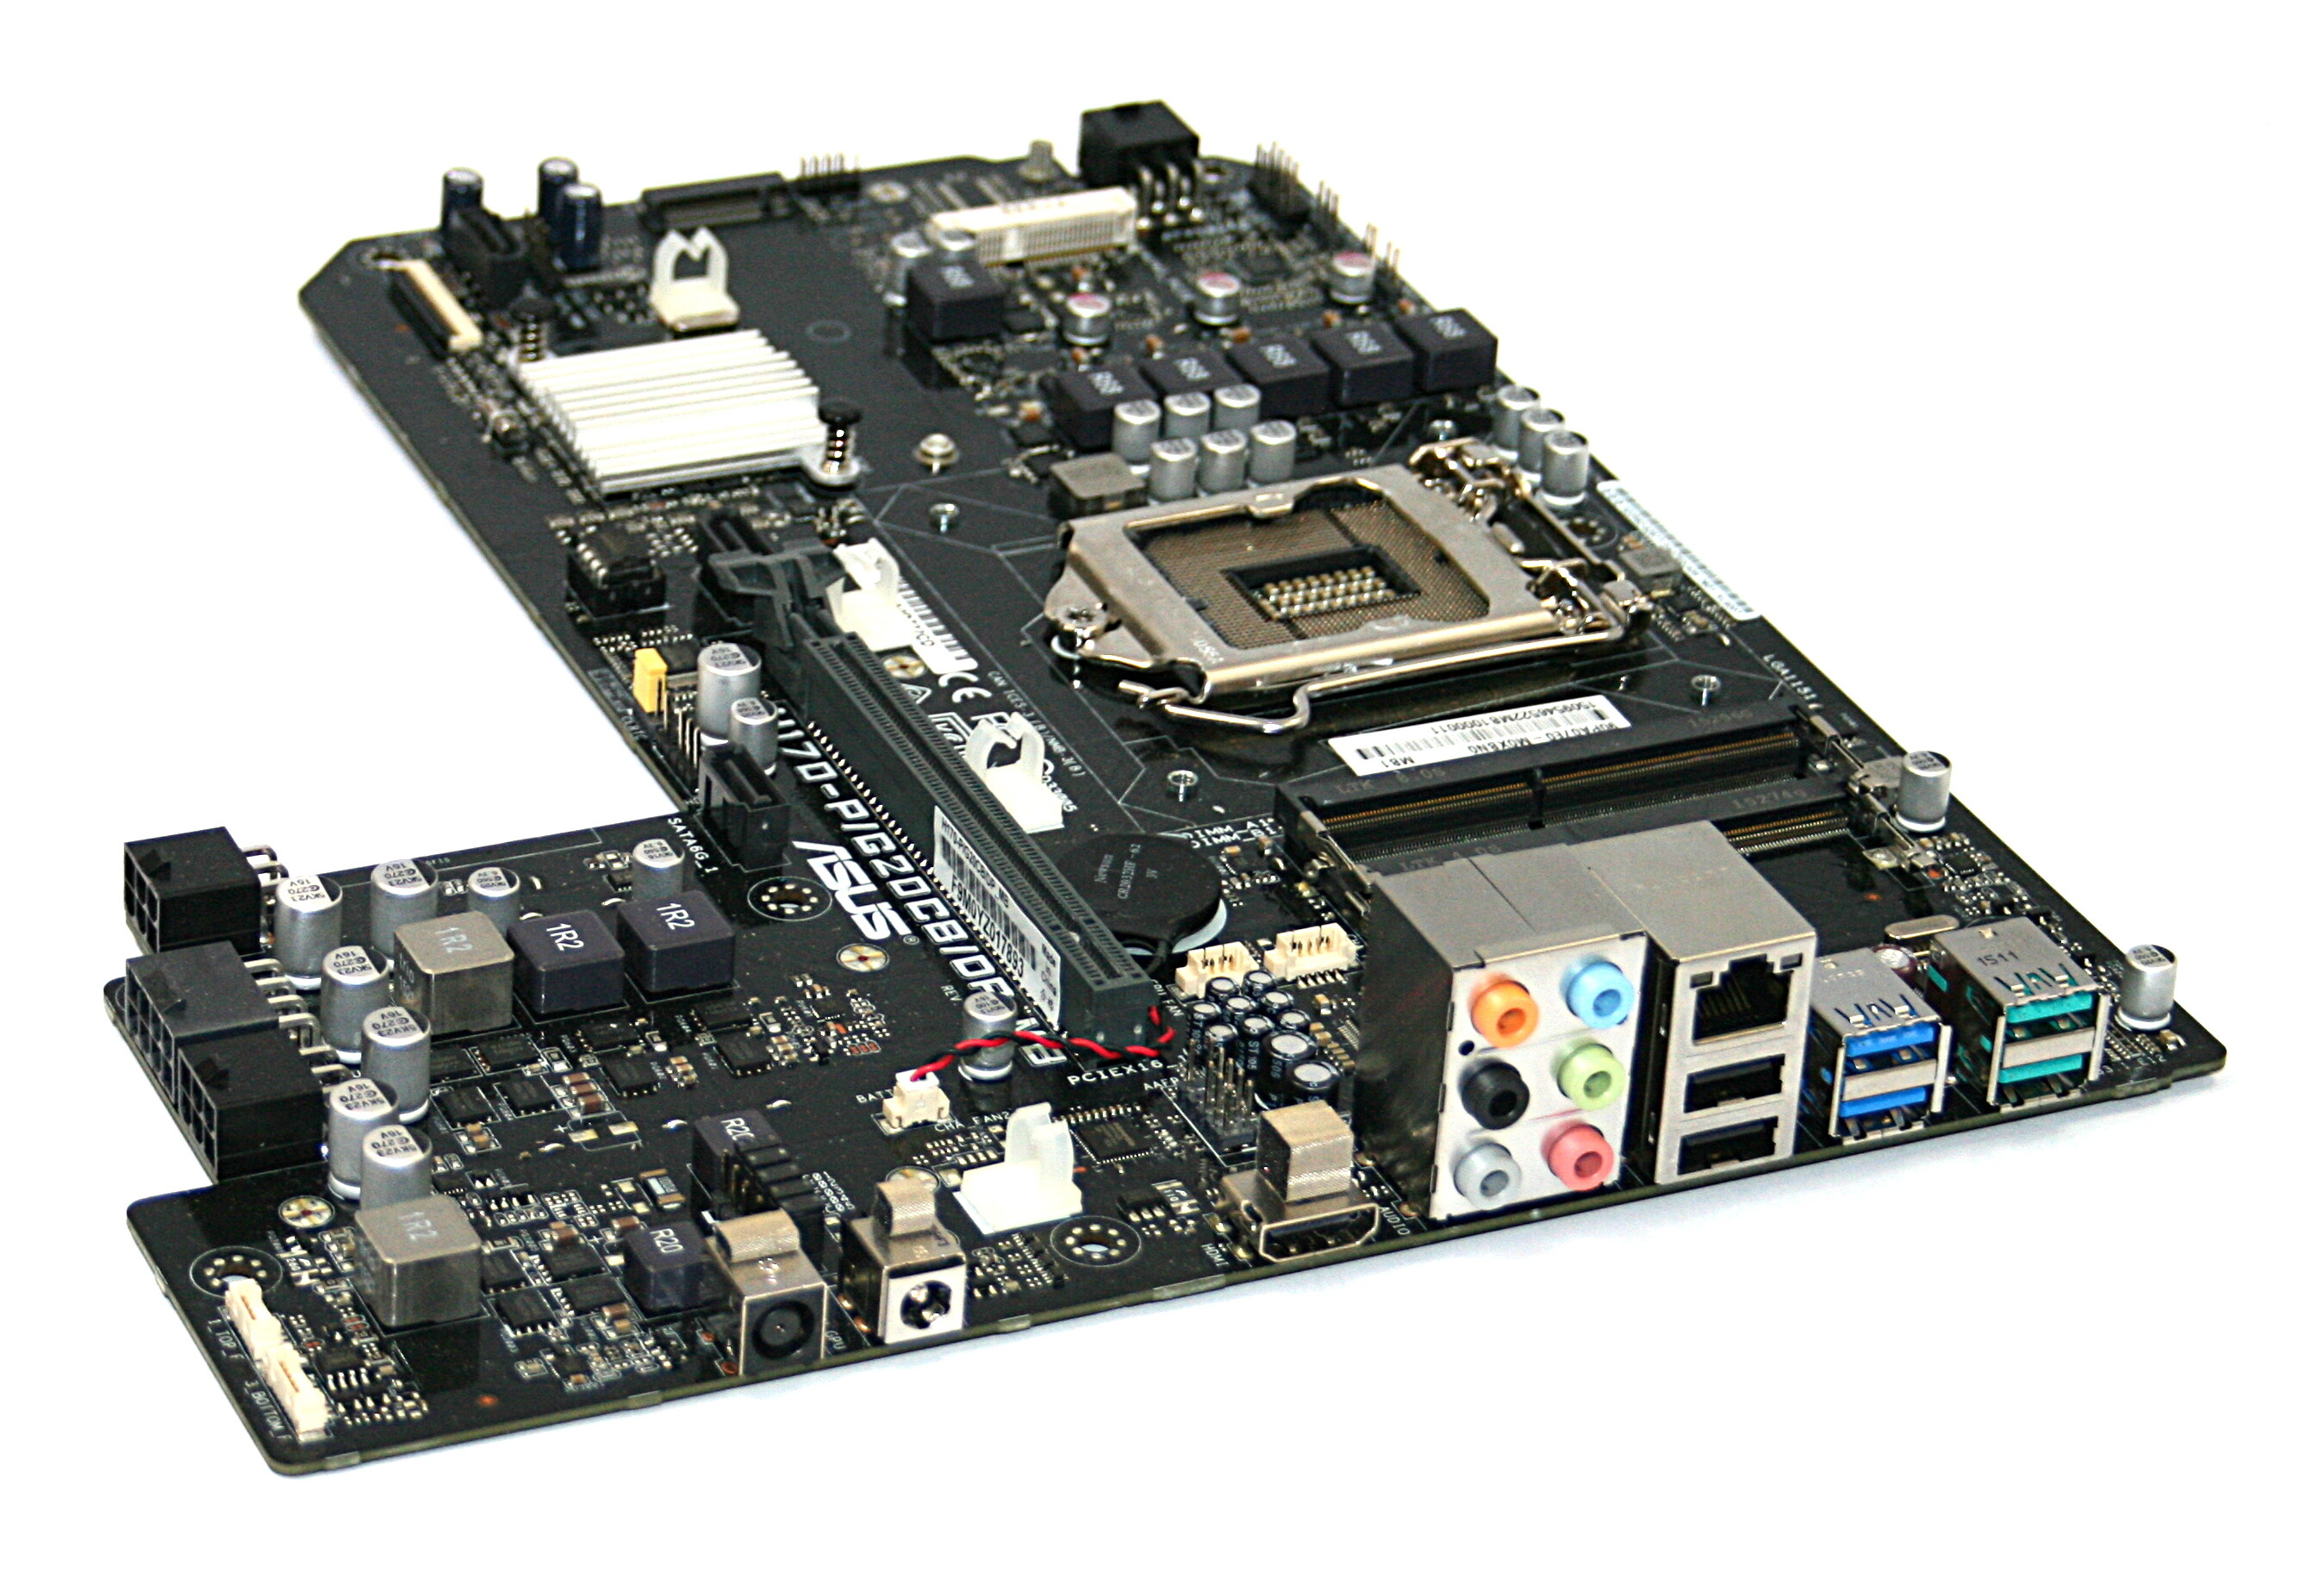
Nearly everything is attached to PCIe lanes, that may be different to standard boards.
I bought this board on e*** for a relatively low price. It is a absolute new one, I assume that a new board is running.
Currently I have a ROG G20AJ (H97) PC. The board ASUS built for that machine is a special one, no standard board is fitting there. The next Gen of that PC was the G20CB with H170 and gen6 CPU. This board has the identical measurements as G20AJ and fits in my machine. So my idea is to upgrade my pc with that new board for low costs. It is an interesting project, additionally i can run the new board without dismounting my current machine. That gives me the possibility to do some measurements with oscilloscopes, voltmeter… what ever else, I have everything in my office/laboratory.
Possibly corporate may work, i will give it a try… tomorrow. Today I have no access to my hardware.
Yes, there is a new version (2101) but ignored that.
My board is only single bios based. There is no other one containing EC/ME or some other stuff.
You should be proud of your Frankenstein programmer, it’s high tech and cool like that!  Ohh damn, that is a board bender, they really cut the corners
Now, I see what you mean about it’s not matching anything! New does not always mean new, or working, especially on ebay but even at big stores like Newegg or Microcenter (DOA happens).
Hopefully we’ll get this and you wont need a 6th Gen CPU, but you may need to end up borrowing one from another system for a quick test if we end up not being able to get anything booting between the two of us working on these BIOS mods
Thanks for the reply about double BIOS roms, good that’s not the case here!
It came to mind because of the B75M corp boards I messed with while back, got 3 at a steal price and all were messed up Intel ME and the ME+ some other data I can’t remember right now was on the secondary flash rom.
OK, my first round of files for you to try is done, hopefully only this round is needed and both will work for you!
Try BIOS version 2101 first since it’s latest version, probably best chance of all around compatibility BIOS-wise with everything else we’re trying to get in there.

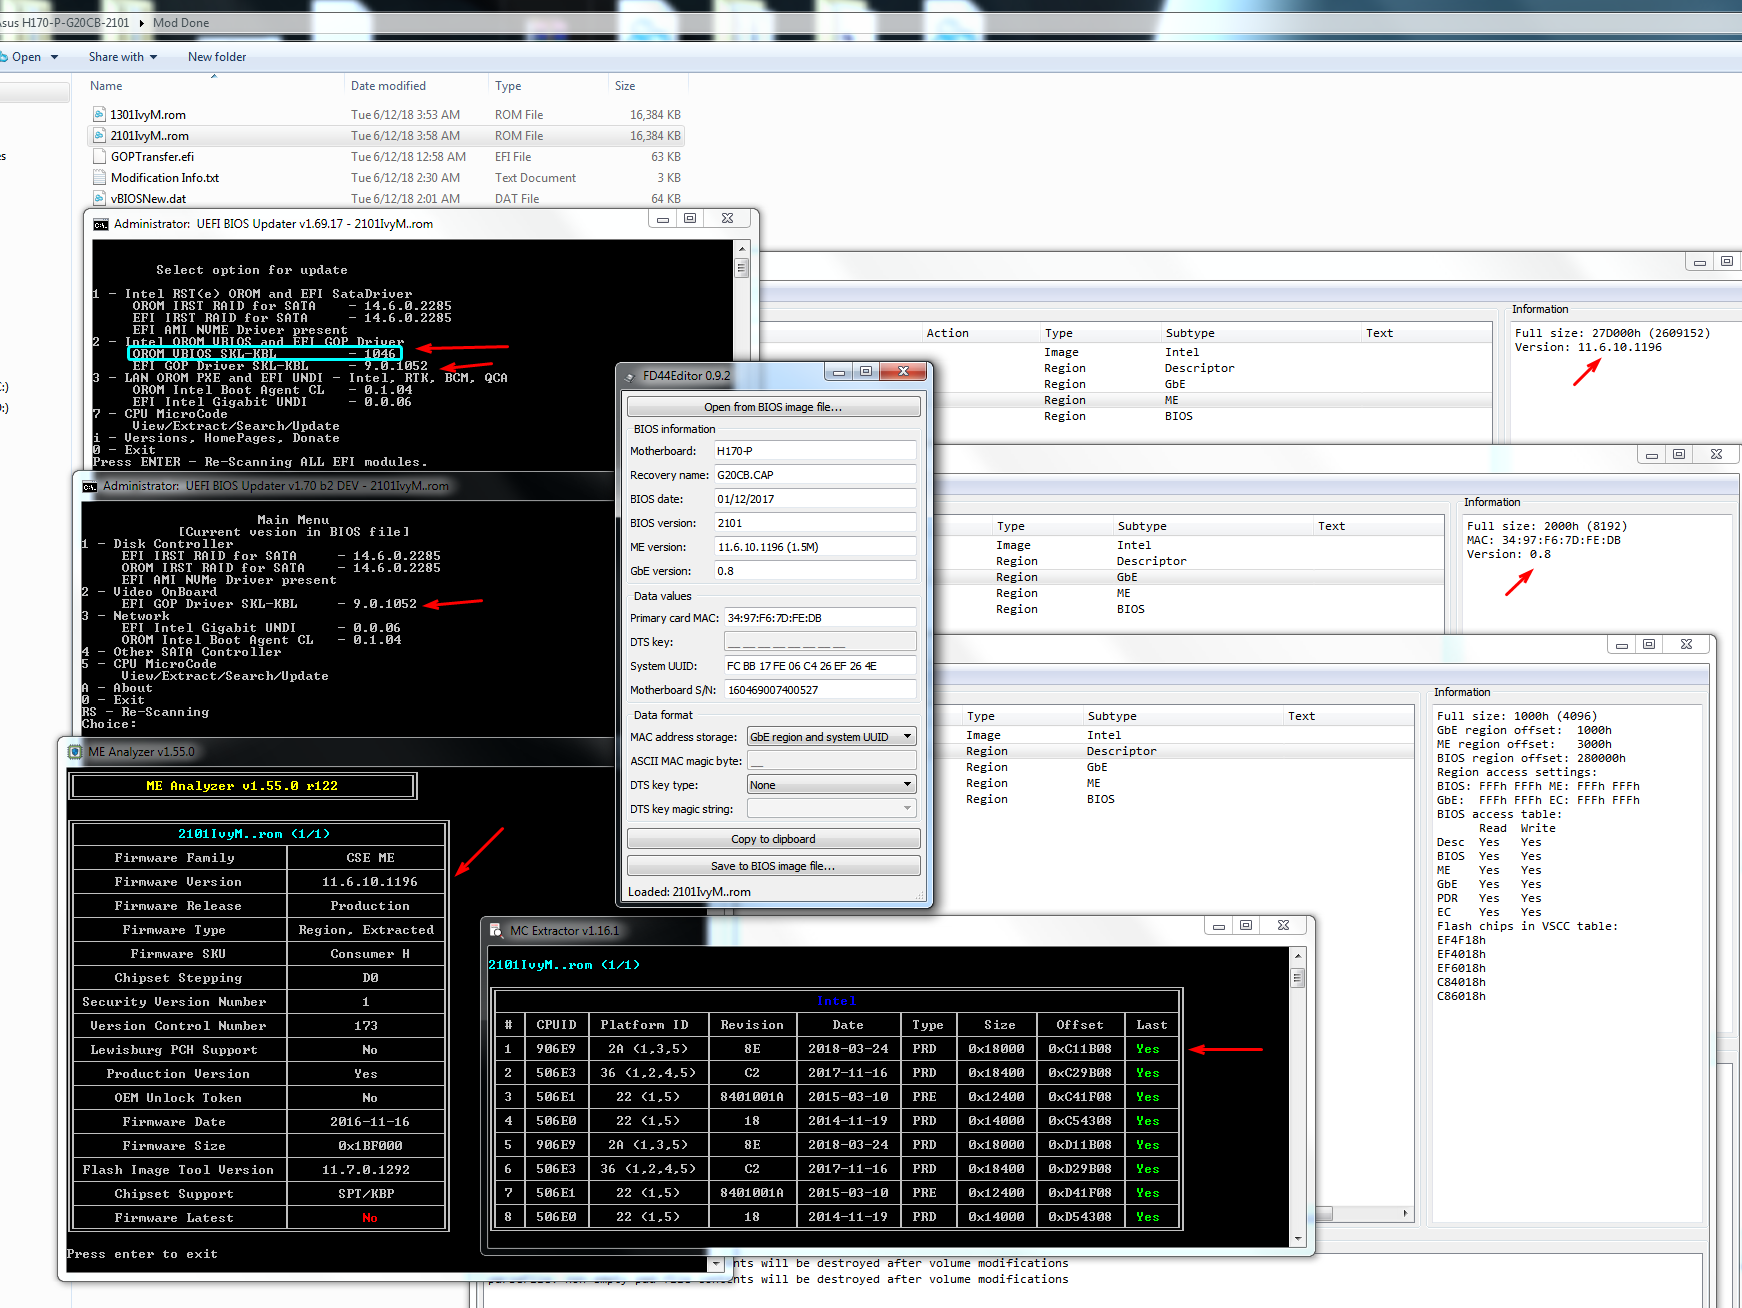
Checked Pre-Mod (at vBIOS and ME for Kaby) -
H170-P-G20CB - 1301 = Version Skylake 9.0.1029 (This is GOP version), actual vBIOS oROM version is 1024 (VBT Version - C4 00 / size b6 0e / 45.5kb / 46,607bytes)
H170-P-G20CB - 2101 (Latest BIOS board) = Same as above
H170 Pro Gaming = SKL-KBL 9.0.1052 GOP / vBIOS oROM 1046
h170 Pro = SKL-KBL 9.0.1052 GOP / vBIOS oROM 1046 (Used this GOP/vBIOS combo version since both H170 I checked added these vers when ucode/ME update was added for Kaby support)
vBIOS / GUID Parent - A0327FE0-1FDA-4E5B-905D-B510C45A61D0 (Same for all boards/BIOS I looked at)
GOP Driver @ SubGUID 380B6B4F-1454-41F2-A6D3-61D1333E8CB4 (Extract as “body” w/ UEFITool, can save as .efi @ 4d 5a leading bytes in hex)
Skylake VBIOS @ SubGUID - C5A4306E-E247-4ECD-A9D8-5B1985D3DCDA (Extract as “body” w/ UEFITool)
Also vBIOS shadow copy, that is called, is located in second “padding” area at main BIOS section opening in EUFITool
Mod Methods Used -
First - Updated microcodes via Inserted Kaby lake only (into both volumes 5/6) with MMTool (5.02 patched) first, then updated all via UBU 1.70 (b2dev)
Second - Updated Clean ME 11.6.10.1196, double verified all correct
Third - update and hex edit GbE region to version 0.8 (hex edited in MAC Address), extract and inserted via UEFITool 0.25
Fourth - Update Intel Graphics to GOP 9.0.1052 + vBIOS oRom - replace method = GOP via GUID/UEFITool (“body” extract/replace) first, same for VBIOS @ both locations
* May need second padding edit after first vBIOS replaced at GUIDE above then saved, reopened and then edit padding vBIOS.
Seemed to not save few times properly, without error but noticed via extract and hex check, then I got it working so not 100% sure what caused initial failure?
But I did verify that insert vBIOS @ GUID then save and reopen and then edit vBIOS @Padding and recheck/edit if needed GUID again then save it finally saves both
* Newer (9.0.1079) GOP here in case you look for updated one later - Intel EFI “RaidDriver” and “GopDriver” BIOS Modules
Finally, verified all opened properly in AMIBCP, UBU old (oRom check) & UBU new, MMtool, FD44Editor, MCE, MEA, UEFITool
http://www.filedropper.com/asus-h170-p-g…301-2101-ivymod
Hopefully this works for you, that would be great!
After flash, since you cannot run fpt -greset due to flashing the chip with a programmer, remove all power from the board (unplug at the wall, remove CMOS battery) and let system sit for one minute.
Then put CMOS battery back and plug in board, put in BIOS chip and start system. If it boots go to BIOS and load optimal defaults then save and apply, then reboot back into BIOS and check ME version info.
…and it took only 60mins to do schematics, layout, milling (LPKF S103 -> really coooooool thing) and soldering.
I checked some things, to verify that the board is comming up, at least partially. PCH RTC crystal runs as soon as i connect the battery. PCH CLK crystal runs as soon as I power up the board pressing the button. CPU starts getting warm as soon as board is powered up, RAM starts getting warm…, coils are getting warm, typical high frequency sounds are hearable, BIOS-chip is read out, dedicated PCIe Graphics Card is booted if mounted (fan spins down to normal speed from high speed). I don´t (want) to believe that the board is dead.
But the Devil is a squirrel, I don´t hesitate to buy/borrow a gen6 CPU if everything fails.
I´m sure that there is nothing else.
Thank you very much, you are awesome!
Differences:
1. same, but used UBU 1.69.17.4
2. another ME version
3. never touched GbE
4. GOP(1079) Update thru UBU, VBIOS(1058) thru MMTool 5.024(patched) in OptionRom by VID,PID
I have the impression, that what i did, wasn´t enough… your way is really different.
THAT would be really great! Thanks a lot for that work. Now I have to wait until tomorrow, damn.
I will dive into the files instead…
[/quote]
Thats the way i am doing every time… board is powerless, batt disconnected, than i remove the chip, flash… after that, around 2 mins has gone, chip -> batt -> wall -> poweron
Sounds like a lot of fun making that programmer. You should make a really slick looking acrylic shell now, just for around the sides leaving top and bottom open-face. 
All that you mentioned can happen with a faulty board too, the PCIE Fan spin down is a good sign though but not always a 100% reliable sign of a properly working board.
You might have to pickup a cheap G4400 or G3900 on ebay, I think I scored the one I use for testing for $26
You’re welcome, and thank you too! 
on #2 ME - but I had no issues, and no manual copying settings possibly missing hidden ones not shown in app or XML’s - so if it works then this could be why if no other major differences.
GbE, I was editing anyway to put your serial number back in there, in the 2101 version BIOS from Asus, so I went ahead and updated both while I did that. This wouldn’t have anything to do with helping get the Kaby going.
on #4 vBIOS, your method is OK too probably, just different way of doing similar, and with different version files. I have not checked the edited file you sent over, wait a minute… maybe you never did send one of those?
If you didn’t, how you check this is extract that GUID C5A4306E-E247-4ECD-A9D8-5B1985D3DCDA with MMtool or UEFITool and padding #2 w UEFITool and check via hex editor if both are the vBIOS you inserted.
Or upload one of your mod files here and let me check, if you aren’t familiar with using Hex
I’d do the same if couldn’t test on a board, dive in a look at the files to see what I could see.
Be sure you remove PSU power plug from the wall too, or 24+8 from the board, not sure if that powerless meant the same to you as it does me  if that’s what you meant then you’re good of course.
hey,
I flashed your images… and surprisingly it does not boot. Damn. It only does what it should do after connecting battery and poweron: Powerled is on for a short while, than the board restarts, but doesn´t boot, but powerled stays on after it was off one second.
Checked your images… found nothing faulty.
yes, i didn´t send you a modified one. I can do this… look at my Dropbox folder, there is a version of my modified bios.
https://www.dropbox.com/sh/w0i3i4mt4jqm9…_a4sx3ktQa?dl=0
I am familiar with hex… i am a software programmer too.
That board is a hard thing. I will check for another cpu and/or ram, to verify that board is really working. That´s strange that nothing works.
All that waiting, and still nothing, bummer!  So nothing with onboard VGA, or PCIE either? Do you get any error beeps with a board speaker?
Thanks for the BIOS links, I’ll take a look and see if I noticed anything funky.
Did you see anything off, or majorly different with the BIOS I sent, since you had a while away from the board to check I assume you dissected while you waited
What ram is that, what speed mainly? Thinking maybe it could be some problems, if high speed and maybe board is trying to load XMP by default and failing, instead of SPD.
Probably not this, and I’m sure you already tried only one stick at a time too. Any cheap OEM or Kingston DDR4 to try instead? I doubt it’s anything related to this, but something to try different if you can.
I checked BIOS, and I see default selection for memory reference clock with optimal defaults is 133 (the 100/133 thing), and usually 100 much easier to use I think.
But, defaults is auto, which probably choose 100 and that’s what would be set when bring board back up again from this process, so I think these two sentences are a waste 
Since we’ve both created BIOS mods, which should be good, makes me wonder about the board more now. There’s no system you can borrow a Gen6 CPU from at work, or friend or neighbor?
Thanks for the image, seeing the power connectors makes me wonder since I’ve messed with a few ITX systems with randomly odd connectors and voltage input specs.
Probably same 19V input as this one needs, some “multi” adapters gave me issues while others didn’t both same spec.
Are you sure your power adapter and all that is correct for the boards intended input? I assumed you probably measure all that since you mentioned being able to check that at work.
There’s nothing connected to the 8, is that not a CPU power connector? I tried to lookup the PDF and see what each connector is, but Asus is lame so no good manual for the internals
I did see this in a review while trying to find a good review showing connected internals. Looks like they say both of these barrel power connectors needs to be connected, one missing in your image so maybe it needs both even if the other 6 pin 19v are connected?
I see similar systems, different chipset, but Asus prebuilt, here in found in a few google image searches for Asus ROG G20CB motherboard, both showing that 8pin connected too
https://prohardver.hu/dl/cnt/2014-09/111…0_inside2_b.jpg
https://rog.asus.com/forum/attachment.ph…8361426&thumb=1
https://www.3dnews.ru/assets/external/il…0_Inside-08.jpg
I did find a good review showing internal stock connections on a similar system (slightly different board), if you wanted to see one and hadn’t yet.
https://www.vortez.net/articles_pages/as…i_review,5.html
And they do have the 8pin connector connected that I was asking about, so maybe it’s needed even though it may seem like it’s not?
I’d be more concerned with getting both of the rear power barrel plugs powered first, since two places I read about the power supply say they’re required
Ohh! Maybe this can change things?! At least when trying PCIE possibly. I see your jumpers are set stock like his before he figured it out (Different model, but similar OEM type pre-built Asus system)
https://rog.asus.com/forum/showthread.ph…et-the-jumpers!
Read down too, other guy says set them differently and it works too (moving all five in that one block to opposite position (connected) it looks like you have them now (Not-connected)
Something to play with I guess, if you haven’t already! 
I also wonder, and tried to look around to find guide or info, about transferring specific GOP settings, like we do with the vBIOS, but couldn’t find anything.
If this is necessary, it should only affect onboard graphics, but then again PCIE may fail too due to needing some specific PCIE patcher like they made for the coffee lake mods.
i´m using 2x16GB DDR4-2400-CL16, gen7 i7 should work with this type of ram. It seems to be possible to change the settings via AMIBCP…
In the next days i will test the board with a i7 6700K… someone has one. Then I will see more… hopefully. The board runs with this K-Version, found a post in the ASUS forums.
The 6-pin connector in the upper left corner to the lower center right corner is the connector for CPU/PCH… without that, the board stays completely dark. Tested it, several days ago.
The other two connectors are for a dedicated graphics card which may need an additional power supply.
If I set the jumpers opposite, the GPU-DC-IN jack becomes active. Checked the routing of the pins. Currently, with that setting, DC-IN-jack is active. So I think, if you don´t have a graphics card with additional power supply, you don´t need the second PSU. But I will get my PSU´s from home and test it tomorrow with booth PSU connected… remember the squirrel lol
I tested it several days ago, too. Switching all jumpers to opposite positions results in a cold and dark board.
Well that’s not too extreme for the ram, but maybe would be good if you could find some 4Gb or 8GB modules.
2133-2400 shouldn’t be causing issues, now maybe 3000 or above you’d have to play with a little to get stable, but I wouldn’t expect them to be causing a non-boot unless 100% incompatible which is rare
I’m always a little concerned when changing AMIBPC sometimes it works fine, other times a single change causes instant failure to boot, and you can never tell which it will be until you start the board and it bricks or not.
So I wouldn’t change anything with that until you know it’s working, so you can tell if that change causes need to reprogram or not.
That makes sense for the 8pin and 6pin there to be for dedicated, and all the images I find show them in use, since they ship with dedicated card. So they’re power out, with cable from there to the dedicated graphics cards?
I couldn’t see any of that in the images I found, probably because most people didn’t want to take it all the way apart.
What about jumpers set in 2/3 like that first image, did that do anything different, or had you only tested all five on and off?
Lots of variables here, aside from what we’re trying to do, you’ve got to find a gen 6 CPU so we can be sure it’s working and setup properly, so we know it’s then ready for the rest of this to be implemented and then only the BIOS/CPU is causing failure.I’d find a cheap G3900/G3930 (I see some of these around $30 right now) or G4400 on ebay. Sorry, overlooked the 6700K mention! It will work by default, BIOS has 2016 microcodes for that CPUID so you’ll be set using that as a tester!
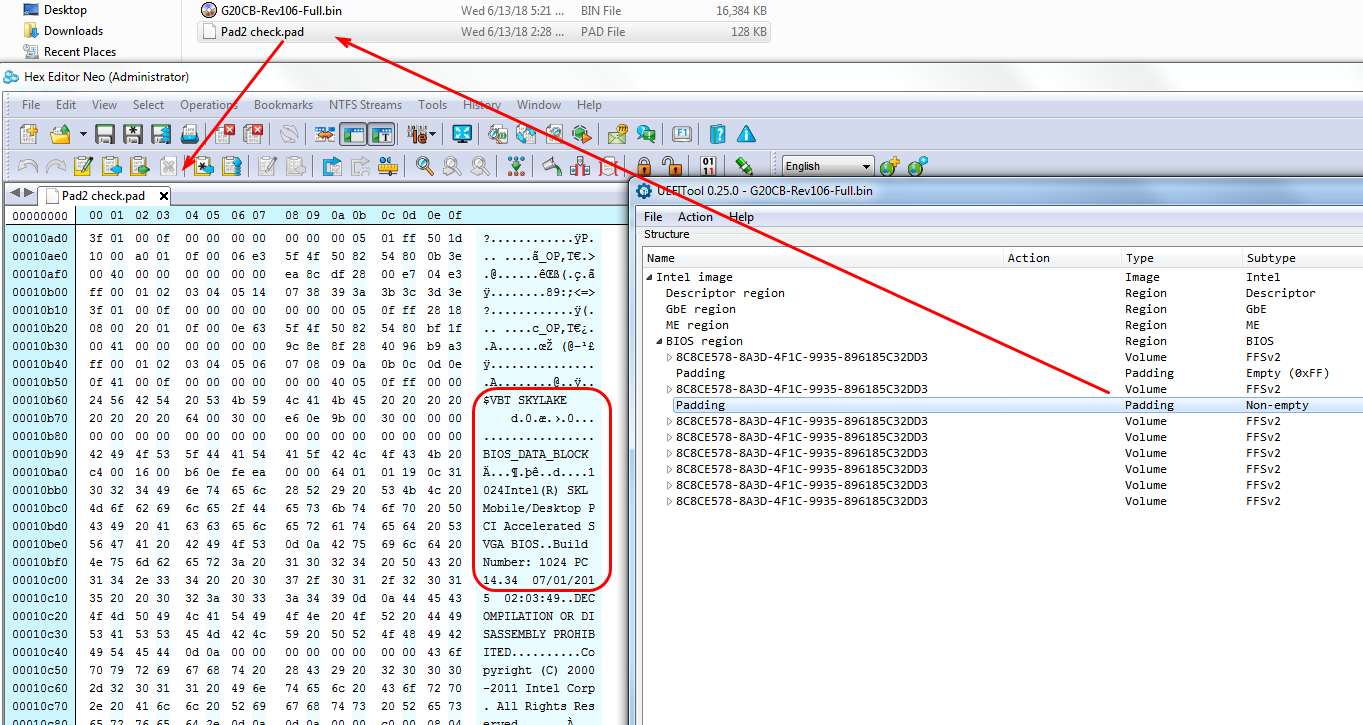
I found old vBIOS oRom 1024 in the mod BIOS you uploaded, in that padding #2 section I mentioned previously, here’s where to find that
I didn’t see anything else off in your BIOS mod, only differences I noticed right away was where we used different versions of the ME and GoP/vBIOS etc
I know, that 6Gen CPU is only supporting 2133 DDR4, but I thought, that 2400 RAM would be set to 2133… may be or not. We will see. I going to ask our IT devision, if they have such a DDR4 2133 just for testing.
Now I have to wait for the Gen6 until weekend… hmpf.
ok, then I will avoid using AMIBCP as long as I did not verified that 6700k is booting.
The 8 and 6 pin connectors are for dedicated, that right.
I can try such a 2/3 setting, nothing critical should happen, as long as no high end graphics card is plugged in. In that case it doesn´t matter, if 2 PSU or 1 PSU are connected. It is a selection only, what jack is used for powering CPU and all the other stuff. Tested… doesn´t matter, still no boot.
Oh… okay… that was a full updated version, and still 1024? Do I forgot something??? I´ll check my other tries.
That’s right, anytime (usually) ram is over CPU speed limit like 2400 it would simply downclock via SPD to 2133 or less.
I mainly meant some of the higher end kits sometimes have issues starting up at slower speeds, due to either SPD missing (overwritten with XMP) or lowest SPD is higher than board wants to start with in auto.
2400 should start up fine in this system, either at 2400 or if auto wanted 2133 that would run fine too. Unless there is some specific compatibility issue with the IC’s and this systems BIOS, it’s rare but stuff like that does happen.
That’s why there’s often many BIOS updates early on as manufacturers try to adjust BIOS stability and compatibility with new boards and new memory kit launches.
Once you know it works with the 6700K, you can do quick test with that CPU still in there, make one setting change with AMIBCP and then save and reflash it and test.
If it boots after that, then it’s OK to make changes with AMIBCP then, be sure to stick to the version you verify is OK in that test.
It’s got me a few times before, where I’d think I remember it’s OK for xx board BIOS and xx version AMIBCP, then find out nope bricked BIOS due to I forgot no version compatible with that boards BIOS, or needed to use this specific version etc.
That was the file from your dropbox, one looked edited and one did not, but I only checked one thing in it and assumed it wasn’t edited, so carried on looking at the other.
You can see in the image the full file name you gave it, 106-Full. Everything else was updated in that BIOS, except the shadow vBIOS there in second padding.
I don’t know if it matters or not, since it’s not detected by UBU when actually updating, but is shown/detected by UBU when it’s first starting up and scanning. I assume since it’s there it’s used somehow and not simply forgot and left in place by BIOS creators.
Than it should not an issue on that board, even with a gen6 as it would downclock to 2133.
I don´t think, that i have to change anything, when the 6700k runs. What is working with gen6 should run with gen7 too. Otherwise that bios has some code integrated, that blocks other CPUID´s than gen6 ID´s. Does anyone had such an issue??? It would be conceivable that such a mess exists.
Maybe something went wrong in some of my versions. I will wait… again… for the 6gen CPU. lets see, if it works.
Yes, it’s more than CPUID and ME, but we’ve tried to cover all we know about that’s necessary. It took a while and many attempts to get similar changeover (Coffee on Sky/Kaby boards) working on regular desktop boards, this one is a odd beast, and I believe the layout may be holding us back, possibly.
I’ve seen some boards run fine half-modded though, boot with Coffee and PCIE card with only microcode and ME set correctly, so should at least be similar with SKL/Kaby.
There could be some little 0402 resistor messing needed for it to work though, or it needs moved to another spot on the board, something tiny like that could stop what we want, but most other boards (in Asus own lineup) did not need any hard-mods, so I doubt this one does either, but you never know.
Yes, we’ll know a lot more once you have the 6700K. How long do you get to use it for testing? We only need a few test really, but would be good if you can keep for a week or so. First you need to test regular non-modified BIOS 2101 latest and be sure this board is working.
Then if OK, we need to test 2101 BIOS with ME update only, to be sure it’s OK with the ME’s we want to use, then one more test with ME + Microcode update. Once that is all confirmed we know anything else is up to us to either get working, or fail, with the Kaby CPU.
We could add final test there, ME+Microcode+GOP/vBIOS with the 6700K, then if that works too with the older CPU, it really should be working with Kaby otherwise some hardware trace or resistor etc maybe missing.