Good evening, so I got a Toshiba P50-A-12Z to use as a work horse, mounted a 480GB SSD, 16GB of RAM, and I already knew that there is something that limits the cpu clock to 2.7Ghz when all cores are used, it is already repasted with Grizzly Kryonaut and it wount go over 70ºC under load, but its BIOS is very limited and I have some hope that I might be able to remove this clock limitation.
So, I updated the BIOS/EC to the latest version(1.9 and 1.3EC) and it is an AMI Aptio BIOS, no information about the Aptio version but it as UEFI boot, but no acess to UEFI shell from the BIOS.
If i use the lateste 5.05 AFUWIN in Windows the system hangs and must be shutdown in the power button because the keyboard/mouse dont respond anymore.
Using a pen with FreeDos(via Rufus) with AFU for Aptio 2.28, AFUDOS 5.05, AFU4.25, AFU4.28, AFU4.33 and anything else that I might be forgetting, I get either BIOS is write protected or cant get flash information.
Is there anyway to dump this BIOS?
Best regards.
EDIT by Fernando: Thread title customized
Ok, finally got it, using FTPW.ex with -D dump.rom -bios
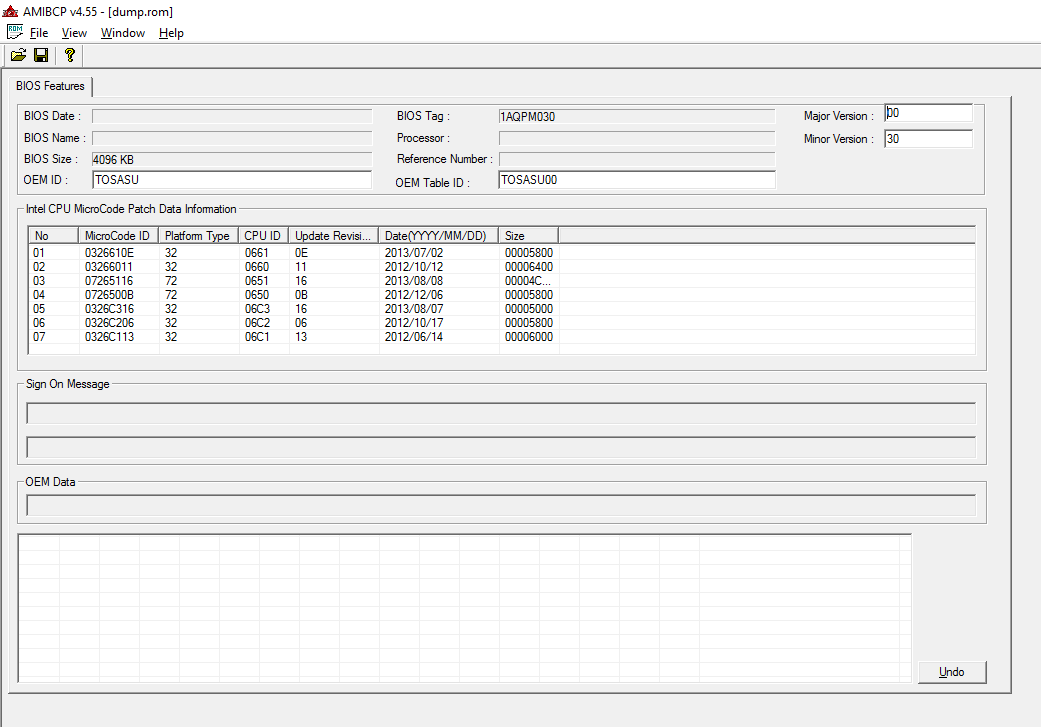
I got a 4MB file but now the only thing that AMIBCP 4.55 shows me is this:
Any version above or under 4.55 will not open the file.
Any ideas about what to do next?
dump.zip (2.6 MB)
Roundup of what I have found/accomplished so far.
Using FPTW I could finally dump the BIOS, but I cant dump the ME portion…
AMIBCP will only show the window that I already posted above, and not the menu structure like it usually does, is there maybe some magic bit in the BIOS that prevents this?
Using MMTool I extracted the BIOS Setup and ran IFR Extract and got this, but its nowhere near a match to what menus are actually visible in the BIOS, the CPU is being limited to 30Watts, with undervolting that results in a measly clock of 2.7ghz on all cores, the same i7-4700 in my G750 scores 650-660 in Cinebench R15, in this laptop, in a cool room I get 530-540, in a hot room, it drops to around 490-500, my i7-2670 can score 499 all day long, this is disappointing ![]()
The CPU temperature wont ever go over 70ºC(already repasted with Kryonaut, added a pair of feet in the rear to lift the laptop a bit.
I have tried to just update the cpu micro-code with UBU and with MMTool, but when I try to flash it again FPTW says that the cpu doesn’t have access for write in the bios eeprom/flash ![]()
Any ideas on how to tackle this BIOS?
--------------------------------------------------------------------------------
Offset: Title:
--------------------------------------------------------------------------------
0x3A809 Main (0x6)
0x494FF Advanced (0x1C)
0x51569 Chipset (0x1E)
0x5AEC9 Boot (0x20)
0x5B976 Security (0x3B)
0x5C8BF Save & Exit (0x4F)
But if I go into the bios I have:
Main
Security
Power Management
Advanced
Boot
Exit
Well, nobody cares about this but here it goes…
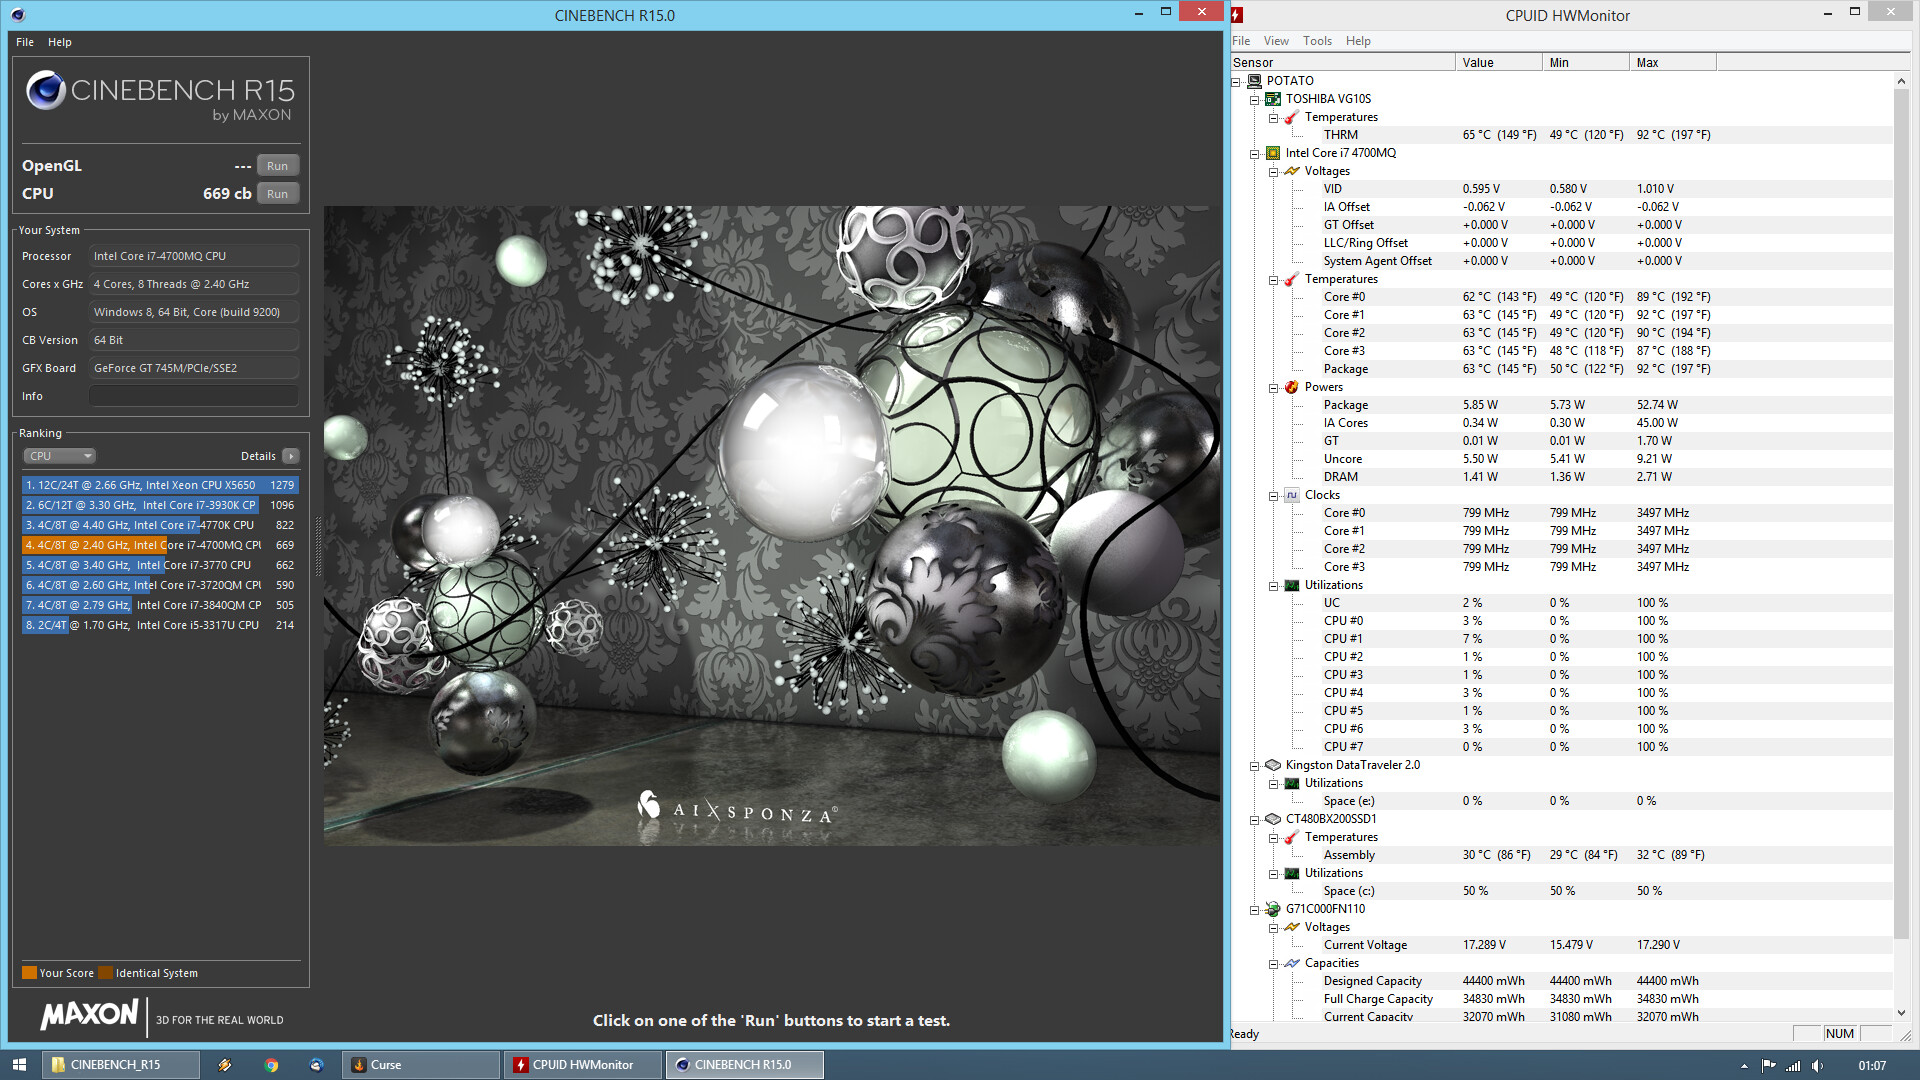
Using the IFR dump from the setup, and using setup_var I poked a dozen vars regarding lock’s and limits, went into Windows, re-installed Intel XTU and all my ratio’s where already preset to 36,35,34,34 and I got an extra option CPU max current, that was set to 39A, set it to 150A(just because), ran Cinebench R15, low and behold it peaks at 50.x watts on load, doesn’t throttle the clocks, and stays nice and fast at 3.4Ghz, got a sweet 670 score on cinebench, on par of what is expected from this CPU.
IF anyone wants I can write what vars and values I changed to be able to remove this limitation
@senso :
Congratulations, that you were able to solve your problem yourself and thank you for your final report.
To make it easier for other users with a similar problem, I have customized the thread title.
I suspect, that the visitors of this thread didn’t know a solution themselves and waited until your final report about how you managed it.
It would be fine, if you would add these informations.
I know that this is a very niche topic, and it feels like the BIOS gurus are slowly getting out of the forums.
I dont like to leave my question topics without a response, when I have the time I will post all the variables and values that I used(need to go back with set_var and read then back, its not an unlock but its better than nothing.
If you have them, could you try to open my dump in all the AMIBCP versions that you might have?
Indeed, the main BIOS Modding topic of this Forum is the update resp. insertion of Option ROM and EFI modules and not the unlocking of usually not available BIOS options.
Whom do you mean? I am neither an expert regarding the usage of the AMIBCP tool nor do I have stored a lot of different AMIBCP versions.
And here is the recipe:
So, first, this is ONLY for the Toshiba P50-A with the 745m GPU and i7-4700HQ CPU.
Start with updating your BIOS to the latest available version, which is 1.90:
http://support1.toshiba-tro.de/tedd-file…41113153531.zip
Grab a USB pen, any size will do, and format it in FAT32, donwload BOOX64:
(To enter BIOS/Boot menu spam F12 at boot)
http://www.mediafire.com/download.php?81vegw2aw0pxcib
And place it inside two folders with the following structure:
x:\EFI\BOOT\bootx64.efi
Flash that BIOS, reboot your laptop, disable secure boot and boot via the USB pen.
This is what you should see:

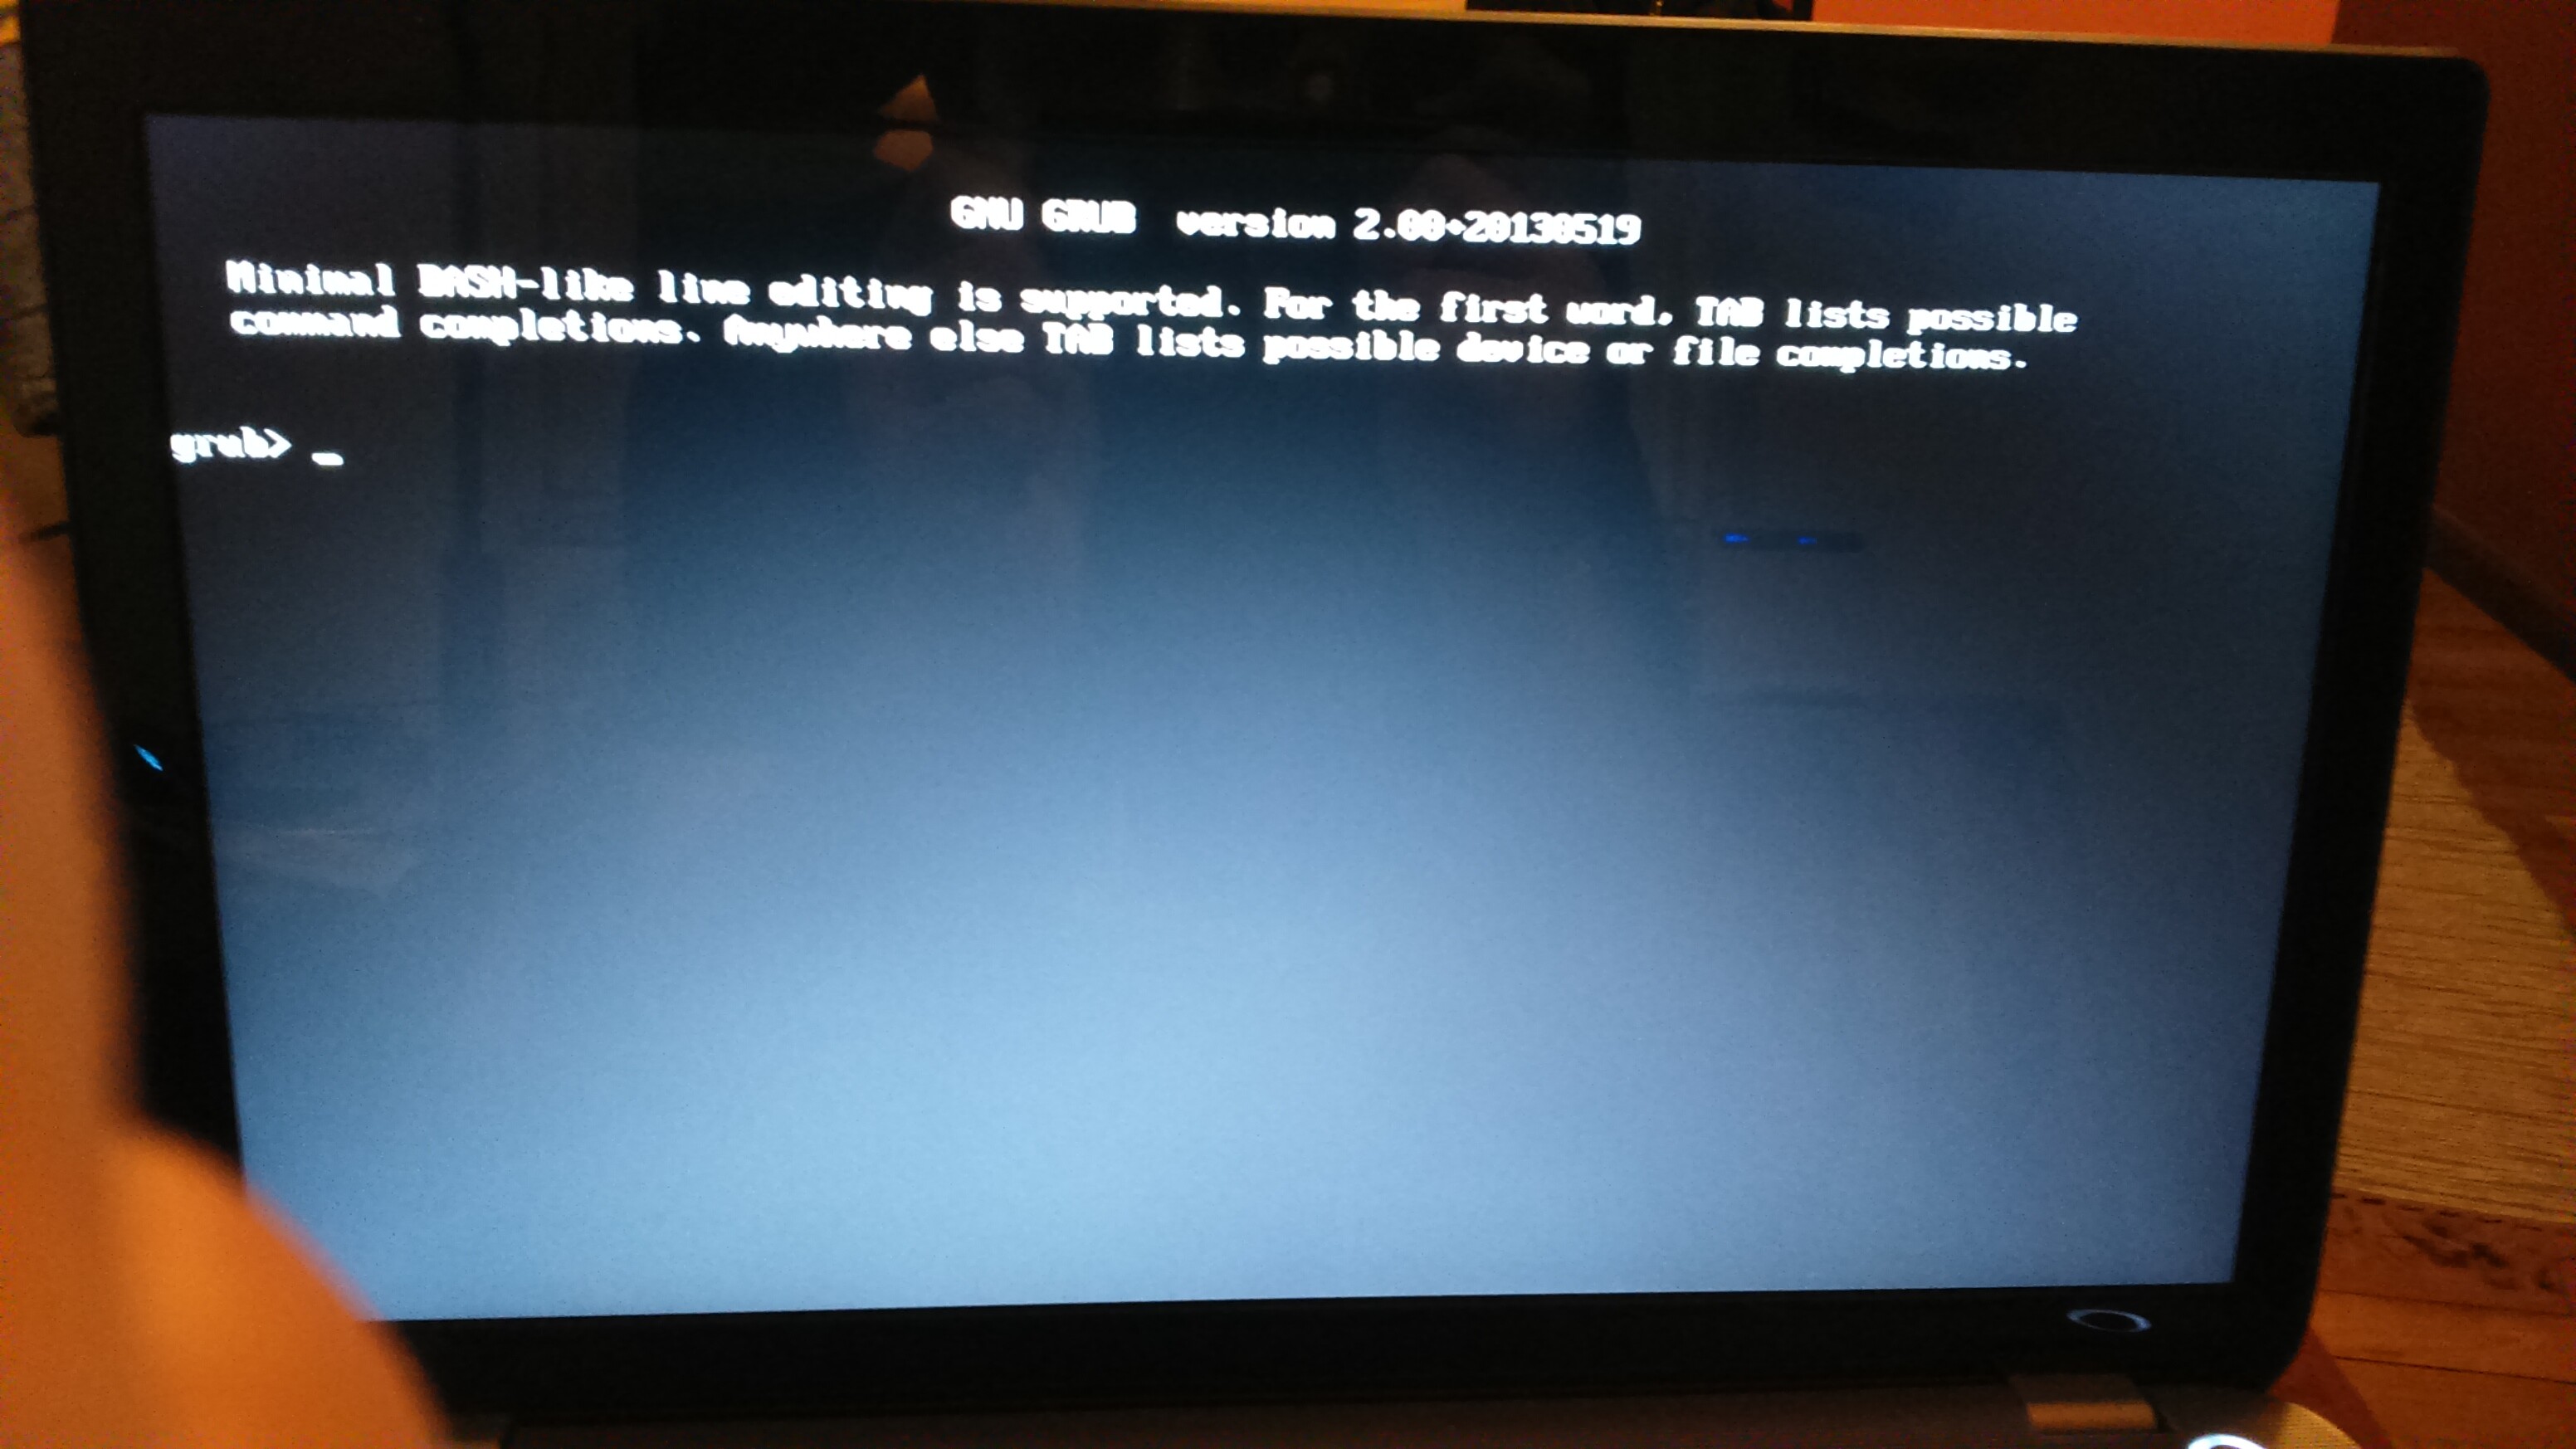
setup_var will complain about a mismatch in a GUID, but ignore it, it worked for me at least, and it will happen for everytime you use setup_var, also, _ will not be in the -_ key, grub assumes an US layout, so press Shift+? to get the _ char, also remenber to press up, so you get the last used command, its faster to use it.
Now, using the command setup_var we will change a lot of variables so we can unlock the cpu current limit, some might not be trully needed, but thats how I made it.
You can also use just setup_var 0x123 to read the variable, or setup_var 0x123 0x23 to set it to 0x23, this is just an example.
I will add a comment on what each line does, DONT coppy any text after the *
Used values/vars:
setup_var 0x25 0x00 * make sure all cores are enabled
setup_var 0x26 0x00 * overclocking lock: set to disabled
setup_var 0x27 0x00 * limit CPUID: disabled, I think this one is to limit what cpu’s might be used if you want to upgrade
setup_var 0x23 0x01 * execute disable bit : set to enabled
setup_var 0x28 0x01 * Intel Virtualization Technology : set to enabled
setup_var 0x34 0x01 * hardware prefetch : set to enabled
setup_var 0x35 0x01 * Adjacent Cache Line Prefetch : set to enabled
setup_var 0x36 0x01 * CPU AES : set to enabled
setup_var 0x37 0x02 * Boot performance mode : set to Turbo Performance
setup_var 0x38 0x01 * EIST : set to enabled
setup_var 0x39 0x01 * Turbo Mode : set to enabled
setup_var 0x5B 0x00 * Energy Performance : set to Performance
setup_var 0x2B 0x01 * Package power limit lock : set to disabled
setup_var 0x3A 0xFF * Cpu Power Limit1 : set to max
setup_var 0x3C 0xFF * Cpu Power Limit1 Time : set to max
setup_var 0x3B 0xFF * Cpu Power Limit2 : set to max
setup_var 0x68 0x00 * Platform power limit lock : set to disabled
setup_var 0x69 0xFF * Cpu Power Limit3 : set to max
setup_var 0x6A 0xFF * Cpu Power Limit3 Time : set to max
setup_var 0x6B 0x64 * Cpu Power Limit3 Duty Cycle : set to max, this is a duty cycle, 0x64 is 100 decimal, so 100% duty cycle
setup_var 0x40 0x01 * CPU C states : set to enabled
setup_var 0x53 0x01 * ACPI CTDP BIOS : set to enabled
setup_var 0x44 0x02 * Configurable TDP Level : TDP UP
setup_var 0x45 0x00 * Config TDP LOCK : set to disabled
setup_var 0x2C 0xFF * 1-Core Ratio Limit : set to max allowed by CPU
setup_var 0x2D 0xFF * 2-Core Ratio Limit : set to max allowed by CPU
setup_var 0x2E 0xFF * 3-Core Ratio Limit : set to max allowed by CPU
setup_var 0x2F 0xFF * 4-Core Ratio Limit : set to max allowed by CPU
setup_var 0x30 0x00 * VR Current value lock : set to disabled
setup_var 0x31 0xFF * VR Current value : factory this one is 0x027, this is where the bios is limiting the CPU to the maximum 39A, set it to 0xFF to a sweet max 254Amps
setup_var 0x234 0x01 * AC Brick Capacity : set to 90Watts(its the maximum), so it wont throttle down
setup_var 0xD1 0x00 * BIOS lock: set to disabled
setup_var 0xD3 0x00 * BIOS interface lock: set to disabled
setup_var 0x305 0x08 * iGPU base memory set to 256MB, I like it with more RAM, smother when using lots of browser tabs, or in Altium or Solidworks
And thats all!
Write exit to reboot, and then do a full shutdown so all the settings stick.
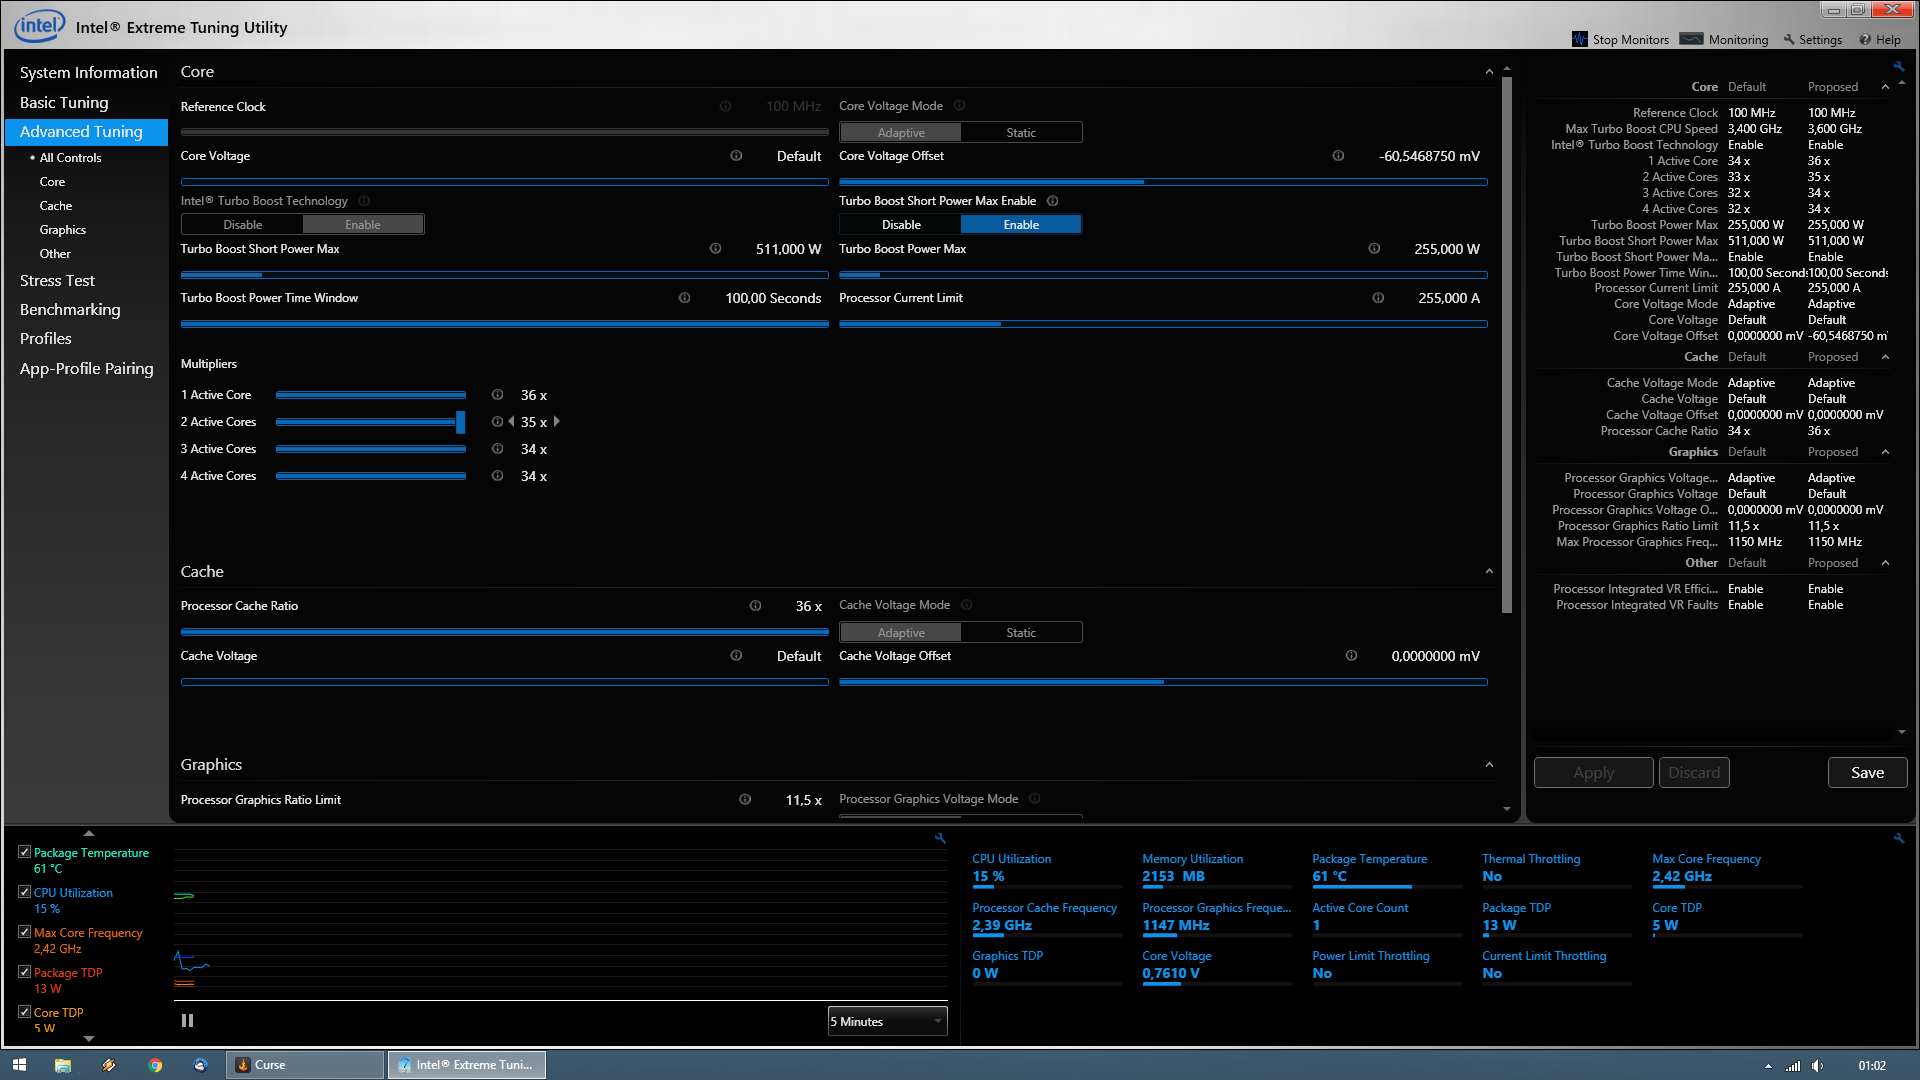
Now go grab Intel XTU, if you already have it installed, remove it, and re-install(make sure to right click and run the installer with admin rights, so it will run in background at startup and apply all your settings).
This is my XTU window, with some undervolting already done, just remenber to set the current to something over 60-70A and its fine.
DON’T forget to clean and repaste your laptop, mine will hit 80ºC with a package TDP of 50-52Watts, I have my heatsink clean, and I have repasted it with Grizzly Kryonaut, at least use Artic MX4.
Have fun.
Cinebench and HWmonitor for proof:
EDIT by Fernando: Put the used values/vars into a “spoiler” (to save place and for a better readability)