Edit button @snakeman 
Thanks for links, will make you BIOS now
10-15 second slower boot, and ME driver issue, sounds like ME FW may possibly be corrupted. Do you see ME FW version shown in BIOS, or can you see this with HWINFO64, or do you see N/A or 0.0.0.0 (If this, it’s corrupted ME FW) << Due to this question, I will wait to make BIOS until I hear your reply on this
Yes, ME FW / Driver issues can cause all kinds of things to not work properly, as for your specific 3D example I am not sure. You’ve not fully explained the issue though, what do you mean “having problems with ME driver”?
How did you put his BIOS on there? You may need to use certain ME driver package, since this is older ME FW, I am not sure. Check the ME driver thread and see what the info says about which version drivers for what FW, and or wait on hitman20’s reply about what ME Driver package he’s used.
@Lost_N_BIOS Thats was with the experimental firmware from @hitman20. I flashed the full bios with fptw -f I get no information from meinfo. I tried to install the driver with previous proper versions of the drivers, they would load but not “start” all other functions work great. I tried a 3D movies under kodi in windows never activated the glasses I thought that was strange, no matter. More interest in your version of the Bios at this point.
This board never showed the ME version in bios looking now.
Haven’t tried HWinfo looking for it now.
Meinfo results
Intel(R) MEInfo Version: 11.8.60.3561
Copyright(C) 2005 - 2018, Intel Corporation. All rights reserved.
Error 86: Communication error between application and Intel(R) ME module (FWU client)
Error 81: Internal error (Could not determine FW features information)
That doesn’t look good.
snakeman
@snakeman I have currently no Windows installed on this PC, so I can’t tell you right now. I used it also as an Hackintosh without Problems with ME. I can also try to Mod the latest BIOS and check it then with Windows if there is the same issue. First I have to find all Tools again to do it.
@Lost_N_BIOS Do you have maybe the Intel Flash Image Tool and can uload it somewhere, because I didn’t find any real Download Link for it. Thanks.
Edit: I have found the Intel Flash Image Tool again on a USB Stick from me.
@hitman20 I just tried hackintosh and it seemed ok. Having problems with Kodi under windows no 3D maybe not even related. Already moved my coffeelake proc to another board.
@hitman20 Yes, I still need the bios if you are willing to help me. I am more than willing to try it myself if you want to instruct me.
snakeman
@snakeman - Without ME Drivers installed, you can’t run MEInfo, except from DOS. Run it from DOS, and use -verbose flag (meinfodos.exe -verbose), show me image of the full output.
Do you have a flash programmer? If not, did you ever make a full BIOS backup with Qflash or AFU? If not, you’ve lost your second NVRAM volume probably, since you now flashed in hitman20’s BIOS with FPT.
FPT also often does not flash or dump second volume, so you may be able to get a copy of it still, if AFU dumps second NVRAM volume (I am not sure).
I’ll just go ahead and make you BIOS with new ME FW instead of using hitman20’s ME FW region, sounds like it’s messed up. OR!!! It may be that you need to run FPTw.exe -greset to reset the ME FW state, since you reflashed the entire BIOS and downgraded ME FW.
Please try this, then run MEInfoWin after that, if you can install drivers, if not then try from DOS. ME driver should already be installed, unless you didn’t install it previously? And, since you can use FPT in windows, this tells me you already have ME drivers installed, and the issue is ME FW is corrupted.
This can be confirmed by HWINFO64, either ME entry will be missing entirely from motherboard section (in large AIDA64 like window), or it will show version as N/A or 0.0.0.0 - You can also check with this Intel tool, it will show ME FW Version at the bottom - http://s000.tinyupload.com/index.php?fil…768052205283107
@hitman20 - ME System tools are here in section “C” - Intel Management Engine: Drivers, Firmware & System Tools
The reason this concerned me and I paused, was I was just going to extract that ME FW region as-is from the BIOS you posted, since you guys have same exact model board correct?
But, due to these ME issues, I’m worried now it’s corrupted, not a big deal there I can redo with fresh ME FW stock base.
@Lost_N_BIOS I reflashed it again with fpt same result. And, I also performed a -greset same result again. HWINFO shows 0.0.0.0.
Thanks for confirming, that 0.0.0.0 means ME FW is corrupted  It’s OK for us, I will make you fresh BIOS with newly redone ME FW (hitman20 will need this fixed too, can be reflashed via FPT or entire BIOS with fixed ME in his programmer if he wants)
Sorry, I got behind tonight trying to fix and test something on my end, so I wont have time to do this tonight. I will get it done for you first thing tomorrow.
@snakeman @Lost_N_BIOS I have tried to Mod the F12 Version for the Gigabyte Z370N WiFi but i wasn’t successfull. I used the original DOwnloaded BIOS and changed the ME Version to 11.6.27.3264 as I did for my old BIOS and Change the SKU to Intel KBH H Series Chipsent and Emulation to Intel B250 Desktop. I have flased the modded BIOS then via the SPI Flasher and when I start it, it runs for around 30 seconds and turns itself of. WHen I restart it then it utrns it off immediality. I will upload both BIOS to check what I have done wrong. I have uploaded the BIOS to https://mega.nz/#!XFkwSK4S!D2mXzSF6MFfte…pYOsIXAsQLBacn8 The Password for the ZIP is hitman20
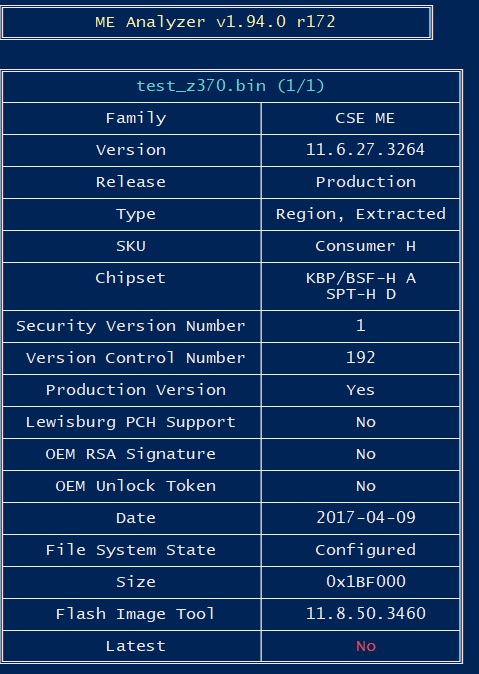
This is the Picture of the ME Analyzer.
@hitman20 - I didn’t check your BIOS, due to Mega is a pain for me to download from, but did you add in 906E9 microcode? Use MMTool on this one, or padding above ucode is removed. If yes, did you fix FIT table after that, if needed? This was not needed when I edited with MMTool, so should be OK
And, you really shouldn’t FPT or flash programmer stock BIOS, this will loose your serial, UUID and LAN MAC ID, as well as a complete NVRAM volume and 95% of your other main NVRAM volume.
If you want to use FPT, or programmer, dump your BIOS (originally on there, it would need programmed back in now, first), then modify that, then FPT or program back. Preferably if you use FPT, only use that, if you use programmer only use that.
To start over, you will need to put back some original BIOS dump you have, from the programmer, unless you FPT flashed stock BIOS before that, then all NVRAM would be lost. Serial/UUID irrelevant here, and LAN MAC ID can be fixed anytime via FPT if needed.
If you are using stock BIOS as base source, just Qflash the BIOS, no need to FPT or program anyway, and as mentioned above it’s not suggested for stock BIOS anyway due to all mentioned.
If, in Qflash, you are not offered quick or full, then you may need to DOS or windows FPT flash FD and ME Regions one by one (by themselves, follow ME region flash with -greset) This would need done with known compatible CPU installed still.
@snakeman - please test this F12 before I make the other older one you wanted. Leave in older/compatible CPU until you are done.
Flash via Qflash, if you are not asked in Qflash if you want Full or Quick (Choose Full if asked), then you will need to follow up with FPT flashes as noted below (use included files as source = filename.bin, these are extracted from the whole BIOS = same/same, just safer to feed FPT this way)
FPTw.exe -desc -f FD.bin
FPTw.exe -me -f ME.bin
FPTw.exe -greset
To ANYONE considering using this BIOS, this BIOS is STOCK modified BIOS, do not flash this with FPT or flash programmer, flash it only via Qflash (FPT or programmer flash of FD or ME is OK)
http://s000.tinyupload.com/index.php?fil…325382903565570
B250 SKU is used to make it Kaby Compatible, Z170 SKU may be possible to use too, I’m not 100% sure, only going on what @dsanke told us to use back first time we did this mod
@Lost_N_BIOS Downloading now… I had two choices Quick or Intact! I choose Intact, flashing now.
@hitman20 here are my results with F12 provided by Lost_N_BIOS
Installed i5 7500 booted up fine
Windows10: booted fine ME drivers are loaded 
Ubuntu 18.04.x: slow booting acting weird but I knew this with F12
Hackxxxxxh: did not boot also not surprised
meinfowin64 results:
Intel(R) ME code versions:
BIOS Version F12
MEBx Version 0.0.0.0000
GbE Version 0.2
Vendor ID 8086
PCH Version 0
FW Version 11.6.27.3264 H
Security Version (SVN) 1
LMS Version Not Available
MEI Driver Version 11.7.0.1040
Wireless Hardware Version Not Available
Wireless Driver Version Not Available
FW Capabilities 0x31101140
Intel(R) Capability Licensing Service - PRESENT/ENABLED
Protect Audio Video Path - PRESENT/ENABLED
Intel(R) Dynamic Application Loader - PRESENT/ENABLED
Intel(R) Platform Trust Technology - PRESENT/DISABLED
Re-key needed False
Platform is re-key capable True
TLS Disabled
Last ME reset reason Global system reset
Local FWUpdate Enabled
BIOS Config Lock Enabled
GbE Config Lock Enabled
Host Read Access to ME Enabled
Host Write Access to ME Enabled
Host Read Access to EC Enabled
Host Write Access to EC Enabled
SPI Flash ID 1 C22018
SPI Flash ID 2 Unknown
BIOS boot State Post Boot
OEM ID 00000000-0000-0000-0000-000000000000
Capability Licensing Service Enabled
OEM Tag 0x00000000
Slot 1 Board Manufacturer 0x00000000
Slot 2 System Assembler 0x00000000
Slot 3 Reserved 0x00000000
M3 Autotest Disabled
C-link Status Disabled
Independent Firmware Recovery Disabled
EPID Group ID 0x1033
LSPCON Ports None
5K Ports None
OEM Public Key Hash FPF Not set
OEM Public Key Hash ME 0000000000000000000000000000000000000000000000000000000000000000
ACM SVN FPF 0x0
KM SVN FPF 0x0
BSMM SVN FPF 0x0
GuC Encryption Key FPF Not set
GuC Encryption Key ME 0000000000000000000000000000000000000000000000000000000000000000
FPF ME
— –
Force Boot Guard ACM Not set Disabled
Protect BIOS Environment Not set Disabled
CPU Debugging Not set Enabled
BSP Initialization Not set Enabled
Measured Boot Not set Disabled
Verified Boot Not set Disabled
Key Manifest ID Not set 0x0
Enforcement Policy Not set 0x0
PTT Not set Enabled
EK Revoke State Not Revoked
PTT RTC Clear Detection FPF Not set
@snakeman - If you need hackintosh mod I can do that too, sorry I didn’t know you needed that done or I would have done already. Thanks for quick testing and report back [check] Now, we know this ME FW region is good, it can be extracted and use in F5 too now.
Good you had “Intact” option, that would be same as “Full”, some BIOS don’t have it, and some models never offer it. Like maybe F5 wont have it, it’s OK in those cases though, just do as I mentioned with FPT if you run into that kind of situation
So, you now need F5 = same as above (+ new F12) both with CFG-Lock >> Disable << This is the main issue with hackintosh I believe, always Enabled by default
This may take an edit or two, before I know which method your BIOS is using to pull setting from. Please pick some obvious setting you know you can tell if it’s enabled or disabled no matter what the BIOS option looks to be set on.
Then I will send you two BIOS to test this changed from default. Default can be enabled or disabled, doesn’t matter, I will just change this in two ways and both may be visible changes in BIOS, but only one way may actually perform the change (and that is key, so make it some setting you can tell enabled or disabled, without touching the setting)
Maybe LED’s, change from default static to something else like Pulse or OFF? << Lets do this one, to Off, if that OK as a test for you?
You know XD/NX//Execute Bit Disable (Set enabled), and VT-d, Secure Boot and possible others needs disabled correct for Hackinstosh. I assume you know, but mention in case maybe you forgot one of those
@Lost_N_BIOS Yes, I sometimes use Hack looks like the F12 bios supports the 9th Generation processors such as i9 9900k activates RTC which s not important to my i5 7500 processor sorry for the confusion. I found this information in a forum. https://www.tonymacx86.com/threads/succe…51#post-1934546 POST #507
Are talking the same thing here as CFG-LOCK?
@snakeman - please see my edits above, I was editing as you replied. CPU Gen means nothing to me, you must mention some model, and then a question about it. Sorry, I don’t know what you are asking or saying there in regards to CPU.
Yes, what you linked is the standard mod I mentioned above CFG Lock, needs disabled for Hackintosh.
As for the other one, I’ve never heard of that needing changed, nor ever heard it mentioned by anyone in regards to anything, but if that is something you need changed we can change that too.
He’s changing it from Default >> ACPI Time and Alarm Device >> To >> Legacy RTC
@Lost_N_Bios sorry for the confusion. If it can be done in the bios that would be great. "changing it from Default >> ACPI Time and Alarm Device >> To >> Legacy RTC".
Thanks for all the help.
snakeman
Sorry, I don’t know what RTC is, if this is some BIOS setting then I can probably enable that for you too (on any BIOS) Unless you mean Real Time Clock?
If yes, that’s probably same thing as discussed above, this wouldn’t be something that changes due to CPU or CPU gen, it’s just a BIOS setting
Yes, OK, I will make you new F12 with CFG Lock disabled and Legacy RTC set & F5 same way.
You’re welcome!
But, first, we need to do as I mentioned above, with some single setting, so I can see which area the BIOS is using settings from. Are you OK with the test I mentioned, does that sound like an ideal way for us to test what I need to know I mean?
I send you two BIOS to test, both with LED’s, change from default static to OFF? Then, you tell me which BIOS I sent you has the LED’s OFF. Then I know where to change these two settings we need to change default of for Hackinstosh.
This is required on my end because the BIOS settings are stored in 3 locations, and only one is used by BIOS as a main setting source, but it’s different for every BIOS what this main default source is (Setup, AMITSE/SetupData (What AMIBCP Changes), or NVRAM)
I will be making two BIOS for this test, one with setup change, other with what AMIBCP Changes, NVRAM isn’t usually the source for this kind of setting change but it will get auto-updated with a copy of the used setting values as they change every time you change something.
I have to leave now though, so I will make these BIOS for you tonight and we’ll proceed from there once I get report back from you on which disables the LED.
Then two BIOS will be made without further testing needed, all will be done.