@ all Intel RAID0 users:
Optimized SSD Performance - Advices for Intel RAID0 Users
If you want to get the best performance and benchmark scores with your SSD RAID0 system, you should do the following:
-
Update the SSD Firmware
- Check the websites of your SSD manufacturer for a newer/better Firmware.
- If such Firmware is a available, flash it.
-
Optimize the BIOS and its Intel RAID modules:
- Make sure, that your system is using the latest/best BIOS version.
- If you want to improve the performance of your system, you should set the “CPU C-Status Support” (the specific name may be different) to “Disabled”. You can find this option within the “Advanced” > “CPU Configuration” section of the BIOS.
Here is the related picture:
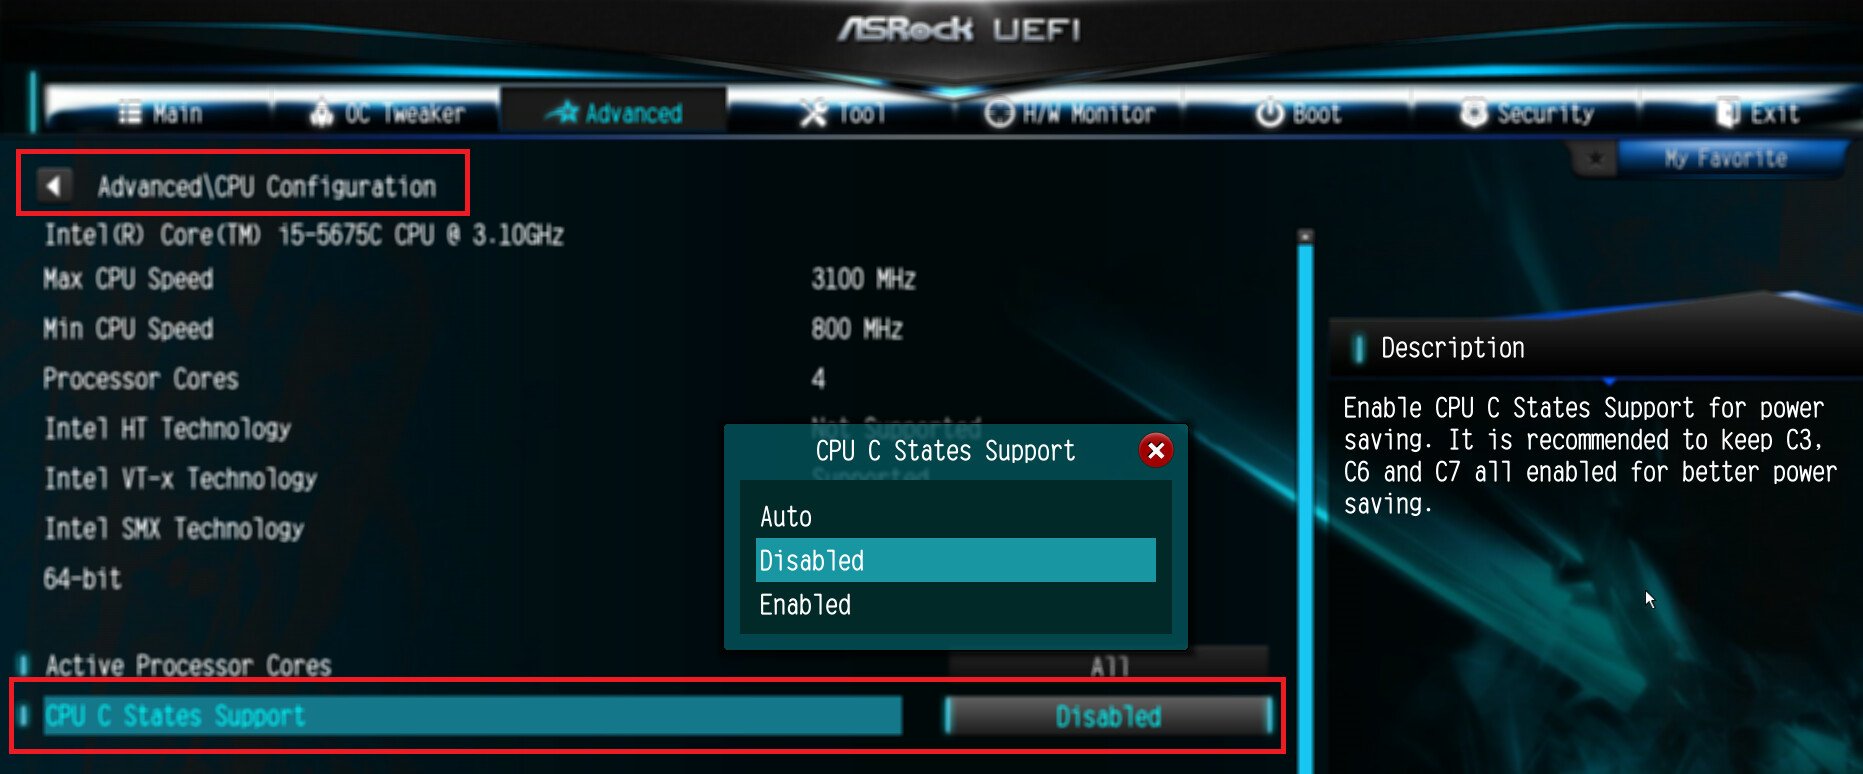
Disadvantage of a long-term usage of this BIOS setting: Your CPU resp. your system will consume more electrical energy. - If the mainboard BIOS should contain Intel RAID ROM/EFI module versions, which are not the best basis for a top-performing RAID0 system, update/downgrade them and reflash the modified BIOS (you do it at own risk!).
-
Clean the (desired) RAID0 member SSDs
- Unless you start with brandnew SSDs, I recommend to do a “Secure Erasure” of the SSDs, which you want to use as RAID0 array members. You can use either the specific SSD tool offered by the manufacturer of the SSDs (look >here<) or a universally usable tool like “Parted Magic” (not recommended for M.2 PCIe SSDs!).
- Since the “Secure Erase” procedure will delete all data incl. the partition table with the RAID informations, you may have to (re)create the RAID0 array thereafter.
-
Optional: (Re-)Create the RAID0 array:
- Run the Intel Rapid Storage Technology RAID Utility (via CTRL+I or from within the UEFI BIOS) and check the status of the (future) RAID0 members.
- If there is already an existing RAID array and you want to change anything (e.g. the RAID sort or the stripe size) you should delete the existing RAID array (all data will e lost) and create a new RAID9 array with the desired settings.
- Choose the optimal stripe size: If you want the best possible performance regarding your daily work, I recommend to choose a stripe size of 32 KB or 64 KB (depending on the size of the data files you are mainly processing). For the best sequential READ/WRITE scores you may use a stripe sitze of 64 KB or 128 KB.
-
Do a fresh OS installation:
- Use an original or correctly updated/customized OS image as source. I do not recommend to transfer/clone an already previously existing system partion.
- Take care of the correct partition alignment! Let the Win7/8/10 Setup do the job or use the “diskpart” commands manually.
-
Optimize the OS configuration:
- Once the OS is up and running, open the Device Manager and look for missing drivers.
- Install the missing drivers and update/optimize the most important other ones (Intel RST, Intel MEI etc.).
- Update your Windows.
- Disable all unneeded Windows Services incl. the Superfetch and Indexing ones.
- When you install any applications, which are permanently running in the background (like Antivirus software), choose a product, which has just a very moderate impact on the system performance.
-
Make sure, that the OS has detected your SSD(s) as “Solid State Drives”:
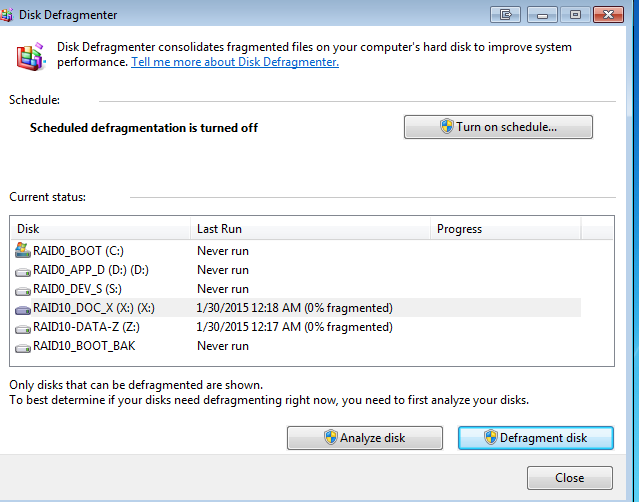
- Call up (don’t execute!) the “Defrag Tool” (Win7) resp. the “Optimizer” (Win8/8.1) and look, if the SSD(s) of your system is/are listed as “Solid State Drive” and not as “Hard Disk Drive”.
- If the SSDs should be listed as “Hard Disk Drive” by mistake, run the “Windows Experience Index” (Win7) or the command “WinSAT diskformal” (Win8/10). This will force the SSD detection.
-
Enable the Device Manager Write Caching options:
- Open the Device Manager.
- Open the section “Disks”.
- Right click onto the listed RAID0 device and choose the Option “Properties”.
- Hit the tab “Policies”.
- Enable both options as shown here:
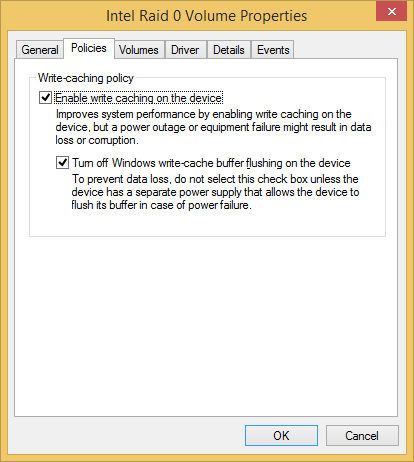
Warning: Turning off the write-cache buffer flushing (second option) may cause a data loss in case of a power interruption or unexspected reboot. - Hit “OK”.
Attention:
Due to a Win7 bug regarding the “Policies” settings of the disks within the Device Manager it may be needed to uncheck both options, then to reboot and to check them again. Otherwise you may get vice versa effects.
-
Do some performance boost settings from within the Intel RST Console.
This requires the installation of the Intel(R) Rapid Storage Technology (RST) Console Software (only once, because the settings will stay untouched even when the RST Software will be uninstalled or the RST/RST(e) drivers will be changed later).
Do the following:- Run the Intel(R) Rapid Storage Technology Console Software.
- Hit the “Manage” tab and double click onto “Advanced”.
- Enable the “Cache Mode” option “Write-Back”. It should look like this:
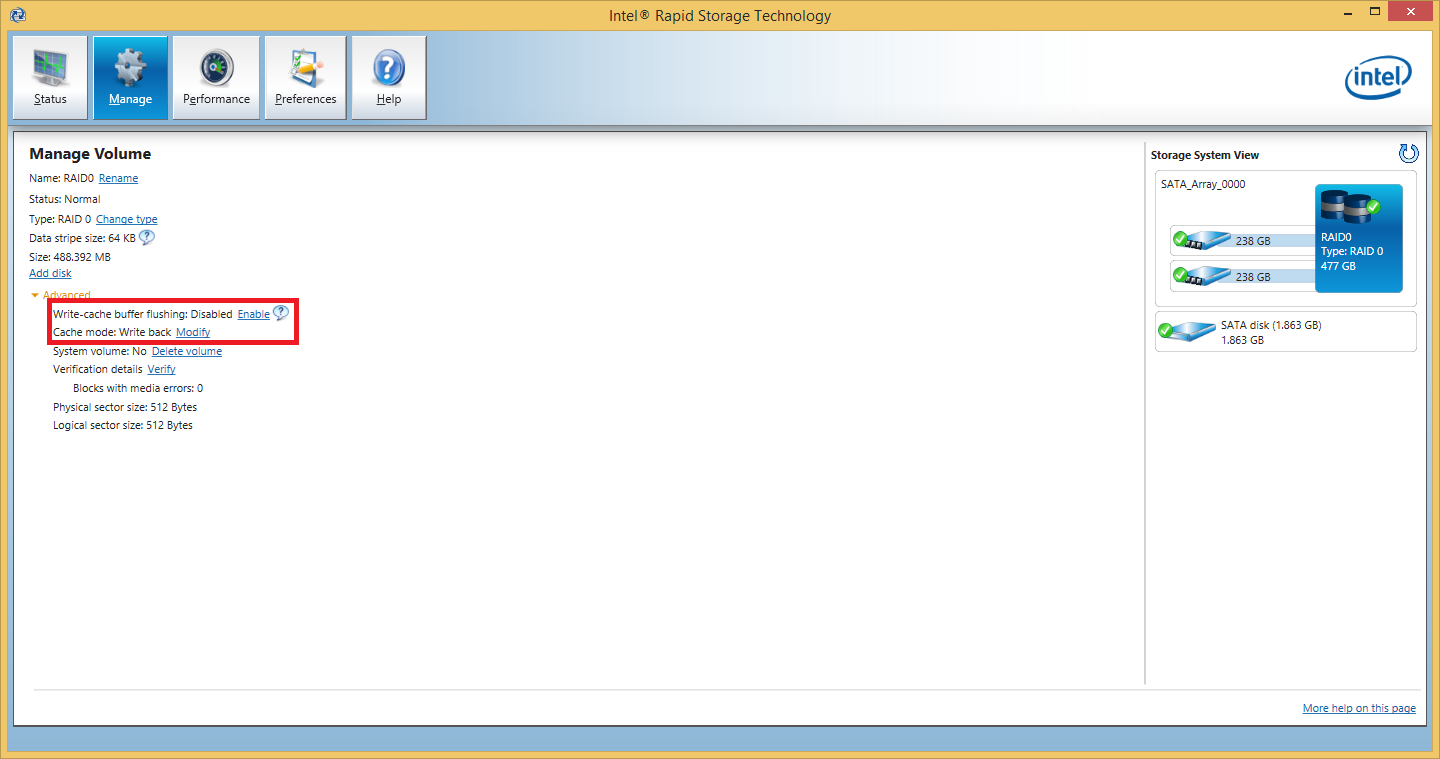
- If the RST Console shows a "Performance" tab (depends on the RST Software version), hit it and check the option "Dynamic Storage Accelerator" on the left side.
- Set the "Dynamic Storage Accelerator" to "Enabled". It should look like this:
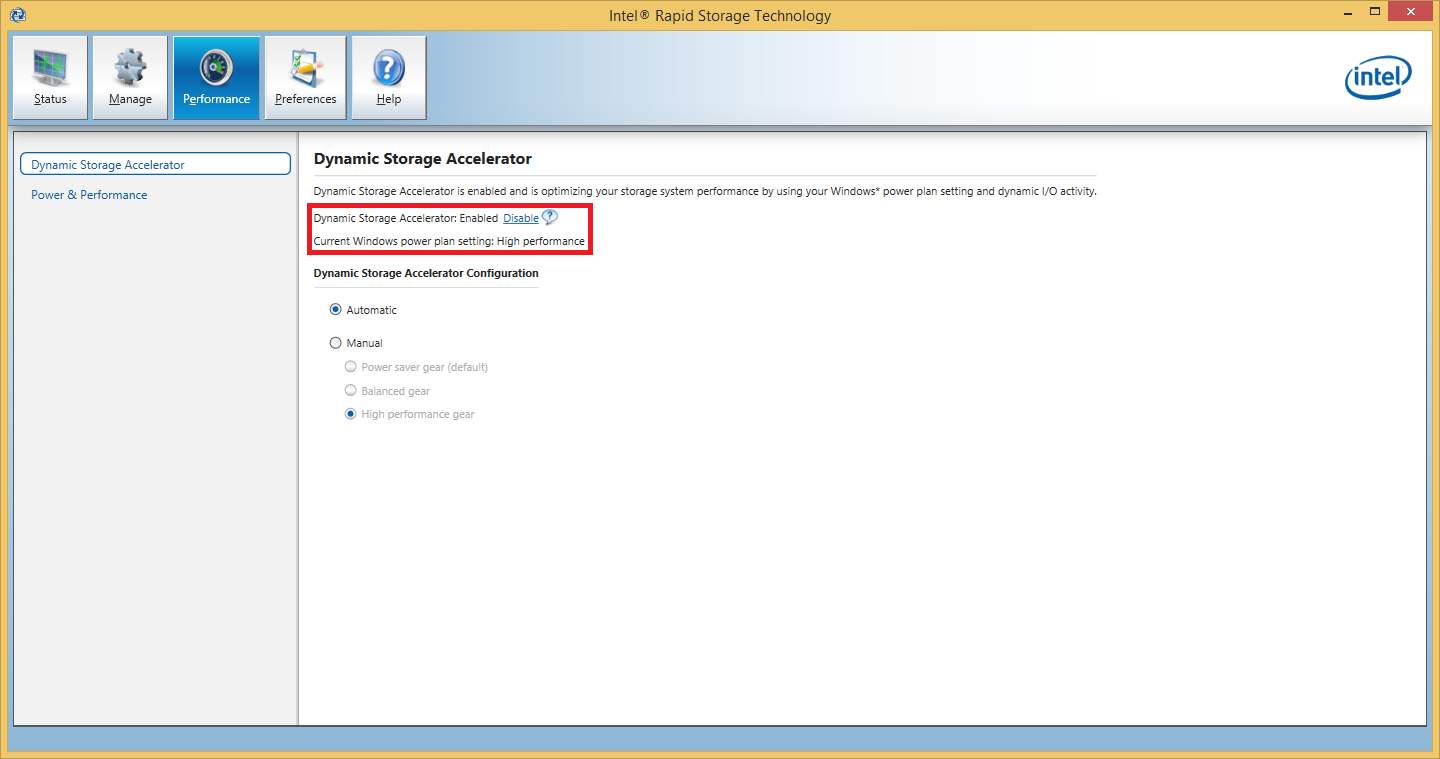
- Choose the option "Power and Performance" on the left side.
- Set the "Link Power Management" to "Disabled". This is what you will get:
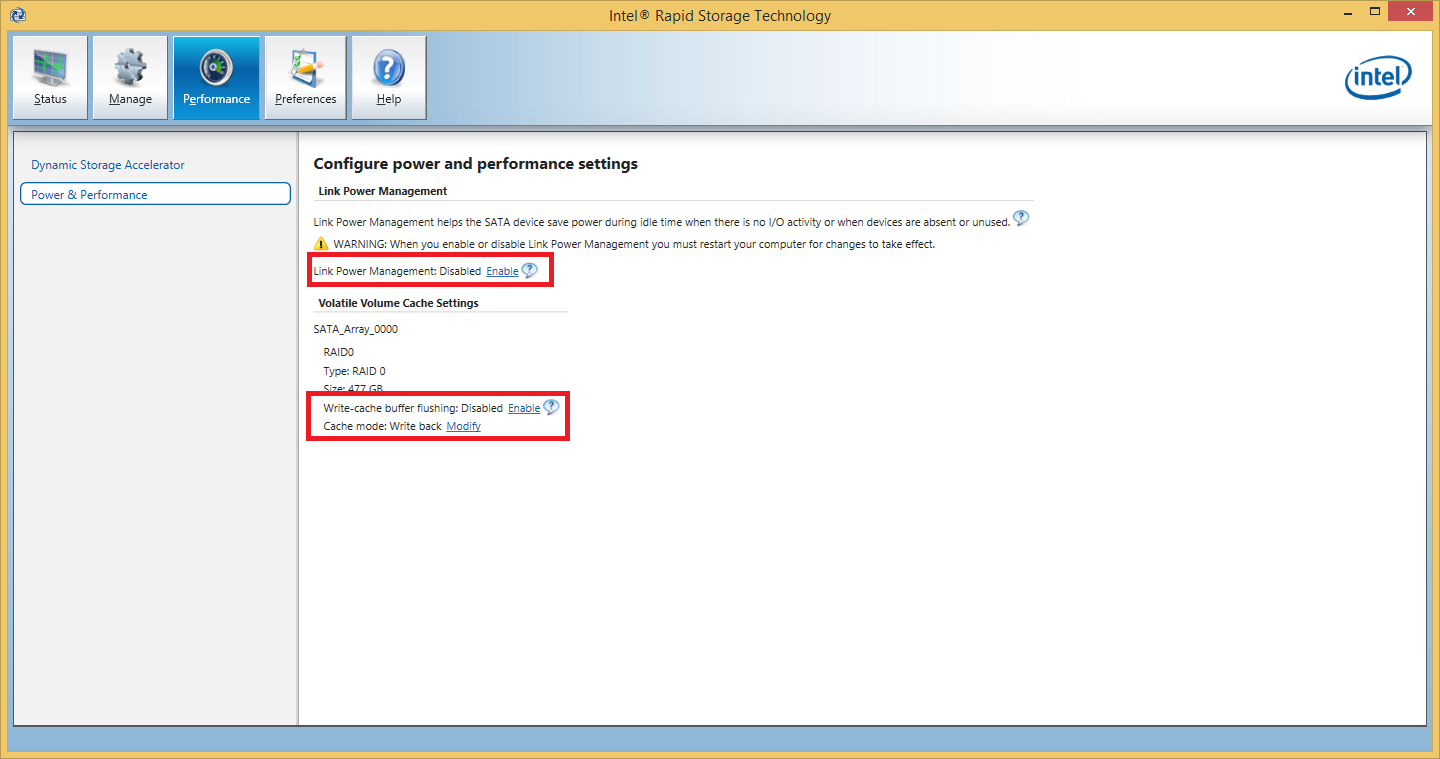
By the way: You may get the same effect, if you enter the BIOS, go to the “Storage Configuration” settings and disable the “SATA Aggressive Link Power Management”. - Close the Intel RST Console (and uninstall the RST Software, if you want to, the previously done settings will stay active).
-
Optimize the “Energy Options” of the OS (only reasonable, when the user wants the best read performance):
- Open the Control Panel.
- Hit the section “Energy Options”.
- Choose the option “High Performance”.
Here is the related picture:
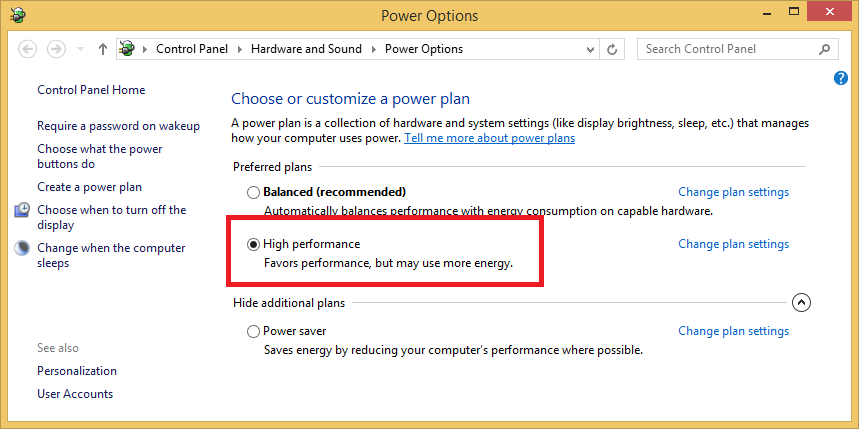
Disadvantage of a long-term usage of the “High Performance” option: Your system will consume more electrical energy. - Close the Control Panel.
-
Minimize the background processes:
- Uninstall not essentially needed programs (like the Intel RST Software) or disable their Services.
- Run the Task Manager and hit the tab "Startup"
- Set all unneeded programs to “Disabled”. Look here:
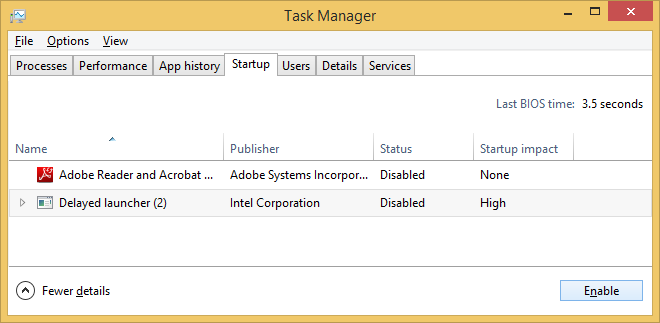
-
Clean your SSD(s)
- Empty the Recycle Bin.
- Send TRIM commands into the SSD(s), provided that TRIM is supported by your RAID system.
This can be done by- a) the special tool, which is provided by the SSD manufacturer (e.g. Intel SSD Toolbox),
- b) the Win8/8.1 "Optimizer" (former Defrag Tool, for details and restrictions please read >this< thread.) or
- c) the "TRIM triggering" option of "Anvil's Storage Utilities".
Have fun!
Fernando
