Hi mates, I need your help because I want to update the CPU microcode for the ASUS M5A88-V EVO, it´s BIOS is an AMI BIOS (non-UEFI BIOS) and its lastest version is 1801 from 2013, I’ve updated the LAN, AHCI and RAID ROMs without problems, but I don’t kmow how to update the CPU microcode.
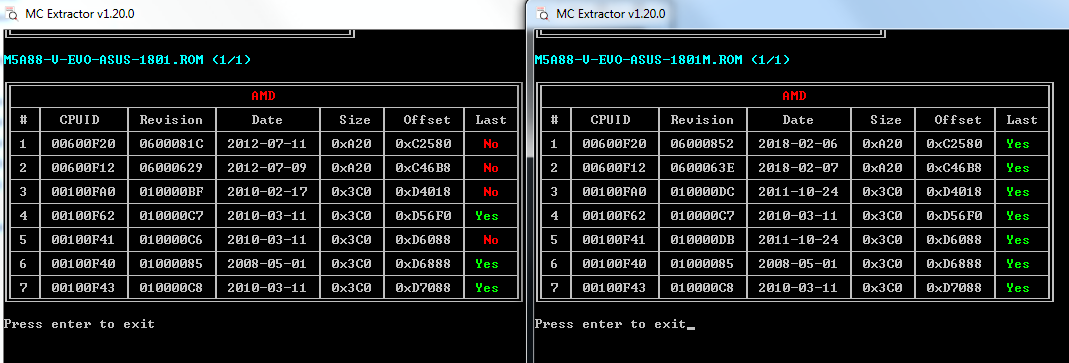
I know which are the microcodes that I’ve to update (mc extractor tool used) but I don’t know how to do it, because there isn’t a tutorial for AMD AMI non-UEFI bios, can you help me people???
Thank you so much, kind regards.
@RaskaipikaFWR -
Here’s an excellent tutorial on CPU microcode updating/modding using the non-UEFI AMI BIOS MMtool … http://wp.xin.at/archives/tag/microdecode 
I agree, we need a guide for AMD microcode updating UEFI and Non-UEFI Same! Even a short guide on how AMD microcodes are named vs what’s detected in a BIOS by MC Extrator vs available microcodes on the github repository would be helpful too!
I can edit manually by hex, or MMTool hex combo but I guide on the actual codes would be great to find.
Sometimes I compare CPUID of known compatible CPU per motherboard QVL List vs BIOS and what’s shown as included microcodes by MC Extractor and the names look nothing alike, and nothing like what is shown at repository.
Sometimes I even see all names look similar, but for example (made up) CPUID is 000F25. I know this CPU is compatible, QVL says so, check BIOS many similar microcodes shown in recognizable name style but only 000F24 and 000F26 along with many others is listed by MC Extractor but 000F25 missing.
When that happens, how is CPUID 000F25 compatible? AMD microcode is very confusing due to this, I can edit and update, but a guide on all that would be a great!
@RaskaipikaFWR - attached is modified 1801 BIOS - Microcodes update only (All done via hex insertion manually)
Asus M5A88-V-EVO-1801-Mod.zip (2.02 MB)
@Lot Lost_N_BIOS, how did you do it???, because yesterday, I tried to make the same (Hex insertion) and NO SUCCESS, I like do the things by myself, to learn mainly, and of course, thanks, I will try it in few time and I will comment about the result.
@Lost_N_BIOS I’ve tested your BIOS and the result is the same, EZ 2 Flash says: “The BIOS is corrupted or damaged”, at this point, I don’t know what I can do to make the update, umm.
I just saw your comment about integrity check, you may get that when trying to flash this too, not sure?
I used HxD too, copy all on each old code, then search via hex byte on BIOS using “Find All” so it highlights the entire old code, then open new code copy all and back to BIOS right click on highlighted old code and hit paste.
You may need to use one of the methods outlined in these threads to flash modified BIOS
[Guide] How to flash a modded AMI UEFI BIOS
[Guide] Flashing modified AMI Aptio UEFI using AFU
Thanks but is not possible, becaus ethose guides are for AMI UEFI BIOS, no for NON-UEFI BIOS like mine, this is the problem, and yes, I’ve used the same method like you. Now I’m extracting the "User defined" components of the BIOS to looking for the hex values of the microcodes, I hope a few of luck.
Edited out old post, I thought you said BIOS was not AMI 

So what, AFU does not work for this BIOS, probably only due to those are new versions? Here, attached is 3x AFU ES versions and 1x older AFU for your specific AMI BIOS type (BIOS8).
With the ES versions, use /GAN as last switch, but try the BIOS8 version first (/GAN may or may not work on the BIOS8 version, but you can try)
AFUDOS BIOSFilename.bin /P /B /K /GAN
No matter what you do, make a backup first before flashing, so later you can modify back in your board’s serial number, UUID and DTS key, along with LAN MAC address too.
AFUDOS biosbackup.bin /O
AFU.zip (294 KB)
@Lost_N_BIOS , I’ve made a little progress, I’ve found that in the E2 Dynamic Module, there are the Microcodes Updates, I’m using MMTool v3.26, I’ve extracted that module (E2) and I’ve made a hex edit, then, I’ve replaced the module in MMTool and then save ROM BIOS.
I’ve been able to flash the BIOS, but when the process finish, the ASUS Crashfree BIOS 3 program popups in the screen, the BIOS isn’t good but I think that I’m in the right way, maybe, I’ve to edit other thing or reference for the new microcode too, I don’t know.
Good find, and thanks for posting info, I will look at that way next too for you.
I also came back here to say I think I found issue with hex method way we did originally, I’m checking something now and changing, will post back with info and new BIOS to try in a few
I’ve made another discover, maybe and only maybe, the problem is the way that the program replace the module, because, I’ve extracted again the E2 module and without edit it, I’ve replace the module in the BIOS and the result is the same, the CrashFree BIOS 3 program popups in the screen when the update finish.
I’ve made a screenshot to see the changes made by the program, and the results are here:
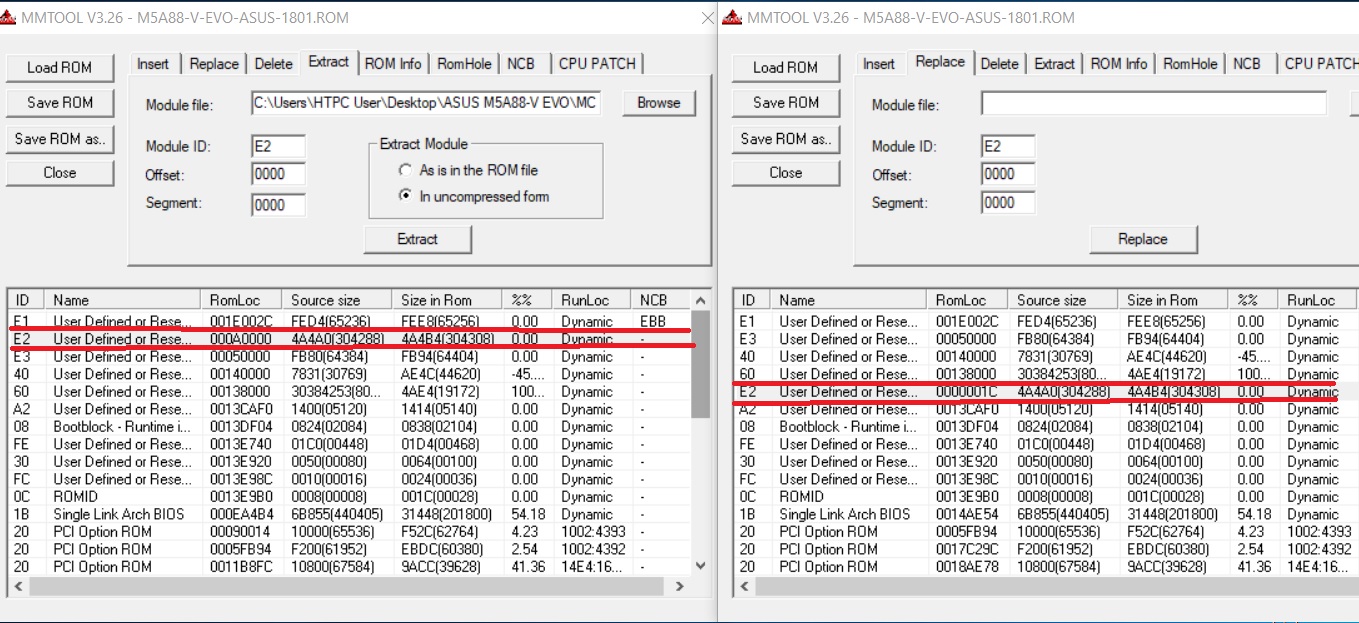
The program changes the “RomLoc” field, at this moment, the E2 module isn’t the second in the list, is the fifth or sixth in the list, the size of the module and its size in the ROM are the same, but like I said above, its “Romloc” is different.
Other test that I’ve made, is replace the AHCI option ROM, and here the situation changes, the RomLoc is the same but the sizes (rom’s size itself and its size in the BIOS) are different, it’s logical because I’m replacing the original version with and updated version.
Good catch, your eyes are open! I thought I had my eye on something in hex, but no luck. I’m now looking at this method you are using too, and comparing before/after insertions.
I think finding the right MMTool is key, I have many version so plan to send you several files to try once I check a few versions out to see which differ and how compared to the original BOS.
Keep in mind, when thinking of size changes, all the microcode updates are same size as the old ones, so I don’t think anything should change in size.
3.12 same change, E2 is moved to location 5
3.19 “” ""
3.22 “” ""
All same! I tried adding location in the offset and segment, both then give vendor ID error or something like that.
I think I got it! Try attached file now @RaskaipikaFWR
I found AMITool always gave error when that E2 module moved, error was unable to extract 1B module (which is single link arch BIOS). So I did mod via hex, hex editing in the modified E2 file, then extracted 1B Single Link Arch BIOS from original and replaced in modified BIOS with MMTool.
I was using MMTool 3.22 then, but I don’t think it matters. Key here was replacing ED module via hex overwrite, then copy in 1B via MMTool from original BIOS into edited BIOS. At least I think that may be the key, if it only flashes properly, no errors and no E2 move though when doing this!
m5a88-v-evo-asus-1801m4.zip (1020 KB)
Unfortunately, this doesn’t work too, again CFB3 popups, but ey, I will find the method to update the microcodes, I hope.
Damn! I will keep on this with you, hopefully we can eventually solve this! There is a way, we just have to find it ![]()
How about this one, corrected a single bit checksum (if works will give tool) Too bad AMITool does not work like PhoenixTool, and allow you to edit modules before/during it’s work, then we could use it in that manner but ignore or uncheck all SLIC settings.
I found this in AMITool PDF, probably some of the source of our issues
Looking into using these options without that tool, so we aren’t messing with SLIC and can still do the microcode updates.
m5.zip (1020 KB)
@Lost_N_BIOS :
No luck mate, corrupted or damaged file,  , but you’re the man mate, thanks for your help.
We’ll get there… Hopefully!
Here is “Test” This BIOS has fake SLIC inserted, but ONLY for testing purposes, to see if this tool allows proper microcode mods while doing the SLIC stuff. I wish you could disable that in the AMITool like PhoenixTool, but you can’t.
So windows activation may be messed up for you if this is working, but it’s only for a test, don’t use it as daily BIOS.
TrySLICToolMethod.zip (1020 KB)
I will try it right now, in a few minutes I tell you if this works or not, thanks again.
EDIT: Sadly, again doesn’t work, but I will continue investigating about the problem, thanks for your help.
One more thing, I’ve been able to flash the BIOS but again, CFB3 program popups one time the flashing is done.
This post might help? It’s about EUFI BIOS, but same modules were editing and they mention warning to not remove that module (So only hex edit in place, which we both originally tried).
Need help to update Microcode for FX-8350 on AMD 990FX-Board
But we can’t “Rebuild” via EUFITool and I bet that’s our only problem. Maybe @Phoenix48 could offer some advice on this?
@Lost_N_BIOS I’ve been reading the last days many threads in this web to find a solution to my problem but without a satisfactory result, and I’ve read too the thread which you make mention. BTW, and I’ve tried too to insert an SLIC 2.1 to fix the E2 module (editing directly the BIOS file or ectracting/editing/reinserting) and the problem is “new”.
With new I want to say that there isn’t a tool to resolve this problem, I think that I’ve to test the VMWare driver method, at least, is the S.O. who manage the microcodes. but at this time too, there is not info about the instructions for an AMD processor.
Kind regards.
@RaskaipikaFWR - It’s a tough one! I just edited another different non-UEFI AMI BIOS (BIOS8 type too) like this one and it modified fine I think.
One last test for you, method I found somewhere. Instead of replacing module, you delete E2 first, then insert modified E2, it autocorrects itself to underneath that critical 1B module (Single Link arch BIOS)
I think moving anything above the 1B module is what was causing issues, if this works. I used MMTool 3.12 this time, but I think any 3.xx works for these BIOS types
Fingers crossed for one last test, let me know!
1801new5.zip (1020 KB)