Hello everyone,
I’m looking into updating my laptop’s oROMs to the latest possible once and for all (since those Sandy Bridge era stuff are no longer updated). The last BIOS available includes:
1) Intel ME: v7.0.4.1197
2) Intel vBIOS: v2117
3) CPU Microcode: 06A7 Rev 12
4) AHCI ???
1) Updated via Windows to v7.1.60.1193 as provided in this forum. If ME is responsible for power management etc, do I need to edit any settings at the ROM file with FITC according to my stock ME and reflash it or is there no actual difference?
2) To my knowledge the latest Intel vBIOS is v2170 (Mobile). Before inserting in the BIOS, do I have to change settings according to my stock ROM with Intel BMP Tool? Does the ROM include the specific manufacturer DEV ID?
3) To my knowledge the latest microcode is rev 29. Can I update this with UBU or do they differ between laptop and desktop platforms?
4) The HM65 does not suppot RAID, only AHCI. Usually to update the AHCI, you need to update the RAID ROM. However, if there is no RAID support, how can you update to the latest AHCI version?
@ plutomaniac:
Welcome at Win-RAID Forum!
Since the Intel ME Interface is controlled by a special Firmware and not by an Option ROM module, you have to flash the ME Firmware separately and not by modifying the BIOS. Please look into the start post of >this< thread.
No.
You should extract the Intel VGA ROM module of your currently running BIOS, open it with a hex editor and compare the DeviceID hex code with the Intel VGA ROM module you want to insert. If there should be a difference regarding the DeviceID, you may have to change the hex code of the newer VGA ROM file.
The UBU tool doesn’t support the BIOS modding for laptops.
Generally I do not recommend toi update the CPU Microcode of mobile systems.
Since your system doesn’t support RAID and Intel 6-Series chipsets don’t need an Intel AHCI ROM module, there is nothing to do for you regarding the Intel AHCI/RAID ROM modules.
Regards
Fernando
Thank you for the fast reply Fernando. ![]()
I know that. I already updated to v7.1.60.1193 via Windows some time ago. I was wondering whether the OEM’s actually change anything from the "stock" Intel firmware that they are provided. Meaning specific laptop alterations etc.
I have DEV_116 which is HD 3000 and both roms (stock and 2170) and a hex editor, at what address can I find the Device ID?
AFAIK the OEM Companies do not modify the Intel ME Firmware.
EDIT: This is obviously not correct. Please read the next post written by lordkag.
Here is the location you should look at:
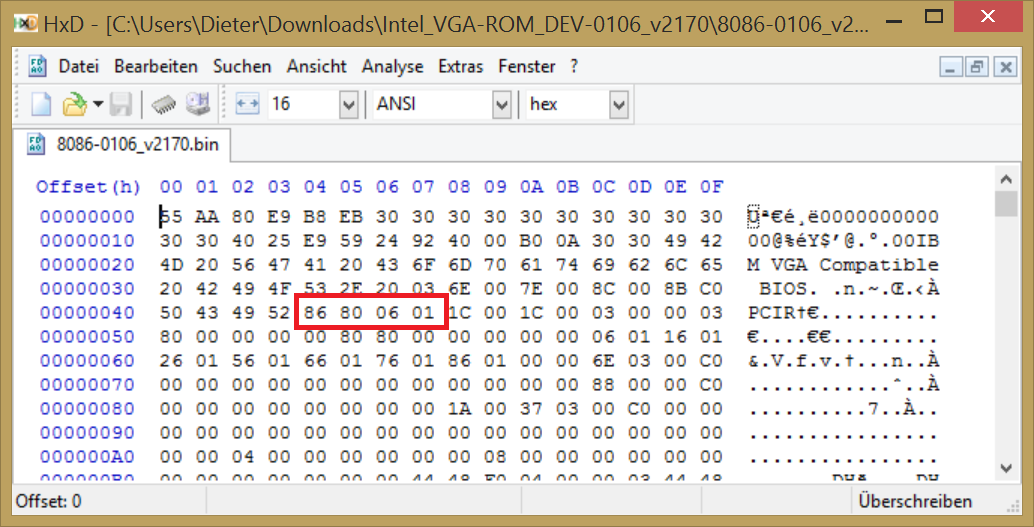
The "86 80" means the VendorID of Intel (it is VEN_8086) and the "06 01" in my example means the DeviceID of the Intel Graphics Controller (in my example case it is DEV_0106).
Since the OEM manufacturers often use other DeviceID numbers, when they insert the related Option ROM module, I recommend to open both Intel VGA ROM modules (the stock one and the one you want to insert) and compare the characters/numbers of the DeviceID at the red marked location. If they should be the same, you can insert the new Option ROM without any problem.
I checked 4 different files (2117 clevo, 2170 intel, 2119 clevo, 2119 intel) and all of them had the same DEV_ID of 0106 so it seems there is no difference there. Basically I was trying to find the SUBSYS so that I could replace it with my own so that I won’t have some other OEM’s. My SUBSYS is 25 50 15 58 so after applying little endian it should be 58 15 50 25. It seems though that all vbios report 0106 despite showing a different DEV_ID inside windows (in my case 0116). So how are these defined then? If I understand properly, if I flash intel’s v2170, it should still report my own DEV_ID and SUBSYS then.
@plutomaniac
You definitely need to transfer the settings from old VBIOS. This is needed for all laptops and for some desktops. You need it again because your VBIOS is probably Sandy only, while 2170 is Sandy-Ivy. So you need steps like 2117 -> 2119 -> 2158 -> 2170.
OEMs do modify ME Firmware, which is why you can’t just replace it in BIOS as is. The flasher is smart enough to keep the old settings when updating.
But you forgot to mention what laptop is this.
Thank you for replying @lordkag . My laptop is Clevo W25xHNx (series that share the same bios). The latest BIOS includes v2117 which is shown here:
I updated the ME via the flasher inside Windows so the settings should have been kept. Back when I updated that, I checked MEInfoWin and run a Manuf check. Everything reported fine.
Unfortunately the Intel vBIOS collection found here does not contain the stock intel v2117 so I cannot directly compare to my own. However, I found Clevo’s v2119 from an almost same model and compared it with the stock Intel v2119 using BMP. There are differences pretty much everywhere, that’s for sure.
I have attached below a file containing the latest actual BIOS file, the extracted clevo v2117, the stock Intel v2119 & v2170 and an extracted clevo v2119 from a very similar model for reference.
EDIT: Actually I’m not sure. It might be SB only as you said. It does say SNB/IVB-MOBILE but after that only Intel(R)Sandybridge Mobile. The v2170 vbios says SNB/IVB-MOBILE but afterwards Intel(R) Sandybridge/Ivybridge. It seems that after v2119 did Intel add IB support.
W25xHNx BIOS Files.rar (1.79 MB)
@ plutomaniac:
Since the flashing of a modded BIOS into the BIOS chip of a mobile system is much more risky than with a desktop system, you should wait for a comment of someone like lordkag, who knows more about this topic than me.
@plutomaniac
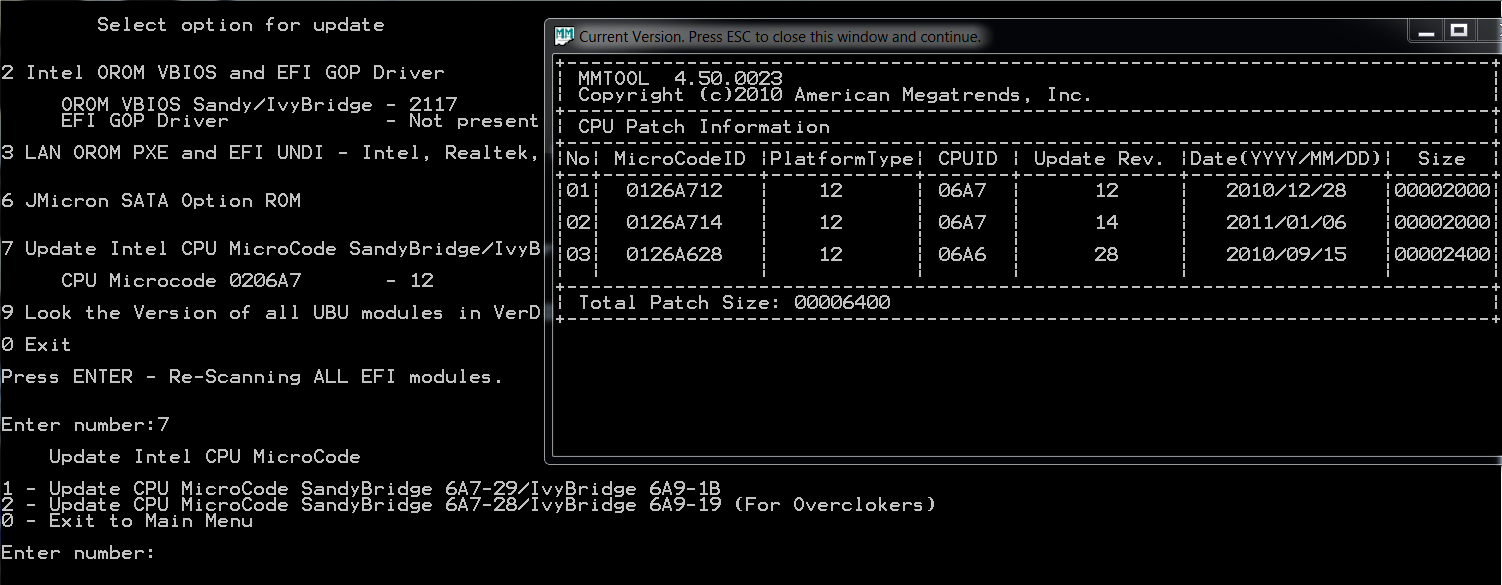
This is what you can update:
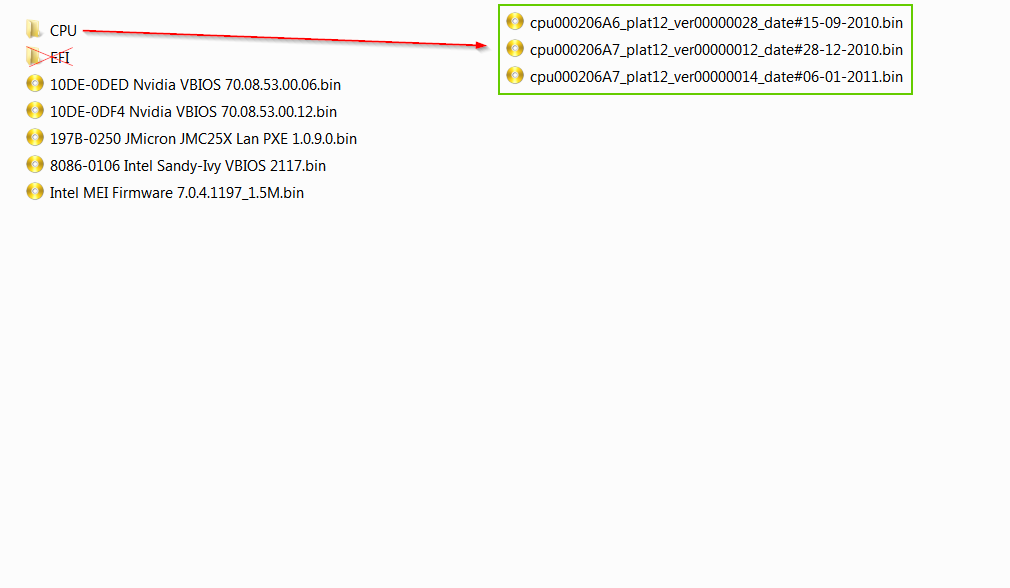
Notice there are two microcodes for same CPUID, probably a mistake from Clevo. You can use UBU to update by selecting 7 and 1, or you can use UBU with the attached microcodes, by selecting 7 and 1. The attached file is for Sandy + Sandy ES.
10DE-0DED is Nvidia 520M and 10DE-0DF4 is Nvidia 540M. I don’t have newer VBIOS than those, but you can search for them in similar laptops. You should know that their are not always compatible, one laptop might push the clock higher or lower.
I don’t have a newer JMicron PXE, but again you can search in laptops with same controller. Not worth the time, you won’t need it.
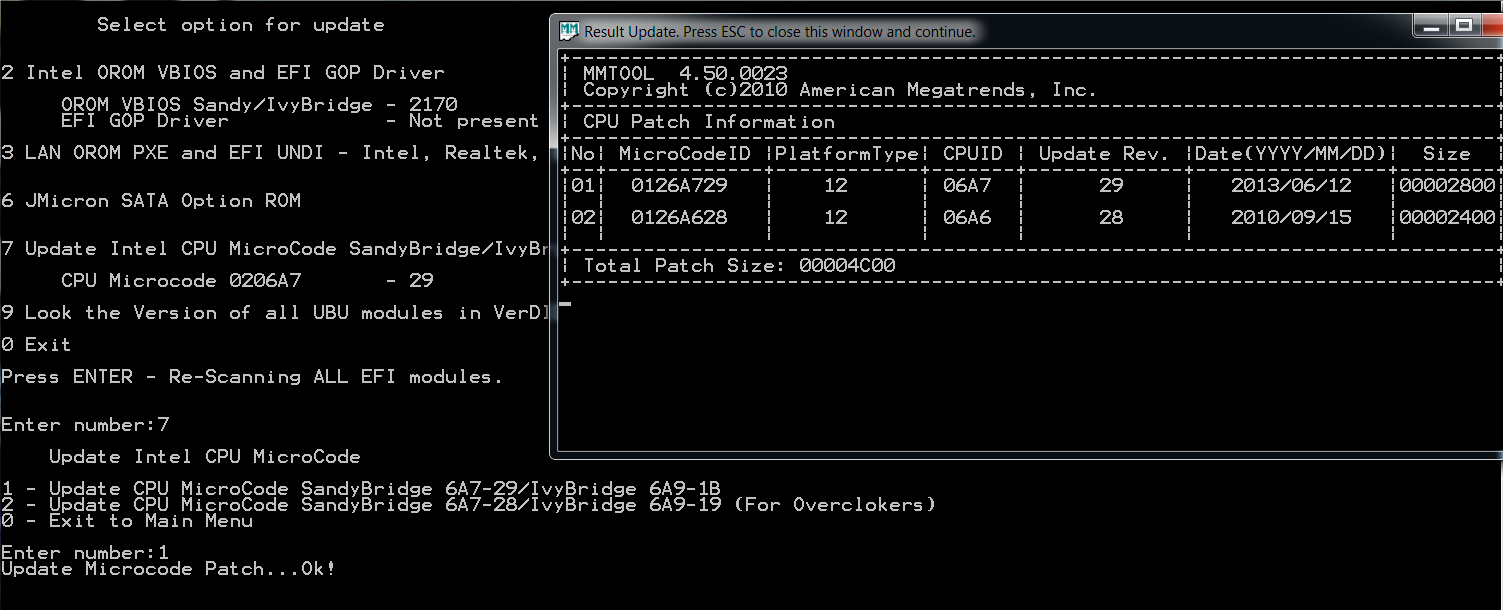
Intel VBIOS 2170 attached. I have done it with 2117 -> 2119 -> 2120 -> 2132 -> 2137 -> 2143 -> 2158 -> 2170 to be safe. There were 4 settings that needed manual sync.
Just drop the folder on top of UBU, replace and you can update VBIOS and microcodes with UBU. Use this only for this laptop!
Before:
After:
UBU_Clevo.rar (68.1 KB)
@lordkag
You are absolutely amazing. Thank you very much for your trouble. Especially the vBIOS procedure that you followed. I checked (just to be sure before flashing) and all the Clevo OEM settings were transferred to the new bios as you said. And indeed Clevo had screwed up with the cpu microcodes there. Both are updated now after a successful flash.
This JMicron rom, I have searched a lot but probably nothing was ever released for it. Not even at the JMicron ftp so yeah, lost cause. My laptop has the 540M, I’ll ask Prema for anything new there (a guy who is known for clevo bios modding). Also I checked and the ME firmware was not overwritten which makes sense since it is a lot newer than the one included with the BIOS.
EDIT: Oh yes, the ME firmware. Does this one need manual editing first according to OEM settings as well?
So apart from the two VGAs, ME, JMicron, CPU-ID did you spot anything else that can be updated? Fernando already told me that the AHCI is not upgradable but, for the sake of two opinions (no offense to anyone), is this accurate? It just seems weird that just because this chipset does not support RAID, you can never update the AHCI counterpart.
@plutomaniac
Don’t bother with JMicron Lan OROM. To my knowledge, it is only needed for Lan Boot and Wake-on-Lan. If it were easy to find, then you could update it for the sake of it, but not when it is hard to find. I only have older versions - 1.0.0.25, 1.0.3.0, 1.0.4.5, 1.0.7.3 - from different manufacturers, so it is not like you could pick a newer one. But if you want to, just search for JMC25X and search in the BIOS of those boards.
If you flash the ME with the update firmware FWUpdLcl, you don’t need to anything, the flasher either skips the settings region or saves them on the go. If you flash ME with Intel FPT, then you need to copy the settings with Intel FITC, because Intel FPT flashes the entire region as is. Another case would be to replace ME directly from BIOS file - ME region, where you would again need to copy the settings.
Nothing else to update apart from those. AHCI is run by an EFI driver, located in GUID 8F5A2E02-538C-4D59-B920-C4786ACBC552. It was built for this board, it can’t be ported, neither replaced with another one. Only Clevo can.
@lordkag
I searched a lot of other models with JMC25X. The latest was 1.0.9.0 as I saw at Clevo stuff, all the other are even older (1.0.7.3 etc). It’s ok, as you said it’s pretty useless. Also indeed I checked and AHCI is specific for every laptop. Even the W25xHPx model (I have the W25xHNx) which has a 520M instead of a 540M uses a different AHCI EFI driver. So, I will forget about these.
For future reference (so that I can learn), can you explain the safe procedure that you did for the vBIOS? I suppose you used the Intel BMP tool with each version’s .bsf file.
About ME, when you say “save/copy settings” do you mean this procedure?
@ lordkag:
AFAIK the newer Intel chipset mainboards from 6-Series up do neither need nor use an Intel AHCI ROM/EFI module.
That is interesting, because until now I didn’t know much about the function of the 25-30 KB sized BIOS module named "AHCI", which can be found in nearly all AMI UEFI BIOSes.
Can you give me some additional informations about this module?
Who is the manufacturer of it and what does it do? If AHCI is run by an "EFI driver", which module is responsable for AHCI, when the user is running the OS in LEGACY mode?
@plutomaniac
I used the closest .bsf (ideally the same version, else higher) to open 2117 VBIOS, that is 2119.bsf. Save the settings. Open the next pair, save the settings, apply the settings from previous modded file, save as temp file, save the settings. Move to the next pair and do the same. At last step you must keep the Signon message from higher VBIOS. When applying settings watch for any warnings/error and try to keep the higher setting, that is if a setting is removed in higher VBIOS, also remove it from old saved setting file .ssf; if a setting has a different name, change the old name with the new one. You do this by compare old .ssf with current .ssf and change only in old .ssf. You will end up with a lot of files and a headache, which will multiply when you double check.
The procedure for ME settings is that one, described by VirtualFred. But you need a full 1.5M file to do this, while 7.1.60.1193 is just an update. To get the full 7.1.60.1193 you need to save the entire ME region: either by using Intel FPT from ME tools with command “fpt -d backup.bin” and extract ME from backup.bin; or with command “fpt -d -me fullme.bin”; or dump the entire BIOS with a programmer and extract ME. The first two will likely fail because of BIOS protection stored in descriptor, the last is not for everyone.
@Fernando
The AHCI EFI driver is probably provided by AMI as source, so every OEM modifies it for that particularly board. The EFI driver might actually need other companions, like AhciBus, AhciController, AInt13…
Just because you run the OS in legacy mode, doesn’t mean that there are no EFI drivers started. In fact, it is the other way around: any [Aptio | Insyde | Phoenix SecureCore] BIOS is built by following the EFI model and specs, give or take some. The OROMs were present in the hybrid stage and are still kept for compatibility reason with older OS systems, but EFI drivers are loaded all the time, except when there is an OROM present and CSM enabled.
Anyway, this question can be better answered by CodeRush, our teacher.
@lordkag
Oh my, the vBIOS procedure is a lot of work actually. Again, thank you very much lordkag. I’m not sure if I understood some parts. I will read it some more and try it when I have more time since I want to learn the procedure.
Actually I did something easier for ME. As you said, if I update the ME from inside Windows the OEM settings are preserved and the version is only updated. So I did that. Then, I run MESET.exe which is a tiny program from Clevo (for clevo models) that overrides the flash descriptor. Then I used the fpt -D command to dump my whole updated bios. I checked it with FITC and the updated ME + OEM settings are there. So now I have the modded bios + ME v7.1.60.1193 + OEM settings ready as a single flash file. To provide this modded bios to other “same” laptops, I’m confused on whether I should use FTP (fpt -f Bios.bin -me) or AFUDOS (afudos Bios.bin /ME) to update the ME. Also, will other people need to run MESET.exe before flashing the ME? For reference, the way MESET works is that you run it, system restart and until you shut down again the flash descriptor is overwritten.
Yes, I forgot that Clevo has this little useful tool. Could you please upload the entire ME 7.1.60.1193 firmware for me? I might needed some day. Open your dump with UEFITool and save the ME region. Then run MESET again and this time use the command “fpt -d -me me.bin” which will save just the ME. Compare the two of them and if they have different content, upload them both.
In order to offer the BIOS to others, you will need to extract this full ME and replace it in the official BIOS. Use either hex editor or better yet UEFITool. Just watch that the ME region is 17F000, while the ME is 17D000. So, if you use hex editor, just replace. If you use UEFITool, make sure the ME is 17F000 by adding FF padding, then select ME Region -> Replace as is. Better run both tests and compare the end result, to be sure.
At the end you can use this file with modified UBU and update the rest of the components. Other users will flash this BIOS and have everything updated. DON’T offer your dump BIOS as it contains private info, serials. Patch the official BIOS.
EDIT: CHECK MY OTHER REPLY BELOW
So, I opened UEFITool and extracted the ME from my first dump (the one I wanted to share initially). Some minutes ago I run MESET again and made a second bios dump.
* UPDATED means that these dumps already include our previous changes (vbios, cpu-ids) as well as the v7.1.60.1193 ME which I updated via Windows some time ago.
The first dump bios is called DUMP_BIOS_FTP_UPDATED_FIRST and the ME extracted from it using UEFITool is called DUMP_ME_UEFITool (from FIRST).
The second dump bios is called DUMP_BIOS_FTP_UPDATED_SECOND and the ME extracted from it using UEFITool is called DUMP_ME_UEFITool (from SECOND). The ME extracted from it using FTP is called DUMP_ME_FTP (from SECOND). Both ME dumps from the SECOND bios dump seem to be the same (SHA-1 check). But they are not the same with the DUMP_ME_UEFITool (from FIRST) file which is weird to me since I haven’t changed anything at the ME side and I’m using the same bios after we updated the modules.
Also, we should keep that in mind (source HERE):
DUMPS.rar (5.31 MB)
@lordkag @Fernando
Ok I did it. This is the procedure that I followed from start to finish:
1. Updated ME to 7.1.60.1193 with FWUpdLcl (it updates version while keeping OEM settings)
2. Run MESET to overwrite the flash descriptor and boot into Windows (constant full fan speed → this way I know it’s overwritten)
3. Run ftpw64 -D DUMP_BIOS_FTP_UPDATED_SECOND.bin (1)
4. Shutdown to reset flash descriptor
HEX Editor Method:
5. Open DUMP_BIOS_FTP_UPDATED_SECOND.bin with HxD hex editor
6. Find the beginning of ME which is 20 20 80 0F 40 (near KRID text) and click before 20 (for me that’s at offset 1000)
7. Edit > Select block and change Length to 17D000
8. Right click > Copy , New file , Right click > Paste Write (ignore the file-size warning)
9. Save as ME_EXTRACTED_SECOND_HEX.bin
10. Open STOCK_BIOS.bin and ME_EXTRACTED_SECOND_HEX.bin with HxD hex editor
11. Select ME_EXTRACTED_SECOND_HEX.bin, Right click > Select all
12. Select STOCK_BIOS.bin , find the beginning of ME (20 20 80 0F 40) and click before 20
13. Edit > Select block and change Length to 17D000
14. Right click > Paste Write (the changed ME region is now in red color)
15. Save as STOCK_BIOS_ME_71601193_HEX.bin (stock bios + updated ME + OEM settings 2)
UEFITool Method:
5. Open DUMP_BIOS_FTP_UPDATED_SECOND.bin with UEFITool
6. Go to ME Region (make sure size is 17F000 and version 7.1.60.1193)
7. Right click > Extract as is and save as ME_EXTRACTED_SECOND_UEFITool.bin
8. Open STOCK_BIOS.bin with UEFITool
9. Go to ME Region (it should report a size of 17F000 and an older ME version)
10. Right click > Replace as is and select ME_EXTRACTED_SECOND_UEFITool.bin
11. At Action tab the old ME is set to Remove whereas the new ME is set to Replace (both sizes must be 17F000)
12. Save image file as STOCK_BIOS_ME_71601193_UEFITool.bin (stock bios + updated ME + OEM settings)
(1) UPDATED means that these dumps already include our previous changes (vbios, cpu-ids) as well as the v7.1.60.1193 ME which I updated with FWUpdLcl. SECOND means that all these are based of my second bios dump that I did as requested by lordkag. For reasons unknown to me the first and second dump are not the same even though in theory I didn’t change anything in between their capture. Either way, both these (updated, second) are specific to my case and the way I handled the process to avoid confusion.
(2) In my case I don’t have to manually set the OEM settings since I used a DUMP of my own bios (which already includes the appropriate settings) for the purpose of using it at same series models from Clevo. Otherwise more steps are needed (when you don’t have access to a dump of the system to be updated).
Things that I learned while doing that (correct me if I’m wrong please):
→ The small Intel ME .bin files (the ones provided here for example) are usable with FWUpdLcl and for version updating only
→ UEFITool extracts the whole ME Region (length 17F000 or 1.532KB) and not just ME (length 17D000 or 1.524KB)
I did it with both methods and these are the results:
STOCK_BIOS_ME_71601193_HEX.bin (SHA-1: 620D1BB96683C23DE3098E4F569709AD83EC780B)
STOCK_BIOS_ME_71601193_UEFITool.bin (SHA-1: 620D1BB96683C23DE3098E4F569709AD83EC780B)
The files are identical. So I guess now it’s ready to be edited with the modified UBU or MMTool?
READY_CHECK_NEEDED.rar (7.13 MB)
@ plutomaniac:
Thank you very much for your detailed and exact report about what you have done. That is the best possible basis for an evaluation of the processing.
Everything looks fine for me, but you should wait until lordkag gave his comment. He knows more about this topic than me.
@ lordkag:
Thank you for having answered my questions regarding the "EFI driver" UEFI BIOS module named "AHCI".
So this module has not been released by Intel and does not contain something like a updatable "Firmware" for the on-board Intel SATA AHCI Controller.
The latter was absolutely new for me. Furthermore I thought, that the "EFI drivers" are the successors of the Option ROM modules, are created by the vendor of the related Controller and are updatable as well.
@plutomaniac
You have done everything right. Now you can use it to update the rest of the components.
Just one thing. The stock Intel production ME is a full 1.5M firmware and usable with any Intel tool. The smaller one, like 7.1.60.1193 is actually an update and usable only with FWUpdLcl. You can get the same small image by using the backup option of FWUpdLcl. Intel FPT deals only with full image.
@Fernando
Yes, it would seem Intel has no concern over AHCI, or maybe they handed the source code to AMI, to be implemented as needed.
Some EFI drivers are the successor of OROM and provided by manufacturers, like the ones from UBU. But many others are just implementing the functions of the old BIOS in the new UEFI form. Just open any new BIOS in UEFITool and see how many DXE Driver are used. When you run CSM disabled you just instruct the BIOS to use only EFI drivers; with CSM enabled you can run both UEFI and OROM, with some boards giving you the option the select which has higher priority. With any option you will get some EFI drivers loaded, just that CSM lets you keep compatibility with legacy BIOS and load OROMs when possible and desired.