[REQUEST] OMEN by HP - 17-an104ng: Intel iGPU on i7 8750H is factory disabled- no ADVANCED BIOS options

Hello!
Dears All who have much more better knowledge than me. In hopes of getting positive response I am addressing the following issue I have been facing. I bought this OMEN by HP - 17-an104ng Gaming laptop when there were no RTX laptops in the market. It came with the latest gen i7 processor. Specs below:

CPU: Intel Core i7-8750H
GPU: NVIDIA GeForce GTX 1060 (6GB GDDR5)
DISPLAY: 17.3”, Full HD (1920 x 1080), 144 Hz, IPS + G-Sync
STORAGE: 250GB SSD + 1000GB HDD
RAM: 16GB DDR4, 2666 MHz
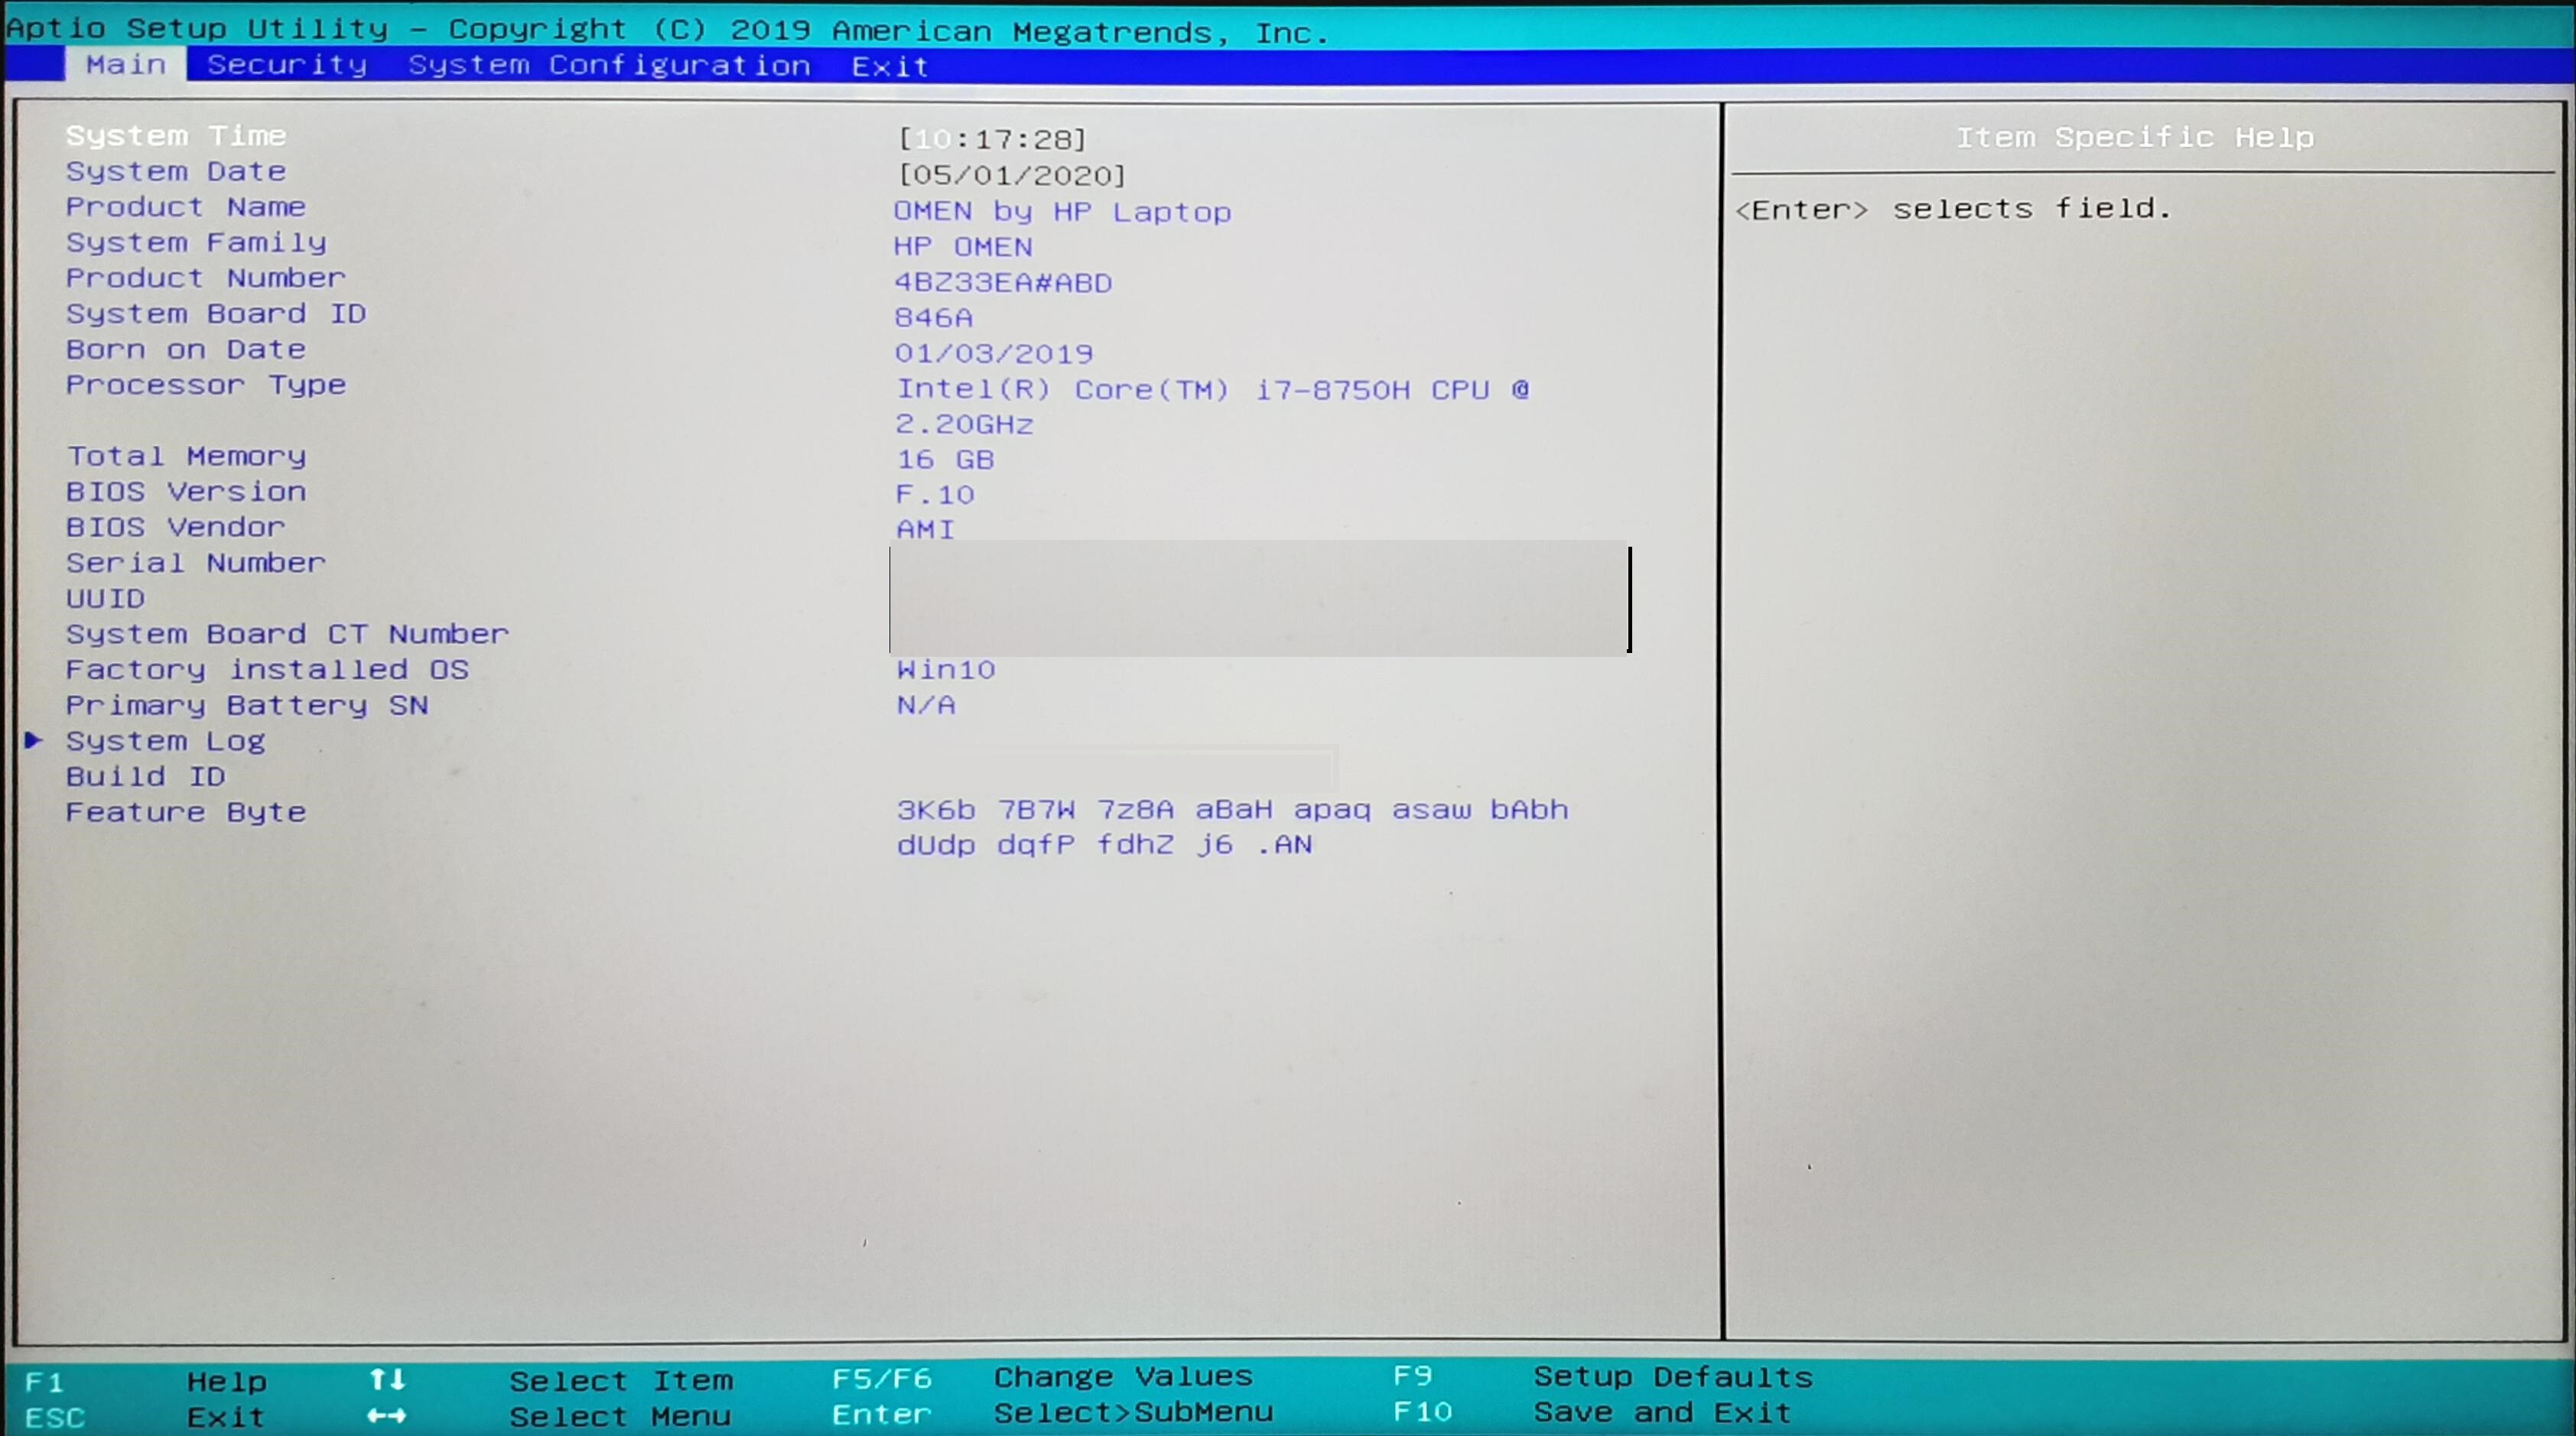

BIOS TYPE AMI(OEM)
BIOS Version F.10
SMBIOS Version 3.2
UEFI Boot Yes
System BIOS Date 11/21/2019

CHIPSET- South Bridge Intel Cannon Point HM370


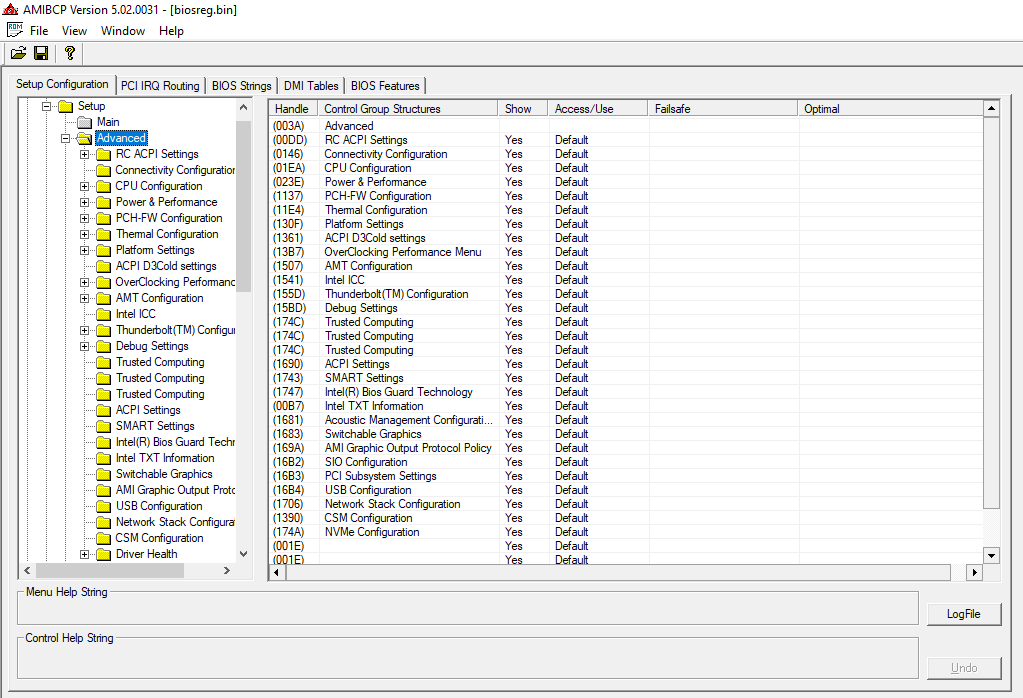
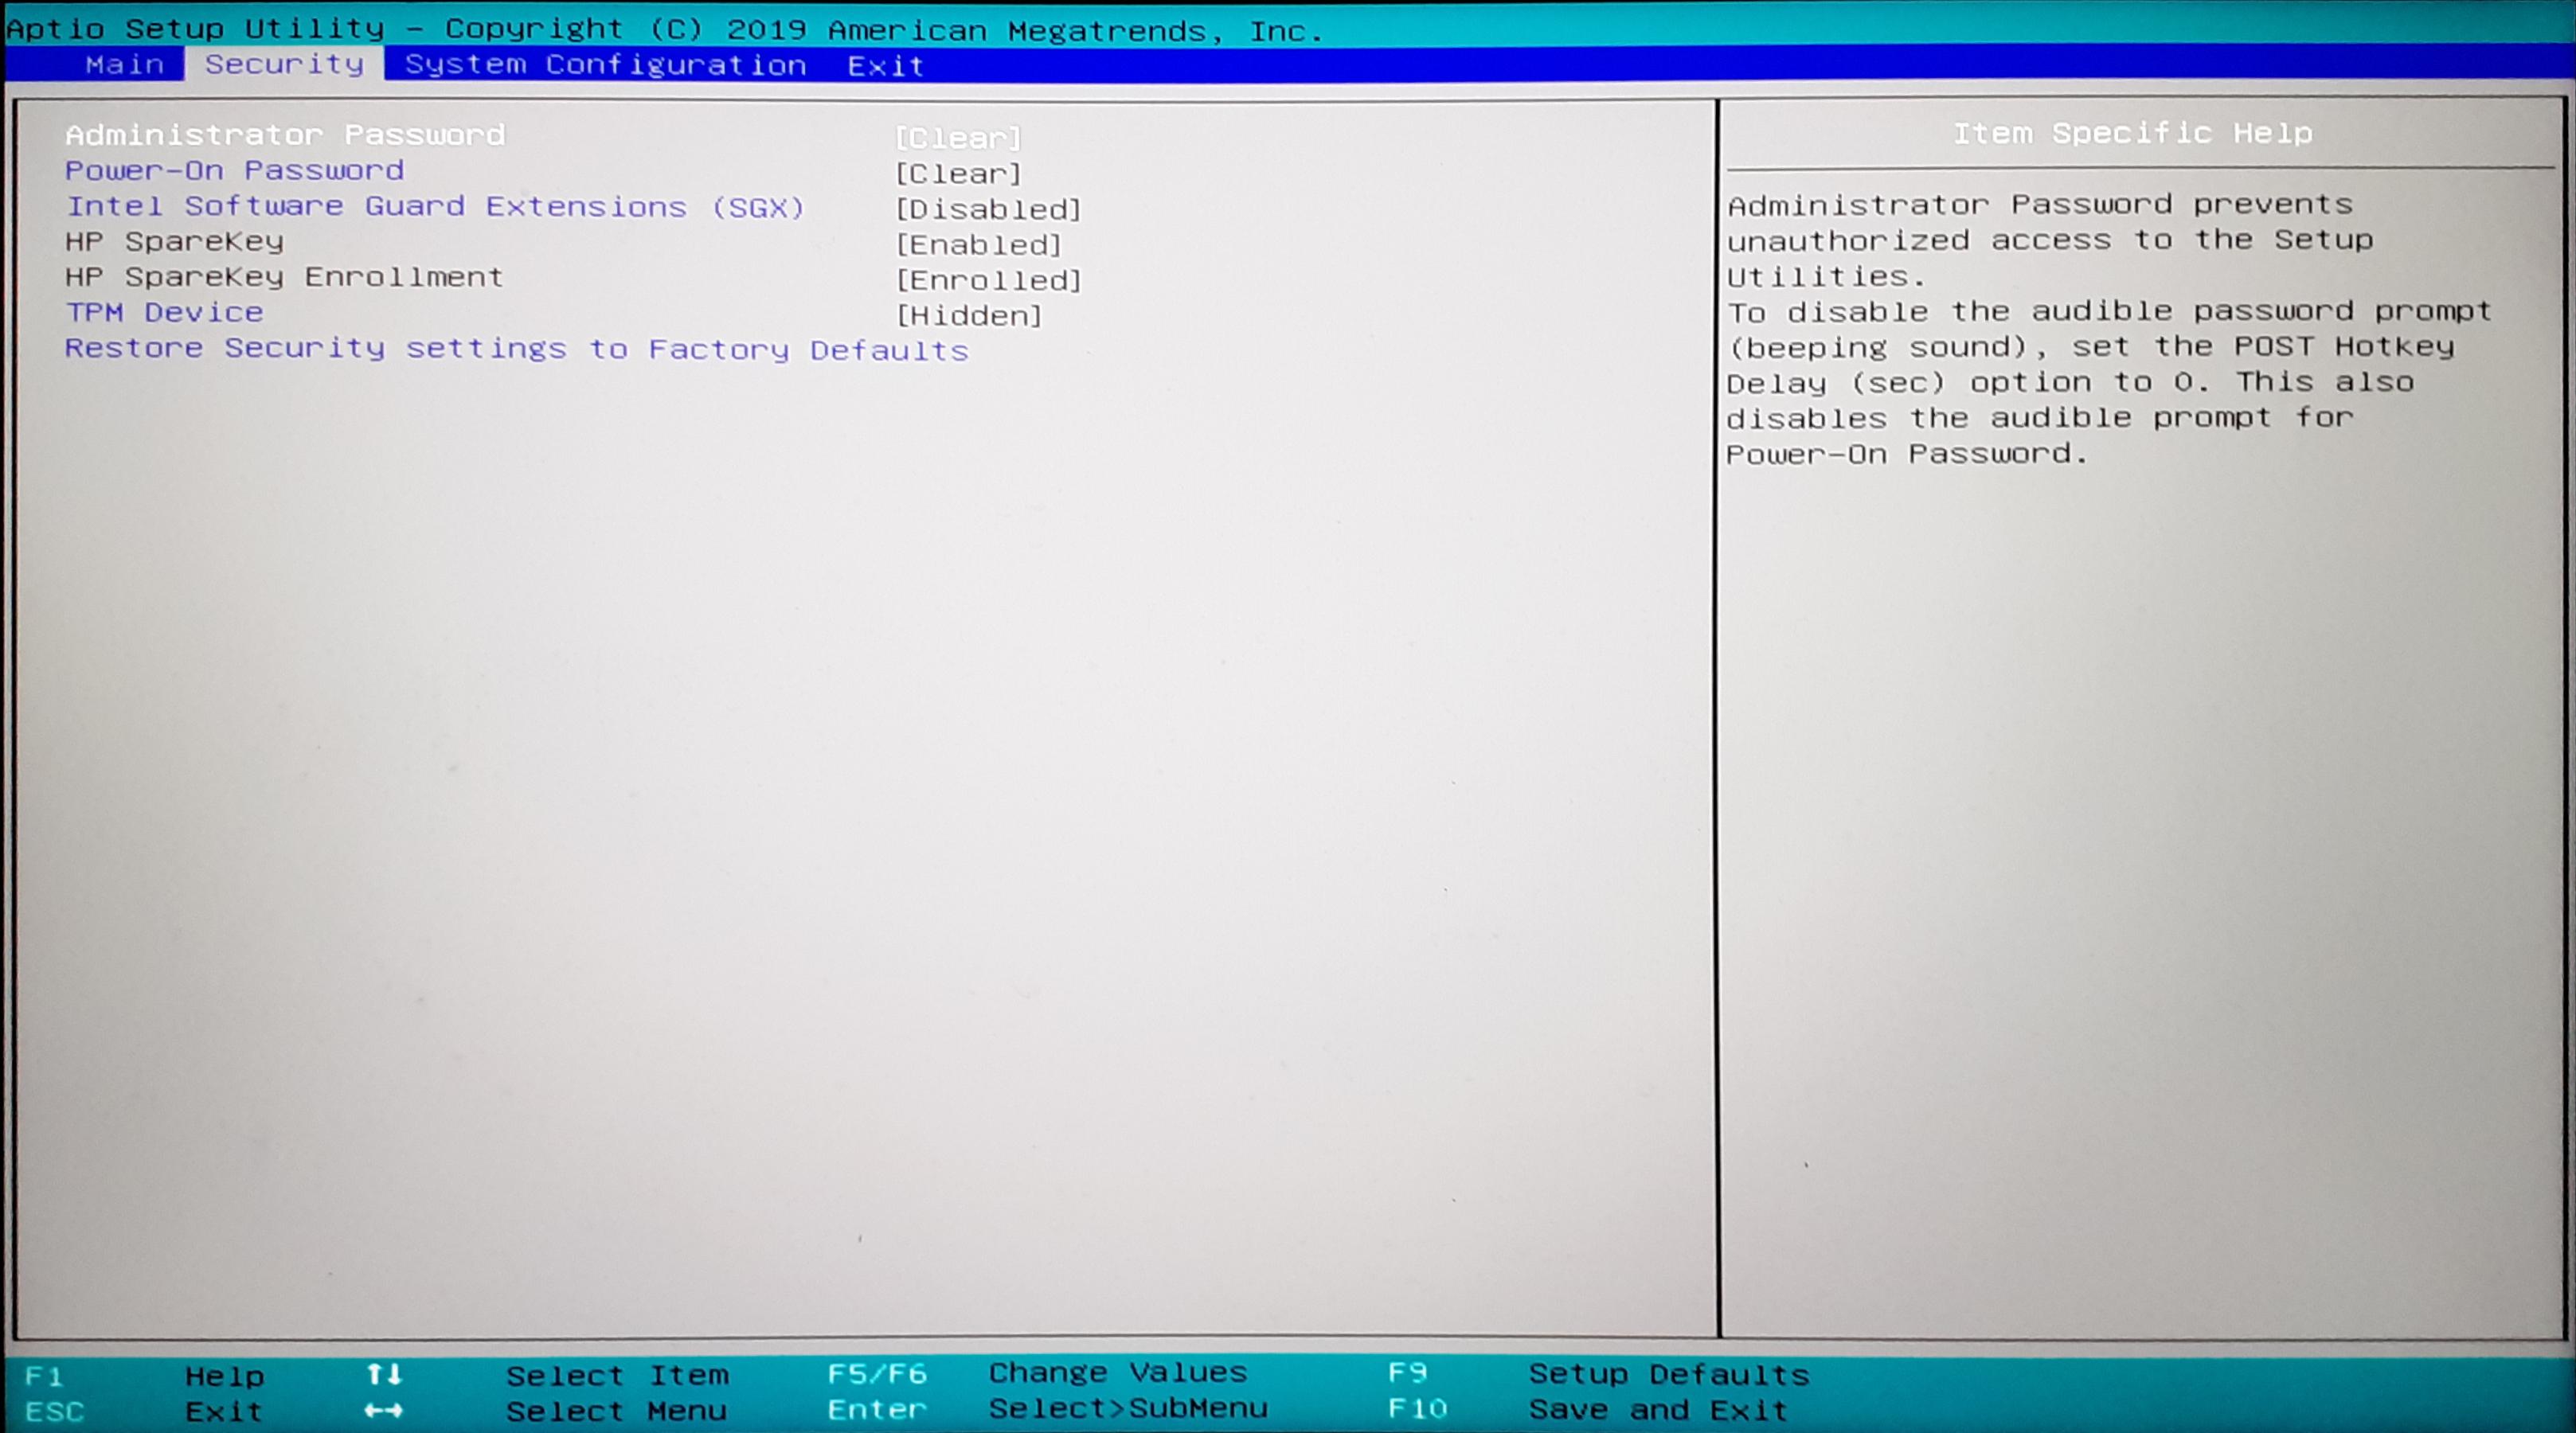
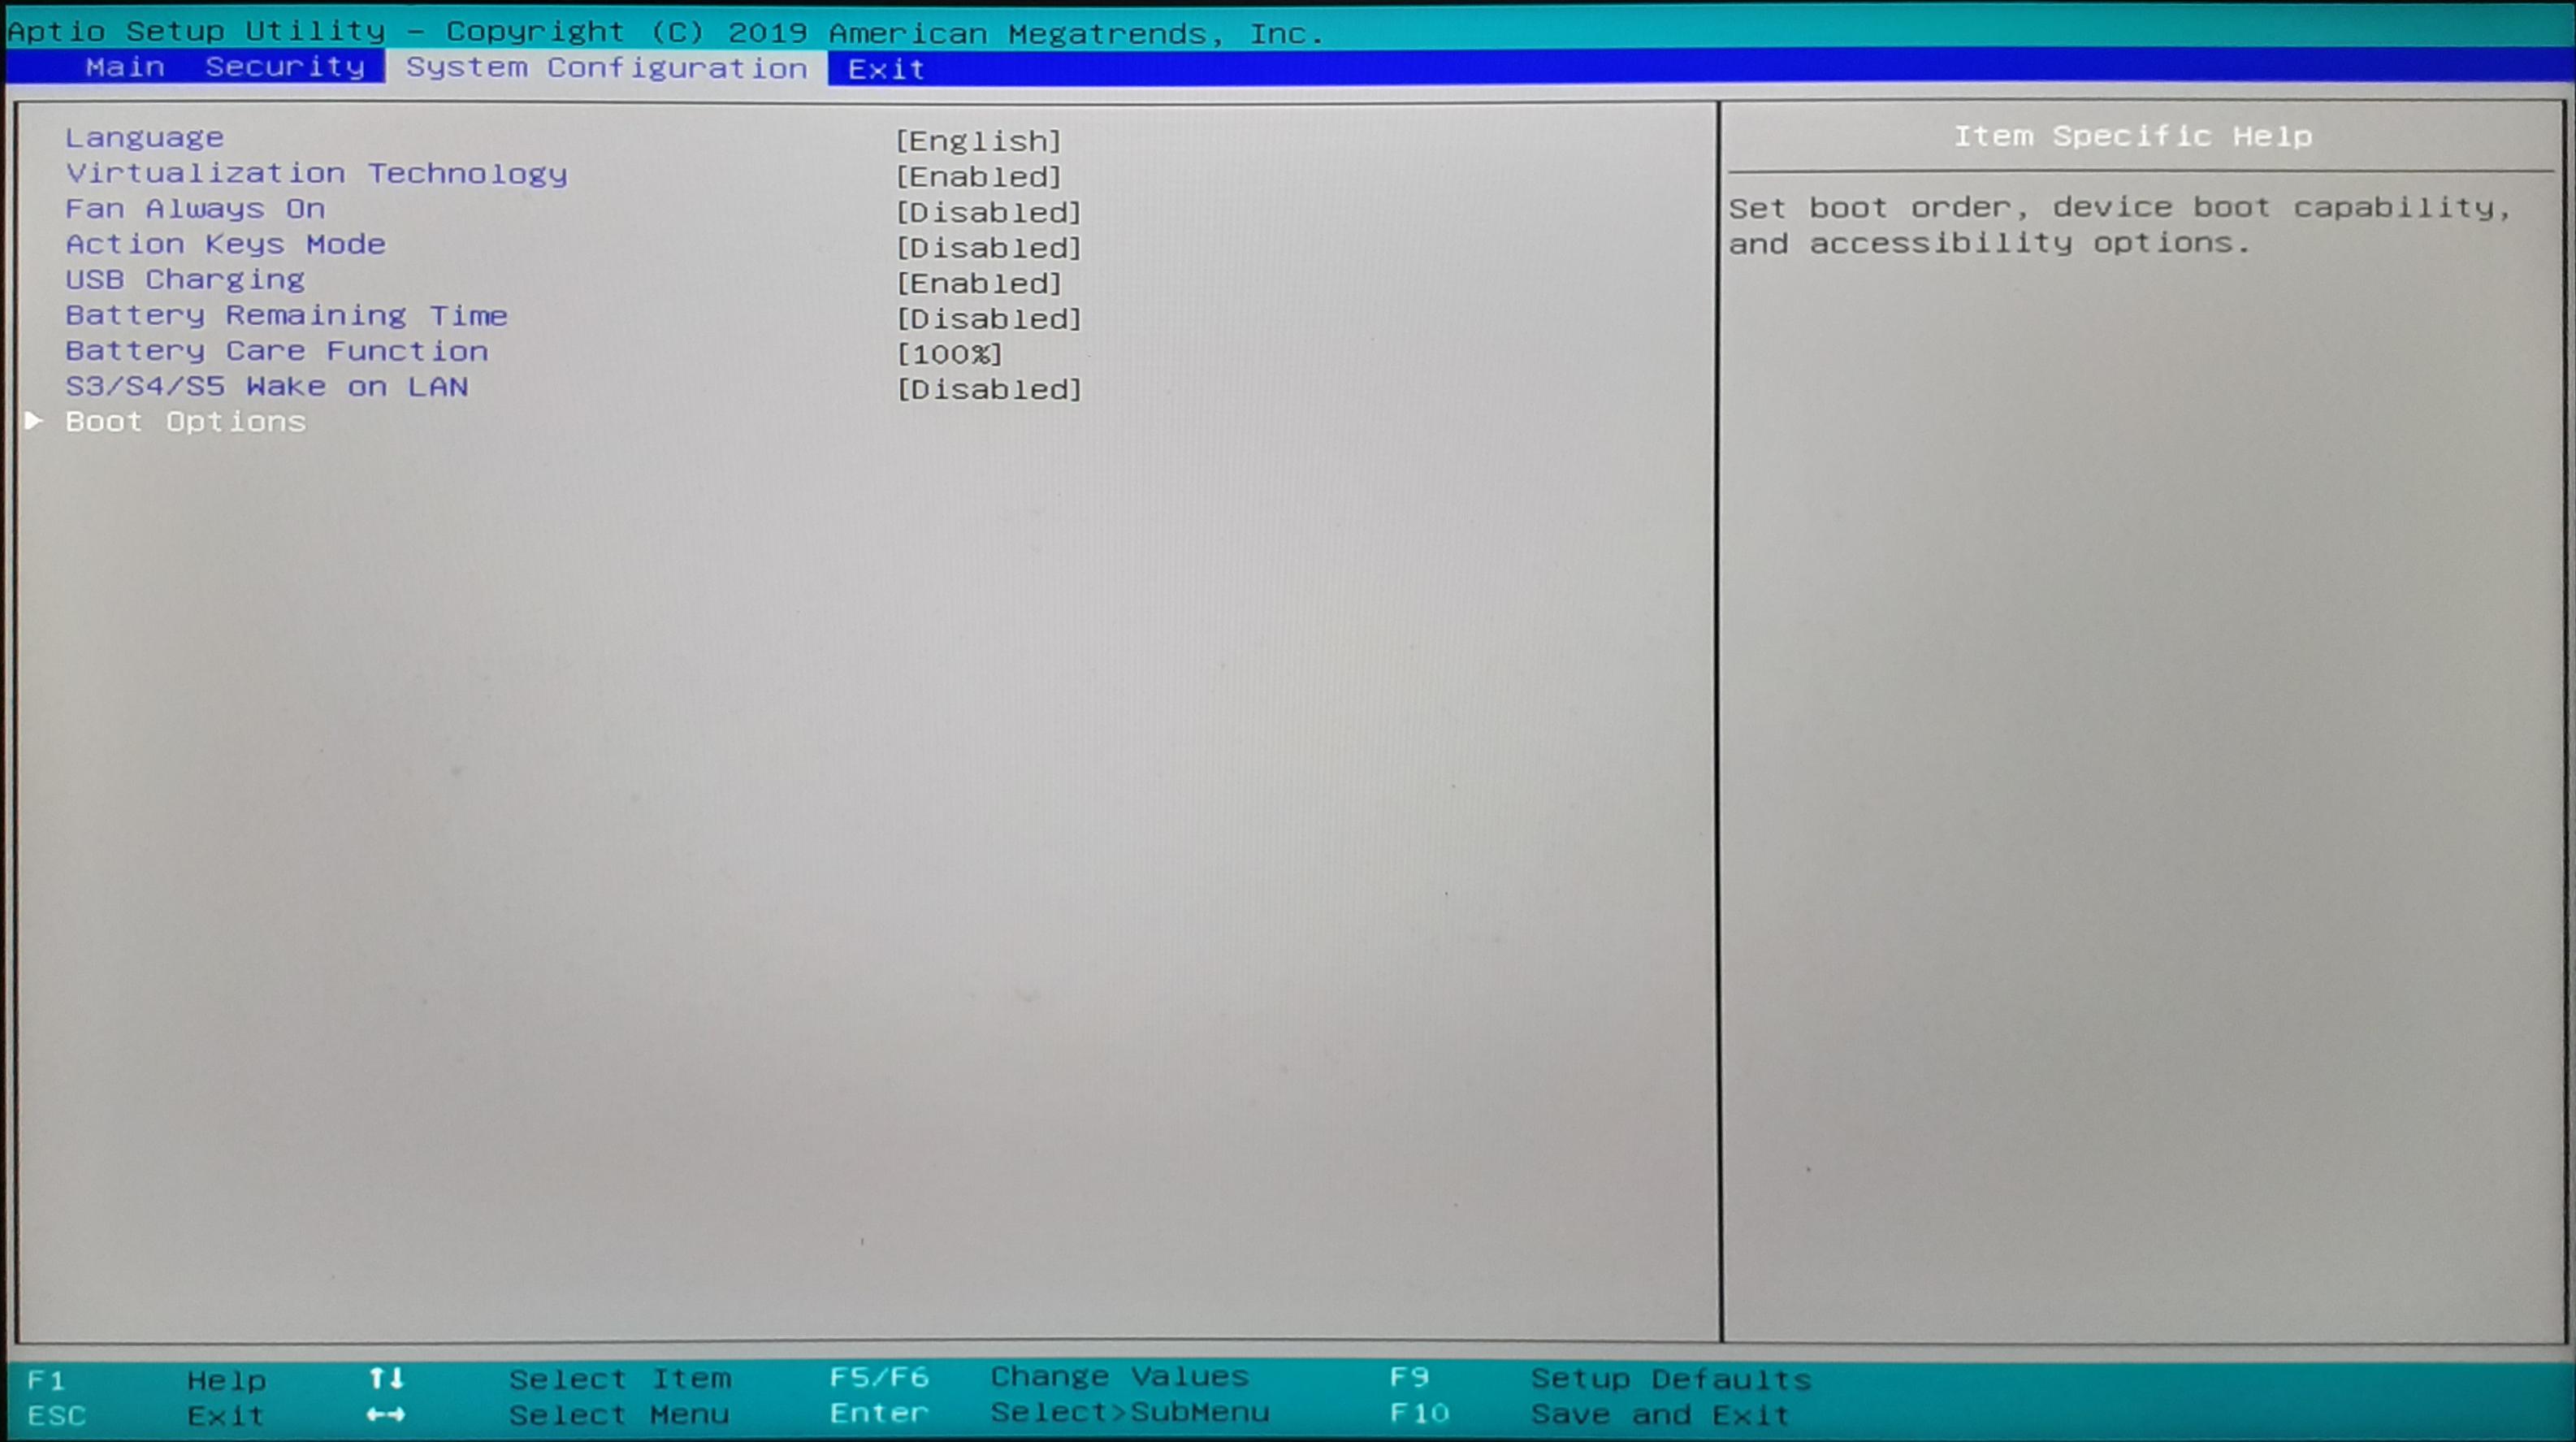
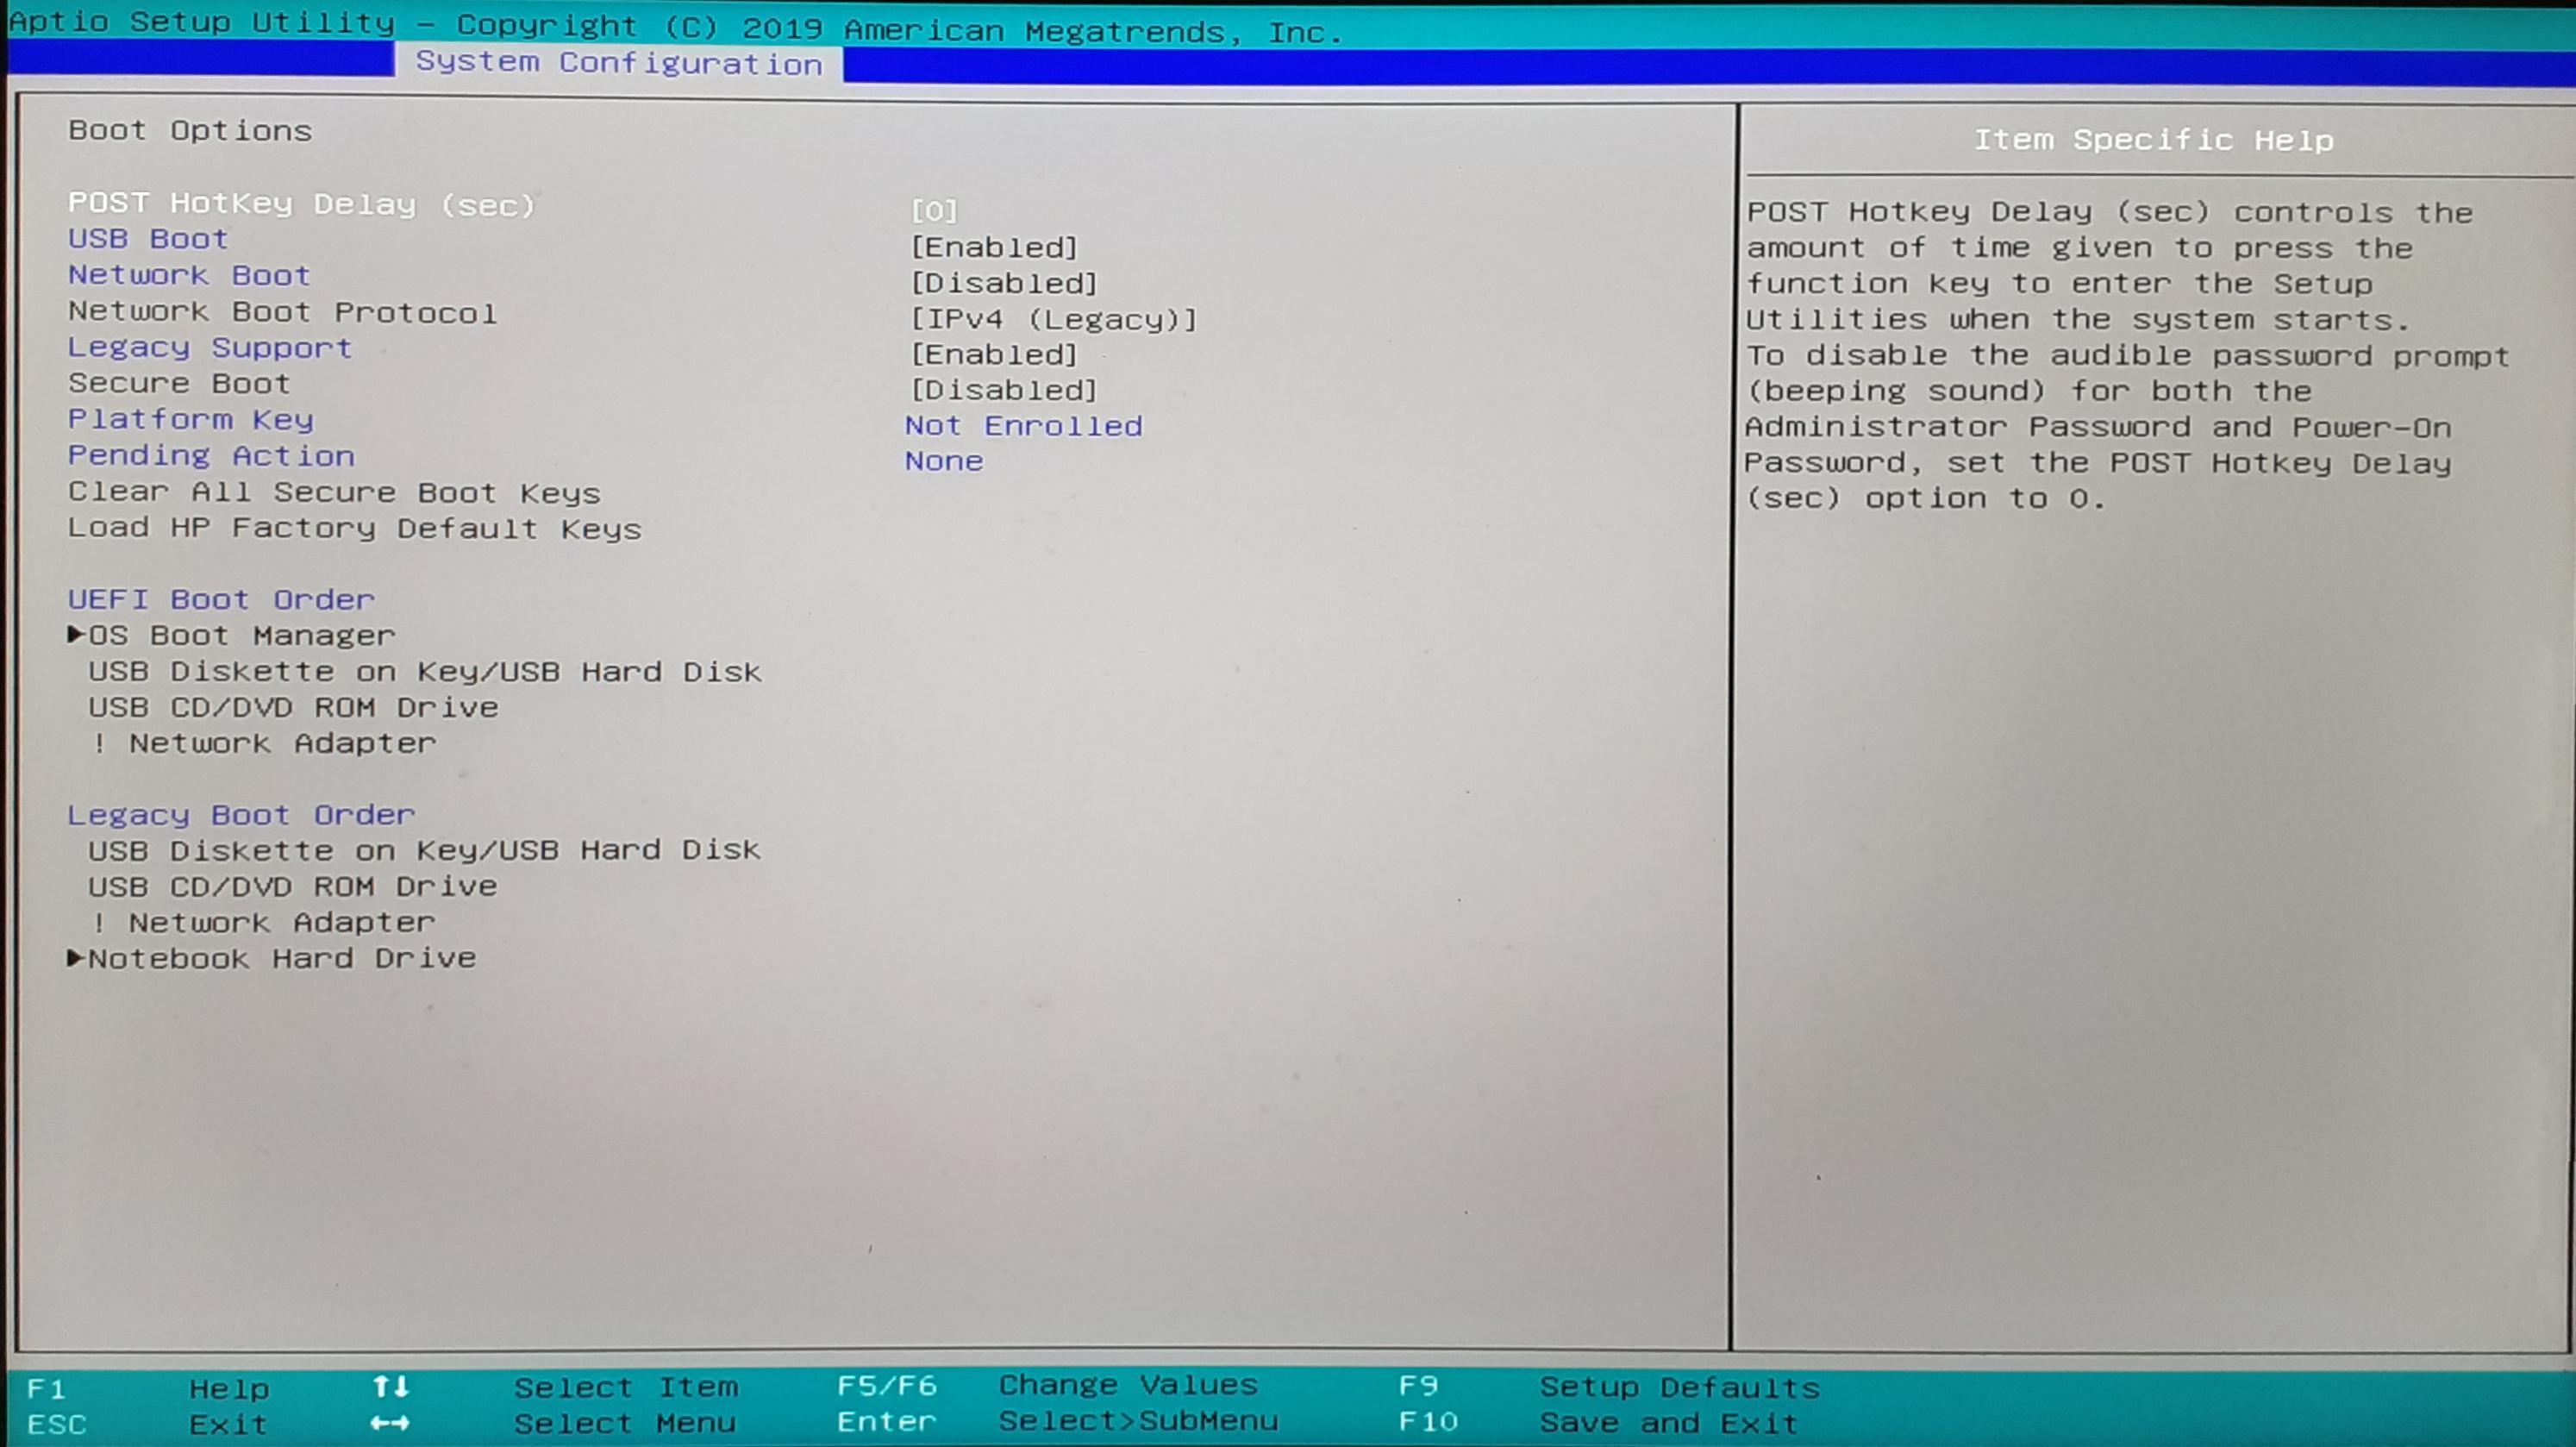
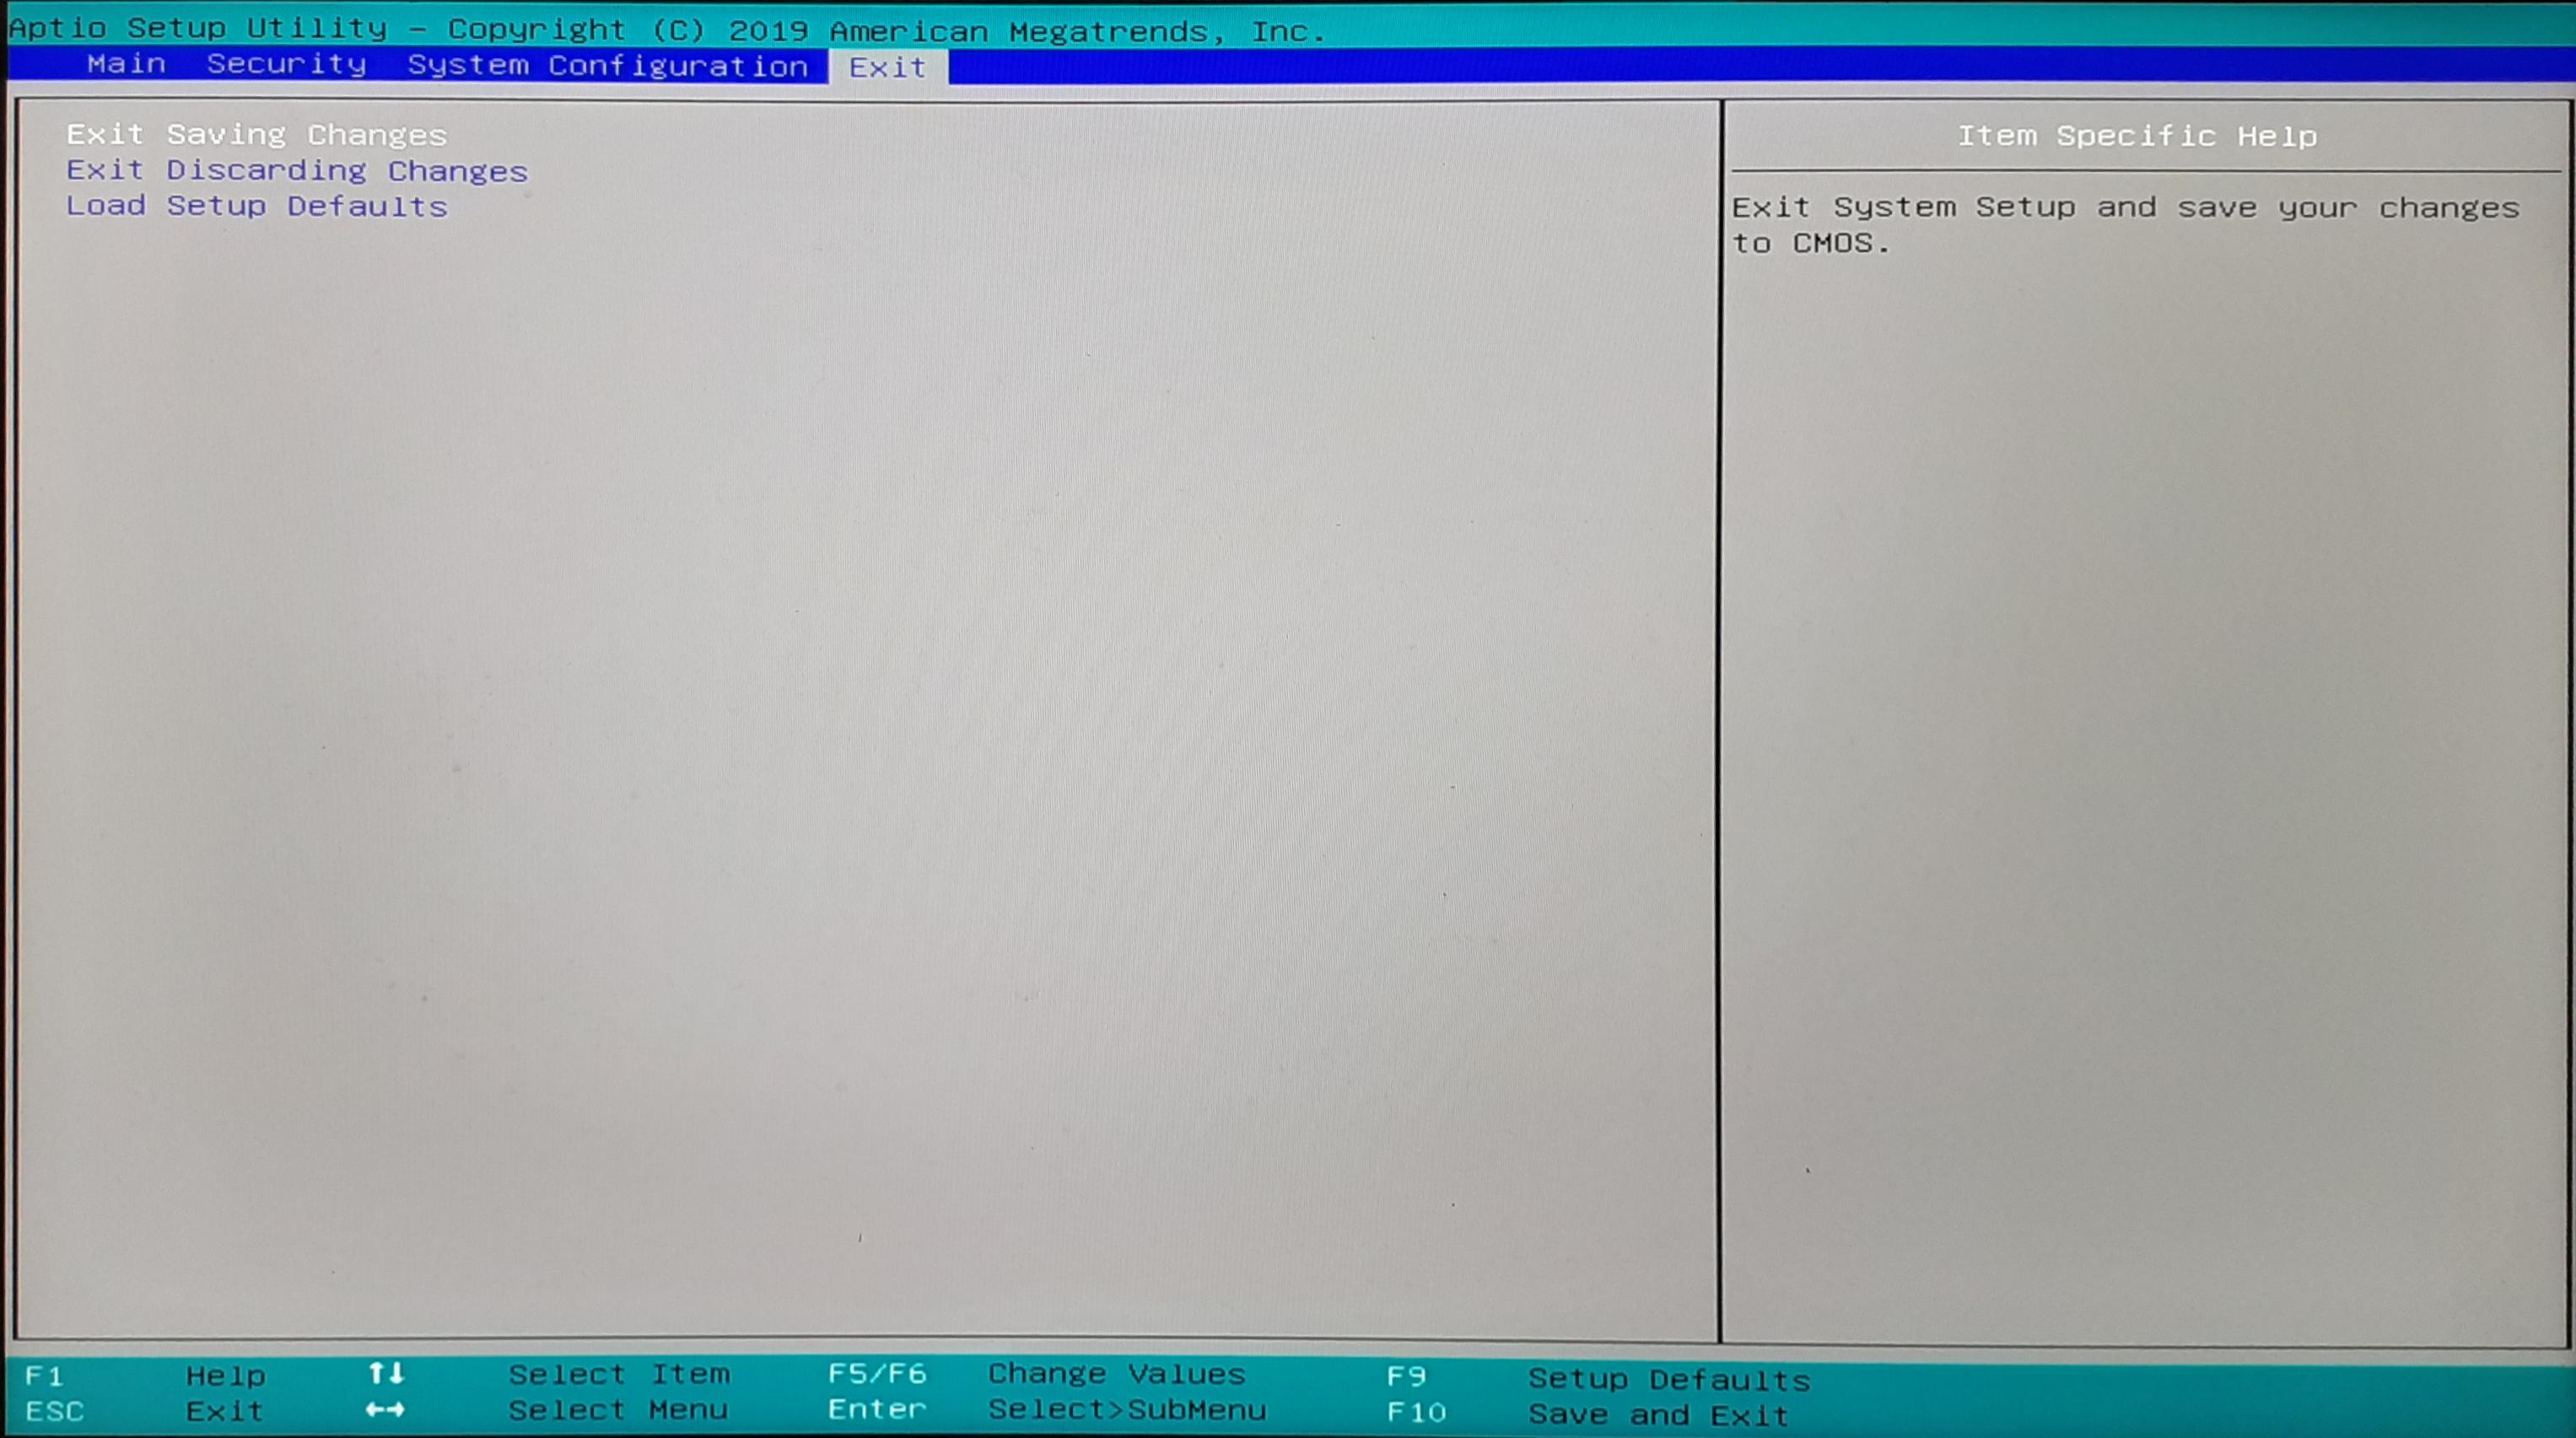
It has a very basic UEFI BIOS by AMI (aptio soft) that only allows me to change virtualization and some boot options, nothing more. This is kinda joke from HP. We have no access to overclocking, undervolting options. Even more frustrating thing, UHD 630 iGPU was disabled in factory and there’s no access from BIOS. I saw many people complaining on HP support forums and there are no satisfying answers. No recent BIOS updates. It seems HP will never enable those advanced options in BIOS for us.
I am planning to utilize this laptop for multiple OSes, including Linux and Hackintosh with GTX1060 pass through in VM for my IT studies.

I need help in two most important things.
1. Can ADVANCED BIOS options be enabled?
2. Will it allow me to UNLOCK and use Intel UHD630 graphics?


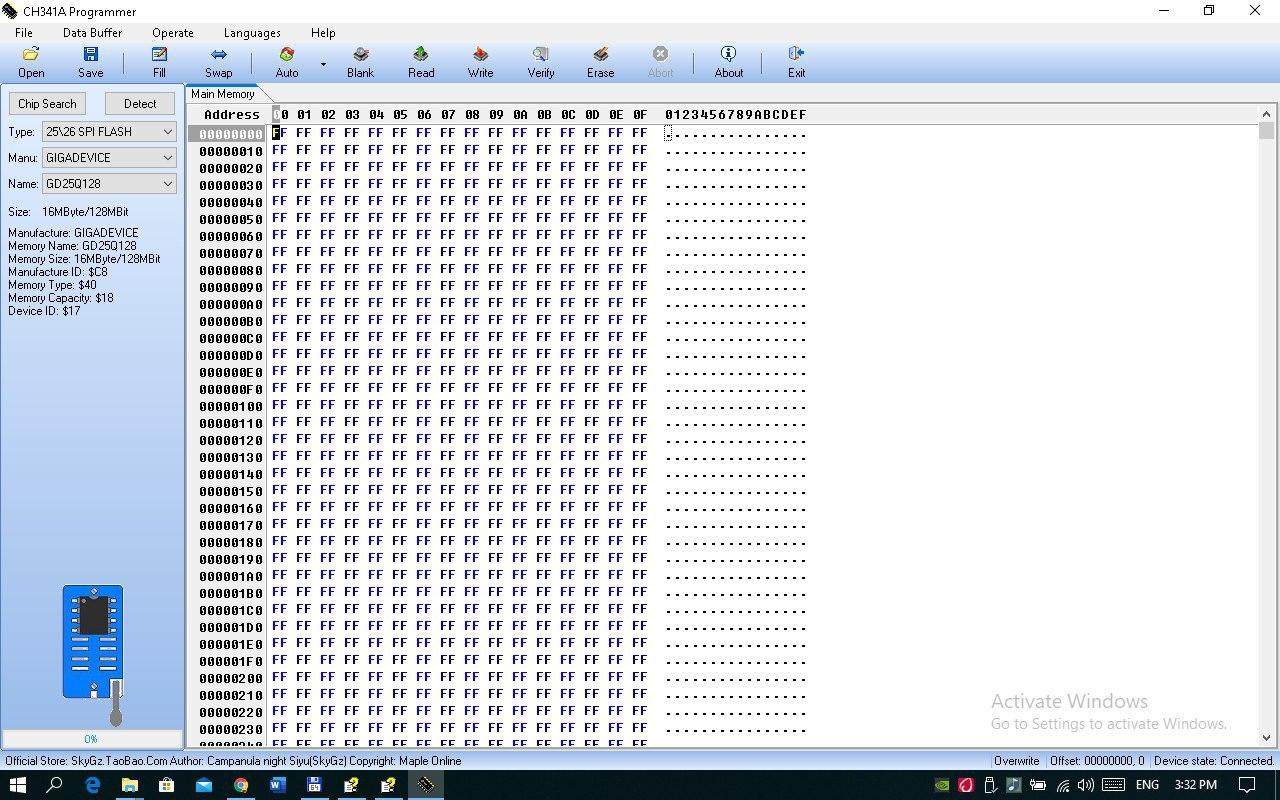
EDIT: Deleted info about previous errors. I now have my bios.bin

ADDED NEW 30.04.2020

@Lost_N_BIOS after reading your answer for @xlegacygt , I used AMISetup_IFR.bat inside UBU folder. When I checked the output text found very similar text for Advanced settings:

Advanced.png


1
2
3
 
One Of: Advanced settings, VarStoreInfo (VarOffset/VarName): 0x475, VarStore: 0x1, QuestionId: 0x5B, Size: 1, Min: 0x0, Max 0x1, Step: 0x0 {05 91 3F 01 40 01 5B 00 01 00 75 04 10 10 00 01 00}
0x328A4 One Of Option: Disabled, Value (8 bit): 0x0 (default) {09 07 04 00 30 00 00}
0x328AB One Of Option: Enabled, Value (8 bit): 0x1 {09 07 03 00 00 00 01}


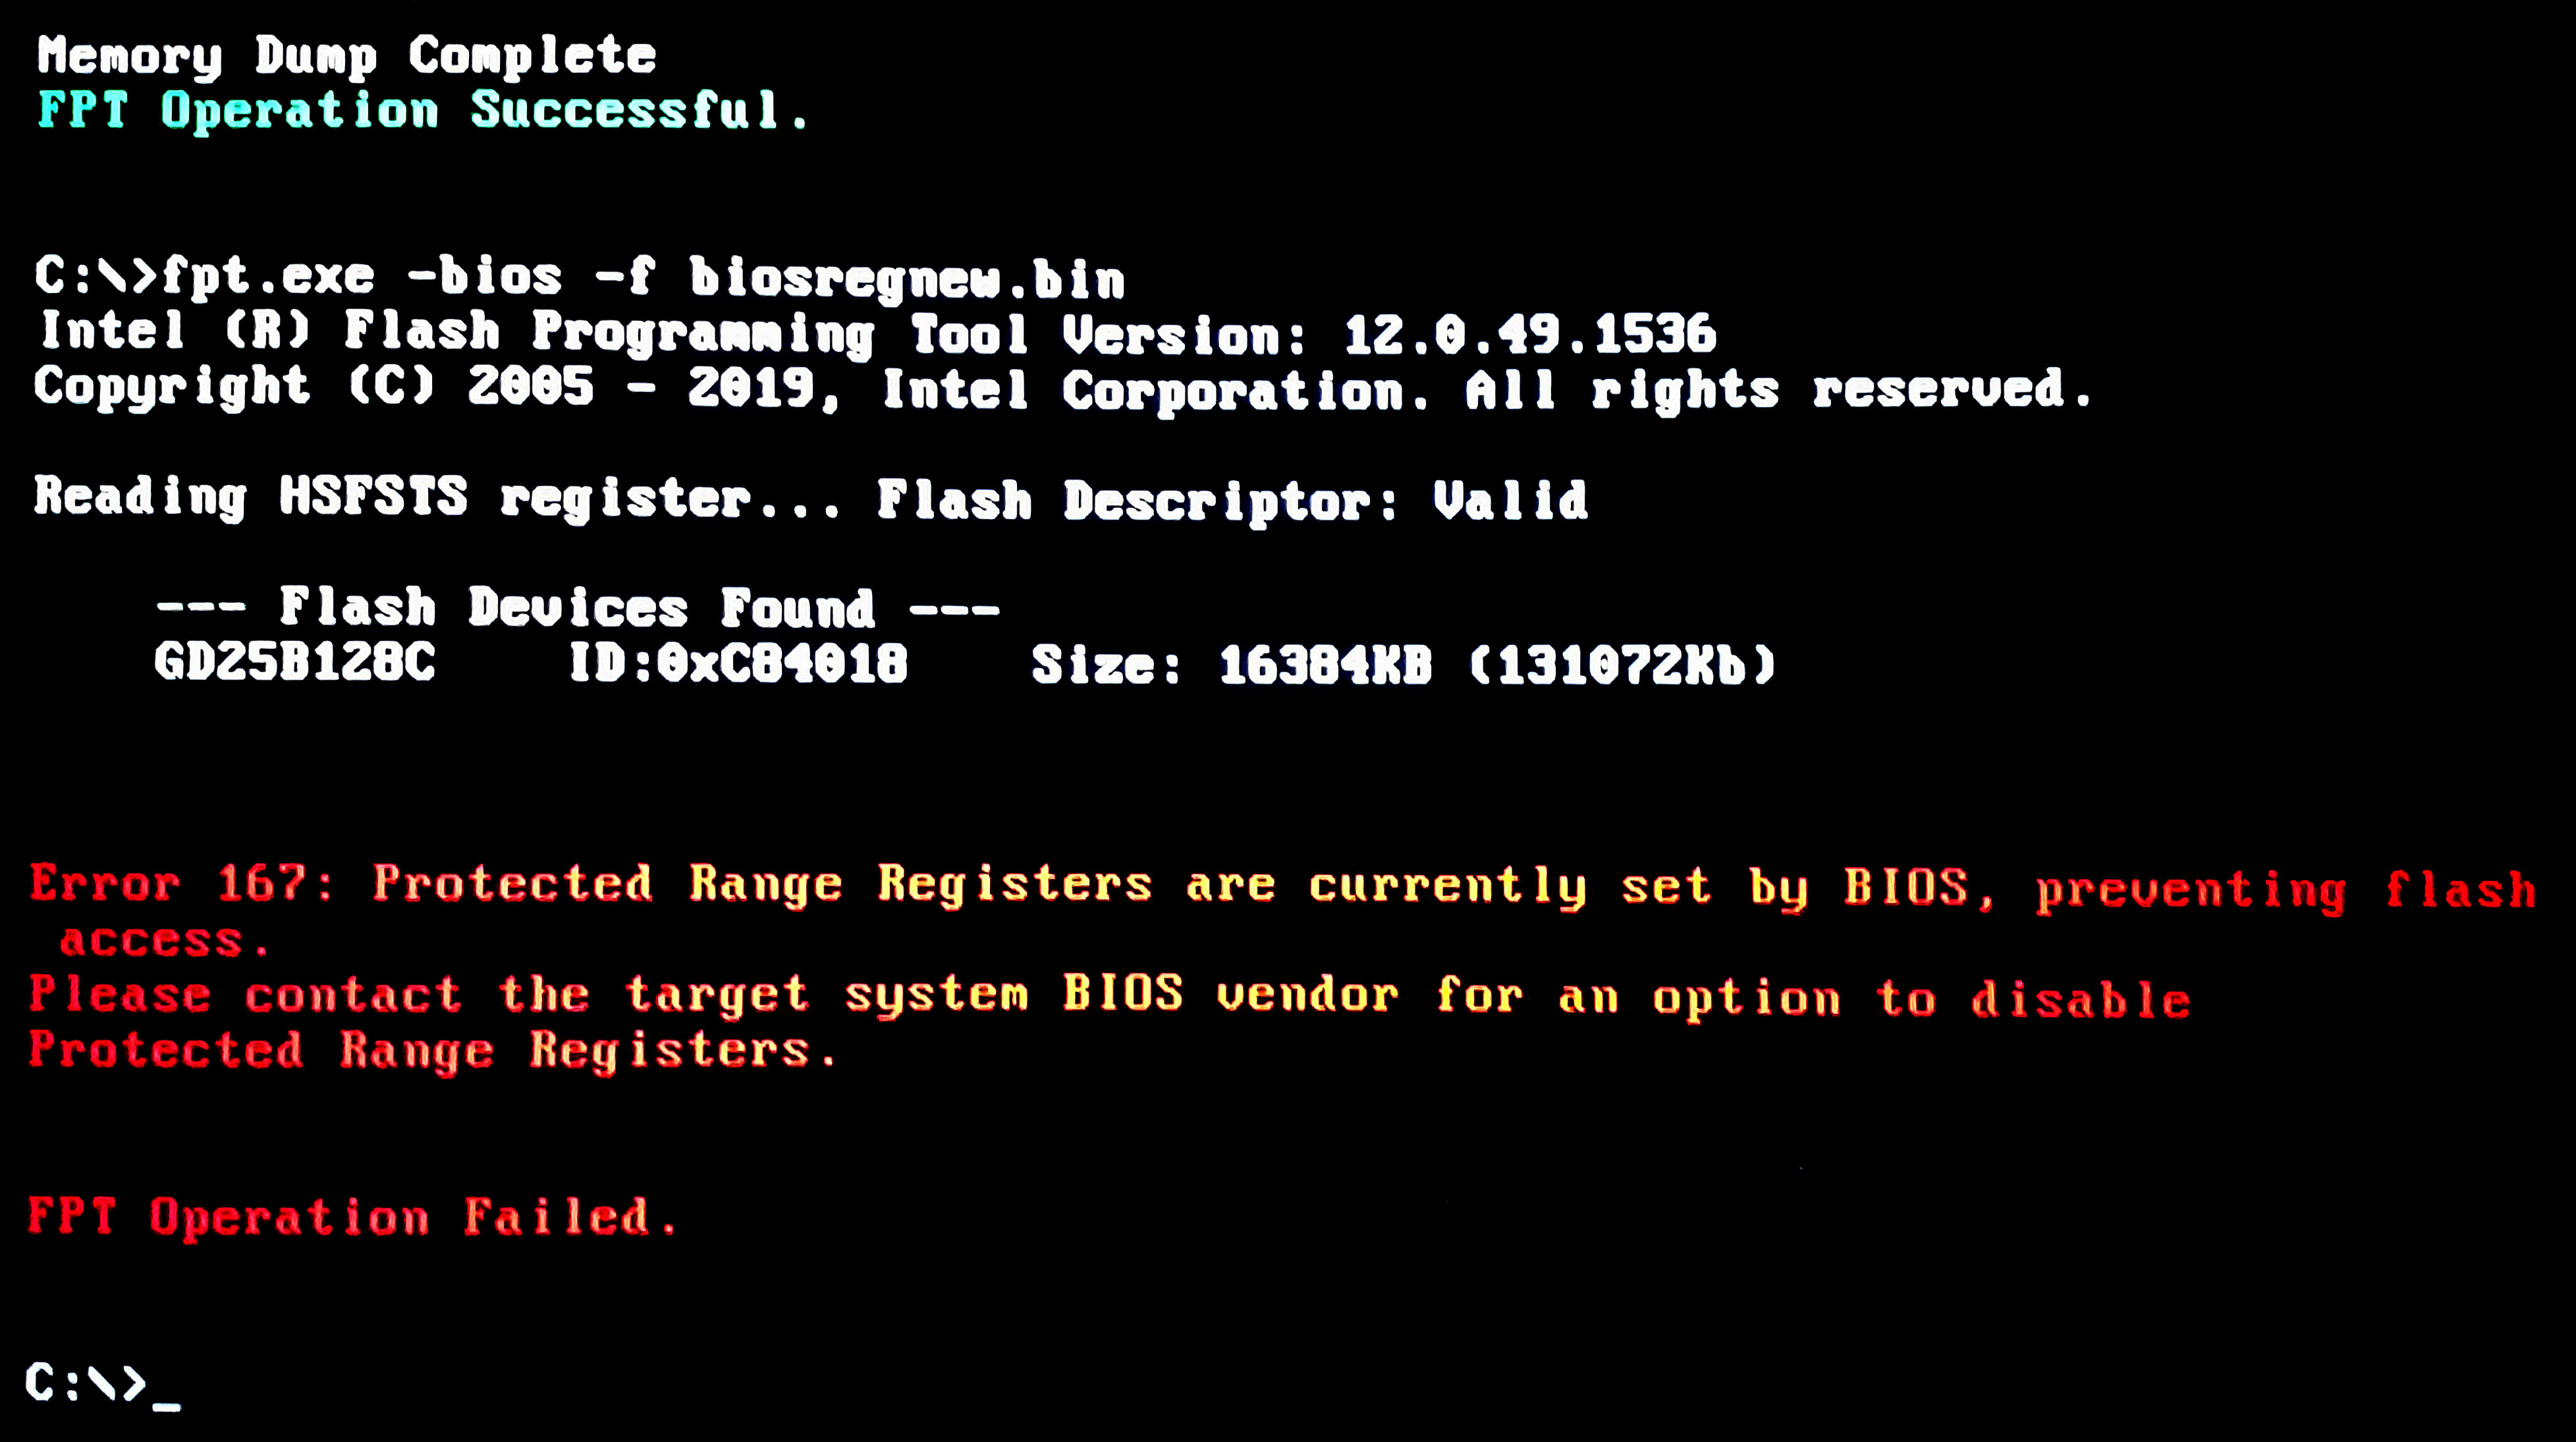
I am thinking same rules applies for my case and use your guide as reference. In below posts I mentioned that I have Intel FPT v.12. However, I do not want to make the mistake @xlegacygt did. Need your confirmation really. I am glad he was able to recover.

EDIT EDIT:

Had an error with Intel FTP on Win 10. Going to try /DOS USB

FTP -d OK -f ERROR.png

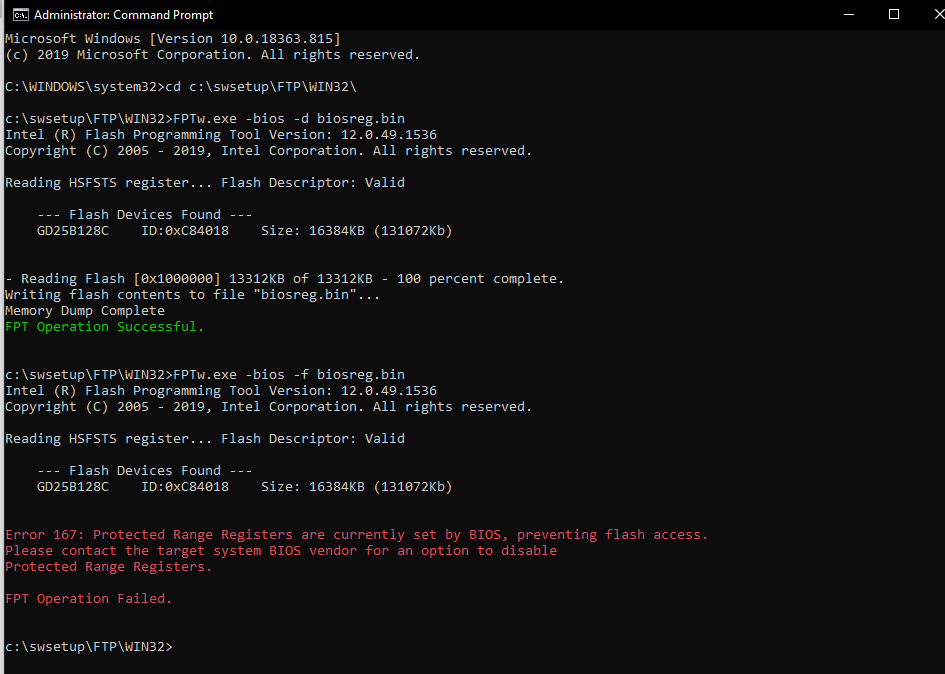
Same error with USB.

EDIT EDIT EDIT 30.04.2020 :

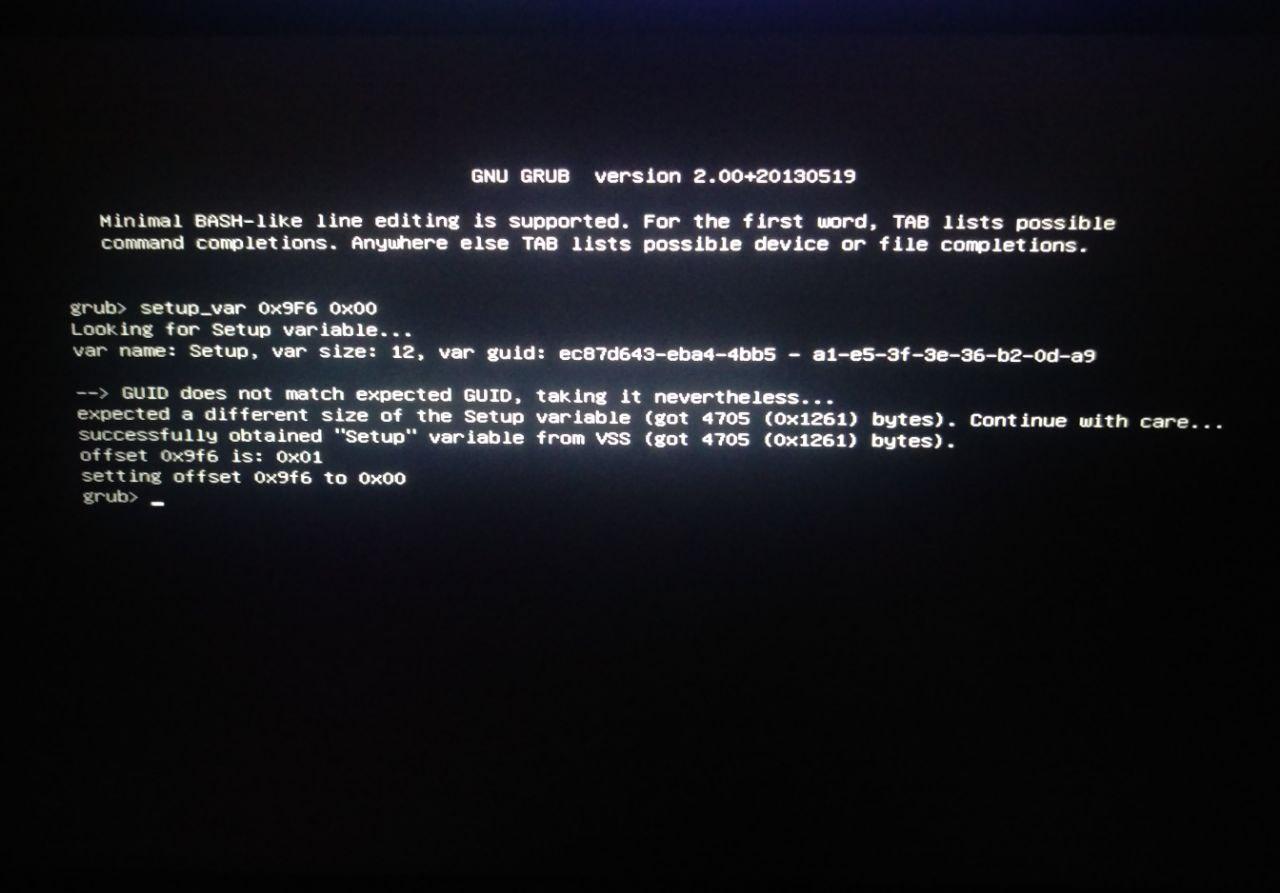
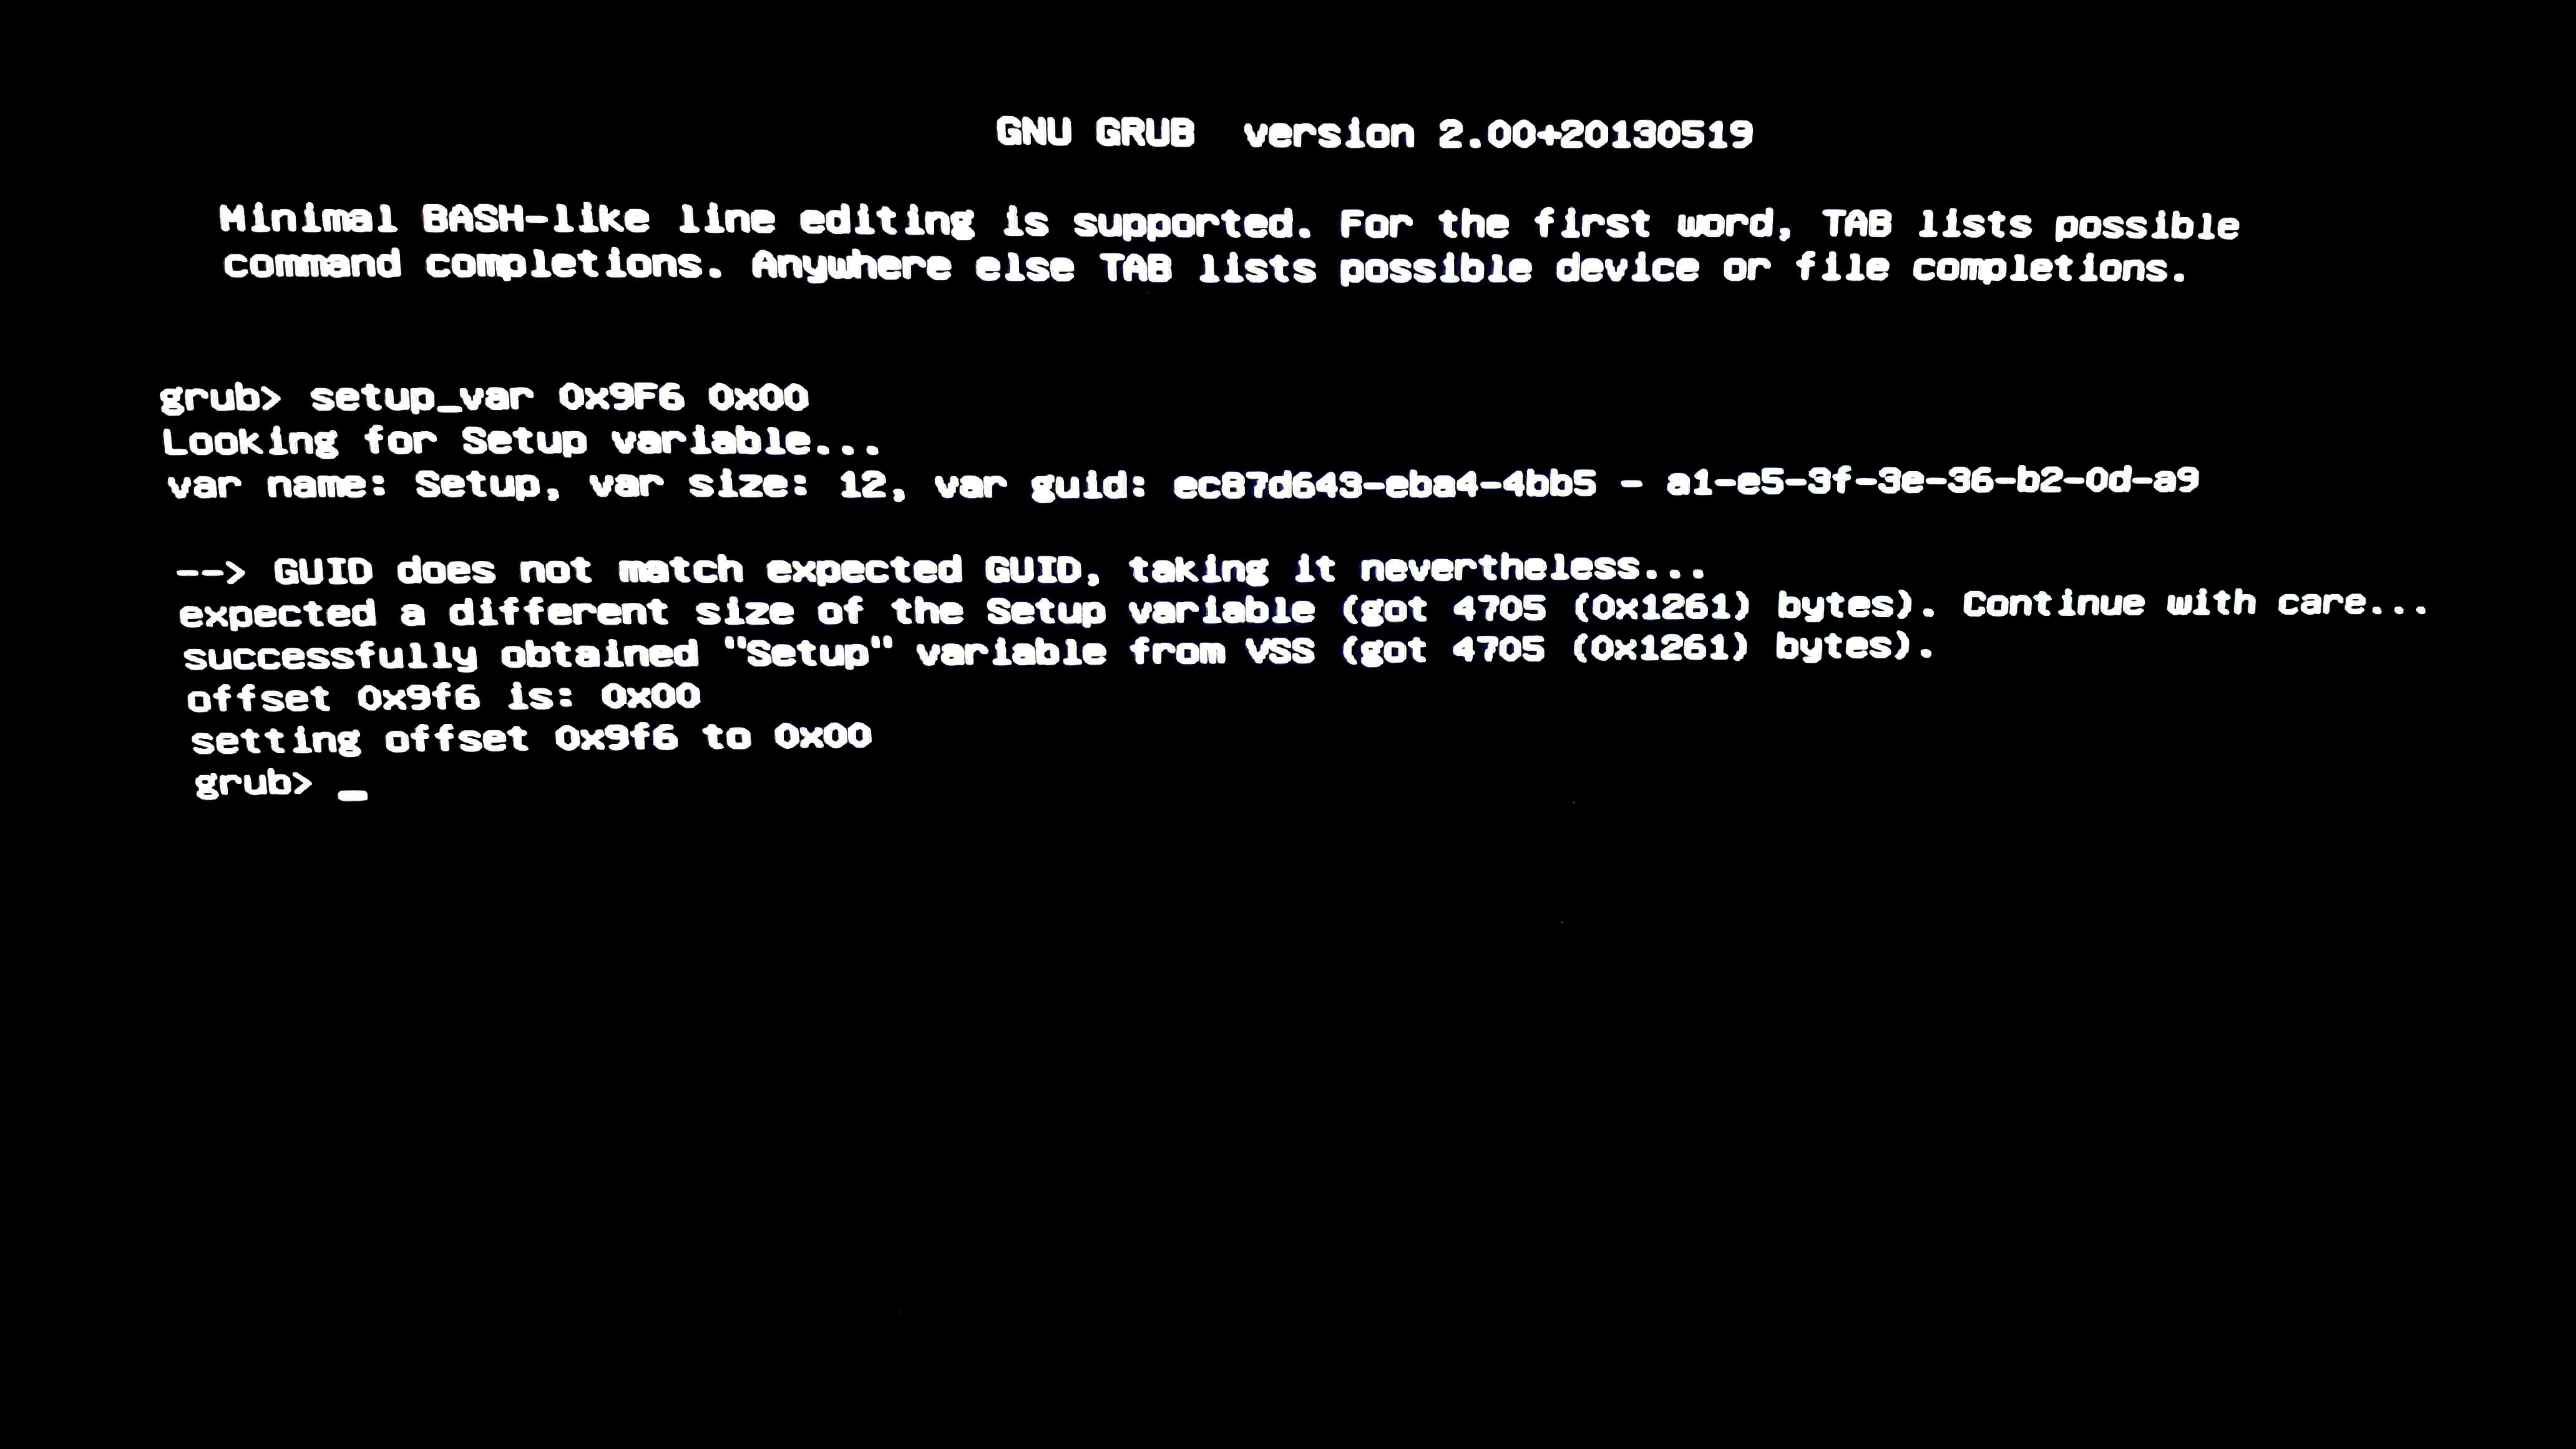
Using @Lost_N_BIOS guide- [GUIDE] Grub Fix Intel FPT Error 280 or 368 - BIOS Lock Asus/Other Mod BIOS Flash I have disabled BIOS Lock.

1
2
3
4
 
0x51A1E 		One Of: BIOS Lock, VarStoreInfo (VarOffset/VarName): 0x9F6, VarStore: 0x1, QuestionId: 0xBAB, Size: 1, Min: 0x0, Max 0x1, Step: 0x0 {05 91 A7 0A A8 0A AB 0B 01 00 F6 09 10 10 00 01 00}
0x51A2F Default: DefaultId: 0x0, Value (8 bit): 0x1 {5B 06 00 00 00 01}
0x51A35 One Of Option: Disabled, Value (8 bit): 0x0 (default MFG) {09 07 04 00 20 00 00}
0x51A3C One Of Option: Enabled, Value (8 bit): 0x1 {09 07 03 00 00 00 01}


BIOS Lock removed.jpg


Now waiting for someone assist me modding my bios.bin to enable Advanced settings. Hope it will happen soon.
EDIT by Fernando: >Here< is the download link to the bios.bin file.

I appreciate any help anyone can offer. I am also ready to donate for those who are putting effort for us the community. Thank you!

The bios update file contains another .exe. I don’t think there’s a complete bios in there. Extract your bios and post the link here in a few days when you can post external links, or attach it to a post. You can extract the bios in windows with this tool.

Nice updates, well done on the hunting too.

I’m not sure if I understand your request, do you want support for the CPU added to the BIOS? And also unlock all the suppressed fields?

I can help with the former but the latter is something I don’t fully understand yet. I understand how to move things out of the if statements but apparently we also need to modify AMISetup or something. Thats where I draw blanks. But adding new microcode to the bios to support more cpu’s is something I can help with.

Well thank you for the commendations. It’s my 2nd day here and I am very new to this kind of BIOS changes. I would not be able to advance without the overall knowledge of the community of this forum. It is, however, very interesting and exciting to do these changes with codes and numbers. It is my passion and hope once finished with my studies I will be able to give something back to the community. :smiley:

Coming to your question, at first(when I had no knowledge of modding bios) I thought it was possible to enable my Integrated Intel UHD 630 GPU by opening up the Advanced Settings from BIOS. You may already know that some laptop models allow the user to Enable/Disable iGPU inside BIOS. I hope it is the case in my situation too, but in another forum I got this reply:


If that is the case then I am going to focus on just modding my BIOS so I can get access to Advanced settings which are hidden right now.


I did not get what you meant by MORE CPUs. I am not going to change the laptop CPU but make tweaks to the current i7 8750H.

I might have seen some strings about on board video when using AMIBCP5. And HWiNFO64 is showing Onboard IGD(Integrated GraphicsDevice ? ). Not sure this is Intel iGPU or dGPU GTX1060


I am attaching the screenshot from AMIBCP5 too.


I hope this time my goal is clearer. Thank you.

Ah yeah, I get now that what you want is “unlock” all those options. I wish I could help there but I can’t even load my BIOS in AMIBCP because Dell uses very long strings in some files and they are difficult to remove without also having to do very deep modding haha.

But I think with that tool its not too hard to do what you need. From what I understand about AMIBCP is that you have to change the permissions for those advanced options to USER or something low privileged and then re-flash the modified bios and you’re done!

@stovorsen , yeah it all boils down into unlocking all those options. No problem, you did helped me by just replying to my posts, keeping me motivated. Thank you for that.
And yes, from what I have seen and read so far how @ explained to on his thread there’s not much remaining. Just to extract the part, make the changes, save modded bios.bin and then flash it. Not sure how to use AMIBCP but on @xlegacygt post they used UEFITool from UBU folder and Intel FPT for flashing the BIOS.
I hope at some time soon @Lost_N_BIOS finds time to look into my post and I may finally be able to finish this project. He has not replied me so far but I understand there so many others looking for his advice. In the meantime, I keep reading other threads to enlighten myself.

Well once you receive your programmer I can try doing what I think is needed in AMIBCP. But since I can’t test and have no experience with the program yet as I can’t open my own BIOS files it would be nice if you can recover from a crappy mod I made.

Fixing my long language strings is next to impossible as you have to test every single module in the bios. But I don’t need all features unlocked in my BIOS. I’m fine with setting what I need in UEFI shell, though at some point it would be nice to have everything in an easy menu.

@unique1188 - So can you now flash BIOS region with FPT? Please test, by deleting any previous BIOS region dumps you made, since you unlocked BIOS lock, and make a new dump
FPTw.exe -bios -d biosregnew.bin

Then test writing it back
FPTw.exe -bios -f biosregnew.bin

If success, then we can mod your BIOS and flash it in without programmer 
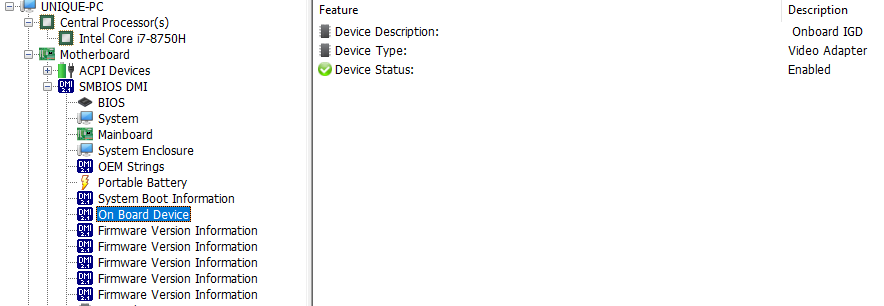
If success, send me this biosregnew.bin file (in a zip or rar, by itself).
Upload to tinyupload.com or uploadfiles.io - thanks

Please give me your full exact model, and a link to the BIOS download page for this system. So I can keep BIOS in proper folder, and have a stock copy

About >>
One Of: Advanced settings, VarStoreInfo (VarOffset/VarName): 0x475, VarStore: 0x1, QuestionId: 0x5B, Size: 1, Min: 0x0, Max 0x1, Step: 0x0 {05 91 3F 01 40 01 5B 00 01 00 75 04 10 10 00 01 00}
One Of Option: Disabled, Value (8 bit): 0x0 (default) {09 07 04 00 30 00 00}
One Of Option: Enabled, Value (8 bit): 0x1 {09 07 03 00 00 00 01}

^^ This may or may not reveal hidden settings, only testing would let you know. This would need edited there in setup + in NVRAM (change to stored current and or default values should be changed as well), and if AMI BIOS, change also should be done at AMITSE/SetupData
I have no idea what you are referencing in regards to anything for xlegacygt, without a link to thread you read about this in.

Is it HP OMEN 17-AN104NG ? If yes, great, link me to stock BIOS download page.
Once I have your BIOSregnew.bin file, and you can flash in BIOS region via FPT, then I can make you first a test BIOS with the advanced settings then enabled so you can see what all that shows, after that I can unlock rest of your BIOS if you want.
If that does reveal more settings, it probably still wont show them all, but once we test and see, then I will need images of ALL of your BIOS, so I can see every setting, every page, every submenu top to bottom, ALL of BIOS - so I can see what is hidden and what needs revealed.

Since we are talking laptop and mod BIOS, I will drop this warning here now, and you will also see it again with any mod BIOS I send you for this system
*** WARNING - To ANYONE with laptop and unlocked BIOS!!! ***
DO NOT try to enable this graphics card or disable that card, switch cards etc. Otherwise you will end up with no display output (ie black screen) and no way to recover except by blind flash or with flash programmer.
You can change graphics related settings, like changing memory sizes, or core speeds etc, just don’t try to disable one card or change which is main etc.

Additionally, be very careful when trying to undervolt CPU, you can leave BIOS unbootable due to CPU voltage too low (Sometimes even 0.05 is too much)


@stovorsen - what BIOS can you not open in AMIBCP, and what version AMIBCP did you try for said BIOS?
Some BIOS you just can’t open in there, some you need special edited AMIBCP, and for that you ideally should only use edited AMIBCP for inspection and do any/all changes you wanted to make with AMIBCP manually instead
Any Text changes >> Setup PE32
Fail Safe/Optimal >> AMITSE/SetupData @ setting QuestionID in little endian - See last part of this post + The image there, then you will understand I’m sure - [Request]Maximus XI Hero - Unlock AMIBCP
Access Level Change ^^ Covered in above info too, see image
Current applied value @ NVRAM >> DatastoreID >> NVRAM Body of said section, value it stored at VarOffset/VarName location.

Sorry, but I can’t explain NVRAM edits very well, without making out a huge guide, but I’ve tried to show it to a few users a time or two, links below
NVRAM edit explained - Determine configurable aperture size from BIOS file
Setup and NVRAM editing here as well - [Help] Unlock advanced menu on 2019 Acer Predator Helios 300 PH315-52 (5)

AMIBCP rarely can help with a BIOS mod like this, usually it will only make “Some” settings visible for you in a menu you can already see (ONLY), by changing access Level to User or Super.
Generally much more advanced editing is needed to reveal a hidden main menu section, then the above may also be needed on top of that too (but only after you first test without it)
And, some settings, even in menus you can already see, cannot be made visible with AMIBCP and would need edit to setup PE32 to unsuppress or ungray

@Lost_N_BIOS , thank you very much for your time!

As you saw here on my #1 post

I used setup_var 0x9F6 0x00 and thought it disabled BIOS Lock. I didn’t try Intel FPT -f until I got the response from you.
So today first thing I did was

1. FPT DOS via USB
FPT.exe -bios -d biosregnew.bin
Then test writing it back
FPT.exe -bios -f biosregnew.bin

2. FPTw with ADMIN CMD
FPTw.exe -bios -d biosregnew.bin
Then test writing it back
FPTw.exe -bios -f biosregnew.bin

In both cases second part of the code FPTw.exe -bios -f biosregnew.bin did not work. Getting the same error.

1
2
3
4
5
 
Error 167: Protected Range Registers are currently set by BIOS, preventing flash access.
Please contact the target system BIOS vendor for an option to disable
Protected Range Registers.
 
FPT Operation Failed.


The USB drive which contains DOS Intel FPT in its root folder was formatted as bootable FreeDOS. I hope it is not causing the issue.

Then I went back and booted using shell.efi via USB. Tested setup_var 0x9F6 0x00 . grub returned the following response


setup_var 0x9F6 0x00 is still 0x00.

So no success here yet. I am however uploading biosregnew.bin here. Please remove empty space. https: //ufile.io/xl51d2y7 . I cannot still post links here(4 more days). That was the reason why I was referencing people’s names with @ or copying the whole Thread name. xD. I used your guides to them making appropriate changes that applies to my system.

My laptop model is OMEN by HP - 17-an104ng. Product number 4BZ33EA#ABD. Product page and link to the bios download page here. https://bit.ly/35nOGFh and https://ftp.hp.com/pub/softpaq/sp100501-101000/sp100723.exe

I understood your point regarding 0x1 to 0x0 may not reveal hidden settings and will be reading the posts you linked about NVRAM so you do not have write long texts again.
I have already ordered Flash Programmer+ Test Clip, arriving tomorrow.

I am also uploading my BIOS images here. These are however all security disabled and keys removed state. If you need with all set to Default I will reupload them again.


WARNING I will keep in mind. Thank you.

Regarding AMIBCP, I only used that to see what’s in my BIOS and to answer @stovorsen and not planning to use it to make changes to my BIOS.
If we can bypass the Intel FPT error and remove BIOS Lock I will go on testing the modded .bin you will provide. If not then Flash Programmer? Please direct me to the posts where I can get the best software to use with guides if available.

I thank you again for your time and effort you are putting for us the community. We cannot thank you enough. Take care and stay healthy as well.

@Lost_N_BIOS thanks for your post.

You and some others have tried to fix the string too long on another bios and you guys had to remove each module one by one to find out which module had the long strings in there: Error: AMIBCP 5.02.0023 language name present exceeds 0x08 in lenght


My bios is aptio 4 and I tried all versions of AMIBCP I could find for aptio 4 bios. Which were only 2. Both give the same message. I tried on my own to remove modules one by one and after each removal rebuild the image and try loading it. But I got dizzy trying after a while. There are simply too many modules in there and I can’t think of a more efficient way to find the “bad” modules and fixing them I wouldn’t know where to start.

I really have no idea what kind of things to expect from AMIBCP and I would be fine with editing those if statements for the suppressed items, but I don’t think its possible to extract the IFR, edit it and somehow put it back. You have to hex edit it right? Which is a bit above my pay grade. I’m fine with editing UEFI but I thought if it’s not too tricky with AMIBCP then I can help others, but as you explained so well it is not that simple.

The main thing I’m bumping up against the getting rid of are the press F1 to continue stuff in Dell bios. Someone else also looking to disable those. Dell is very annoying cuz they require you to press F1 is you replace any Dell part with something else. Even if the replacement parts is much better. Really dislike Dell doing that. It’s not like my fans are broken, they’re better than what Dell used… But I don’t want to derail this topic with that. I patiently wait for my turn.


@unique1188
On my Dells I need to set a service jumper before I can read or write bios regions, even when I disable all the locks in UEFI shell. I don’t know if your HP might have something similar. On my Dells the UEFI settings do stick which isn’t the case on yours. Disabling bios/msr/etc locks on mine is remembered but it doesn’t do anything until the service jumper is set.

@unique1188 - That means either BIOS lock was not the issue, BIOS lock itself usually only causes error 368 if enabled. 167 would be FPRR (may also be called Protected Range Register) is still enabled, or SMI Lock - I can’t check, no link to stock BIOS here yet, so check your IFR for either of those and then disable if needed
Ahh, I see you linked biosregn, and then stock BIOS too - thanks!

Yes, check to be sure the following is 0x00 in grub/setup_var

Flash Protection Range Registers (FPRR), VarStoreInfo (VarOffset/VarName): 0x10B0, VarStore: 0x1, QuestionId: 0x6C0, Size: 1, Min: 0x0, Max 0x1, Step: 0x0 {05 91 E4 10 E5 10 C0 06 01 00 B0 10 10 10 00 01 00}
0x45772 One Of Option: Disabled, Value (8 bit): 0x0 (default) {09 07 04 00 30 00 00}
0x45779 One Of Option: Enabled, Value (8 bit): 0x1 {09 07 03 00 00 00 01}

If it is already 0x00, then this is controlled within a BIOS module (PCHInitDXE or PowermMgmtDXE usually) and not a BIOS setting, only way around it is to disable in module directly, then program that back into chip, and then dump with FPT and use that as base going foward
I will see if I can find and remove in module, sometimes I can find, sometimes not Sorry, I looked, and cannot locate it

Security keys do not matter to me about BIOS images, but I would need them in a zip or rar please and thanks.
Best to wait to try anything mod until your programmer arrives, and you’ve made a backup that someone has checked to confirm to be OK and valid, otherwise you may not be able to recover easily if it bricks due to failed write or RSA-Signed BIOS can’t be edited, or Intel Boot Guard enabled at PCH etc.
What is your BIOS chip ID? Look with magnifying glass and flashlight if needed.

@stovorsen - I don’t see your posts there, so that thread does not help me to help you in any way
As mentioned, I can send you an edited AMIBCP for your BIOS that will allow you to look around at BIOS with AMIBCP if you need to do that.
But I would not trust edited BIOS to flash from it (and if it’s Aptio V one, you have to remove all strings but English before you save, so even more reason to only use for inspection.
Any edits you wanted to do with AMIBCP in such cases should be done manually instead, but you can use these modified AMIBCP to inspect if you want.

IFR is just text output of the hex contents of setup module, so yes, you can extract setup, generate IFR, use that IFR and hex edit the setup module then insert back into BIOS.
This is what we use IFR for, and getting variables needed for setup_var if you wanted to use that.

Quick example from the BIOS in question here, setting I posted above. This is from IFR of the Setup PE32 module body
Stock contents -
Flash Protection Range Registers (FPRR), VarStoreInfo (VarOffset/VarName): 0x10B0, VarStore: 0x1, QuestionId: 0x6C0, Size: 1, Min: 0x0, Max 0x1, Step: 0x0 {05 91 E4 10 E5 10 C0 06 01 00 B0 10 10 10 00 01 00}
One Of Option: Disabled, Value (8 bit): 0x0 (default) {09 07 04 00 30 00 00}
One Of Option: Enabled, Value (8 bit): 0x1 {09 07 03 00 00 00 01}

Edit to change (done in hex, on the PE32 module body) using following info
Flash Protection Range Registers (FPRR), VarStoreInfo (VarOffset/VarName): 0x10B0, VarStore: 0x1, QuestionId: 0x6C0, Size: 1, Min: 0x0, Max 0x1, Step: 0x0 {05 91 E4 10 E5 10 C0 06 01 00 B0 10 10 10 00 01 00} Search this string on Setup PE32 body
One Of Option: Disabled, Value (8 bit): 0x0 (default) {09 07 04 00 30 00 00} << This “30” = “Default” marker in this particular BIOS only, we’ll move to below instead, put “00” in it’s place
One Of Option: Enabled, Value (8 bit): 0x1 {09 07 03 00 00 00 01} << Move 30 to here

So post edit setup PE32 body, generate new IFR would look like this
Flash Protection Range Registers (FPRR), VarStoreInfo (VarOffset/VarName): 0x10B0, VarStore: 0x1, QuestionId: 0x6C0, Size: 1, Min: 0x0, Max 0x1, Step: 0x0 {05 91 E4 10 E5 10 C0 06 01 00 B0 10 10 10 00 01 00}
One Of Option: Disabled, Value (8 bit): 0x0 {09 07 04 00 00 00 00}
One Of Option: Enabled, Value (8 bit): 0x1 (default) {09 07 03 00 30 00 01}

Also, on your Dell’s, whichever those may be, it may be due to the above type of lock (in module, not in BIOS setting), and or you just need to edit FD to unlock FD for all regions still (This is what jumper does, disabled ME FW and bypasses FD locks)
Here’s how to edit your FD to unlock for all regions, dump BIOS, look at first part in hex, compare with images 1 or 2 in second spoiler here, edit per whichever one looks like your FD
[Guide] Unlock Intel Flash Descriptor Read/Write Access Permissions for SPI Servicing

However, if you have FPRR set inside a module, sometimes unlocked FD may not help in all cases and you may still need to use jumper anyway.

Now, what is your BIOS that you want to look at with AMIBCP, what model, then I will PM you AMIBCP to use for inspecting only.

@Lost_N_BIOS , sorry I linked that thread cuz the process you did there I also tried on mine. I also tried removing all modules and it still wouldn’t load lol. To inspect and see what’s there would be awesome yes. Feel free to PM me a link to it. Thanks!

I’m familiar with setup_var. Its what I use the IFR too, very nice to have. Was just wondering about all those suppressed things and how to change those. I seen you explain it in another thread: Suppressed menu entries in BIOS setup – To actually move it outside the if statement we have to use the values found in the extracted IFR right?

I think I also get that but unclear on how to change it. I can find the locations in the .bin file with an hex editor but what to change there (to move the ref out of the if statements) is still a mystery to me. I don’t want to derail this topic but thank you for taking the time to explain the process. A lot has become more clear to me

So if I understood correctly the process to unlock the bios settings like most people here request is to find the offsets of suppressed items in the IFR and then use a hex editor to move them outside the if statements? If yes then maybe I can help out a bit here once I understood how to do the actual moving. But maybe I misunderstood completely haha.

My main focus for myself is the F1 warnings from bios. I just can’t figure that out and they annoy the hell out of me

@Lost_N_BIOS , Thank you very much for a quick response.

Oh, I am glad you have found the links. Today I have received my CH341A Flash programmer and successfully read then saved the BIOS CHIP (ID GIGADEVICE GD25Q128 25-26 SPI FLASH ). I packed everything into one archive in separate folders for you. Link to download here >> https ://ufile.io/p38d2k4cr. I am not sending in PM as you are already getting tons everyday.
Should I still check this code or it is not necessary anymore? As now you have the file extracted from BIOS chip using the CH341A Flash programmer.

1
2
3
 
Flash Protection Range Registers (FPRR), VarStoreInfo (VarOffset/VarName): 0x10B0, VarStore: 0x1, QuestionId: 0x6C0, Size: 1, Min: 0x0, Max 0x1, Step: 0x0 {05 91 E4 10 E5 10 C0 06 01 00 B0 10 10 10 00 01 00}
0x45772 One Of Option: Disabled, Value (8 bit): 0x0 (default) {09 07 04 00 30 00 00}
0x45779 One Of Option: Enabled, Value (8 bit): 0x1 {09 07 03 00 00 00 01}
 

Looking forward to your input on this again. Below is the screengrab from CH341A Flash programmer when it detected my GIGADEVICE GD25Q128 25-26 SPI FLASH BIOS chip.
You are rocking as always. Thanks

GIGADEVICE GD25Q128 25-26 SPI FLASH.jpg


On device written something different AH1826-25B127DSIG-U85917

cHIP.png


==============E=D=I=T=================================

I have just tried opening the image saved from CH341A Flash programmer and getting error messages
MMTool says: Firmware Volume size is invalid
AMIBCP says: Couldn’t open the file
UBU found nothing…


I did something wrong? Or I should be using other Tools here?

==============E=D=I=T=======E=D=I=T=======================

I found this from @junjoo [GUIDE] Flash BIOS with CH341A programmer and [GUIDE] The Beginners Guide to Using a CH341A SPI Programmer/Flasher (With Pictures!)
and following step by step. Once I have the good verified dump I will re-upload the files.
This time I am gonna try with Linux

By the looks of your image the Windows tool didn’t see the flash chip properly. All the fields should populate with info not $17 and $18 and such.

I suggest you make a Linux live usb stick with a Debian/Ubuntu based distro and once booted run sudo apt-get install flashrom and try with that one.

Windows is just too much of a hassle where some chips only work in certain software versions and/or driver versions. With Linux + flashrom you don’t have to deal with that and only have to deal with fitting the clip properly.

Just keep running flashrom until it detects a chip, sometimes the auto-detection matches more than one chip and you have to tell it which chip with a parameter but it will tell you when. It’s well made software, unlike those Chinese windows apps.

@stovorsen - Send me your BIOS, or link me to stock version you are using at manufacturers site, so I know which AMIBCP to send you
Move outside suppression breaks BIOS sometimes, so best to not do that unless you have a flash programmer, backup made and confirmed to be valid/OK, and are ready to recover - otherwise just null the suppression as you see us discussion there.
If you want a more exact method of this geared towards your BIOS, you’ll have to give me link so I can know what BIOS so I can post a few examples for you here.
Move is cut/paste in hex, but as mentioned above, best to just null unless you are ready to recover with programmer in case your BIOS does not like move type of edit.

No, most people either want a setting or two changed = easy in most cases, and as you noted in your thread the other day this often does not require BIOS edit
Setting or two made visible = Can be very simple sometimes, or VERY hard, or impossible (at least for me, mainly some Insyde), all depends on BIOS - All require flashing mod BIOS here
Or a complete menu unlock = This obviously varies greatly between different brands and BIOS types, always requires mod BIOS flash

Show me F1 warning screen image, and I’ll check your BIOS and tell you if you can bypass or not, and how (This may not be in BIOS settings)


@unique1188 - No file attached there, so I can’t even check what you’ve dumped

Use software version 1.34 and Gigadevice GD25Q128
http://s000.tinyupload.com/index.php?fil…695330485827902

Read, verify, then save

Then do exact same with ASProgrammer 1.41 using the GD25Q128C ID
https://github.com/nofeletru/UsbAsp-flash/releases/

Then zip both using max compression and send to me. Both have been confirmed working on your chip ID, but there is a few chips with that same ID under different actual ID’s

@Lost_N_BIOS @stovorsen Hello! Thanks very much for the replies and further explanation on the matter.
Here I uploaded the previous save with all other related files included on max WinRar compression here>>
https://ufile.io/p38d2k4c
I am gonna need recovery bios.bin already to flash with the programmer as Windows CH341A Flash programmer did something wrong and it reads only FFFFFFs now. I may now have bricked chip I am getting CAPS LOCK blinks 5 short 3 quick. According to HP support page it means

Bios error.png


I have tried the Intructions on HP page with BIOS recovery USB for my device(Win+B boot, Win+V boot, just USB boot). Did not work.

Well now i must definitely use Linux from now on. Already made LINUX Live USB.
@Lost_N_BIOS can you create recovery file from what I uploaded to the above link for me to flash with the programmer?

I am not sure what do I have to do now. Need urgent assistance. Thank you!

@Lost_N_BIOS
My bios is in my topic here. I can’t really take pics for the errors cuz they’re different ones and it would mean turning off the computer I’m using now haha. I saw you mention it could be bypassed in asm but thats something I can’t do myself. I also extracted the module that contains the F1 messages. There is only 1 with this messages. I would also be fine with the error still showing but the need to press F1 removed.

If you want the stock BIOS its here, the BIOS region is attached to my topic and to this post. Its extracted with fptw.

I do have a programmer and used it to recover from a bad flash already haha. So no worries there.

bios.bin.zip (3.7 MB)

DellErrorLogConfig.zip (7.79 KB)

@unique1188
Your chip is not bricked. It may be badly erased/formatted. Do as I suggested and try with flashrom in Linux. If you use it to flash back a backup it will wipe the chip before flashing so no worries there. Most important thing is that you have the programmer already. There is a nice guide on the forum about it if you’re not familiar with Linux.

If the BIOS from HP contains a full BIOS image you might be able to use it to recover. I will also have a look for you. Most likely it needs to taken apart in FIT and then flash the files with flashrom. That was the procedure that worked for me. I’ll let you know soon.

@stovorsen Thank you. Okay I will try reading it again on Linux. I am familiar with Linux but will have a look into the guides just to avoid any mistakes. What if FFFFF reads keep happening in Linux too?
I will be posting any updates and keep you and @Lost_N_BIOS in the loop.
Have a nice Sunday guys!

It doesn’t matter if reading fails. The important thing is to have a backup that was dumped with the correct tools. I downloaded the HP .exe file and it has an advanced option to copy the .bin file. I tried opening the bin file in Intel FIT but it gave me an error.

When I flashed a badly modified BIOS on mine I used FIT to take a backup apart and rebuild it. It gave me 2 images, one for each BIOS chip. You can’t just flash the .bin file form HP back without extracting the right parts and flashing those to the correct chips. Usually laptops have more than 1 BIOS chip. Mine has 4mb and 8mb chips and thats a desktop. The Dell .bin file is always 12mb so impossible to flash as it wouldn’t fit. I’m sure the same is happening here. Once you have the correct files you can flash them back to the right chips.

Hopefully @Lost_N_BIOS knows how to extract the files you need from the HP bin. But its possible the image is not complete as is sometimes the case with vendor update files. But since it has the option to copy just the bin I assume its a full bin. Did you create any backups yourself? Even if its just a dump made with the bios backup toolkit. Also don’t give up on the recovery options. It looks like your HP supports BIOS recovery. Try making the recovery usb again with another stick maybe? It’s also odd that your laptop gives you errors seeing you’ve only read the bios right? Or did you erase/write to it too?

I uploaded the HP .bin file here.