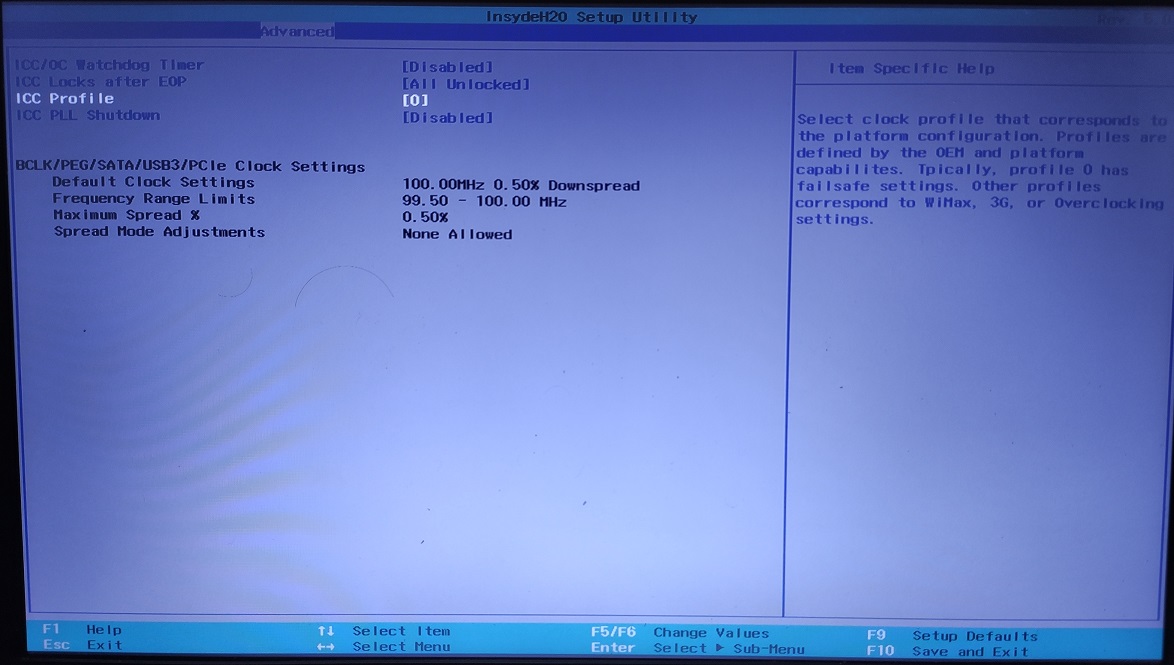
Hello again, I did manage to ungray the ICC option, and now I can insert a number there. I have tried to change the value from 0 to 1, 2 and some couple more, but when I save and reboot it is always back to 0. Maybe there is a specific number to attempt? Since there is no number profile to choose from, just a empity fill box in there. Thx for the repply.
@Lost_N_BIOS @Mártin BRM Could you teach me how to do it? I got 0 experience in editing BIOS file, I have been trying to learn it via google, but haven’t found the proper ways to do it (which is scare me, because I might brick my laptop). what I wanted to do is unlocking the advanced menu tab, I just bought spi-programmer+soic8 clip and managed to dump my bios
@felix185 - Sorry I missed your post until now! But, this thread and anything mentioned here does not apply to your model, once you reply I will split and move this over to the 571G thread Here is your unlocked E5-571g-57MJ BIOS - http://s000.tinyupload.com/index.php?fil…596303860683916
*** WARNING - To ANYONE with laptop and unlocked BIOS!!! DO NOT try to enable this graphics card or disable that card, switch cards etc. Otherwise you will end up with no display output (ie black screen) and no way to recover except by blind flash or with flash programmer. You can change graphics related settings, like changing memory sizes, or core speeds etc, just don’t try to disable one card or change which is main etc. Additionally, be very careful when trying to undervolt CPU, you can leave BIOS unbootable due to CPU voltage too low (Sometimes even 0.05 is too much)
WARNING *** - This BIOS is user specific! If you are not user felix185 at Win-RAID.com forum, DO NOT USE THIS BIOS!! If you do, and you are not felix185, then you will loose your serial, UUID, OG NVRAM, and possibly LAN MAC ID as well. You have been warned!!!
@Ov3rCl0ck5 - Do you have flash programmer? If yes, dump your BIOS and send to me, if not, do below and tell me what error you get at step #2, and send me file from step #1 - You may need flash programmer, not sure, we can try without and see if we can make it happen
If you have already modified the BIOS in ANY way, you will need to re-flash it back to factory defaults using factory method (NOT FPT)!!! Additionally, please remove all BIOS passwords, disable secure boot, and disable TPM or Encryption if you have enabled. Do this before moving on to below
If you do not have Intel ME drivers installed, install them now from your system driver download page, then start over here after reboot. Check your BIOS’ main page and see if ME FW version is shown. If not then > DOWNLOAD HWINFO64 HERE <
Once HWINFO is open, look at the large window on the left side, expand motherboard, and find the ME area. Inside that section is the ME Firmware version. Take note of the version. (ie. write it down or get a screenshot)
Once you have that, go to the thread linked below, and in the section “C.2” find and download the matching ME System Tools Package for your system. (ie if ME FW version = 10.x get V10 package, if 9.0-9.1 get V9.1 package, if 9.5 or above get V9.5 package etc) > DOWNLOAD " ME System Tools " packages HERE <
Once downloaded, inside you will find Flash Programming Tool folder, and then inside that a Windows or Win/Win32 folder (NOT x64). Highlight that Win/Win32 folder, then hold shift and press right click. Choose “open command window here” (Not power shell! >> * See Registry file below *).
If you get an error, reply to this post with a screenshot of it, OR write down the EXACT command entered and the EXACT error given.
((If “open command window here” does not appear, look for the “Simple Registry Edit” below…))
Step #1 Now you should be at the command prompt. You are going to BACKUP the factory un-modified firmware, so type the following command: Command: " FPTw.exe -bios -d biosreg.bin "
>> Attach the saved "biosreg.bin ", placed into a compressed ZIP/RAR file, to your next post!!! <<
Step #2 Right after you do that, try to write back the BIOS Region dump and see if you get any error(s). Command: " FPTw.exe -bios -f biosreg.bin " ^^ This step is important! Don’t forget! ^^
If you get an error, reply to this post with a screenshot of it, OR write down the EXACT command entered and the EXACT error given.
Here is a SIMPLE REGISTRY EDIT that adds “Open command window here as Administrator” to the right click menu, instead of Power Shell Double-click downloaded file to install. Reboot after install may be required > CLICK HERE TO DOWNLOAD CMD PROMPT REGISTRY ENTRY <
If the windows method above does NOT work for you… Then you may have to copy all contents from the Flash Programming Tool \ DOS folder to the root of a Bootable USB disk and do the dump from DOS ( DOS command: " FPT.exe -bios -d biosreg.bin " )
@Rygen29 - Send me your dumped BIOS, or see post #8-16, I explain how to unlock your model and that exact version of the BIOS (Mártin BRM was on 1.08 BIOS too, so edit is same for you)
@Lost_N_BIOS Hi, thank you for replying my post, I just tried the post #8-16, which is succeed. I manage to edit my bios via SPI-programmer+SOIC8 clipper with CH341a software… but it seems my problem can’t be solved this way… the reason I want to unlock the advanced menu tab is that I might fixed blank screen after installing graphic driver by changing the default GPU adapter that maintain the display to my dGPU instead iGPU ( I tried to change from IGFX or SG to PCIE and resulted on blank screen, I had to remove my BIOS battery to reset it). I have been facing this problem for a month, installing older driver, newer driver, etc. my laptop is currently running with microsoft basic display adapter and NVIDIA Graphic, but I can’t change the display brightness, Can’t connect to HDMI and anything that run on fullscreen will get like 1FPS-10FPS because non existence of IGFX driver ( Intel Graphic driver). Do you have any experience regarding this problem?
@Rygen29 Hey! I have exactly the same problem with the same hardware. It drives me crazy. I also use linux and the problem persist in linux as well. So that means the problem is a hardware mulfunction. Could you solve this problem?
unfortunately, I haven’t found the solution yet. I bought another Laptop already, and been in hiatus to solve the problem ever since, I did open another discussion and request. let’s see what we got
The solution is really easy. Just turn off Laptop, then press and hold both FN and TAB key and while holding push power button, then hit F2 key to enter bios. So this is how you accidentally enabled advanced settings
I am in need of some assistance with modifying the BIOS dump on my old laptop motherboard (which does not have any periphery, only the motherboard). Despite my efforts, I have not been successful in accessing advanced settings and power options.
The motherboard is from laptop HP Notebook - 15-r151nu (ENERGY STAR)
I have tried modifying the BIOS myself several times without success. I have also tried using a grub mod to change the setup_var, but it seems that this method can only edit vars up to ~0x200, while my vars are 0x1234 & 0x1235 (at least that’s what i understood) .
I have attached the BIOS dump fetched from the chip(CH/SPI).
Your help could save this motherboard from becoming e-waste and contribute to a more sustainable future.
Best regards, Any explanation of what and why should be changed is welcome
Here are BIOS dump and SetupUtility IFR
At first, you can make sure if any modification is appliable by searching for the following pattern.
Ususally HP BIOS has SHA checksum check implemented. Some versions of it are already cracked and you might be lucky to find that the method is suitable.
I’m 50:50 about this, I used an H2OEZE for exporting/importing modules, only good known test was to change the BIOS version, any other change led to a black screen for the external monitor, strangely when I insert a bootable USB flash drive blinks/starts, but no picture…
You can change BIOS version string because it’s located in the “padding” area which basically represents “freeform” at the top of the EFI FFS hierarchy. The modules are located in the DXE volume, which is subject to the check.
Structure view is available in UEFITool.
Our discussion is offtopic here, so I consider this reply on your issue as my latest.

