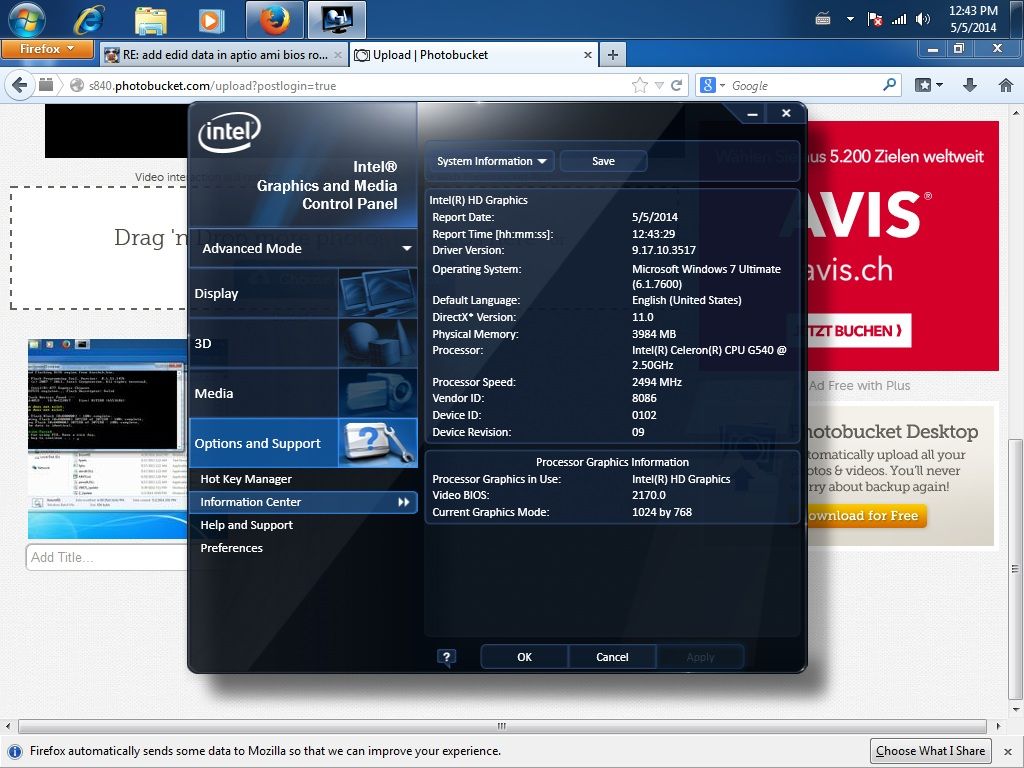
The fact that you got 2170 VBIOS version (in Intel Panel) means that the protection was by-passed, because the original BIOS had 2143 version. As to why it didn’t worked, I have some ideas for testing. You must install a clean driver to read the VBIOS timings. But before that, do the following with only the Hannstar screen connected all the time, no other screen (! important):
1. Unpack the attached rar to the same folder as previous files. 2. Run biosbck.bat to get a biosbck.bin for modding. 3. Run Z_Update.bat only once, then run biosrefl2.bat to flash the updated BIOS. 4. Shutdown. 5. Boot to Windows and uninstall Intel HD Graphics as depicted here. Run all the instructions in that order. 6. Download a new driver from here for x64 OS, or here for x86 OS. 7. Install it, shutdown. Boot and test the resolution, see if you have any 1024x600 in Win or Intel Graphic panel. 8. If not, run Z_Update.bat followed by biosrefl2.bat, then shutdown and boot, until you get a working 1024x600 or you get "Testing is complete!"
If this still doesn’t work, I’m afraid I’m running out of ideas. Maybe if you would post some pictures of “BIOS -> Chipset” tab and “BIOS -> Chipset -> (SA) Configuration -> Graphic Configuration -> LCD Control”.
i following again your instruction until its finished, but still cant get 1024x600. few of things that i can reporting to you:
1. as a confirmation, here is the screen shoot from intel hd driver that the video bios version is 2170
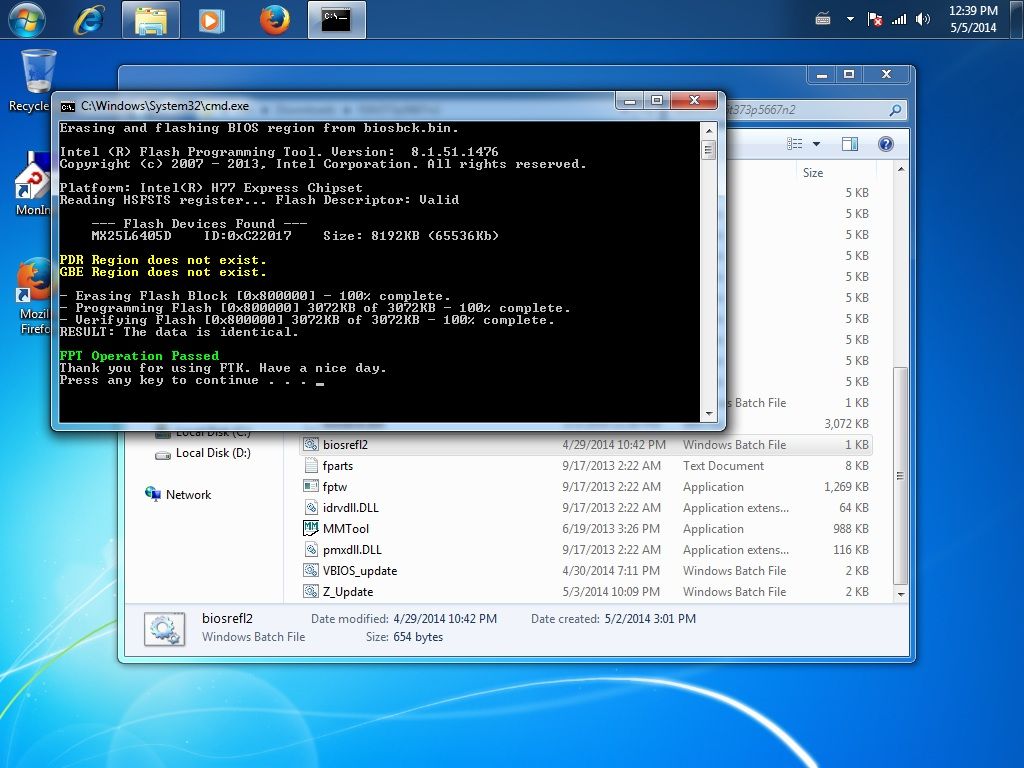
2. since the first try, everytime i execute biosrefl2.bat, there are a comment that "the data is identical" as the pict below
may be, i need to always delete biosbck.bin before execute z_update.bat or biosbck.bat?
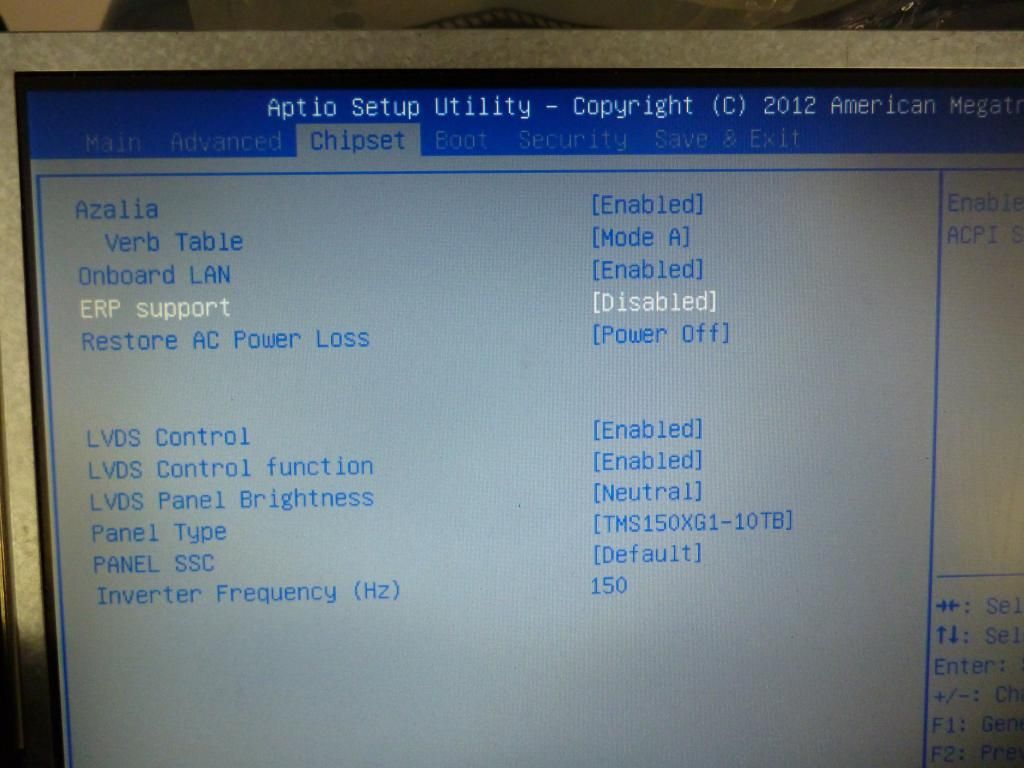
3. in bios lvds panel selection, i always use "TMS150XG1-10TB" and inverter frequency "150" because only with this one, the hannstar screen working, otherwise, i need to use hdmi monitor to see everything (which we need to avoid to use it).
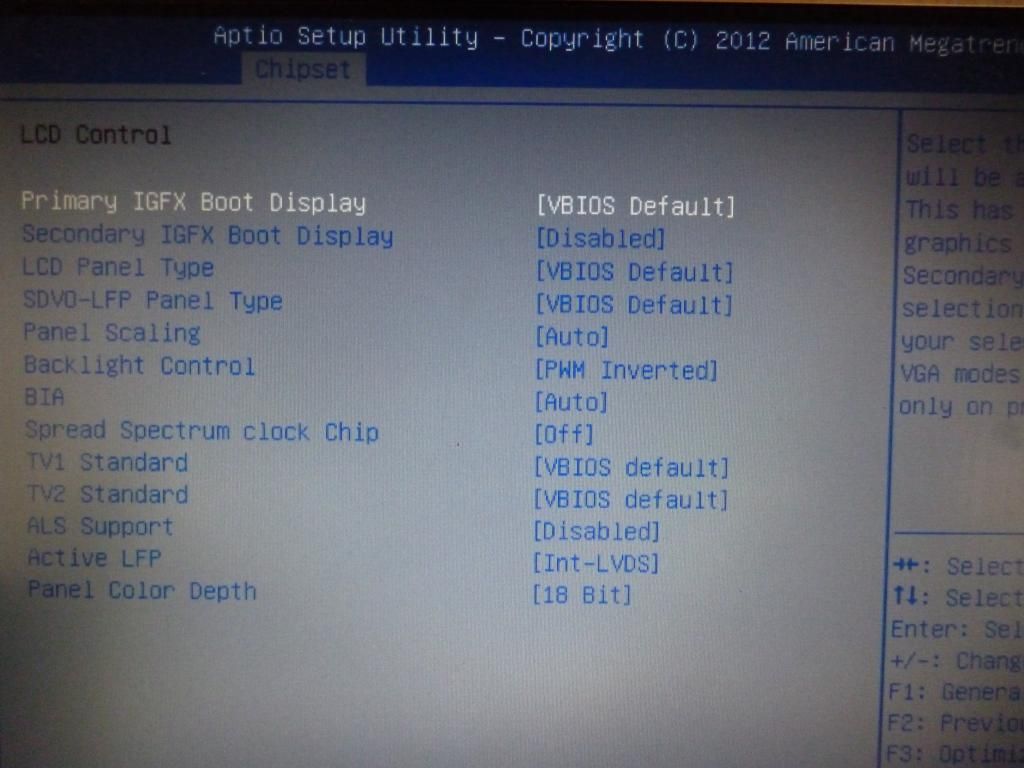
4. as your request: here is "BIOS -> Chipset"
but for "BIOS -> Chipset -> (SA) Configuration -> Graphic Configuration -> LCD Control" i cant get it, there are no selection of (SA) configuration as you see in the picture above.
First of all, there is no problem with “The data is identical”. If you read the above 3 lines, you will see that it compares the updated BIOS region with the flashed biosbck.bin, to make sure that there were no errors during flashing.
I think you are at the end of the line. It is better to buy a new 1024x768 LVDS screen, which will give you: native support from BIOS, full UEFI support (works with CSM disabled), no need to mess with BIOS+drivers. It is my impression that any 1024x768 will work, but you should make sure that the supplier has a return policy, otherwise buy the same screen as offered in BIOS setup. When you get one, install the original BIOS and clean install drivers as advised before.
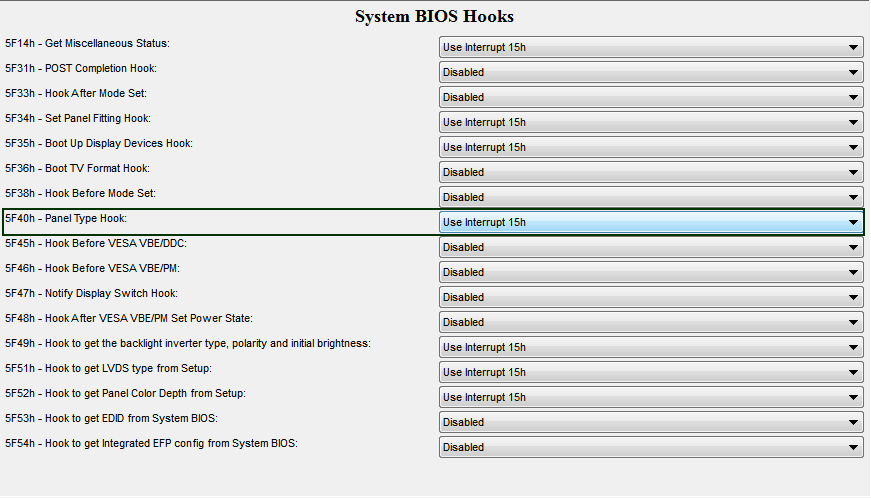
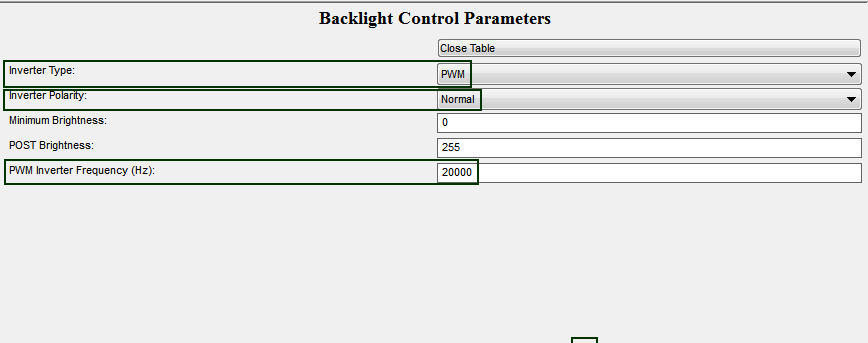
There are several reasons why I think the netbook screen is not supported by your mainboard. It is a netbook screen and your BIOS has support for only 1024x768, 1366x768 and 1920x1080 screens. The timings from Eee PC for 1024x600 require Inverter PWM Normal at 20000Hz, your BIOS offers PWM Inverted at 0-250Hz. Your BIOS overrides the VBIOS timings with the ones from “Panel Type” and I haven’t found any DTD outside VBIOS/Addon/GopDriver, which means it is simply forcing a specific timing, despite my attempts to disable the 5F40h hook.
Until your new screen arrives, here are some other things to test. Do you get any higher screen resolution than 1024x768? What happens when you change the aspect ratio setting (Proporzioni in your first screen from here)? What happens when you apply this?
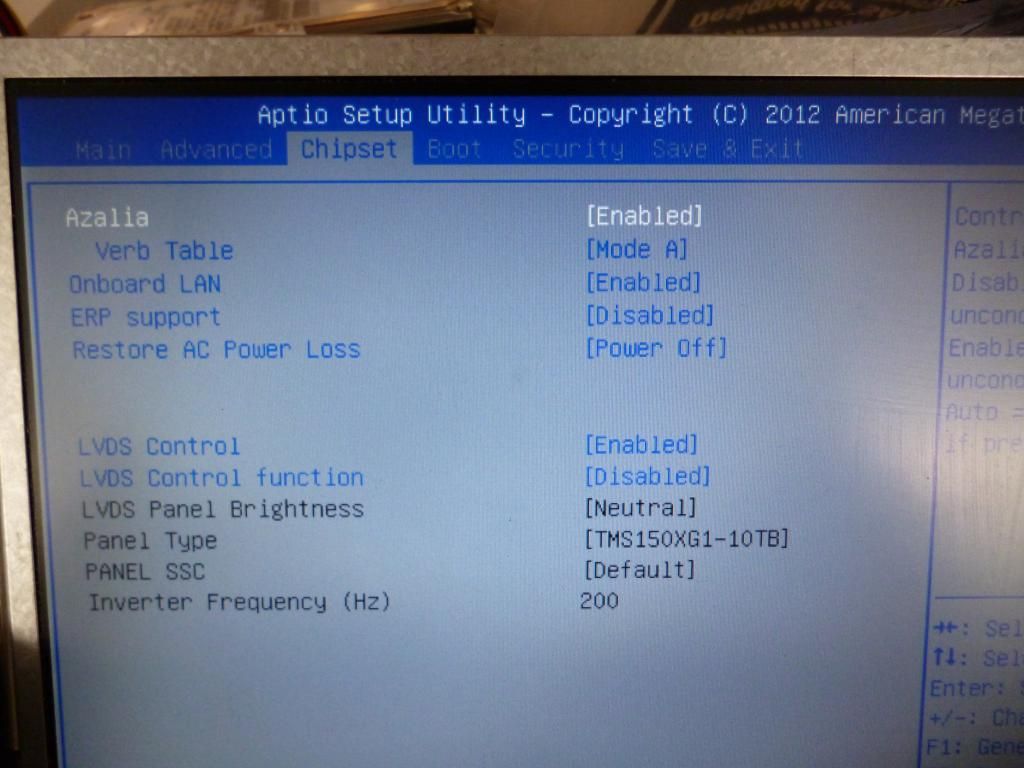
Since your BIOS is overriding any values in VBIOS, let’s change a few things. First set Inverter Frequency to 200 and see if anything good or bad happens, then leave it at 200Hz. When you change “Panel Type” to “Other Panel”, do you get a black screen no matter if in BIOS or Windows? The “Other Panel” is needed to have the VBIOS decide the timings. When you change “LVDS Control” = Disable and “LVDS Control Function” = Disable, does it still sets 1024x768 as default? My first guess is that they should be set to Disabled, to let the VBIOS decide.
The last two tests for VBIOS I can think off. Unpack and overwrite the files in the previous working folder. Run biosbck.bat, run #Any_Update.bat and type 9, then run biosrefl2.bat. This will set 1024x768 as default panel, maybe it will somehow stretch the screen. Even if it works, the end result might not be pleasing.
The last test is to hack the default timings for 1024x768 and change them to 1024x600. Run biosbck.bat, run #Any_Update.bat and type 10, then run biosrefl2.bat and reboot. You should probably also test with “Panel Type” = “Other Panel” and “LVDS Control” = Disable + “LVDS Control Function” = Disable. Restart and check: if the screen turns black, leave them at default and test as it is.
As a last attempt, have you tried Linux, where Ubuntu and Mint are strong recommendations?
1. if in bios i choose "TMS150XG1-10TB", than in windows/intel driver,there only two options of resolution: 1024x768 or 800x600. if i change vertical aspec ratio setting, the effect are quite similar like if i make costums resolution, i still cant see the bottom part of the screen, plus there are a big black strip on the top (if i use exactly 1024x768 screen, the black strip must be on the top and bottom). i already try to hack and override windows registry since the beginning, its doesnt works.
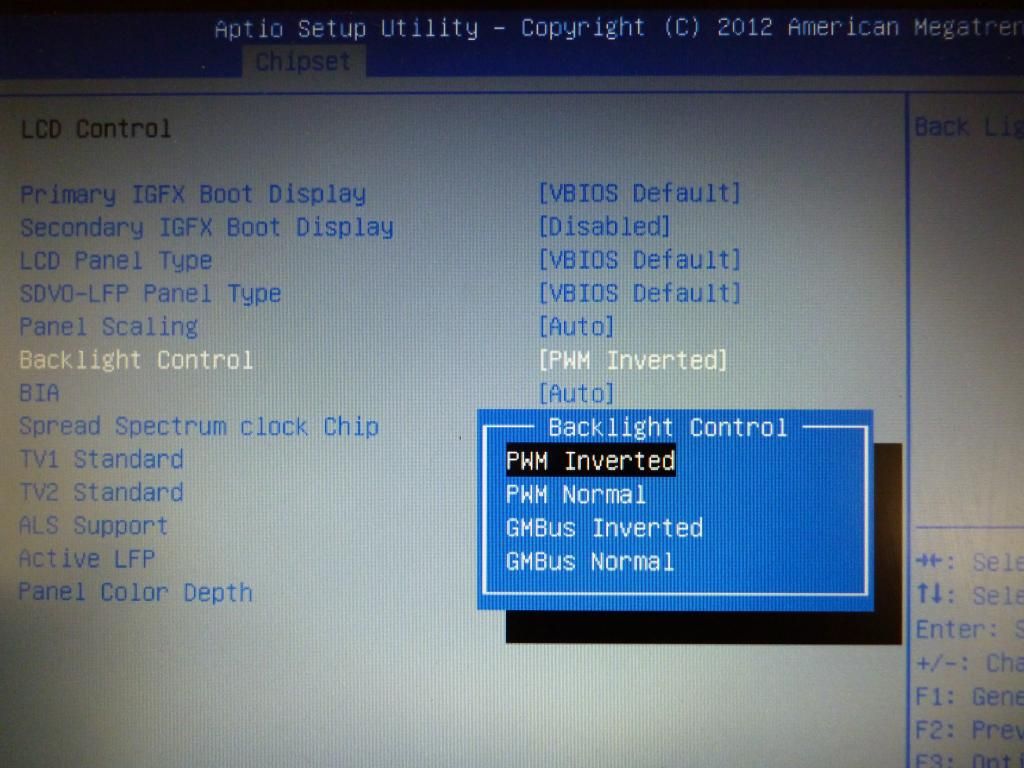
2. i try inverter frequency to 200, the screen still working well, seems there are no difference compared with 150. if i choose "other panel" the screen will totaly black out no matter if in BIOS or Windows. "LVDS Control" = Disable makes the lvds port disactivated and "LVDS Control Function" = Disable makes to lock all of the lvds settings parameter as the picture below. not to makes VBIOS decide the best settings for itself.
3. i try your test3 as your instructions, but still doesnt works. i think, all of your mod works if i use hdmi monitors, but not for lvds port. since we need to make it change, we need to modify the data inside TMS150XG1-10TB menu. but once more time, its just my cent as newbie.
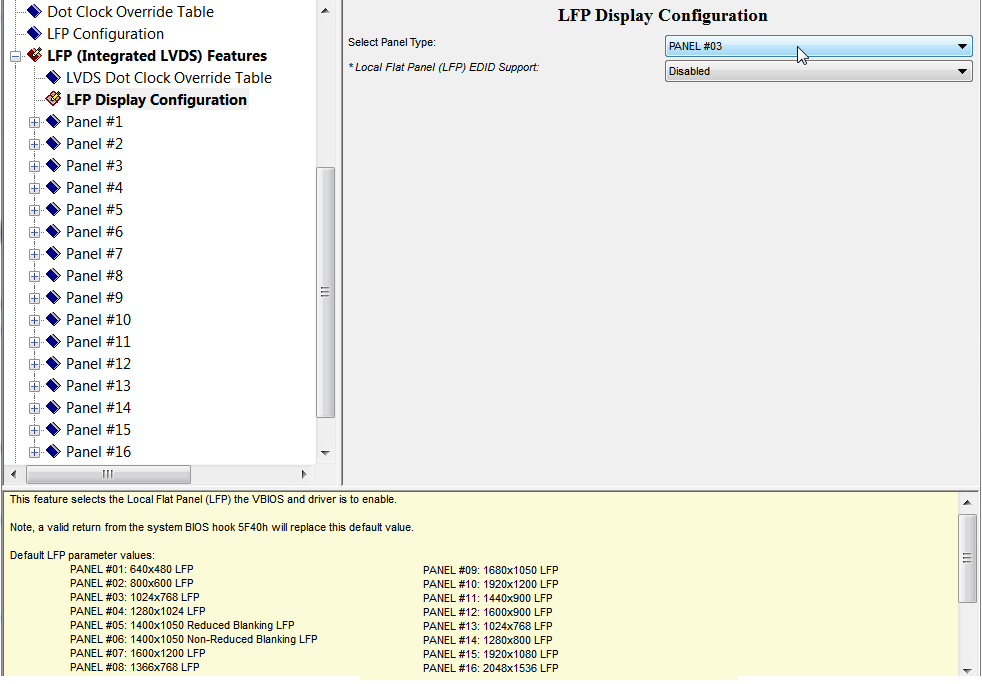
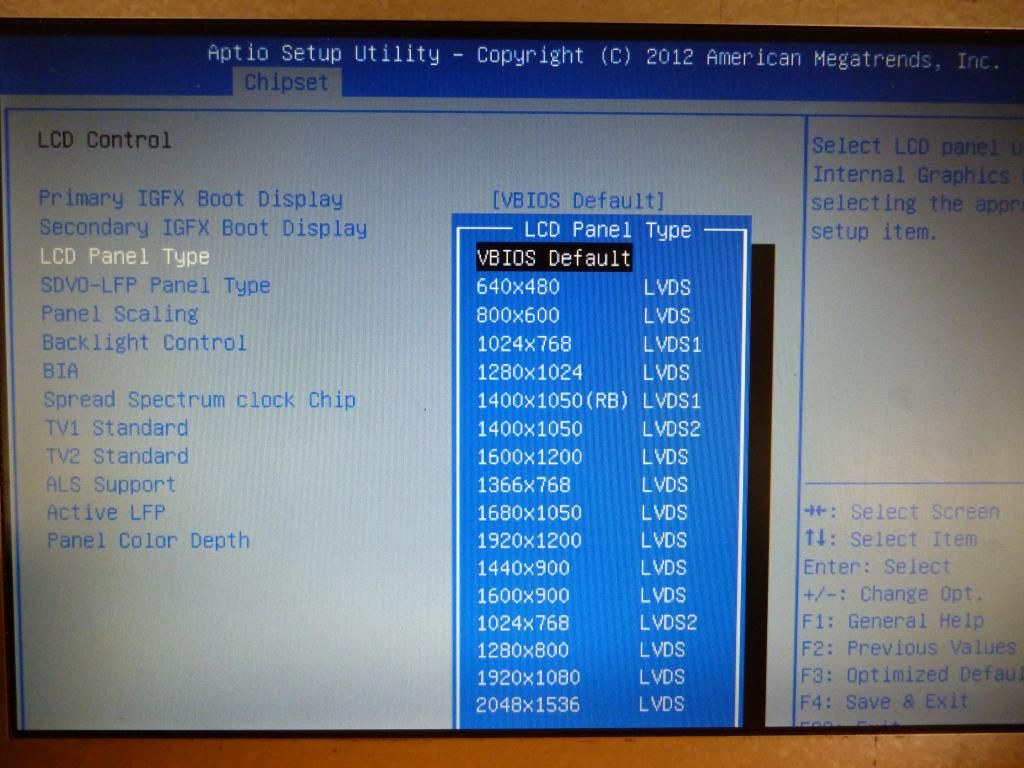
I analyzed a bit deeper and I can 90% tell you that it is a hardware problem, your LVDS connector is not able to provide the requested frequencies asked by your netbook (!) screen, which should be expected. Bottom line, buy a new screen with resolution from 1024x768 and above. Following is the explanation. The VBIOS provide 16 panels type by default:
Your BIOS has 4 default values to select. Notice how the values are linked with the resolutions from above screen. I think Gigabyte has opted to put a particular screen name (instead of the default resolutions) to avoid users complaining that another screen doesn’t work, i.e. “we support only these screens”. In theory, any screen with 1024x768, 1366x768, 1920x1080 and 1440x900 should work out of the box (the timings are at default) and any other normal screen after patching the VBIOS.
And this is how it passes the selected value, by using the 5F40 hook in VBIOS Addon. I repeat, there is no timing outside VBIOS/Addon/GopDriver, all it does it selects one of those 16 panels, which can be changed as the OEM pleases. Before you ask, yes I disabled those hooks and I’ve done a hole lot of other things to no avail:
Now, the real problem. Your netbook screen needs these values, but your mainboard can only offer 0-250Hz, which I think is available for 1024x768 and above:
Your BIOS is set to PWM Inverted by default and the setting is hidden. If you want to test with PWM Normal, download the rar, unpack to previous folder. Run biosbck.bat, run unlock.bat, run biosrefl2.bat, reboot and look for: BIOS -> Chipset -> (SA) Configuration -> Graphic Configuration -> LCD Control -> Backlight Control
But the main problem remains the inverter frequency.
@lordkag thank you so much… let me try to resume… please correct me if i’m wrong:
1. there are 16 panel type with different resolution preset, but only 4 displayed in bios menu with “alias” name…just curious to know, one day, if i have one of the other 12 panel resolution on the list, how to accessing it? 2. if you already disable the hooks, it means, i can override the windows registry again with chance of success? since there are no linkage again between windows/intel hd driver with vbios. 3. i know, the real problem is about the frequency…so, if i buy another screen panel, let say 1366x768, i need to check their required inverter frequency? or just any 1366x768 screen can be match easily with this motherboard? 4. i will try again your bios mod tommorow, and hope so there are (SA) Configuration → Graphic Configuration → LCD Control → Backlight Control at bios chipset tab.
Need to disable the System BIOS Hooks and select the panel in the first screen. But I doubt you will be able to do that by yourself, this needs to be done to VBIOS and Addon. This only applies to LVDS connections, HDMI/DVI/DP should work by default. 2. No. There is nothing you can do, because the timings are not supported, specifically the inverter is not capable of supporting your netbook screen, thus it falls back to default 1024x768. I don’t think you can solve this hardware issue. 3. Any 1024x768, 1366x768, 1440x900 (as “other type”) should work. Maybe you only need to set PWM Normal at 200Hz, but I think Gigabyte has already set them up as needed. 4. Report back. I think I might also need to remove some “suppress if” in Setup.
Before you read the following, please note that I still strongly recommend that you should buy a new 1024x768 or 1366x768 or 1920x1080p screen, to have full support, better image and no strange scaling. Once you do this, flash original BIOS, clean install video drivers, test with PWM Normal at 200Hz or PWM Inverted at 200Hz. It is more than likely that it would work.
I decided to add some last tests, because it turns out I trusted too much in the VBIOS from Eee PC and the timings are not really appropriate for your panel. The real EDID and timings are the ones you extracted with MonInfo from laptop, without any video driver. It matches the pdf, plus it has the serial and manufacturing date. There are many tests because I had to work with the following variables: PWM Inverted/Normal, Inverter at 200Hz/20000Hz, SSC on/off, BIOS Hooks on/off. These are the last tests and only the first 6 (from 11 to 16) are important, the others are just variations in case the BIOS hooks are faulty. Decide for yourself how much do you want to torture your mainboard. Besides the proper timings, I also added the proper PnP ID, which means that the monitor should be fully detected by VBIOS+drivers.
Testing goes like this: inverter frequency always set at 200Hz, run biosbck.bat, run #Any_update.bat and input a number from 11 to 22 (in this order), run biosrefl2.bat, reboot and remove all the monitor devices under Device Manager -> Monitor. Windows should add a new PnP monitor.
After the first flash (number 11), reboot, remove monitors from Device Manager, clean install HD drivers, remove monitors once more. This is to acknowledge the new timings. With tests 11-18, switch between first and second panel type in Chipset, test with both - they are running at 1024x600, but with 2 different timings from proper EDID. With tests 11-16, 19, 21 select PWM Normal; the rest with PWM Inverted. Or you can save yourself the memorizing and test with 1st/2nd panel and PWM Normal / PWM Inverted. I know there are a lot of testing, but it was also a lot of work.
I think none will work, being a hardware incompatibility. Treat yourself with a better screen.
just to make it clear, its mean that every time after i give input a number in #any_update.bat i need to do "run biosrefl2.bat, reboot and remove all the monitor devices under Device Manager -> Monitor. Windows should add a new PnP monitor."? or i loop back to execute #any_update.bat again?
yes, i know about hardware incompabilities, i’m still looking for 10" 1366x768 screen to buy…
Of course you do all that with every number/test, because biosrefl2.bat is flashing this modified BIOS and removing monitors is to force reinstalling a new monitor. It takes a few seconds to do the monitor reinstalling. Only after the first BIOS flash you do: monitor reinstall + clean install HD + monitor reinstall. Please pay attention to what I write, it is not necessary to come with this double questions after all the work I invested. I could have put you to do all the work in MMTool and command prompt, just provide the files, but I went a little further with batch, just to avoid this questions.
@lordkag i just try with number 11… can i ask something that makes me confused? i just want to avoid any mistakes. 1. in your instructions: "clean install HD" means that i need to remove the intel hd driver, restart the pc and install it again? 2. "switch between first and second panel type in Chipset" you mean switch between "tms150xg1-10tb" and "m185xtn01" in chipset bios menu?
But if you really want to go this way, despite the fact that I tried to do all the work and also provide (in my honest opinion, maybe I’m mistaken) accurate test conditions, then so be it. My work here is already done and I suppose a few minutes of my time is not that much of a loss.
Pre-condition: Inverter 200Hz
First test: run biosbck.bat, run #Any_update.bat and input the number 11, run biosrefl2.bat, reboot and remove all the monitor devices under Device Manager -> Monitor. Scan for new devices and Windows should add a new PnP monitor. Clean the video drivers like I already told you, remove the monitors once more, reboot and install 3517 drivers, reboot and test resolution.
The following tests: run biosbck.bat, run #Any_update.bat and input the number x (where x is from 12 to 22), run biosrefl2.bat, reboot and remove all the monitor devices under Device Manager -> Monitor. Scan for new devices and Windows should add a new PnP monitor. Reboot and test resolution.
Extra steps: with tests 11-18, switch between first and second panel type in Chipset Tab, test with both. With tests 11-16, 19, 21 select PWM Normal; the rest with PWM Inverted.
The first 6 tests (11-16) are important, the others you can skip if you want. If you do only these 6 tests, deduce from above: PWM Normal at 200Hz and switch between first and second panel type in Chipset Tab. The switching between panels must be done as a last step, when testing the resolution, with a simple reboot in between.
I think it is more or less the same as previous message, I really don’t see what I could add.
@lordkag i try it all from #11 to #22, and as your guess, no one works… also i try with "m185xtn01" panel from bios, the effect little bit different than before for all of this test. if in previous test they are blank, black, nothing…on this test the screen become white and blinking so many times until i shutdown the computer from power button.
anyway thanks a lot for your effort… you are amazing