Hello. Very new to the world of BIOS modding and using hex editors so please forgive me if I sound like I don’t know what I am talking about because well…I kind of don’t. 
That said, I have a ASUS E203MA that I suspect may have a corrupt BIOS. The computer powers on, but black screen. No external video either. Tried some initial troubleshooting and I am down to either corrupt BIOS or faulty motherboard. I want to try BIOS first. I removed the motherboard from the laptop and then desoldered the Winbond BIOS chip. Using a Raspberry Pi 3 and some soldered-on wires, I used flashrom to take a dump of the original (possibly corrupt) BIOS and saved it as a .bin
I then downloaded the latest BIOS from ASUS’s website. (https://www.asus.com/us/Laptops/ASUS-Lap…Desk_BIOS/) It is my understanding that ASUS BIOS updates are not complete BIOS ROMs, but rather, a partial ROM that ASUS EZ-Flash merges in with the existing BIOS during an update or something to that effect. I’m not really sure how that works, but that is my general understanding however wrong it may be.
I was reading about other users with a similar situation on ASUS’s website (https://rog.asus.com/forum/archive/index…55497.html) and some users were creating “reconstructed BIOS” images by dumping the original ROM and then merging in the downloaded update using a hex editor by following this:
1
2
Reconstructed_Image 0x0 - 0x1FFFFF = Bricked_Image 0x0 - 0x1FFFFF ( 2 Mb).
Reconstructed_Image 0x200000 - 0x7FFFFF = Update image 0x800 - 0x6007FF ( 6 Mb)
I downloaded HxD and loaded both the original dump and the update file I downloaded from ASUS. I can see the files are indeed different, but here is where I become painfully lost. I have no idea what I am supposed to be doing at this point. I was hoping someone could help me.
Basically, I am trying to get an up-to-date ASUS BIOS ROM (as a .bin) by merging my dump with the latest ASUS update so I can then flash that image back to the Winbond chip, solder it back to the motherboard, and see if it fixes my problem.
I have attached my original dump to this post. Thanks a lot for your help guys!
asus_original.zip (5.65 MB)
@panthraxnation2 - The info you mention does not apply here, full BIOS image is provided by Asus, you simply need to remove BIOS body from capsule (ie remove first 2KB (0-799H), BIOS starts at 800h) then transfer over board specific info if you want (serial, UUID and MAC ID if stored in BIOS not in chip)
Here, try this and see if it now works, if it does then we can try to put back system details next (if you want or care, we can do via FPT so programmer wont be needed) 
 - http://s000.tinyupload.com/index.php?fil…314183231883408
ONLY try above file is you confirm this is E203MA model and NOT E203MAH or E203MAS << If it’s one of those latter two, I need to give you different file
This is latest stock BIOS with capsule removed only, no edits done, board specific info such as serial, UUID ect will be generic or empty and Ethernet may not work.
@Lost_N_BIOS - Thanks a ton for the info. My troubleshooting and suspicion along with your guidance was indeed the solution! It took about a full minute after powering on with the newly flashed BIOS chip soldered in place, but eventually the ASUS BIOS splash screen appeared and then it eventually loaded to Windows. This model does not have build in ethernet, but I am able to see and connect to WiFi networks. Basic functions of the laptop (audio, keyboard, mouse, etc) all seem to be functioning just fine. So I suppose we just need to get the system details merged back in and then reflash? Thanks again! I’ll wait for your reply.
@panthraxnation2 - Great to hear you’re back in action now! No Ethernet means no MAC ID to need be put in BIOS then, so nothing to worry about there.
Yes, we just need to get your serial and UUID back in there, if you want, it’s only really necessary for RMA or sometimes software/windows activation etc. But yeah, we can put in there easily now I think
Please do as noted below
Please remove all BIOS passwords, disable secure boot, and disable TPM or Encryption if you have enabled. Do this before moving on to below If you do not have Intel (CS)TXE drivers installed, install them now from your system driver download page, then start over here after reboot.
Go to the thread linked below, and in the section “C.2” download the V4 (CS)TXE System Tools Package for your system.
> DOWNLOAD " (CS)TXE System Tools " packages HERE < Once downloaded, inside you will find
Flash Programming Tool folder, and then inside that a Windows or Win/Win32 folder (
NOT x64).
Highlight that Win/Win32 folder, then hold shift and press right click. Choose
“open command window here” (
Not power shell! >> * See Registry file below *).
If you get an error, reply to this post with a screenshot of it,
OR write down the
EXACT command entered and the
EXACT error given.
((If “open command window here” does not appear, look for the “Simple Registry Edit” below…))
Step #1Now you
should be at the command prompt.
You are going to BACKUP the factory
un-modified firmware, so type the following command:
Command:
" FPTw.exe -bios -d biosreg.bin " >> Attach the saved "biosreg.bin ", placed into a compressed ZIP/RAR file, to your next post!!! <<
Step #2Right after you do that, try to
write back the BIOS Region dump and see if you get any error(s).
Command:
" FPTw.exe -bios -f biosreg.bin "^^ This step is important! Don’t forget! ^^ If you get an error, reply to this post with a screenshot of it, OR write down the EXACT command entered and the EXACT error given. Here is a
SIMPLE REGISTRY EDIT that adds “Open command window here as Administrator” to the right click menu, instead of Power Shell
Double-click downloaded file to install.
Reboot after install may be required> CLICK HERE TO DOWNLOAD CMD PROMPT REGISTRY ENTRY < If the windows method above does NOT work for you…Then you may have to copy all contents from the Flash Programming Tool \ DOS folder to the root of a Bootable USB disk and do the dump from DOS
( DOS command: " FPT.exe -bios -d biosreg.bin " )
@Lost_N_BIOS - Thanks again for the help. I have followed your instructions and attached a zip file of biosreg.bin to this post. No errors were produced. I also tried flashing back that same bin and also received no errors.
biosreg.zip (5.62 MB)
@panthraxnation2 - Thanks! Was that dumped after just the one boot up? If yes OK, only asking to know.
Can you see serial or UUID info in BIOS main page? If yes, show me image before flashing this so I can see what you see, and then after (only if it changes)
http://s000.tinyupload.com/index.php?fil…467725181651844
Please flash this back via >> FPTw.exe -bios -f biosregm1.bin
And then boot to windows twice, then reboot back to windows third time and dump for me once more with new name >> FPTw.exe -bios -d biosregback3.bin
If this bricks, sorry It’s an odd BIOS type I’ve not edited much before, so am not sure what areas if any we’re touching are hashed etc.
** And on that note ** Please run this from the System Tools >> TXEInfo/Win32 folder and show me image of the end of report, before you flash anything (wait for my reply) >> TXEInfoWin.exe -verbose
@Lost_N_BIOS - The dump that I attached to my last post was actually the 2nd boot up. The S/N/UUID info does not currently appear in BIOS. All blank.
I am about to head into work (where the computer is). I will reply within the hour of a screenshot of the TXEInfoWin.exe -verbose information and wait for your reply before flashing the panthraxnation2-biosregm1.7z file you provided. Thanks again!
---------------------
@Lost_N_BIOS - Sorry it took me so long to reply. Got busy at work and was unable to get to it right away. I am attaching a screenshot of the information you requested. Hopefully this is what you were after. I will wait for your reply before I flash that image you linked to. Thanks!
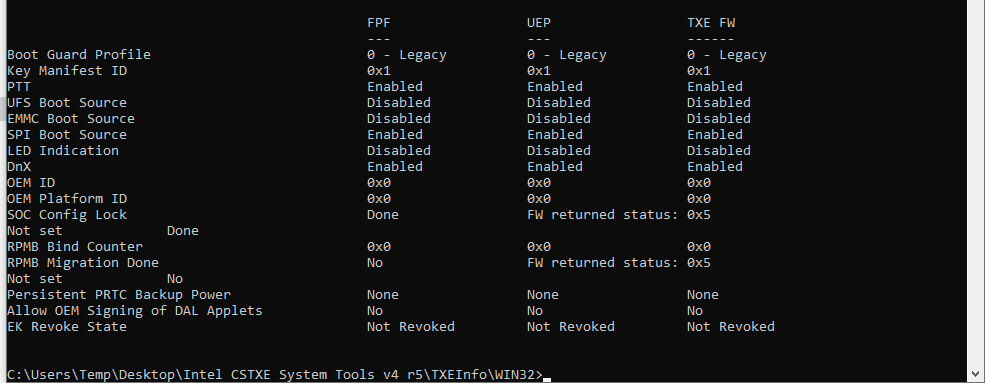
@panthraxnation2 - Please wait, due to TXEInfo FPF side I am not sure how to recognize in this type of ME FW if boot guard key is burned into FPF or not.
plutomaniac - Can you tell if Measured or Verified boot is enabled here from image above, or whatever equiv is for TXE?
I see profile 0 at FPF, but unsure if that means no key burned in, OK-Go or not
* Edit - @panthraxnation2 - Looks like you are OK to go ahead and test the BIOS I sent
@Lost_N_BIOS - Should I be able to use the command "FPTw.exe -bios -f biosregm1.bin" in an elevated command prompt from the Intel CSTXE\Flash Programming Tool\WIN32 folder to flash that BIOS?
I did try it and got 3 errors:
"Error 317: Hatdware sequencing failed. Make sure that you have access to target flash area!
Trying to erase the same block (iteration: 1)"
"Error 317: Hatdware sequencing failed. Make sure that you have access to target flash area!
Trying to erase the same block (iteration: 2)"
"Error 317: Hatdware sequencing failed. Make sure that you have access to target flash area!
Failed to erase this block 3 times!"
FPT Operation Failed
Yes, reboot and try again. If that fails, try the DOS or UEFI version instead. If same, let me know, and I will redo mod with different tool in case that is causing the issue.
@Lost_N_BIOS I rebooted and tried the same command again, but received the same error. I am not quite sure what you meant by “try the DOS or UEFI version” and I didn’t want to move ahead on my own without being clear on what I need to do. Thanks.
@panthraxnation2 - OK, before I explain DOS or UEFI method. When you created that BIOSreg.bin you sent me, did you have secure boot enabled, TPM or encryption enabled, or any BIOS password set? If yes, remove/disable all that and make a new BIOS region dump with new name and send to me.
DOS/UEFI means boot to DOS or EFI/Shell and use the files for that from the DOS/EFI folder inside FPT folder DOS would probably be easiest, unless you already know how to boot to EFI Shell…
Never mind, this version there is only Shell32/64, no DOS. So you’ll have to google how to boot to shell, and put the FPT.efi and fparts.txt on the USB also. Then boot to shell and run commands same way from there (but change FTW.exe to FPT.efi)
If we continue to have issues, and you don’t mind, you can always desolder the chip and dump again and send to me, then I will put back in system info and you program back.
@Lost_N_BIOS - Made some headway, but stuck once again. 
There seems to be no built in EFI shell for this laptop. At least, no discernible way to entering from UEFI settings. Following these instructions, I created an UEFI Shell bootable USB:
I created the EFI bootable USB and placed your bios, FPT.efi, and the fparts.txt on the USB and issued the command:
1
FPT.efi -bios -f -biosregm1.bin
The shell only returned a line to another prompt with nothing displayed on the screen, as if a command hadn't been issued at all. I tried to run just FPT.efi to see if I could get some command choices to appear or something, but same behavior.
Does the shell have to be ran from the computer itself (i.e. no USB)? Is that my problem? Or am I doing something wrong?
EDIT: Scratch that. Just found a way to launch EFI shell from UEFI. I'll keep you posted...
EDIT 2: There is an option for Launch EFI Shell from filesystem device but selecting it only causes the screen to flicker and it returns back to the UEFI. No Shell.
Looks like you’ll have to pull the chip again then, sorry Unless you have SOIC clip
It may have to have always been this way anyway, I just hoped we could use FPT once FD unlocked, but I didn’t check other things that may have also been enabled that needed disabled because those you can usually change other ways if needed.
@Lost_N_BIOS - Dumped the bios again. It’s zipped and attached to this post.
panthraxnation2_new_biosdump.zip (5.68 MB)
@panthraxnation2 - Sorry, but here is three edits, I am not 100% sure how this should be in there due to stock BIOS vs original dump etc.
OG is first edit I made you, I’d try that first, then M1/M2 I remade tonight, slightly different, I think only OG or M1 would be correct, but I’m not 100% sure, sorry, as I said before this is very odd BIOS
http://s000.tinyupload.com/index.php?fil…611031616411704
Hey, are you sure there is not two BIOS chips on this model? This looks like FD/ME and only part of the BIOS region. This may explain why FPT flash of BIOS region fails with files you’ve sent me.
Please dump BIOS region with FPT once running again and send to me so I can see it to be sure >> FPTw.exe -bios -d biosregcheck.bin
@Lost_N_BIOS - Thanks! I just tried flashing “OG”, but unfortunately it appears the laptop is bricked. It doesn’t like that one. Should I try the other two as well?
Also, there is only 1 BIOS chip on the motherboard as far as I can tell.
EDIT: @Lost_N_BIOS - Good news! It liked the “M1” edit, but System Information and Serial Number are still listed as N/A or blank in the UEFI settings.
I have dumped the biosregcheck.bin as instructed. Zipped and attached.
biosregcheck.zip (5.61 MB)
@panthraxnation2 - Great to hear at least something worked, and was bootable anyway! I guess that “OG” edit was not ideal, and that’s why FPT said no too, which is surprising since it will usually flash any bad edit you give it and brick the board for you if that’s what you give it to flash in 
So, since M1 edit still did not show correct info, try M2 and see if brick or still nada. Thanks for BIOS region check, that is same region I see from dump, so that confirms no other chip and this is just very odd BIOS (no DXE volume, odd layout, weird system info area and layout etc)
If M2 fails as well, I will look at M1 again and see if I can figure out why it’s OK but is still incorrectly showing the system info. What do you see for serial/UUID, FF’s or 00’s etc? Ohh, sorry, I see you said Blank or N/A
@Lost_N_BIOS - Thank you for the help and all your effort and tenacity in helping me getting this computer up and running again. Unfortunately, I have run out of time with the computer, as it belongs to a customer and they need it back. I’ve kept it as long as I could, but my time with it is up. It boots and Windows hasn’t deactivated itself or anything, so I suppose it will have to do for now. I really, really appreciate all your help. Thank you again!!!
@panthraxnation2 - Ohh!! You’re welcome!! Very sorry we ran out of time, I didn’t know it was not your board
Yes, serial and UUID usually only used in RMA and sometimes “some” software activation, but since they can get easily erased, and or some BIOS do not even use, it’s not used for that too often anymore.
Sorry we couldn’t sort it before time ran out  Next time try to let me know it’s not your item, and if such cases if I have other ideas etc I will make all those BIOS at once instead of waiting for you to test a few etc.
Usually though, this kind of thing is very easy to fix, only takes one edit and we’re done right away, but this BIOS is very odd and details were stored in strange location and in unusual way.
I’ve never seen BIOS structured like that, nor Asus putting details where these were or how they were etc. So that’s the only reason there was issue and no proper resolution this time, in the time we had anyway.
You’re welcome, and please do post back anytime you need more BIOS help, I’m sure next time around we’ll have a much more successful time
 -
-