I flashed a modded BIOS I was working on with Lost_N_BIOS for my EVGA E767 x58 / Intel Xeon x5675 machine. After successfully flashing the new BIOS and powering on the computer, it starts running through the BIOS POST diagnostics, beeps once (like normal), but then instantly reboots. This happens over and over.
What I’ve tried:
*I’ve tried flashing a handful of alternative BIOSes that Lost has helped create (I’ve been using a buspirate hardware flasher to flash)
*I’ve cut power/battery and wiped CMOS a number of times
*I’ve removed all RAM except for one stick in the first slot
*I’ve then swap tested alternate RAM sticks
*I’ve disconnected all SATA + USB connections
*I’ve swapped out GPUs
*I’ve switched plugging the computer into different power outlets/circuits
*etc.
Here are two videos showing what happens. It runs through the POST (shown here by LED diagnostics), but then resets at the same spot each time:
https://www.youtube.com/watch?v=G2YqyPlV…p_7LfJ7wpfWMj4s
What does it mean if it’s resetting after the POST beep? I recall that the single beep means the POST test concluded successfully, but I may be mistaken on that.
I’ve wondered if this could have something to do with the fact that I’m using an Intel Xeon x5675 on a consumer x58 board. I’ve been using this CPU on this motherboard just fine for the past year or so, but I can’t remember if I had to modify the BIOS in any way at the time to get it to work. So I’m wondering if perhaps this could have something to do with the microcode possibly?
@Coldblackice
It’s seems to fail at 2B > 2D so, that’s the video initialization and video memory test.
Does the vbios is all right on the card? original or modified? graphics card name and manufacturer?
did you enabled and forced the non-present 1366 igpu path within the bios instead of auto? or force set the PCI-ex to 1.0 addressing while using an nvidia 20XX series gpu?
is the x58 board working with it’s original bios and you can access the POST screen?
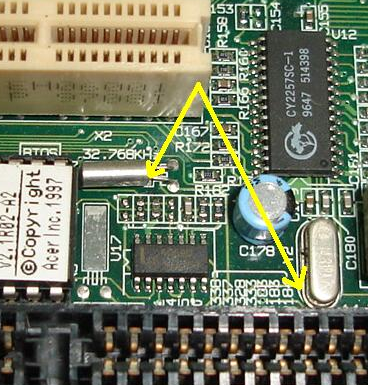
If nothing apply and you don’t know what I’m talking about inspect visually the board quartz crystal nearby the pci-express for short point\conductive dirt.
@noInk
Thanks a lot for your reply, you’re awesome! When you say vbios, I assume you mean within the mainboard BIOS itself (vs. the GPU)? If so, how would I go about checking the validity of the vbios? I haven’t manually modified it myself, as I wasn’t even aware there was a vbios in mainboard bioses. I’ve only been interacting with CPU microcode + OROM modules. But perhaps something could have shifted offsets around so that the vbios isn’t in the right place?
What’s the "1366 igpu path"? I know 1366 refers to my socket pins, but my motherboard doesn’t have an igpu or any built in display output capability. Or should this still be present nonetheless?
I’m not able to get into the BIOS settings, so I can’t change anything at this point. If you’re asking if I changed anything in the settings right before this happened, I didn’t. I’ve been using this motherboard with a Xeon x5675 for about a year now with no problems, but only after modding the "latest" default official BIOS from EVGA (released years ago) and trying to insert updated microcode, after a successful flash from DOS, after restarting, the boot looping began – and it hasn’t stopped since.
That makes me think it probably wouldn’t be a hardware fault/issue, right? It just seems unlikely that hardware fault/defect/damage would happen after a flash.
So I went and downloaded the most recent official BIOS from EVGA and then flashed it using my hardware buspirate flasher, however, after reinstalling the BIOS chip, the boot loops continue to happen as if nothing was any different. The exact same boot loop at the same spot + LED codes. Are there any other chips on the motherboard that get programmed based on a BIOS? I’ve wondered if perhaps my modded BIOS resulted in some other chip being flashed with adjusted timings/settings, now causing this issue. Probably not, I assume.
Here’s a video of what displays on the screen when this boot looping happens. There’s a brief display of some of the top few lines of the POST screen:
https://www.youtube.com/watch?v=Jrq5y9wX…pfWMj4s&index=1
I inspected the board for that crystal you mentioned – I see both types nearby in that area, the cylinder and the SMD crystal. I assume you’re referring to the cylinder one. Visually, it doesn’t look damaged. I do have a multimeter and oscilloscope – is there a way I can test it to know whether it is damaged or not?
Thanks again noInk, I’m willing to do any other suggestions or troubleshooting to try and resolve this, even if it means soldering on the board!
If you have other suggestions, I can definitely do anything asked.
@Coldblackice I have one suggestion.
I know you said that you took the battery out and cleared CMOS but sometimes this is not enough to drain the caps completely and properly clear CMOS.
I suggest you do it again but this time leave the PSU disconnected (both ATX and EPS plugs) from the board for at least 15 mins and then try to boot with a BIOS you 100% know worked before.
@Coldblackice
Not really! First thing first, if your board is the 131-GT-E767 many image on the internet shown the board equipped with an removable socket for the bios programming.
Isn’t the actual chip removable from the board itself? Are you sure you are using the flasher on the chip holding the bios?
If the board has an “reset CMOS” button, on these type of bios, unless you flashed some very wrong image onto, it should work right away once pushed while OFF.
Like @chinobino suggested if the chip is physically attached try to discharge the board by removing the battery and the power cord.
To hasten the process you could also hit the power button few time when there no battery or power cord attached.
IF this doesn’t work, read back the content of the chip, right after you programmed the content and compare the binary to the bios provided by the manufacturer. The content should match 100%.
To answer your question it depend by how other IC are configured, certain IC could download the firmware upon changes if preset or shadow the OPTION ROM from the BIOS.
About the vbios I was referring to to the external video card.
1366 board by default doesn’t have any integrated video bios support but some manufacturer used those board for prototyping other socket with socketed CPU adapter.
For the crystal you could try to use some compressed air.
If nothing is making contact they should work unless shattered. Any conductive material will short the outer shell if touched or alter the internal functioning, some are made to do with an O ring.
Thanks. I tried this, but to no avail. Before I went to bed, I disconnected the power cord, took CMOS battery out, held reset-CMOS button, it sat overnight in this state, then next day, again held reset-CMOS button (though obviously not necessary at that point), and then powered back on with the CMOS battery still out, just to see if anything different happened. Same thing. Then I put the CMOS battery back in and tried, and same thing ![]()
Thanks again for the suggestions, but unfortunately, I’ve already made sure that the chip flashes were sound. You’re correct, it’s a removable chip, and I’ve been removing the chip and attaching it to my SOIC8 adapter attached to a buspirate, then using flashrom to not only flash BIOSes to the chip, but also dumping the chip’s image each time in order to compare the hashes to make sure that it was a bit-perfect flash. I wish this was where the problem is! But unfortunately, the flashes have been bit-perfect every time ![]()
As for the vbios, that makes sense. I knew there wasn’t an onboard video capability, but I wasn’t sure if perhaps a vbios was put into all BIOSes by a manufacturer as a base, and then just not used if a motherboard doesn’t have onboard GPU. Thanks for the info though.
As for the crystal, I very lightly touched it with my finger to test if it was secure, wondering if maybe there was a cracked solder joint. It seemed to move a little bit, but not at the legs where it’s soldered, it was the "can" that very slightly moved. But this could be normal/expected, since it does have legs and it’s understandable if it’s not rock-solid unmoving like an SMD part would be.
Is there any testing I could do with my multimeter (fluke 87V) or oscilloscope (or logic analyzer) to further diagnose and try to pinpoint what/where the problem is?
I wish there was a way to debug exactly what is happening in the BIOS/POST process when this happens, like what commands are being sent to X chip, or what Y function is returning an error, etc.
@Coldblackice
Dunno, are you using a modified bios or the original from the manufacturer?
usually board POST or don’t, your reboot on the POST with a memory error. Is the VGA compatible?
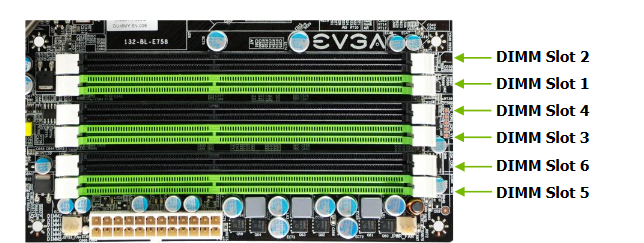
See again the “installing system memory (DIMMs)” on page 18 of the PDF and try again to use only one memory bank on slot 1.
On your board slot 1 should be the second slot from the CPU.
If you sure about the bios image and reseting the current CPU doesn’t solve the issue you should evaluate if another CPU work.
Sounds like you programmed in stock BIOS, correct? And same?? If yes, then something wrong with that BIOS, or it’s not compatible with your CPU.
Program in the older BIOS you know works with your CPU, then as mentioned above make sure your memory is in the correct slots since X58 was odd and picky about that.
The original issue with BIOS I sent you could be that the microcode needs added in a different way, which we can test and fix later, but first you need to get back to working BIOS state since you have programmer.
If you have a dump of your BIOS before you flashed in the mod BIOS I sent you, I would program that back in, otherwise use the stock one of the same exact version (or whatever modified BIOS you were using of that version, if you were using some older mod BIOS)
Did you remove the CPU before this happened / during this time? If yes, maybe you bent some CPU socket pins? Check to be sure all is OK, and re-seat the CPU, additionally as mentioned above, try some other more common CPU as well if you have one (like i7-920)
For reference @ X58
2b = (Copy/pasta from the interwebs)
When the system powers on and the Debug LED shows the usual POST code sequence but hangs on 2b or you get a beep code as soon as the sequence reaches 2b, then the Mainboard cant detect your Videocard properly.
Note that the POST code sequence might not halt at 2b but continue, so the final POST Code it displays could be FF, 00 or 7F which means the Maiboard booted, entered BIOS, or OC recovery kicked in and is waiting for Input to enter BIOS.
Since the Videocard couldnt be detected properly you will only see a black Monitor and either 2b, FF, 00 or 7F. Check if there is something wrong with the Videocard, the PCIE slot or BUS, the Monitor or monitor cable. Turn the Monitor on and off, switch the Monitor cable from one D-SUB or DVI plug to the other in case your Videocard has two.
If this doesn’t help then reboot and load the optimized defaults. If that doesn’t help either try another Videocard if possible, or try the Videocard in another system to make sure its working properly. Try another monitor or try the Monitor on another System.
Intel MRC Code
This block of code has to be implemented in every Intel based platform BIOS. It initializes and configures the processor and runs bus training and adusting routines. It adjusts clockskews, read/write leveling, signal termination resistors and several chipset timings dynamically depending on the trace length, signal quality, timing and memory installed in the motherboard. If the MRC code hangs or the board cant pas the MRC code and resets it usually points towards memory problems and unsupported multiplier settings or a unsupported combination of multipliers.
Shut down If the board shuts down after a second and the Debug LEDs flash for a fraction of a second, the PWM cant get enough juice
7F OC Recovery
b0 Intel Core i7 MRC Code - Chipset - check above
b1 Intel Core i7 MRC Code - Chipset - check above
b2 Intel Core i7 MRC Code - Memory - check above
2A Reserved/Unused
2b Invoke vga BIOS
2d VGA Bios loaded, initializing display output, display VGA BIOS details, Award BIOS details, CPU type, CPU speed etc
If the issue come from the microcode within the original manufacturer bios (never hear of) the below programmable file should 101% work on your X5675 unless it’s an engineering sample.
All the useless and possible redundant microcode has been removed, no other changes.
Use it @ your own risk modified 131-GT-E767
If it does not, or cause issue:
post an backup with the 5000-6FFF region filled.
If you do not have any, try to use the MRC filled I sent you via PM and report back.
The config came from mine board with DDR3 2133 memory but should rewrite upon boot, so, you can manually check by comparing that range.
If it does not change upon boot it mean IMC\RAM issue\incompatibility wrong channel usage ETC ETC.
@Coldblackice
and?
Hey @noInk and @Lost_N_BIOS , I really apologize on the delay. I’ve lost my job, so I’ve been trying to come to grips with that. Thanks again for your help + patience here!
I flashed the stock EVGA BIOS, correct. No luck, same exact reset loop (and timing) ![]() I downloaded it straight from EVGA too, to be sure there weren’t any remnant mods I may have applied to the one I’ve had on disk.
I downloaded it straight from EVGA too, to be sure there weren’t any remnant mods I may have applied to the one I’ve had on disk.
As for a backup of my old BIOS, in the Award flasher utility, I enabled the parameter/flag to do a dump/backup of the BIOS. I thought this meant it would dump the current BIOS before flashing the new one, but it seems all it did was dump the new BIOS after flashing  Anyway, I guess it’s my fault for not verifying that before flashing, lesson learned. So unfortunately, I don’t have a backup of my last working BIOS.
Nope, I didn’t touch or move the CPU in any way, nor any other hardware (GPU, memory, drives, cabling, etc). Nothing was touched or changed or moved. Just did a simple reboot to DOS, flashed the modded BIOS, restarted, and then commenced the boot loops, which have been happening the exact same ever since.
Ah, very interesting, thanks for sharing. I had never heard of this before! It sounds like this must be the source of this, right? The resets happen after the single-beep BIOS/POST process, though I don’t know exactly what happens following immediately after that beep.
Thanks @noInk , I appreciate this. I flashed the BIOS you sent me (still using my hardware flasher), dumped the chip to verify that the hashes matched, reinserted the chip to the motherboard, and still no go ![]() Same exact boot loops at the same exact spot + timing. So bizarre. I’ve also tried clearing the CMOS, removing the battery and unplugging and letting it sit unpowered for hours, to no effect. I’ve tried booting without the CMOS battery in, to no effect. I’ve tried booting without a GPU attached, and that also doesn’t change anything (though I do get the BIOS beeps warning that there’s no GPU attached, but after this the system still reset loops).
Same exact boot loops at the same exact spot + timing. So bizarre. I’ve also tried clearing the CMOS, removing the battery and unplugging and letting it sit unpowered for hours, to no effect. I’ve tried booting without the CMOS battery in, to no effect. I’ve tried booting without a GPU attached, and that also doesn’t change anything (though I do get the BIOS beeps warning that there’s no GPU attached, but after this the system still reset loops).
However, I just downloaded the BIOS you linked above, assuming it was the same link as the one you sent, but doing a diff on them, I can see that they’re different – I guess I misunderstood your instructions. Like I mentioned, the one you sent still resulted in the same exact boot loops + timing, but I can flash this one above, as well, and report back. I really apologize again on the delay.
Actually, I think I may have misunderstood your instructions – are you saying that after flashing the BIOSes you posted, I should attempt to boot with them, and then afterward dump the BIOS chip to see what was written to the chip?
If so, I’ve misunderstood how this works. I was under the impression that the motherboard stored BIOS settings/RAM timings/etc in the CMOS chip, not in the SOIC8 flash chip, due to the fact that BIOS settings get wiped when the CMOS gets cleared. I didn’t realize anything was dynamically stored within the BIOS image itself.
So if I’m understanding this correctly — correct me if I’m wrong – I’ll re-flash these BIOSes you’ve posted, attempt booting them, and then assuming there’s still a boot loop, I’ll re-dump the chip afterward and then post the results, which should show what timings/information the motherboard wrote to the chip?
@Coldblackice
Sort of it depend by the manufacturer and how it’s done.
If it didn’t worked with the 5000-6FFF region filled file tough it could be hardware related.
@noInk
I flashed that MRC-filled BIOS you sent. After hash-verifying it, I powered on, the boot-looping still occurring, I powered off, then removed the chip and extracted the post-boot BIOS, uploading it here: Modified (MRC) E767 – Post-boot dump
Looking at those MRC offsets you mentioned, it appears my motherboard did write to that section, although I’m unable to tell whether the data looks good or whether there are problems present.
Are you able to glean anything from the data? Should I also try flashing the FF-filled MRC BIOS you posted and then boot + post the result from that one, as well? Not sure if that would be of any use, but I’m willing to do/try anything. Thanks again!
@Coldblackice
Remove both CMZ16GX3M4A1600C9 and seat the F3-12800CL9-4GBRL on DIMM Slot 1 and DIMM Slot 3 ( should be the grey slot )
@noInk
After doing this, should I redo flashing the BIOS you sent? Meaning, should I re-flash another fresh empty-MRC BIOS and then power on with this new memory stick arrangement? My assumption is probably not.
I’ll do this. Just wondering, is this so we can see what data gets written to the MRC section with an alternative arrangement of memory sticks? Or is it just to test for any bad memory slots / bad RAM sticks?