Yes, of course, here you are: http://ftp.kontron.com/main.html?downloa…832426108685686
My goal is to add microcode for cpu-id 000306a9 without replacing any of the 000206a1…7 codes.
@Ludolf
According to your link, nothing is displayed and does not download. Attach here. And indicate the model of the motherboard.
Sure.
It is Fujitsu D3076-S1, i extracted bios-region because of size-restrictions for attached files and changed extension to .txt.
This is from vanilla update-file, no dump of my hardware.
D3076-S1_BIOS_region.txt (2.5 MB)
@Ludolf
Your BIOS is not AMI UEFI.
Looks like Insyde H2O or Phoeni SCT? On such platforms, UBU is not able to process microcodes. No suitable tools.
Try [TOOL] H20EZE - Insyde “Easy BIOS Editor”
UBU can open the file (v1.79_6) and shows:
BIOS platform - AMI Aptio 4
BIOS version - 4.6.4
Manufacturer - Fujitsu
MMTool is also able to open the file.
@SoniX Bios: ftp://ftp.kontron.com/Products/Motherboa…S1x.R1.12.0.ZIP
@Ludolf You can trick MCUpdate.txt: Write the code of an existing microcode in front of a wished for microcode, f.ex. change
“306A9 1155\cpu306A9_plat12_ver00000021_2019-02-13_PRD_A8DF9213.bin” to
"206A1 1155\cpu306A9_plat12_ver00000021_2019-02-13_PRD_A8DF9213.bin"
And: Ubu (1.79.5) seems to delete microcodes that are commented out…
#LGA1155
206A2 1155\cpu306A9_plat12_ver00000021_2019-02-13_PRD_A8DF9213.bin
306A8 1155\cpu306A8_plat12_ver00000010_2012-02-20_PRD_E44A4EF2.bin
306A6 1155\cpu306A6_plat12_ver00000004_2011-11-14_PRD_1D1150A5.bin
306A5 1155\cpu306A5_plat12_ver00000009_2011-11-10_PRD_9F575F21.bin
306A4 1155\cpu306A4_plat12_ver00000007_2011-09-08_PRD_7E23E5AF.bin
306A2 1155\cpu306A2_plat12_ver0000000C_2011-07-25_PRD_45CEAA5F.bin
306A0 1155\cpu306A0_plat12_ver00000007_2011-04-07_PRD_5F4A8285.bin
206A7 1155\cpu206A7_plat12_ver0000002F_2019-02-17_PRD_8D15DF31.bin
#206A6 1155\cpu206A6_plat12_ver00000028_2010-09-15_PRD_2B9BECC8.bin
#206A5 1155\cpu206A5_plat12_ver00000007_2010-07-22_PRD_20B7FDE6.bin
#206A4 1155\cpu206A4_plat12_ver00000022_2010-04-14_PRD_8A6F7F91.bin
#206A3 1155\cpu206A3_plat12_ver00000009_2010-06-09_PRD_261BDACD.bin
#206A2 1155\cpu206A2_plat12_ver00000027_2010-05-02_PRD_EB510B0E.bin
#206A1 1155\cpu206A1_plat12_ver00000007_2009-12-23_PRD_8F1081F2.bin
#206A0 1155\cpu206A0_plat12_ver00000029_2009-11-02_PRD_D6930586.bin
╔═════════════════════════════════════════╗
║ MC Extractor v1.44.0 r153 ║
╚═════════════════════════════════════════╝
╔═════════════════════════════════════════════════════════════════╗
║ Intel ║
╟─┬─────┬───────────┬────────┬──────────┬────┬──────┬────────┬────╢
║#│CPUID│Platform ID│Revision│ Date │Type│ Size │ Offset │Last║
╟─┼─────┼───────────┼────────┼──────────┼────┼──────┼────────┼────╢
║1│206A7│ 12 (1,4) │ 25 │2011-10-11│PRD │0x2400│0x5C9060│ No ║
╟─┼─────┼───────────┼────────┼──────────┼────┼──────┼────────┼────╢
║2│206A6│ 12 (1,4) │ 28 │2010-09-15│PRD │0x2400│0x5CB860│Yes ║
╟─┼─────┼───────────┼────────┼──────────┼────┼──────┼────────┼────╢
║3│206A5│ 12 (1,4) │ 7 │2010-07-22│PRD │0x1C00│0x5CE060│Yes ║
╟─┼─────┼───────────┼────────┼──────────┼────┼──────┼────────┼────╢
║4│206A3│ 12 (1,4) │ 8 │2010-05-26│PRD │0x2400│0x5D0060│ No ║
╟─┼─────┼───────────┼────────┼──────────┼────┼──────┼────────┼────╢
║5│206A2│ 12 (1,4) │ 26 │2010-02-17│PRD │0x2400│0x5D2860│ No ║
╟─┼─────┼───────────┼────────┼──────────┼────┼──────┼────────┼────╢
║6│206A1│ 12 (1,4) │ 7 │2009-12-23│PRD │0x2000│0x5D5060│Yes ║
╚═╧═════╧═══════════╧════════╧══════════╧════╧══════╧════════╧════╝
These microcodes are in your BIOS file
GUID 17088572-377F-44EF-8F4E-B09FFF46A070
╔═════════════════════════════════════════╗
║ MC Extractor v1.44.0 r153 ║
╚═════════════════════════════════════════╝
╔═════════════════════════════════════════════════════════════════╗
║ Intel ║
╟─┬─────┬───────────┬────────┬──────────┬────┬──────┬────────┬────╢
║#│CPUID│Platform ID│Revision│ Date │Type│ Size │ Offset │Last║
╟─┼─────┼───────────┼────────┼──────────┼────┼──────┼────────┼────╢
║1│306A9│ 12 (1,4) │ 21 │2019-02-13│PRD │0x3800│0x5C9060│Yes ║
╟─┼─────┼───────────┼────────┼──────────┼────┼──────┼────────┼────╢
║2│206A7│ 12 (1,4) │ 2F │2019-02-17│PRD │0x3000│0x5CC860│Yes ║
╚═╧═════╧═══════════╧════════╧══════════╧════╧══════╧════════╧════╝
These microcodes are in your BIOS file
GUID 17088572-377F-44EF-8F4E-B09FFF46A070

D3076-S1_206A7_306A9.zip (4.75 MB)
I guess it will work (testing at weekend), both codes are shown in MMTool. If you simply add or replace microcodes with hexeditor, only the first one will be recognized by MMTool and the flashtool from Fujitsu (the command "efiflash.exe /info" will show all microcodes in bios, including cpu-id and version).
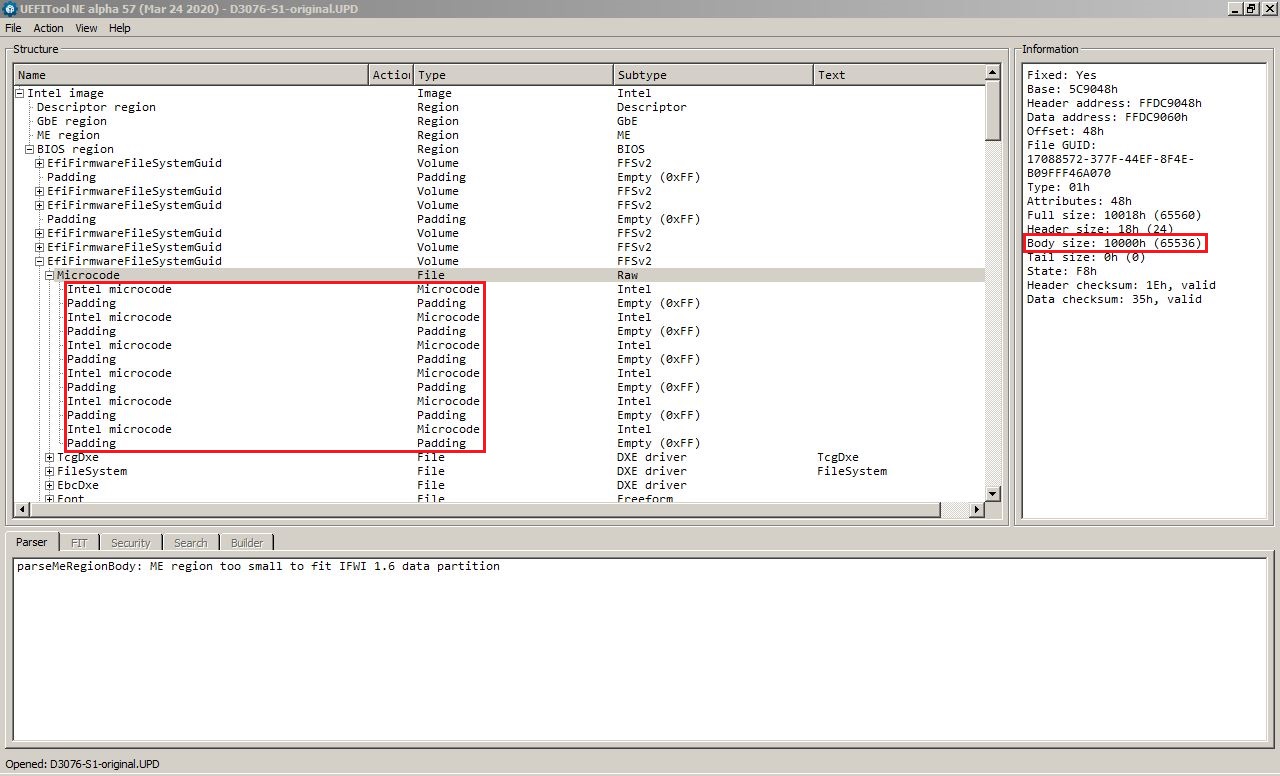
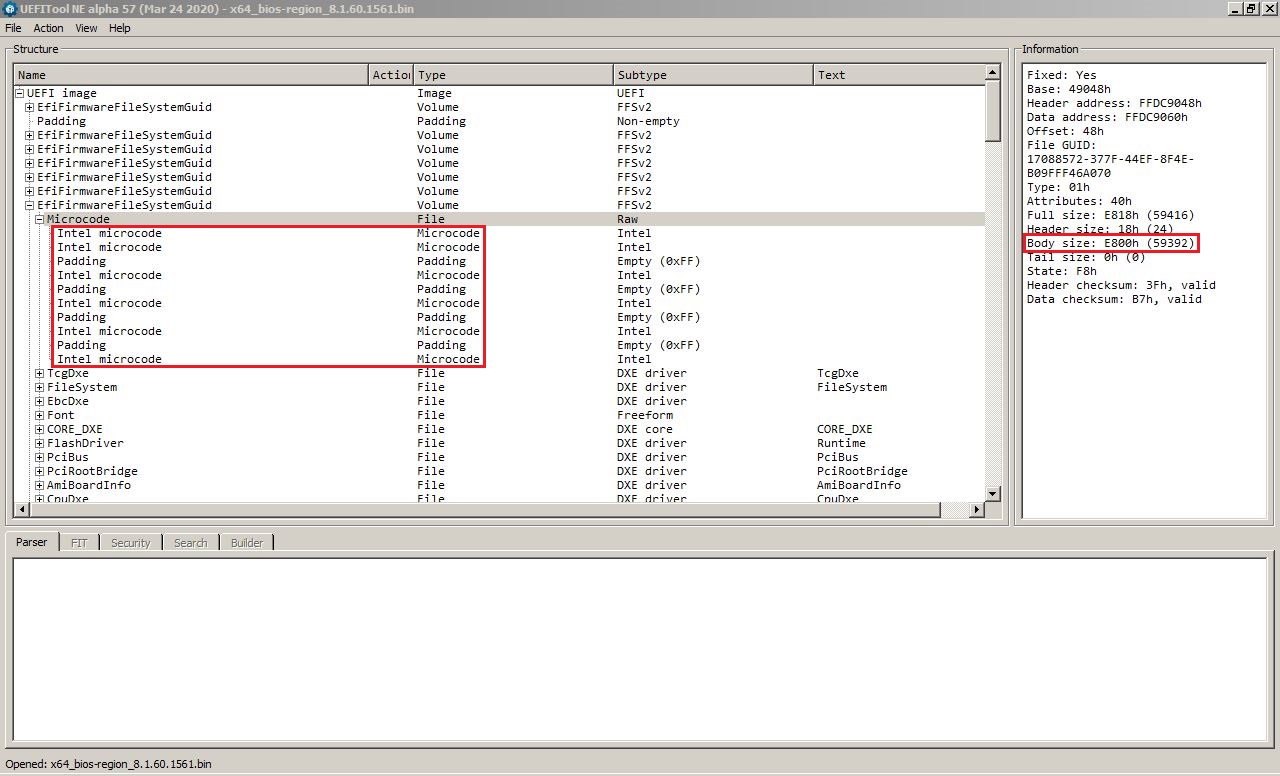
In the original bios-file is empty space (padding) between microcodes with lenght 0x400h, after last code 0x2000h. Complete microcode-image has size 0x10000h. After automatic updating all microcodes with UBU, padding after first and last microcode is removed, what reduced size of microcode-image from 0x10000h to 0xE800h and shifted all following images. See my 2 screenshots attached. Size-entry in header and header-checksum for mc-image was corrected by UBU, this bios is working when flashed.
What are the “paddings” between microcodes for? Why is UBU reducing the size of this part? In my opinion padding is necessary to recognize all microcodes, but i don’t understand the background.
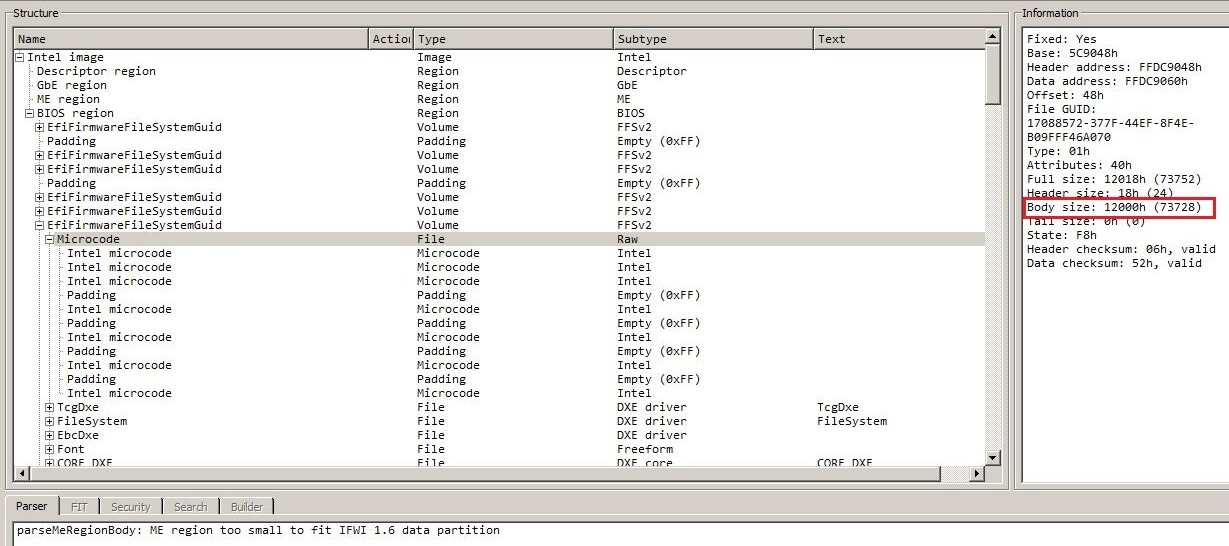
Okay, i managed to add the microcode without deleting the other codes (and mobo is still working  ).
).
I inserted the new code for cpuid 306A9 in the extracted “File_Raw_Microcode_body.raw” (done with uefitool) and removed the padding at the end. Then replace body w/ uefitool, which is correcting size-entry and checksum. I tried this several times with different paddings after the new code, until MMTool shows all microcodes, also efiflash is recognizing the new code, now 7 instead of 6. Here two screenshots with opened mod-bios:

@Ludolf You can add microcodes with UBU, too. Duplicate the line with the wished for microcode and change the identifier to an already existing identifier. UBU will update the existing MC and add the ‘duplicate’ MC…
#LGA1155
306A9 1155\cpu306A9_plat12_ver00000021_2019-02-13_PRD_A8DF9213.bin
206A7 1155\cpu306A9_plat12_ver00000021_2019-02-13_PRD_A8DF9213.bin
306A8 1155\cpu306A8_plat12_ver00000010_2012-02-20_PRD_E44A4EF2.bin
306A6 1155\cpu306A6_plat12_ver00000004_2011-11-14_PRD_1D1150A5.bin
306A5 1155\cpu306A5_plat12_ver00000009_2011-11-10_PRD_9F575F21.bin
306A4 1155\cpu306A4_plat12_ver00000007_2011-09-08_PRD_7E23E5AF.bin
306A2 1155\cpu306A2_plat12_ver0000000C_2011-07-25_PRD_45CEAA5F.bin
306A0 1155\cpu306A0_plat12_ver00000007_2011-04-07_PRD_5F4A8285.bin
206A7 1155\cpu206A7_plat12_ver0000002F_2019-02-17_PRD_8D15DF31.bin
206A6 1155\cpu206A6_plat12_ver00000028_2010-09-15_PRD_2B9BECC8.bin
206A5 1155\cpu206A5_plat12_ver00000007_2010-07-22_PRD_20B7FDE6.bin
206A4 1155\cpu206A4_plat12_ver00000022_2010-04-14_PRD_8A6F7F91.bin
206A3 1155\cpu206A3_plat12_ver00000009_2010-06-09_PRD_261BDACD.bin
206A2 1155\cpu206A2_plat12_ver00000027_2010-05-02_PRD_EB510B0E.bin
206A1 1155\cpu206A1_plat12_ver00000007_2009-12-23_PRD_8F1081F2.bin
206A0 1155\cpu206A0_plat12_ver00000029_2009-11-02_PRD_D6930586.bin
Delete MC: Comment the corresponding mc out in MCUpdate.txt
#LGA1155
#206A6 1155\cpu206A6_plat12_ver00000028_2010-09-15_PRD_2B9BECC8.bin
Should remove 206A6
Exchange MC: Use the existing identifier that’ll be replaced for the wished for MC
#LGA1155
206A2 1155\cpu306A9_plat12_ver00000021_2019-02-13_PRD_A8DF9213.bin
will exchange existing 206A2 with 306A9
Add MC: Change the identifier of the wished for MC to an exisiting identifier
#LGA1155
306A9 1155\cpu306A9_plat12_ver00000021_2019-02-13_PRD_A8DF9213.bin
206A7 1155\cpu306A9_plat12_ver00000021_2019-02-13_PRD_A8DF9213.bin
206A7 1155\cpu206A7_plat12_ver0000002F_2019-02-17_PRD_8D15DF31.bin
will add 306A9 to an existing 206A7 and update 206A7 to listed version
#LGA1155
#206A6 1155\cpu206A6_plat12_ver00000028_2010-09-15_PRD_2B9BECC8.bin
Should remove 206A6
Exchange MC: Use the existing identifier that’ll be replaced for the wished for MC
#LGA1155
206A2 1155\cpu306A9_plat12_ver00000021_2019-02-13_PRD_A8DF9213.bin
will exchange existing 206A2 with 306A9
Add MC: Change the identifier of the wished for MC to an exisiting identifier
#LGA1155
306A9 1155\cpu306A9_plat12_ver00000021_2019-02-13_PRD_A8DF9213.bin
206A7 1155\cpu306A9_plat12_ver00000021_2019-02-13_PRD_A8DF9213.bin
206A7 1155\cpu206A7_plat12_ver0000002F_2019-02-17_PRD_8D15DF31.bin
will add 306A9 to an existing 206A7 and update 206A7 to listed version
@Lost_N_BIOS
I restored my MSI model by flashing the modded dumped file I uploaded the screenshots, and MSI dragon Center is working now.
Warning I am an expert I did comparisons and it was just OEM info that were changed, don’t take my case as a standard
About the Speed stuck at high frequencies, it turned out it is just stupid and silly, starting Windows 10 there are 2 ways to choose power plans, and they work independently (Microsoft should consider sync these power plans), I just clicked the battery Icon and it was set to best performance although I have never changed it. maybe it was changed by it self just by flashing modded bios.
Now my Laptop works as it was in the original bios 
@izajasz :
I got the same error messages as you (post #1343), but if I remember correctly, I installed Python 3.8.5 x86 and then I installed colorama and pltable using the x86 version, but then I uninstalled the x86 and installed Python x64, I reinstalled only pltable using the x64 version and it worked just fine.
But if I remember correctly, I didn’t use x86 version, I just used the x64 version.
IF you want to give a try, try installing Python x64 and open CMD (no admin required) and copy paste these line
1
2
2
python -m pip install colorama
python -m pip install pltable
Not sure if your case will be the same as mine, I just remembered today that I wanted to reply you the same day but I didn't
EDIT by Fernando: Fully quoted post replaced by directly addressing to the author and inserting the senders reference post number (to save space)
To help you here is the link https://www.python.org/ftp/python/3.8.5/...3.8.5-amd64.exe
When I installed Python I installed the link from the home page and then I realized it was x86
@ALL
Please update MCExtractor to version 1.48.0 or later
I just downloaded UBU 1.79.6, extracted it and put my BIOS file (BIOS 2401 from there: https://dlcdnets.asus.com/pub/ASUS/mb/LG…I-ASUS-2401.zip) into UBU’s folder. After loading the file, I’d selected “5” for the microcode and then a Python ModuleNotFoundError occured:
Traceback (most recent call last):
File “mce.py”, line 21, in <module>
import colorama
ModuleNotFoundError: No module named ‘colorama’
These microcodes are in your BIOS file
GUID 17088572-377F-44EF-8F4E-B09FFF46A070
[Intel CPU MicroCode]
F - Find and Replace from MCUpdate.txt
V - View/Edit MCUpdate.txt
[MC Extractor]
X - Extract all CPU microcodes
S - Search for available microcode in DB.
[Internet access required]
C - Check and Update for MCE and DB
0 - Exit to Main Menu
Choice:
What’s wrong here?
Thank you for the hint! ![]()
DrvVer v0.27.6 out.
- Support EFI Intel KOP Driver Lakefield v16.0.xxxx
@SoniX
Is removal of Intel GOP VBT update from UBU intentional ? Because between UBU versions 1.79.6.1 and 1.79.3 (not sure which exact version did that) I lost an option to update Intel GOP VBT (Skylake), even though vbtskl.bin is in the same location as in the version 1.79.3 of UBU (\Files\intel\VBIOS).
Thank you for your work on UBU, it’s really great tool.
New folder for replace GOP VBT
’Files\Intel\GOP_VBT’
Upon start the tool you will show the error message "The syntax of the command is incorrect." it is because of the command "ren i-sda"