Hey guys, I’m new to the forum and to the whole world of bios tinkering so pardon my lack of knowledge. I have a Dell Precision m4700 workstation laptop with : i7 3740qm cpu Nvidia quadro k1000m 16gb of ram
While attempting to update my bios using the exe some sort of error occured and made it so that my PC will only boot up after swapping the ram sticks ,doing that only gets you one boot and if you turn the PC off you have to swap them again. Trying to upgrade or downgrade the bios from inside windows doesn’t work either so I got a programmer and tried to flash my two bios chips using a supposedly fully functional dump I found online.
Unfortunately even tho I was able to read the chips and flash the dump without any issues, my laptop straight up refuses to boot now and swapping RAM doesn’t help, when you click the power button the power led lights up and the cpu fan spins at full speed for about 5 seconds then the whole thing shuts off, nothing shows up on the display.
I’m thinking that the only way to fix this now is to somehow repair my original bios files so I have attached the dumps I made before the flash if anybody can help:
@Lost_N_BIOS sorry to bother you mate but from the various threads I’ve been reading you seem to be the resident expert when it comes to bios repair. Can you please take a look at this, thanks.
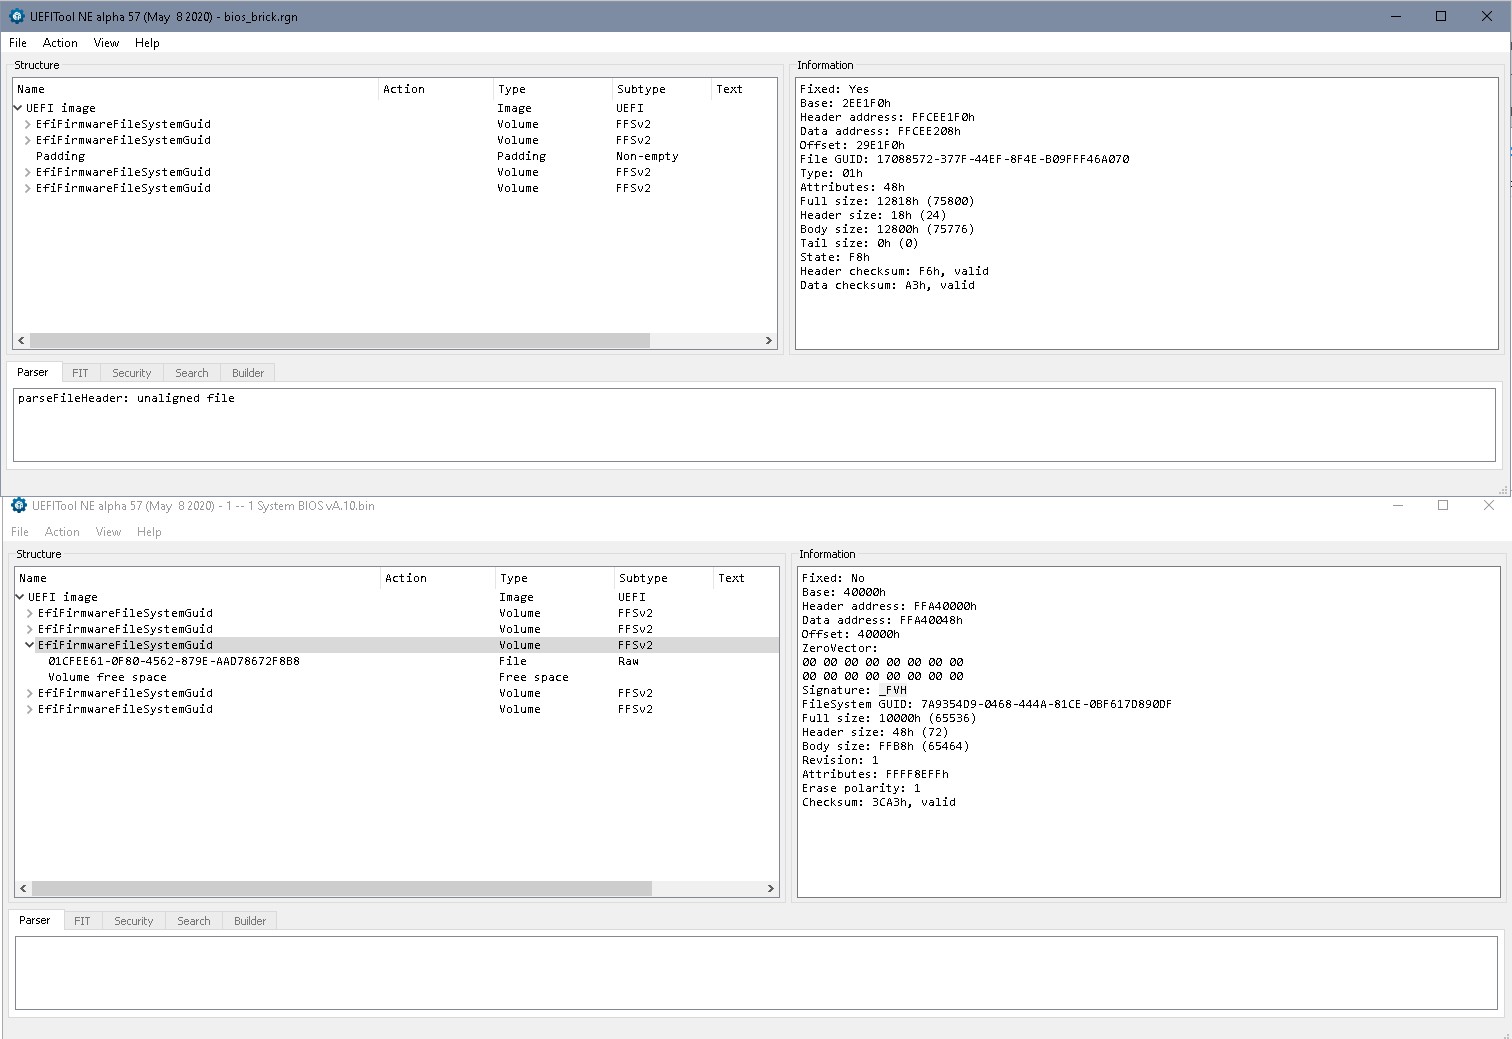
@SarcasticBaka Bios region is corrupted, see picture- 3rd volume is padding in bricked bios, but there’s also corruption in 4th volume. First 2 volumes are NVRAM, might contain machine specific information and other settings that will be rebuild automatically. As far as I can see your old bios version is A9.
This will be a little ‘try and error’ anyway- easiest start would be stock bios and your old FD/ ME/ GbE and see if system starts. Your bios is divided onto the 2 chips, 8MB first, 4 MB thereafter, if you copy the 4 MB file at the end of the 8MB file you have your complete firmware. (Keep the two original files as backup, work with copies of these files!)
Download bios A9, extract with Dell PFS BIOS Extractor (link), there are some more files in the corresponding folder- “1 – 1 System BIOS vA.9.bin” 6144kB is the ‘new’ stock bios region.
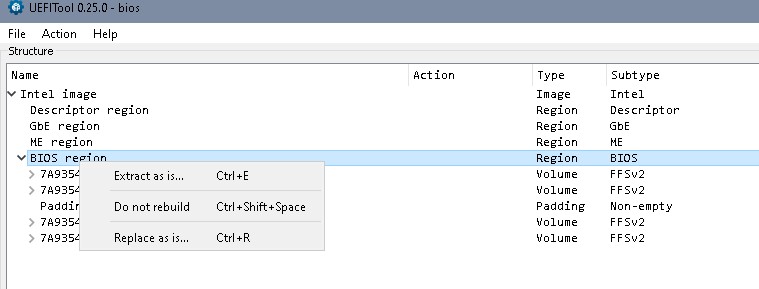
Open complete bricked bios (12MB) in UEFItool025, right click on bios region => replace as is with the A9 stock bios version which you extraxcted, save bios
Split bios in HxD or any other Hex Editor at 800000 so that you end up again with a 8MB and a 4 MB file. Flash these files.
If system boots, next step would be trying to transfer your old NVRAM, in the hope that it wouldn’t be corrupted If system doesn’t boot, there may be corruption in other bios regions, too.
Hello thanks for the assistance! Unfortunately after doing everything you said and flashing the new modified bios the result is still the same, cpu fan spins loudly for a few seconds before shutting down and no boot. I guess there is corruption somewhere else as well.
@SarcasticBaka Did you read back the two SPIs and compared the results so that you can be completely sure that you flashed correctly? Sometimes flash program and programmer don’t work on all spi combinations. Flash programs verify can be wrong, too. What program are you using?
If you can be 100% sure that your SPI chips were flashed correctly the next step would be using a clean ME:
Intel ME System Tools v8 r3 - (2017-11-19) contains two versions of FIT- use the newer one.
Use a copy og the original (complete) dump of the bricked bios (12 MB)
Instead of choosing a ME from repository (step 4), you take the ME from the bios package you already extracted (1 – 6 Intel Management Engine Update v8.1.30.1350.bin).
In step 7 of the guide you exchange the ME Region in the folder ‘Decomp’ with the unconfigured ME. In addition to this replacement you replace the file ‘BIOS Region.bin’ in the ‘decomp folder’ with the stock bios from the region (1 – 1 System BIOS vA.9.bin), rename it to 'BIOS Region.bin’
After ‘build’ the tesult will be in folder ‘build’, you’ll find both the complete image and the 8/4 MByte file. In case you did everything correctly the 4MB file should be bitwise identlical to the 4MB file generated when changeing bios region to stock bios. If that’s the case you need to flash the 8MB chip only.
Please post the resulting 2 files. Should be under the 6 MB limit when zipped.
@lfb6 I’m using AsProgrammer and yes I have read the chips after flashing and compared them to the bios files I used and they were identical, so I think they were flashed correctly
I’ve followed your instructions and I’ve attached the two output files, I also did verify that the 4mb file is identical to the one I had generated earlier. So should I now proceed with flashing the new 8mb file?
@lfb6 Yeah the post threshold is 5 which I was trying to reach and that’s why I made 3 different posts. I always take out the cmos battery but I honestly am not aware of any jumper on this motherboard.
@lfb6 Alright succes! well kind of… I am able to boot finally which is great but I can only do so on one stick of 4gb ram. I have 4 ram slots for 16gb total but right now if I place any of the other 3 sticks I am unable to boot. Either the fan spins for about one second then turns off, or I get a blinking light code signaling memory issues or sometimes the dell logo does show up but the whole screen is filled with visual artifacts and then it shuts off. I have a hard time believing all 3 of those sticks just died at once but I don’t know if this is bios related as well.
Edit: I managed to make it boot with all 4 sticks after trying every combination imaginable but it seems rather random still. It boots fine for like 3 times in a row and then suddenly it doesn’t, and you have to move the ram sticks around in order for it to boot again. which is very similar to the issue I had that led me to want to fix the bios in the first place, although that was more severe since I had to saw them around every single time I turned off the computer.
@SarcasticBaka Looks like you got at least two different problems here. Are all sticks same brand/ size/ organisation/ speed? Do you have the possibility to check these one by one in another system? The problems arose before you tried to update the bios- they were reason for updating if I understand right, so not sure if a bios update will help here if thsis configuration worked stable before.
Would your system allow to run memtest on it (boots from stick)?
Recent hardware changes?
Other things that happened to the notebook?
This should be a socketed cpu, right? Did you open/ close again the socket once?
@lfb6 Little update on this, after I booted on just 4gb of Ram I thought I would try to update the bios the normal way again which had obviously never worked before but my thinking was that I had perhaps fixed my bios enough to where a normal update was possible now. Turns out I was right! I tried to upgrade to the latest version of the bios available on the dell website which is A19 using the exe on a bootable dos usb drive and it worked fine, so now my pc seems to be healthy bios wise thanks to you which is fantastic. Now as far as the ram thing goes to answer your question, 3 of the ram sticks are the exact same hynix 4gb while the forth is a samsung 4gb one. Before this whole bios ordeal when I was tryna diagnose the issue I had I ran memtest multiple times with all 4 sticks in and it came up with no errors whatsoever. So even tho I had to swap sticks around to get the pc to even boot, once it booted the sticks seem to work fine and I didn’t get any errors or crashes. Now that I have fixed my bios tho it’s different, I’ve done a lot of experimenting since yesterday and this is what I understand up to this point: -I have 4 ram slots A,B,C, and D. I can have any two sticks in slots A & C or B & D and the pc boots fine every single time, no errors of any sort. -If I have more than two sticks in , even 3 of the exact same hynix ones = no boot -If I have two sticks in A&B, A&D, B&D, B&C =no boot -If I have all 4 sticks in = no boot so yeah that makes for a maximum of 8gb or ram I can have in and boot correctly and they need to be on A&C or B&D. Very strange behavior that I don’t really understand, all the sticks seem to be fine individually as long as they are in those slots. I open the cpu socket a number of times and reapplied thermal paste to both it and the gpu so I don’t think that’s the issue.
Which slots do you call A,B,C,D? There should be 2 accessible from the bottom and 2 under the keyboard.
Did this machine ever run stable with 4 slots used?
Considering your bios- you might’ve lost some information like serial number, service tag since we began with empty NVRAM. MAC adress was stored in (unchanged) GbE. If you’re not very concerned about that you might just continue as it is. Otherwise one could try to copy the old NVRAM back into your bios region and have a look if the system does boot. That would’ve possibly been easier i when on same bios version that was used when NVRAM was written.
I’m not experienced in finding/ extracting this kind of information in a bios region, as you mentioned before @Lost_N_BIOS would be the person to ask for that.
@lfb6 A & B are the slots on the bottom, C & D are under the keyboard. Since that last message I have managed to get the pc to boot with 3 or 4 sticks but it’s never stable it runs fine for a couple hours at times before crashing the pc and usually I can’t boot anymore after that. with only 2 sticks in the A&C slots tho it runs fine with no crashes whatsoever. As far as the service tag I can still see it in bios settings so I don’t believe it’s been lost, right now it’s having more than 8gb of ram that’s causing issues.
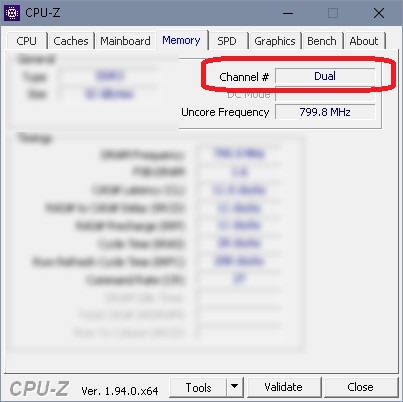
@SarcasticBaka Yes. Do you have another ivb- cpu for testing? Dual core would support only 2 sticks, but if dual channel would work with stable with 2 sticks this would point into a direction). Since memory controller is in cpu it might a fault there, or it might be on the board- weak capacitor, corrosion on the board- whatever…
I see. Unfortunately I do not have another cpu on hand at this moment , I guesI’ll stick with 8gb until I get my hands on one and I’m able to give that a try. Although I guess since it might be a cpu issue I could atleast take it out and replace it in the socket, maybe reapply thermal paste again. Probably won’t change anything but wouldn’t hurt regardless. Thanks a bunch for your help dude, I’ve taken up alot of your time over the last like 4 days and now I have a working computer thanks to you.