Hello, I have bricked my GA-X58A-UD7 and cannot get CH341A to detect the chip at all. I tried to do Pins 4 and 7 trick and Pins 5 and 6, and the board still doesn’t bootup at all from backup BIOS which leads me to believe that both BIOS chips are bricked. When I did the pins trick a short circuit occurred and I saw smoke for less than 1 second but switched the power off straight away. I inspected the damage and I can see around the 2 BIOS chips area, in between BIOS Chip 1 and BIOS Chip 2 there is a bit of damage with maybe a micro silver blob (resistor?). I let it cool down for a few minutes and the board turns on but still stuck in a bricked state. I am at loss in trying to make the board work and how to make the CH341A detect the BIOS chip. The BIOS is MXIC MXL1605D. I believe the board will work again once I can restore the BIOS back on it. I have both the Green and Black CH341A but none of them detect the BIOS chip, either I get FFFFF which I assume no detection or 000000 which I assume detection but unknown BIOS chip to programmer.
@Lost_N_BIOS Maybe you can help with this?
Since you shorted the chip, from my experiences with similar on exact same boards and others that used the same methods, the traces will be blown on the board almost always, show me some high res images of the whole area (that 1/4 of board, front and back) And please put them in rar or 7zip, thanks
That damage is done instantaneously, so quickly removing the short or cooling things off doesn’t help. You may be able to repair the trace though, if you are good enough with soldering and have solder setup handy. Chip usually survives, it’s the board that takes the damage
What is your chip ID, and what version software did you try? What was the initial issue, how did it act, what debug code did it stop on, what was shown on screen if anything, what did you do that caused this state, etc?
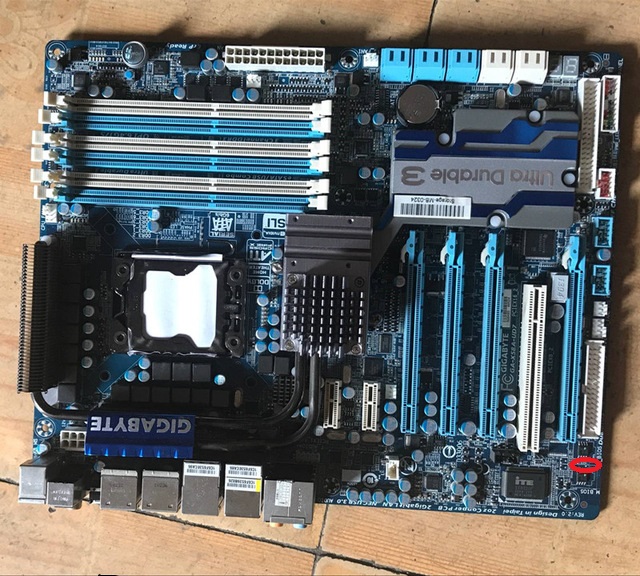
Ok so basically after I blown the chip, the board did still boot but then I attempted to flash my modded BIOS with FPT and it bricked. The backup BIOS doesn’t boot up to restore, despite me already resetting the CMOS (taking out battery and unplugging PSU cables). So the connection to the backup BIOS is faulty after the short or is it bricked now, I’m not sure. Now it’s stuck on debug code C1 with the motherboard not POSTING. So basically this is the boot sequence C1 -> C3 -> 88 power off. I don’t have enough storage on my phone to take a pic right now, but I have attached a PIC of where the damage occur. I have tried with CH341A 1.31. The BIOS chip is MXIC MXL1605D
That sounds like you may still have a chance then, maybe… FPT? You can’t use Intel FPT on this board, there is no Intel ME FW, so it shouldn’t have done anything.
Backup BIOS doesn’t matter, it can be removed and board will still boot, if main is programmed correctly, provided there is not a short between the two, or a broken trace on certain paths while others are still connected.
I need actual camera photos if possible, when you have time, ideally not phone images. When trying the programmer to dump main, which should be your only goal right now unless you’ve already erased with programmer(?), be sure to have CMOS battery in and all power connected.
What is your chip ID, and what software versions have you tried?
Do you have another X58 board you can try that CPU in, so we can rule it out?  I see this in google for X58 debug >> 88 is dead CPU, but can also be dead/incompatible PSU or dead motherboard
FPT can flash BIOS, it works using FPT version 5. So if I try to do backup BIOS restore method, it will POST code 88 and switch off instantly. If I reset CMOS it will do C1 -> C3 -> 88 -> Power off. So do you think BIOS chips are corrupted, or is there a damage to the backup BIOS chip traces? The board did boot up normally after the smoking occurred and I booted into FreeDOS to flash modded BIOS but after FPT flashed the chip with the modded BIOS, it became bricked. I was using CH341A ver 1.31 to restore the chip but either I get 000000 detection or FFFFFF Detection, same result with 1.34, yeah the CPU is definitely working. The BIOS chip is MXIC MXL1605D
Good to know, it’s been so long since I used one of these I must have forgot, thanks for the refresher I’ll have to keep that in mind 
debug code 88 only tells you what I mentioned above in regards to that, nothing about the BIOS (but dead board could be dead BIOS too). The only thing we can say for sure is main BIOS is corrupted, or there is a short or broken trace, that is all I can guess without having board in my had to examine.
Be 100% sure you are connecting everything correctly, here’s a guide with images - [GUIDE] Flash BIOS with CH341A programmer
https://www.bios-mods.com/forum/Thread-G…341A-programmer << Same as one as above, but with all images expanded/visible at once
Give me your stock BIOS you modified, and the mod BIOS, so I can check and see if I can see the original problem. Have you used 1.31 to read AND write to this exact chip ID before? If not, then try other versions, such as 1.18-1.30 - http://s000.tinyupload.com/index.php?fil…257455007472602
Main BIOS could be fried too, hard to know for sure. I have a few X58A’s here I think, give me some time and I will see if any have exact same chip and if they do I’ll see what version reads and writes to the chip properly
Get me those images when you have a chance tonight.
Yep so do you reckon the traces to the backup BIOS is basically gone and now it can’t restore the backup BIOS?
@Lost_N_BIOS So I have managed to restore the BIOS using CH341A 1.29, but now it gets stuck on verifying pool data, so if I disassemble everything and take out CPU and CMOS battery and leave it overnight, will it completely forget the settings by the morning?
Forget about backup BIOS, you don’t need it anyway, you have programmer. However, once all fixed, if it’s possible, you’ll want to use the boards internal mechanisms to copy main to backup, I’ll show you how later.
As for if the backup will ever work properly, or if you’ll be able to do what I mentioned above, unsure due to the short that happened, I need to see images of the board before I can speculate on that.
Put a jumper on the clear CMOS pins while you leave the board sitting, same with power on pins, then it will all be cleared for sure. Did you dump the BIOS after you wrote, to hex compare, to double verify it actually wrote in the complete BIOS 100% properly?
I’d also go ahead for now and dump the backup BIOS, so you have a copy of your LAN MAC ID in case sticker is missing from the board (is usually on or near LAN block)
Have you old CPU with CPUID 106A4h (C0) or 106A5h (D0)?
I have Xeon X5675.
Ok so I had to order some new CH341A BIOS clips cause the old one no longer had any grip, so how do I make my own NCPUCODE.BIN and update into the Award BIOS? @Lost_N_BIOS
@rootuser123 - Use rubber bands to make it grip again, put around tip until it’s tight enough to hold (be careful, you can break the BIOS legs) Those springs are tight, even on the $3 clips, I don’t see how people wear them out?
Here is a guide on NCPUCode editing - [Guide] How to update the CPU microcodes on a non-UEFI Award/Phoenix BIOS
For X58A use cbrom 155 for inserting, and 115 for checking post-insert, or 115 for all. Double check your final BIOS before you flash, using MC Extractor, if you get dupe or “Badly Packed” entries see FAQ #1 of the guide above, or ask for more help.
Programmer (or FPT) is not needed for flashing mod BIOS on Gigabyte EX58 or X58A boards, you can use Qflash or flash from DOS. I’ve done this a million times on 100’s of these boards, and helped many 1000’s more do the same
Ok so I used CBROM199 to insert microcodes and CBROM155 to update OROMs in the hope that the new BIOS won’t be stuffed and brick the board. Yeah I can confirm that backup bios traces on the PCB are damaged and no longer can access the backup BIOS, I am lucky the main BIOS traces didn’t get damaged and the board still boots with a valid BIOS. So electrically, I think the board is fine and should still be able to perform with no issues.
Cbrom199 is an issue, don’t use that for these boards BIOS. For microcode insert use 115, or you can use 155 to insert NCPUCode (after insert you can’t check /d it will crash, but that’s OK), everything else here use 115 too.
If you’ve already flashed in a new BIOS mod, using 199, and the board didn’t brick, then you are lucky this time around.
I agree, if BIOS chip, or traces there are damaged to the backup BIOS, that should be OK as long as the board posts from the main BIOS is should be fine otherwise.
If you need me to make you a Mod BIOS let me know 
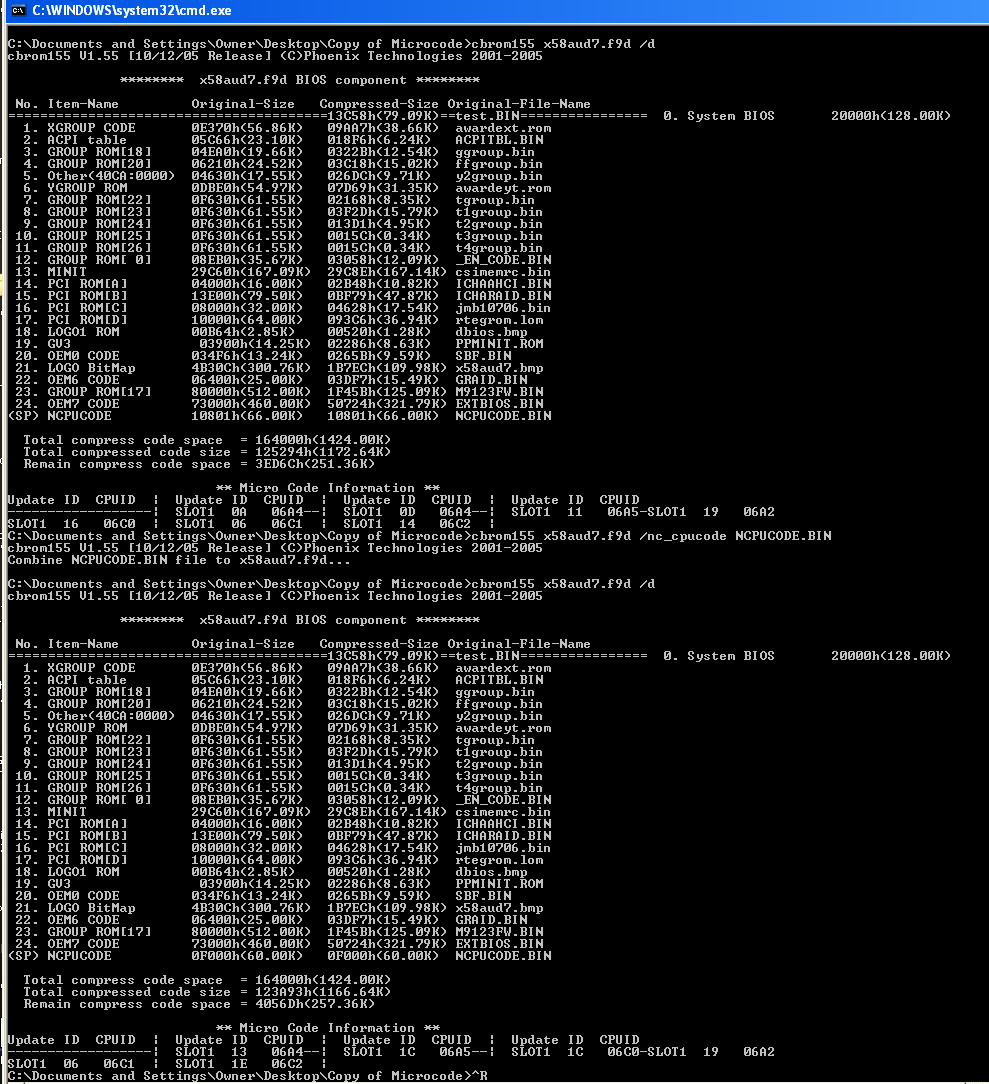
CBROM155 crashes when I try to insert microcode so have to use 199. But when I check with MCExtractor, it says the microcodes are there. I am waiting for new clips to arrive and will report back when I get time to flash.
Cbrom155 crashes during insert, are you sure, or only after you insert and then try to check? I just checked to confirm, it inserts fine as expected, it’s only when checking afterwards it crashes as I mentioned it might (it will often crash on mod BIOS after microcodes changed, this is normal sometimes)

However, I just checked this BIOS using 155 /D post ucode insert and it’s fine too (rare to see)
You can use 115 instead as I mentioned if 155 concerns you. Again, do not use 195-199 for this BIOS, it will break the BIOS due to sensitive modules (GV3, MINIT, etc) get moved.
Never mind, this BIOS is safe to use 199 on, I checked in hex and the sensitive modules don’t get moved this instance nor do any other sensitive things locations (ppminit, mementrypoint x2, csimemrc.bin)
So you’re fine, ignore me… for this boards BIOS only 
Microcodes being there means nothing, that only means they are in the BIOS, you can do that via hex and insert anywhere you want and MCExtractor will detect them.
You need to be sure BIOS is modified properly, otherwise you will have same brick as the original situation, so you have to be careful is all I was trying to help you do.
But watch out, I noticed I do get badly packed microcode when using 199, if you see that in MC Extractor you need to fix via hex, then after that extract OEM7 file or Logo, and reinsert to fix the checksums.
Same packed error with 155 too, and 115 doubles the ucodes  so we don’t want to use that one here after all either I have to fix that packaged error half the time anyway, so used to seeing that and it must be common on more than Gigabyte BIOS too since it’s FAQ #1
Oh I was using Windows 10, that’s probably why it crashes with 155.
Yes, I use XP for all cbrom work, inside virtual machine
Hey, I did the same thing as you did , but with a gpu bios , i bricked the card , tried to unbrick it by shorting pins and saw some smoke coming out, i also have dual bios but my ch341a can’t detect either. i just get FFFFF and 00000