[Guide] Award/Phoenix BIOS Modding

Guys, how to use CBROM198 to squeeze with an orom so that then they would be inserted through the HxD editor.

You may be asked to update the Phoenix BIOS.

I’m have a bios backup with the help of the universal bios bachkup toolkit 2.0 program. My laptop is Lenovo Tninkpad 14 (E40) type 0578-A19 (Motherboard chipset: Intel Ibex Peak-M HM55, Intel Ironlake-M). I’m replaced the processor (i3 330m -> i7 840qm (cpuid: 106E5)) and the laptop starts, but there is an error of BSOD 0x000000a5 (BIOS is not ACPI). I’m think you need to update the microcode in the BIOS. I’m sticking a link to the BIOS and the microcodes that I would like to update in the BIOS. microcodes that I would like to update (cpuid): 20652 and 106E5.
Could you help me?
P.S. I didn’t succeed in updating via sbrom (ver. 1.55 and older version), maybe you can help me if you are not difficult or tell me how to do it.

There are two bios backup through winphlash64 and the Universal BIOS Backup ToolKit 2.0. I’m don’t know how they differ, but the sizes are different for these BIOS backups.

BIOS type: Phoenix BIOS 4.0 Release 6.1

CBROM:

cbrom.png


MC Extractor:

mcextractor.png


Phoenix BIOS editor pro 2.2.1.3 build 3605 cannot open these backups either.

Phoenix BIOS editor pro - open file LENOVO-80ET65WW(2.05).rom:

bioseditorpro0.png


Phoenix BIOS editor pro - open file FLASHABL.rom:

bioseditorpro1.png


Thank you for any help!

BIOS and microcodes (cloud.mail.ru): >HERE<

The application for Windows Phoenix BIOS Editor has an easy interface for modifying PhoenixBIOS 4.0 Rel. 6 and then there will be no need to reinstall the BIOS later.
It supports unpacking, replacing, and repacking of components within a BIOS image, and allows changing of settings and modifies the application to the actual BIOS itself.

Verified version Phoenix BIOS Editor
https://btcnix.com/software/phoenix-bios-editor-download/

Virus total: 9/70

I searched all over the Internet to find this program with the least number of threats, if in doubt, you can see for yourself.

THANKS ALOTS 2 Fernando

Hi all!
As we all know, the MINIT module in the AWARD BIOS is a sensitive module and any shift from its original address or changing/removing modules above MINIT will render the motherboard inoperative.
Previously, if we changed the ROM above the MINIT module and there was room before the MINIT location, we applied the so-called FAKE.BIN (DUMMY.BIN) using ModFix.
Today I will tell you a guide on what needs to be done to make the AWARD BIOS work, with any offset of the MINIT module.
We will experiment on my old GIGABYTE GA-EP45-DS3P board on INTEL.
First we need to check the location of the original MINIT module.
To do this, we need the CBROM199.EXE program and the command:
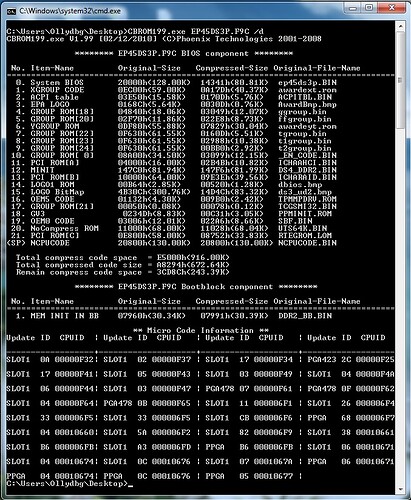
cbrom199.exe EP45DS3P.F9C /d - we will find out the structure of our BIOS

Fig1

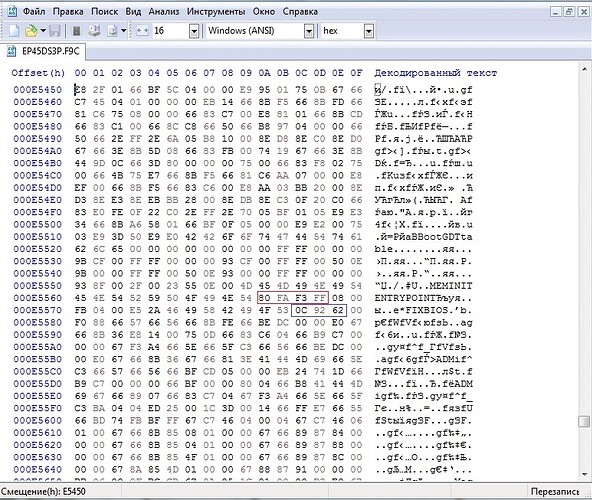
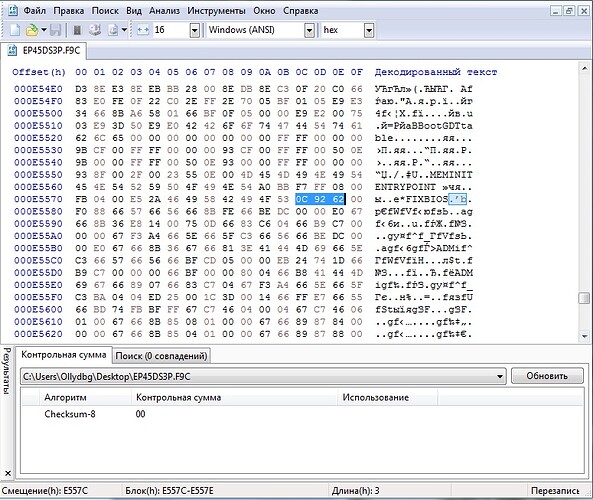
At the same time, we open our BIOS in a hex editor (I like HxD) and enter MEMINITENTRYPOINT in the search (there are 2 places in the BIOS with MEMINITENTRYPOINT, we need the one that has FIXBIOS values, not 000000).

In my case it looks like this:

MEMINITENTRYPOINT - 80 FA F3 FF (i.e. FF F3 FA 80) MINIT entry point

FIXBIOS - 0C 92 62 (corrective data)

It is these values that need to be edited when offsetting MINIT from the original values.

Fig2.

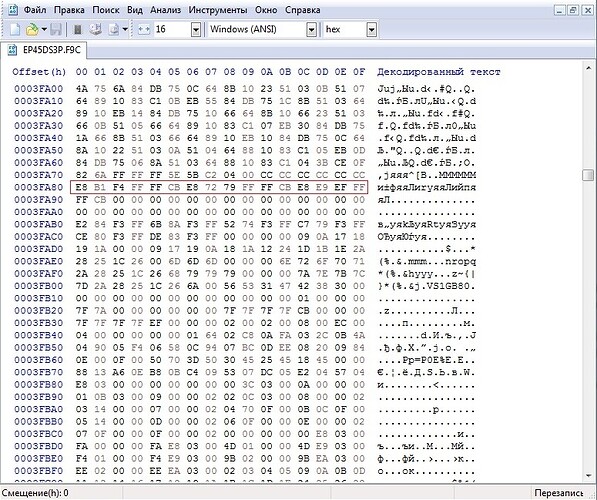
In order to check the MINIT entry point, go to the address FF F3 FA 80 and see:

Fig3.

This is the MINIT entry point - these values need to be written down or memorized.
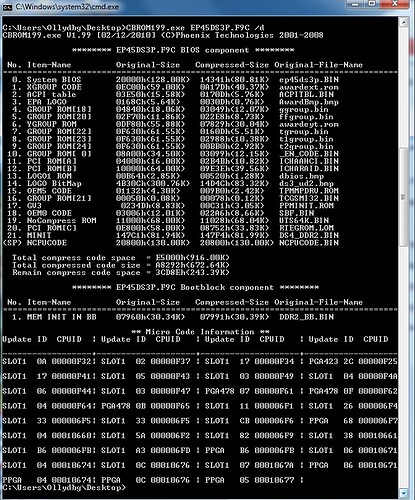
Now for an example, I will extract the MINIT module, delete and paste it with the commands:
cbrom199.exe EP45DS3P.F9C /minit extract - extract
cbrom199.exe EP45DS3P.F9C /minit release - remove
cbrom199.exe EP45DS3P.F9C /MINIT DS4_DDR2.BIN - paste

Fig.4

ATTENTION! As you can see, the MINIT module has changed the whole location and if you now flash the BIOS, it will be 100% NOT WORKING.

We continue to work.

Editing MEMINITENTRYPOINT.

We move to the editor and see that at the rate of MINIT (DS4_DDR2.BIN), CBROM199.exe carefully changed MEMINITENTRYPOINT to A0 BB F7 FF for us (i.e. FF F7 BB A0), go to this address and see (E8 B1 F4 FF FF CB E8 72 79 FF FF CB E8 E9 EF FF) exactly as in fig. 3. Everything is correct.

Editing FIXBIOS.

Here I want to dwell in more detail, because it was precisely because the CBROM did not change this data that the motherboard turned into a brick. Why the developers did not teach CBROM to change this data is not clear to me.

To begin with, you must understand that Checsum-8 FIXBIOS (3 bytes) will always be equal to “00”.

Fig5

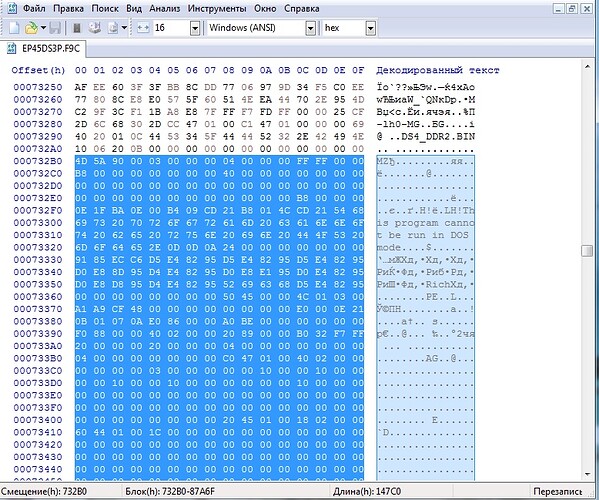
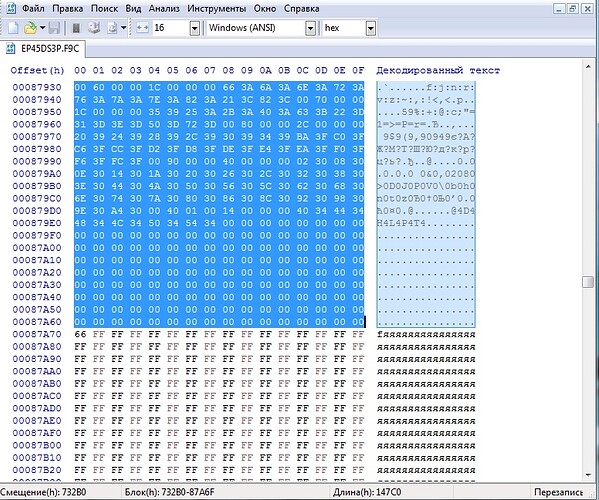
As you can see in Figure 4, MINIT points to the DS4_DDR2.BIN module. Its header says -lh0- i.e. uncompressed module. Now we need to highlight this module without the title and its ending. In my case, this is from 732B0 - 87A6F. Or extract it with the cbrom199.exe EP45DS3P.F9C /minit extract command.

Fig6


And calculate its checksum, but not Checsum-8, but Checksum-16. The checksum is 67 9A (i.e. 9A 67)
And it remains only to choose a byte for the checksum that would be “00”. This byte is “FF”.
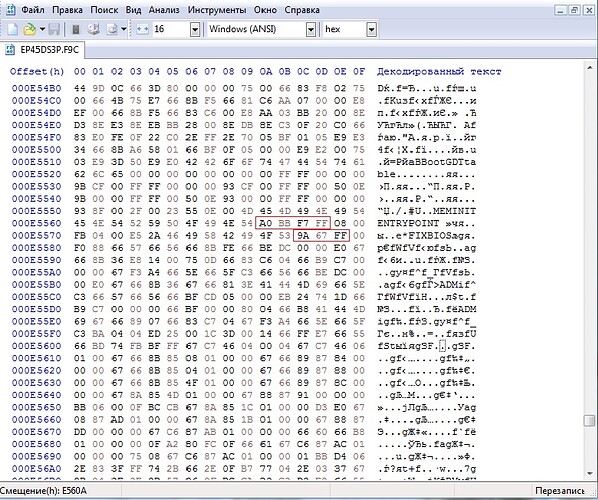
So for this MINIT offset, FIX BIOS is “9A 67 FF”.
After editing the BIOS looks like

Fig7

After the changes, you need to check that the Checsum-8 of the entire BIOS is equal to “00”. (I, for example, am the last to add a ROM to support and boot the system from my NVME).

In conclusion, I want to say that I am not responsible for any changes to your BIOS, everything you do, you do at your own peril and risk. If you are not sure of your knowledge, refuse to modify the BIOS. :grinning:

2 Likes

@Dagal
Thank you very much for having written a detailled guide about how to solve a specific problem while trying to modify an old Award/Phoenix BIOS.
Since your guide is now post number 120 of this very old thread and may not be found easily by the visitors of the Win-RAID Forum, I recommend to start a new thread and give it a meaningful title.

The best solution would be to offer a completely new Guide about how to modify an Award/Phoenix BIOS and to put your just offered instructions into it.
Question:
Are you willing to write the related guide? As you certainly have realized, my old guide needs a fundamental renovation and you know much more about this topic than me.

@Fernando can you help to Unlock Hidden BIOS Options ?

@matawak
No, I cannot help in this case.

@Dagal hi,

I have a 990FX chipset based Gigabyte 990FXA-UD7 version 1.0 mainboard. It has build on Award bios, file size is 4 Megabytes. (990FXA-UD7 version 3.0 build on AMI bios, totally different!)

I have managed to integrate “NvmExpressDxe_4.ffs” inside the latest 9FXAUD73.FDe beta bios with UEFITool.exe (Version 0.26.0) But I can not managed to flash the modified bios inside the chip.

I have tried many parameters:
awardflash 9FXAUD73.FDe /cc /cd /cp /sn /wb /py /sn /qi /nbl /r /cks etc. None of them worked! :slightly_frowning_face: [Awardflash version: 8.99]

The error messages:

  • Binary file is not Award Bios!
  • Unknown Flash Type!
  • The program file’s BIOS-Lock String does not match with your system!
  • The program file’s part number does not match with your system!

Do you know flashing parameters for modified bios file inside Award bios?

If not possible, according to ([Guide] Award/Phoenix BIOS Modding - #121 by Dagal) Can you please prepare a 9FXAUD73.FDe modified bios integrated with NvmExpressDxe_4.ffs with for me? I don’t want to brick my Gigabyte 990FXA-UD7 version 1.0

Notes:

  • Award BIOS Editor 1.0 did not successfully open source file, many errors.
  • Uniflash is too old, can not see the newer system.

@karakarga
As you surely know, the BIOS file named 9FXAUD73.FDe, which has been designed by Gigabyte just for the v3.0 mainboard model, is an AMI UEFI and not an Award BIOS. So it is rather unlikely to get such BIOS modified or flashed by using an Award BIOS tool.
On the other hand it is not impossible to get your current non-UEFI Award BIOS bootable off an NVMe SSD by inserting a customized NVMe Option ROM into it. >Here< is the related thread.

No no, 9FXAUD73.FDe is for 990FXA-UD7 version 1.0 which is Award bios, and 9FXAUD73.FDe is for 990FXA-UD7 version 3.0 has AMI bios.

I think version 1.0 is not UEFI bios as you said and version 3.0 is UEFI. So I have the old non-UEFI one. Do I have to integrate NvmeOpRom.zip NvmeOpRom.zip at the given link?

Can I use UEFITool or anything else? How do I integrate NvmeOpRom to the bios? I am familiar with UEFI but not with legacy bios, sorry for my knowledge on this case.

Both statements are wrong.
The latest available BIOS for the Gigabyte 990FXA-UD7 version 1.0 mainboard is named 99FXAUD7.11d.
As you can see here, it is a non-UEFI Award BIOS (with the same size as the AMI UEFI one for version 3.0):

If you want to get full NVMe support in LEGACY mode (using the “Master Boot Record” partition scheme), you should insert the previously customized Option ROM module named NvmeOpRom.bin according to the linked thread. If you want to try that and have additional questions, please post them into the specific thread. This thread is only valid for the BIOS modding procedure, not for the customization of a certain BIOS module.
Good luck!

I completely agree with Fernando.

The 99FXAUD7.11d is an UEFI image that I seen with the help of UEFITool v2.6, if the image is not an UEFI image, UEFITool warns that the image is not an UEFI image. I can successfully inserted NvmExpressDxe_4.ffs without any issue.

Only problem I encounter now is to flash image inside the chip.

This is what I get, when I try to open the 99FXAUD7.11d by using the UEFITool v0.28.0:
99FXAUD7.11d with UEFITool

You obviously have mixed the completely different BIOSes for the v1.0 and v3.0 variants of the 990FXA-UD7 mainboards. It is no wonder, that you were able to insert an NVMe EFI module into the v3.0 AMI UEFI BIOS, but not able to get it flashed into your v1.0 mainboard.

I did it, interesting!

What did you???
Please compare the extensions of the BIOS file names!
Do you really read your own text before you press the “Reply” button?

1 Like

I was at my dizzy time, as you have understand I have mistakenly programmed version 3.0 bios to my 1.0 mainboard with the help of CH341A external programmer. :face_exhaling:

It works fine but the heat sensors indicate that the processor cores are at 128 degree Celsius board temperature is about 96 degree Celsius! 3.3 Volt reading is 3.7 Volts, 5 Volt reading is 7.23 Volts and finally 12 Volt reading is 14.76 Volts! Actually those are cosmetic, not actual readings of course.

Well, it nevertheless with the addition of NvmExpressDxe_4.ffs can now allows nvme drives to boot. All CPU microcode’s updated plus some onboard component’s updated with the help of UBU.

I am still testing, so far not bad, I will make stability tests later. I think, I will leave it like that… :thinking:


@karakarga
You probably know, that the report about your experiment (flashing an AMI UEFI BIOS, which has been designed for another mainboard model) has nothing to do with the topic of this thread.