@ all users with an old nForce RAID system:
Preliminary Notes
Many users with an old nForce RAID system have severe problems, when they try to get Vista or Win7/8/10 installed onto their nVRAID array. Either the nVRAID array will not be detected at all by the OS Setup or the OS installation fails after the first reboot. Affected are mainly old nForce RAID systems with an nForce2, nForce3 or nForce4 chipset, who are able to support nForce P-ATA RAID and S-ATA RAID arrays simultaneously. These so-named “LEGACY mode” nVRAID systems need a special procedure to get any modern Windows OS properly installed. This guide has been especially designed for users with an nForce4 AMD (CK804) chipset running in RAID mode.
Note: None of the Windows Operating Systems from Vista up do support NVIDIA nForce2 and nForce3 RAID systems.
The following instructions are only an abstract from my original and much more detailed guides, which I have started at nForcersHQ Forum in May 2006 for Vista (>LINK<) and in February 2009 for Win7 >LINK<). Interested nForce RAID users can get there a lot of additional informations (as long as the linked guides are available at nForcersHQ Forum).
How to get Win7/8/10 (32/64bit) installed
onto a “LEGACY mode” nForce SATARAID array
Last updated: 06/14/2016
Preconditions:
- Windows Operating Systems can be installed onto each available spacious partition, but the active bootable partition (named “Drive C”) has to be within the nForce RAID array and should have the NTFS file system.
- The RAID array has to be set as bootable (within the nVRAID configuration tool) and as first bootable HDD (within the mainboard BIOS option “HARD DISK BOOT PRIORITY”).
- Since the nVRaid BIOS (other name: MediaShield IDE ROM) is part of the mainboard BIOS, you should check, if you have flashed the latest available mainboard BIOS version with an appropriate NVIDIA RAID ROM module version.
- All modern Windows Operating Systems need a rock stable system during the installation. If you have an overclocked system or critical RAM sticks, you will get BSOD’s, “missing file” messages or sudden reboots during the OS installation.
- Users reported about problems during the OS installation, when the Setup routine detected other storage devices (RAIDed or non-RAIDed HDDs, USB devices, card readers etc.) outside the target RAID array.
Suggestion: Unplug all storage devices outside the active RAID array and disable all unneeded controllers within BIOS before you begin with the installation of the OS. Once the OS installation has been successfully finished, all devices can be re-attached.
Preparations:
Since none of the modern Windows Operating Systems has nForce SataRaid drivers “in the box”, which are suitable for all nForce chipsets, users with an old (= Legacy type) nForce Raid system should do the following preparations:
-
Get and store suitable 32/64bit WHQL certified nForce SATA_IDE and SATARAID drivers: (only valid for nForce4 AMD (CK804) SataRAID systems)
- Depending on the architecture of the desired Windows OS (x86/x64), I recommend to download one of the following nForce IDE drivers:Unzip the downloaded driverpack (don’t mix the 32/64bit version!) and copy the driver folder inclusive its subfolders and their content onto an empty FAT32 formatted USB stick.
-
Create a “LEGACY Patch Boot USB/Floppy/CD” (as an emergency solution)
- Download the small LEGACY Patch file package from here:
-
>Boot Patch for LEGACY mode nForce RAID Systems<
Unzip the package and burn the ISO file as bootable USB/CD. Alternatively you can create a bootable floppy disk with the patch by running the make_floppy.bat file, which is within the package too.
Note: This “LEGACY Boot Patch” simulates the presence of a non-LEGACY mode nForce RAID system and can be used with 32bit and 64bit Windows Operating Systems.
Credits: The LEGACY Patch method has been developed and published by nForcersHQ Forum member hwti in November 2006.
-
>Boot Patch for LEGACY mode nForce RAID Systems<
- Download the small LEGACY Patch file package from here:
OS installation onto the nForce RAID array:
- Boot off the USB/DVD with the desired OS image.
- When you are asked, where you want to get the OS installed, and you won’t see your RAID array(s) and RAID partitions, plug in the prepared USB stick or floppy disk with the appropriate 32/64bit SATA_IDE driver v9.98.
- Hit the “load driver” button.
- Navigate into the SATA_IDE driver folder of your prepared USB stick or floppy disk. You will get a popup window, where the “NVIDIA nForce Serial ATA Controller” is shown as compatible device.
- Select the compatible device and let the OS Setup load the prepared driver.
- After having loaded the driver (maybe you have to hit the “Refresh” button), you should see the nForce RAID array as 1 device and its partitions (if not, you may have to restart the OS installation by booting off the prepared “LEGACY Patch Boot USB/CD/Floppy”, for details see below).
- REMOVE YOUR USB STICK /FLOPPY DISK WITH THE “F6” DRIVERS BEFORE PROCEEDING.
- Delete all shown RAID partitions, create a new one for the desired OS and let the OS Setup do the formatting.
- Select the just formatted partition and let Setup install the desired OS install onto it. Maybe the OS Setup will create some additional small sized partitions, which are required for a proper boot function.
- The rest will the OS Setup do by its own. Even the restarts should not induce any problem.
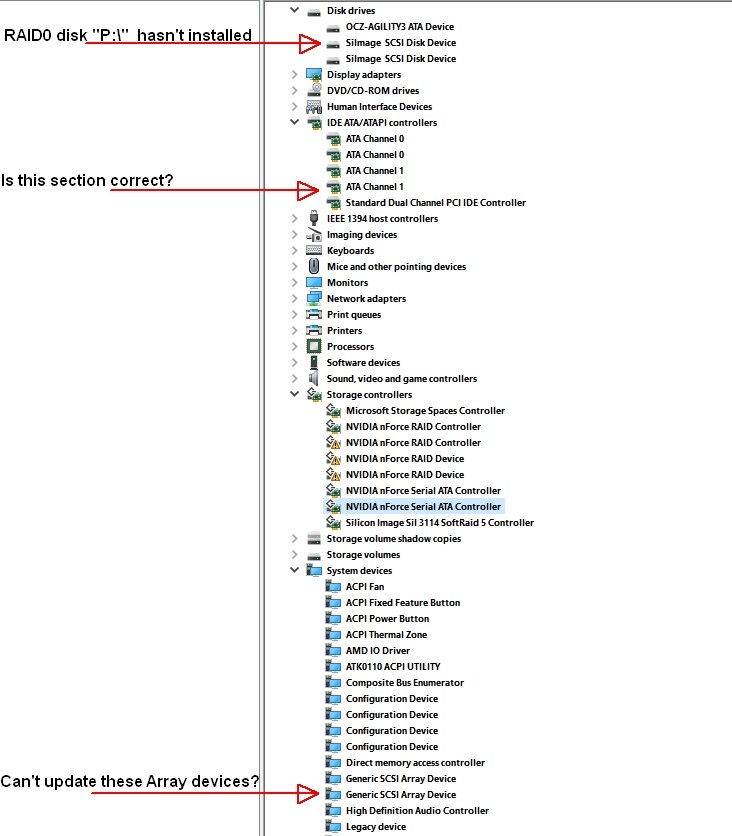
- Once the OS is up, you should do a look into the “IDE ATA/ATAPI Controllers” and “Storage Controllers” sections of the Device Manager (choose the “View” > “Show hidden devices” option):
You will see the following devices:- “NVIDIA nForce Serial ATA Controller(s)” using the nForce SATA driver v9.98 and
- "NVIDIA nForce RAID Controller(s)" and “NVIDIA RAID Devices” (maybe with the names of the RAIDed hdds) using the in-box nForce RAID driver v10.6.0.xx. Note: Although at the end of this installation method the OS is using different nForce SATA and RAID driver versions, you should be able to work with this fresh installed OS.
- If you want, you can manually update the in-use nForce SATA_IDE and SATARAID drivers later on (see below).
- Boot off the “LEGACY Patch Boot USB/CD/Floppy” you have prepared (see above).
- When prompted, remove the Patch Boot USB/CD/Floppy, insert the Win7 DVD and press any key.
The computer will now boot Win7 Setup from DVD similar to a non-LEGACY mode nForce RAID system. - Although the RAID and its partitions will already been detected and shown by the OS Setup, you should hit the “load driver” button.
- Navigate into the SATARAID driver folder of your prepared USB stick or floppy disk. You will get a popup window, where some NVIDIA nForce SATA and RAID devices are listed as being compatible.
- Select all compatible devices and let the OS Setup load the prepared SATARAID drivers.
Note: If the device named “NVIDIA nForce Serial ATA Controller” should not been shown as compatible while loading the content of the SATARAID folder, you need to load additionally the content of the prepared SATA_IDE driver folder. Choose the device, which is shown as compatible. It should be the “NVIDIA nForce S-ATA Controller”. - After having loaded the drivers you should still see the RAID array as 1 Disk Drive and its RAID partitions.
- REMOVE YOUR USB STICK /FLOPPY DISK WITH THE “F6” DRIVERS BEFORE PROCEEDING.
- Delete all shown RAID partitions, create a new one for the desired OS and let the OS Setup do the formatting.
- Select the just formatted partition and let Setup install the desired OS install onto it. Maybe the OS Setup will create some additional small sized partitions, which are required for a proper boot function.
- The rest will the OS Setup do by its own. Even the restarts should not induce any problem.
- Once the OS is up, you should do a look into the “IDE ATA/ATAPI Controllers” and “Storage Controllers” sections of the Device Manager (choose the “View” > “Show hidden devices” option):
You will see the following devices:- “NVIDIA nForce Serial ATA Controller(s)” using the nForce SATA driver v9.98 WHQL and
- "NVIDIA nForce RAID Controller(s)" and “NVIDIA RAID Devices” (maybe with the names of the RAIDed hdds) using the nForce RAID driver v9.98 WHQL as well.
- If you want, you can manually update the in-use nForce SATA_IDE and SATARAID drivers later on (see below).
OS installation outside the nForce RAID array
Users, who want to install any modern Windows OS outside the nForce RAID array, should be able to complete the OS installation successfully without the need to load any drivers, but they will not see the RAID partitions and datas within their Windows Explorer and Disk Management.
The problem can be solved by installing the needed and appropriate nForce SATA and RAID drivers from within the running OS. This can be done either by running the installer of a suitable Vista/Win7-10 nForce chipset driver set or manually from within the Device Manager.
How to manually update the nForce SATA and RAID drivers:
It is not easy for nForce RAID users to get the related NVIDIA nForce SATA and RAID drivers manually installed without risking a BSOD.
This is what they should do:
- Run the Device Manager.
- Hit the “View” tab from the menu and choose the option “Show hidden devices”.
- These are the devices, whose drivers have to be updated (DON’T REBOOT WHEN PROMPTED - WAIT UNTIL YOU HAVE VERIFIED, THAT THE DRIVERS OF ALL DEVICES HAVE BEEN SUCCESSFULLY UPDATED!):
- a) the “NVIDIA nForce Serial ATA Controller” (may be listed within the “IDE ATA/ATAPI Controllers” or “Storage Controllers” section of the Device Manager),
- b) the “NVIDIA nForce RAID Controller” (is within the “Storage Controllers” section) and
- c) all NVIDIA nForce RAID Devices, which are listed within the “Storage Controllers” section (that are the HDDs, which are members of the RAID array and may be listed with a slightly different name).
- This is the update procedure itself:
- Right click onto the related device and choose the options “Update Driver Software” > “Browse my Computer…” > "Let me pick…"
- Hit the “Have Disk” button and navigate to the INF file of the special nForce driver you want to get installed.
- Force the driver installation (disregard all warnings).
- Verify the driver update success by doing a right click onto all mentioned devices and choosing the options “Properties” > “Driver”.
- NOW YOU CAN REBOOT (finger crossed)!
Good luck!
Dieter (alias Fernando)