@Fernando ,
I agree with you to not write an extra guide for the customization of a WinPE image. Your Guide is sufficient to help the users who wants customize WinPE image.
However, in the current Red “Start change log” nor the updated part I don’t see nowhere the “WinPE” or “WinRE” reference. Does I have missed something ?
I hadn’t yet edited/written the related changelog details before I got your feedback, but the changes were obviously so minimal, that you missed them. Now it will be easier for you to find the WinPE related small text.
@ all:
Due to the release of the new NTLite v1.3 Beta, which makes the similar customisation of mutiple OS Image Editions much easier, I have totally revised the start of this thread.
NTLite users, who prefer to use the stable NTLite v1.2, can find my “old” guide for a while within the next post.
Update of the Start Post
Changelog:
- Updated: the complete guide
- New: all inserted screenshots
Good luck with the completely revised guide!
Dieter (alias Fernando)
@ all users, who want to install Win7, Win8.1 or Win10:
Introduction:
When you are going to do a fresh OS install, it is a good idea to customize the original OS image by integrating the things you need or like to use (special drivers, additional hotfixes, features etc). This way you will save time and may avoid some troubles (see below) while doing all this later, that means once the OS is already up and running.
The easiest and safest way to customize an OS image from Win7 up is to use a special tool. My favorite one is NTLite (>LINK<), which has been developed by our Forum member and nLite maker nuhi. The free version of NTLite is able to do all the needed operations for this guide, including the removal and addition of special mass storage drivers like the Intel RST ones.
Special problem for users of an Intel RAID system (up to 7-Series Chipsets) running Win8/10:
All MS Operating Systems from Win8 up do contain a new generic Intel RST(e) RAID driver v12.0.1.1019 (Win8) resp. v13.2.0.1022 (Win10) named iaStorAV.sys, which is used by the OS as the DEFAULT Intel RAID driver for all Intel platforms from ICH8R up.
Users with an Intel RAID system may run into severe problems, when they try to “downgrade” the already running in-box Intel RAID driver or any other previously installed Intel RST(e) RAID driver from v11.5 up (named iaStorA.sys) to a “classical” Intel RST RAID driver named iaStor.sys (latest version: v11.2.0.1006). According to my own experience you may get an unbootable and unrepairable system after having done such Intel RAID driver “downgrade”.
Solution:
Together with nuhi I have recently found a very safe method to prevent the just mentioned Intel RAID driver “downgrade” problems by using NTLite. Since Version 1.0.0 build 2420 beta the free tool version is able
a) to remove the generic Win8/10 Intel RAID driver named iaStorAV.sys and
b) to integrate the desired Intel RAID driver version instead.
Here is a guide about how to to do it:
Integration of Drivers (incl. AHCI/RAID)
by using NTLite v1.2
Guide for Win7, Win8/8.1 and Win10 (32/64bit)
Last updated: 02/16/2017
Changelog:
- New:
All inserted pictures - Customized:
Parts of the guide
1. Preparations
This is what you need:
- the latest NTLite 1.2 version (you can get it >here<)
Note: This guide applies to any NTLite version, but it is recommended to choose the tool architecture (32/64bit) to be the one of your host Windows OS (which you are currently running). - the OS image you want to customize (either as ISO file or as content of a bootable OS DVD/USB Flash drive, the “Sources” folder should contain a boot.wim and an install.wim file) and
- the desired AHCI/RAID drivers and other device drivers you want to integrate into the OS image (usually available >here< or >here<).
Further preparations:
- Create a new folder outside the OS partition and give it any name (e.g. D:\NTLite-Work).
- Copy the content of the bootable OS DVD/USB Flash drive resp. extract the related ISO file (by using a tool like 7-Zip or WinRAR) into the just created folder.
- Install NTLite onto your computer.
2. Working with NTLite
This is what you should do:
-
First steps:
- Run NTLite.
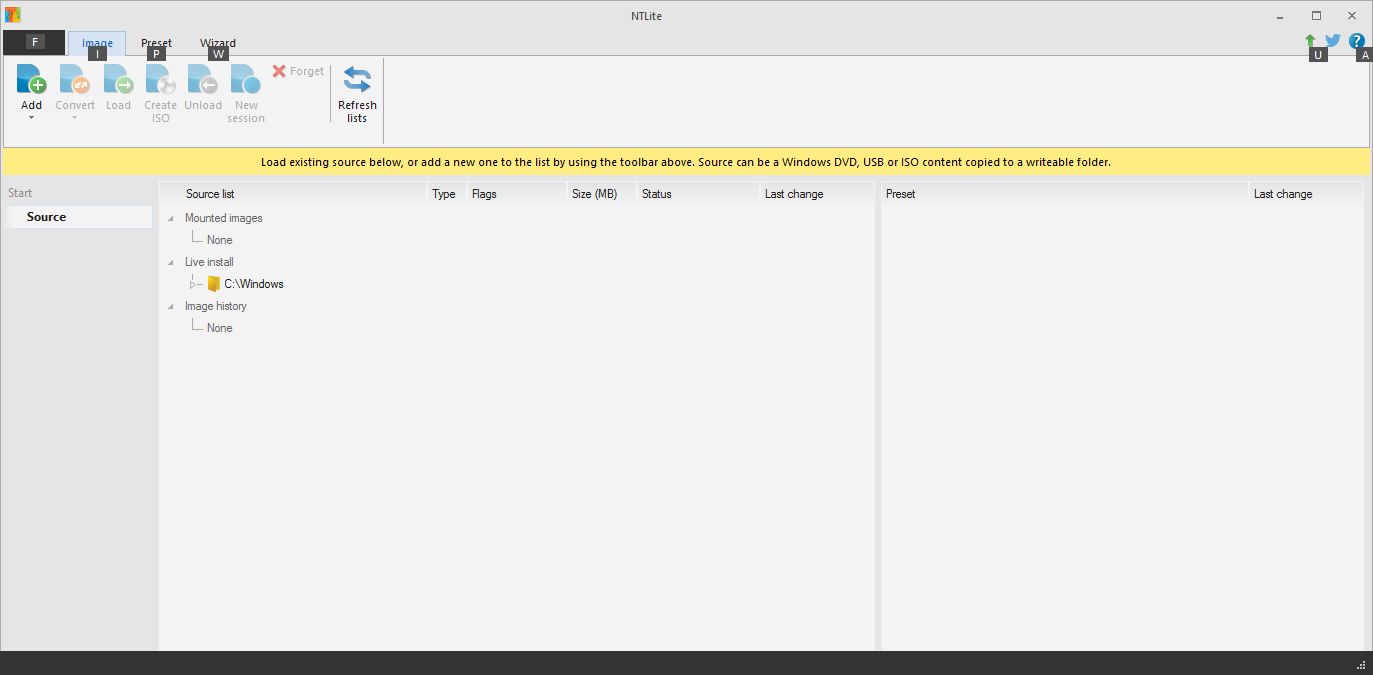
Now you will see the NTLite GUI Interface similar to this picture:
- Run NTLite.
-
Choosing the target directory:
- Click onto the "Add" button from the Toolbar, navigate to the folder, where you copied/extracted the original OS image files, and click "Select Folder".
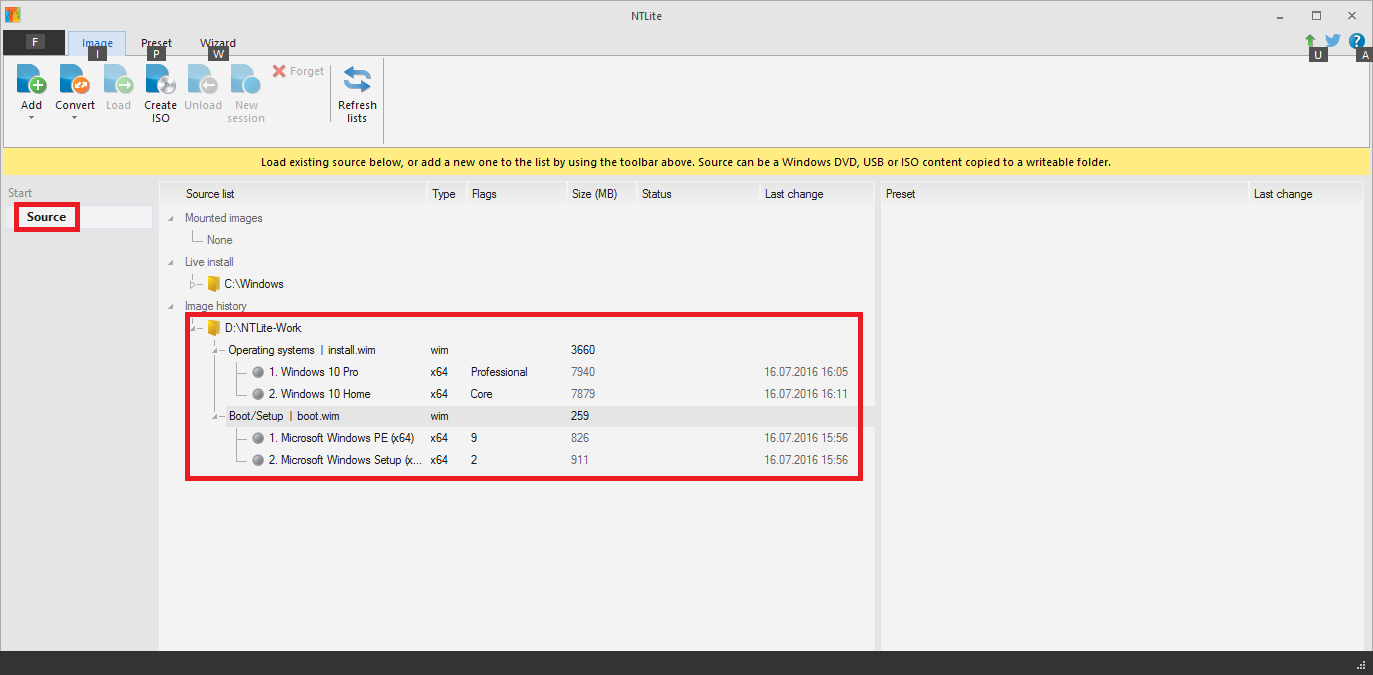
- After having expanded the "Boot/Setup" string (leads to the BOOT.WIM) on the right hand side, you will see a picture like this:
General Info:
The file named INSTALL.WIM (or INSTALL.ESD, if even more compressed and encrypted) is very voluminous, because it contains the complete OS data in compressed form. That is why this file has to be customized, if the user wants to use a special third party driver from scratch or want to avoid the usage of a special in-box driver. Since the INSTALL.WIM may contain more than 1 OS image (example: Win10 Home and Win10 Pro), you have to pay attention which of them you want to customize. If you want to customize more than 1 image, you have to repeat the procedure with the other one(s).
-
Loading of the desired Windows installation image
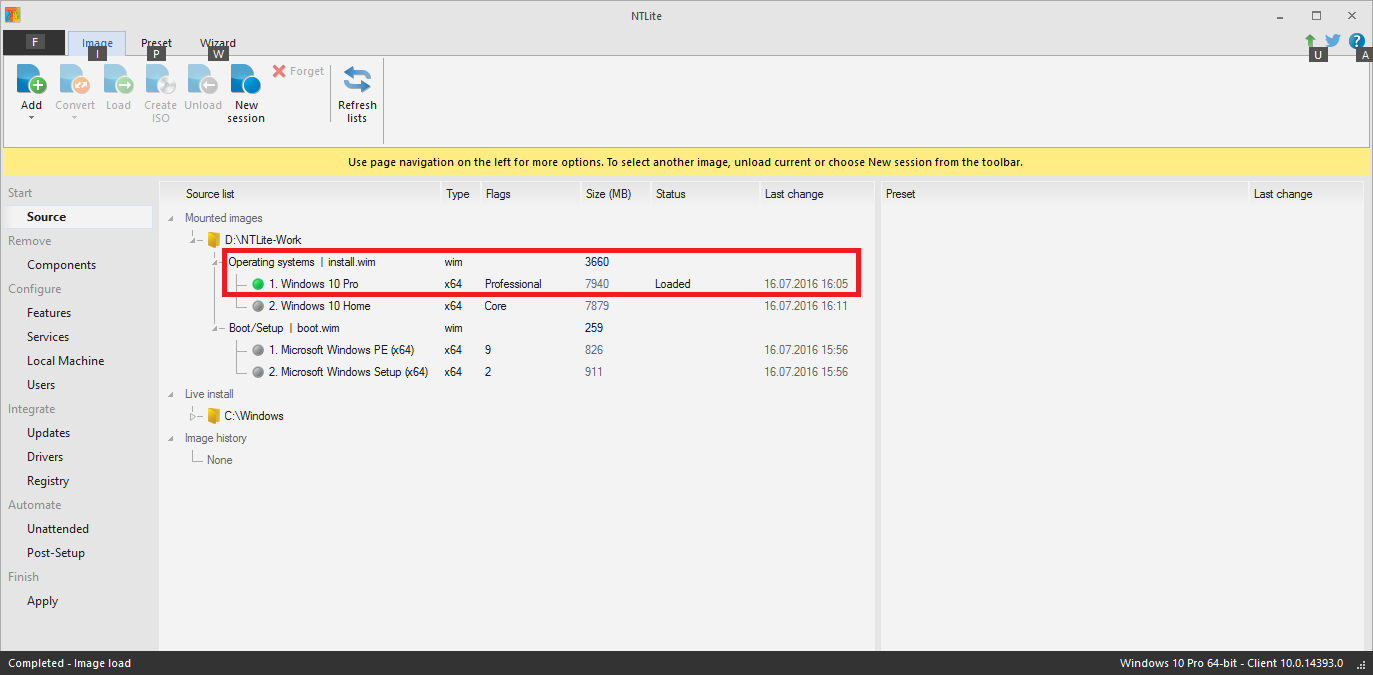
- If not already done, expand the NTLite processing folder part "Operating Systems | install.wim".
- Right-click onto the Windows Image you want to customize (example: Windows 10 Pro x64 "Anniversary Update") and choose the option "Load".
- After having finished the loading process, the line with the chosen Operating System will look like this:
-
Integration of the desired drivers into the chosen Windows Image
(here:Intel RST RAID driver v11.2.0.1006)- Click onto "Drivers" within the left NTLite window and then onto the "Add" button from the Toolbar.
- Navigate to the folder, which contains your desired driver (e.g. an Intel RAID one), and click "Select Folder".
- Now you will see the related driver and, after having expanded it, the associated INF files within the middle NTLite GUI window:
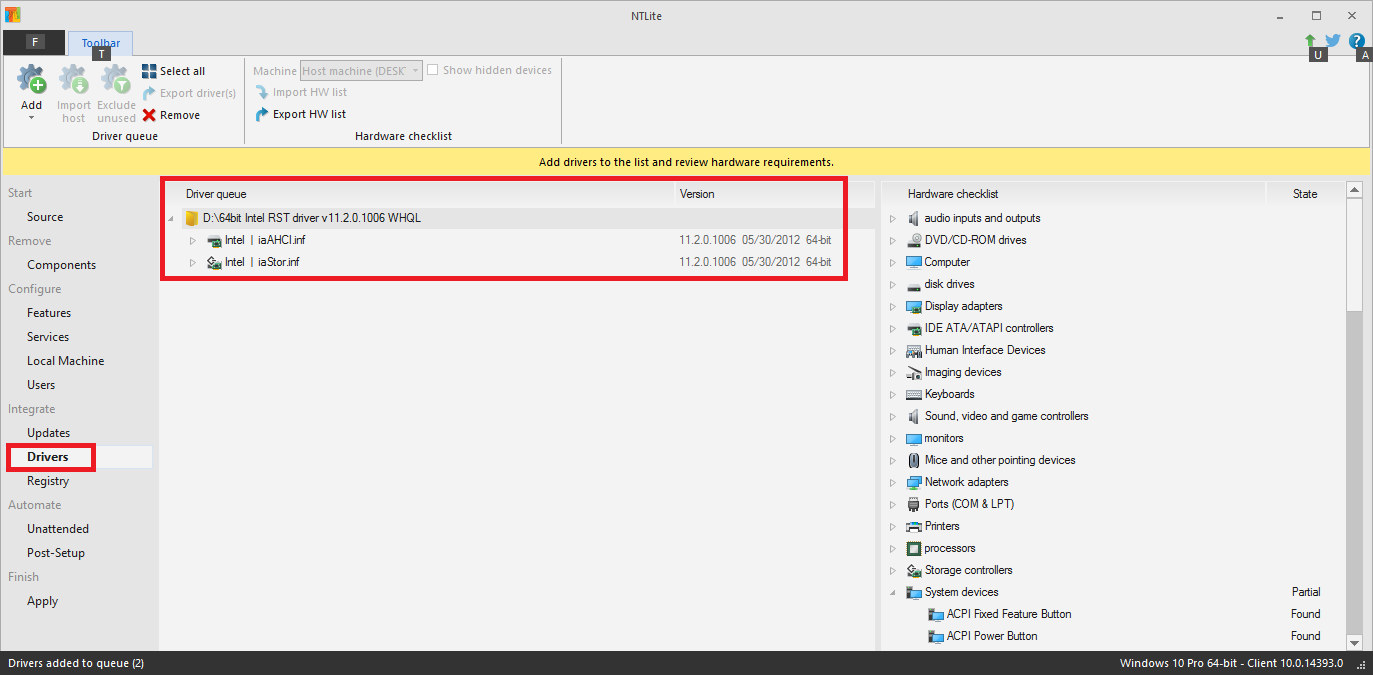
- If you don't want to integrate all offered INF files (e.g. the iaAHCI.inf for the AHCI driver and the iaStor.inf for the RAID driver), you can remove the unwanted INF file by right clicking onto it and choosing "Remove".
- This procedure can be repeated for other device drivers you want to get integrated into the Windows Image.
(here: Win10 in-box Intel RST(e) RAID driver v13.2.0.1022)
Info: This step makes sure that your integrated and potentially older driver will replace Microsoft's default in-box driver.
Warning: Be careful with component removals and read the page warning. By the way: Driver removals are a bit safer than other removals.
Note: If the desired removal should fail due to a "LOCKED by the HOST machine" message (this is an NTLite feature to prevent the creation of an unbootable Windows LIVE medium), you should click onto the "Compatibility" button, which is shown within the Toolbar while working on the removal of "Components". Then uncheck the "Host Machine", which is listed within the section "Machine support (Hardware lists)" and click onto "OK".
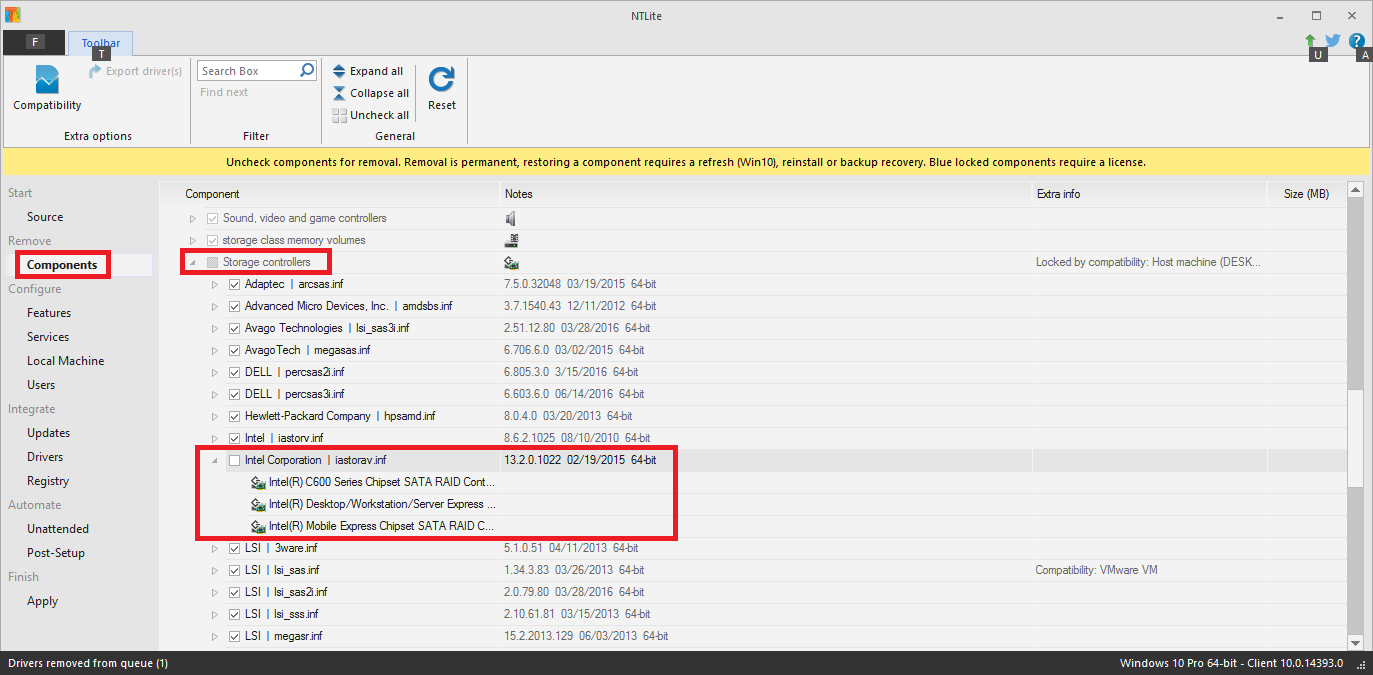
- At this point you have the possibility to add Windows hotfixes and Windows features (like .NET 3.5) into the chosen Windows image.
- Click onto "Apply" within the left NTLite window.
- This is what you should see now (after having expanded the tasks you had chosen):
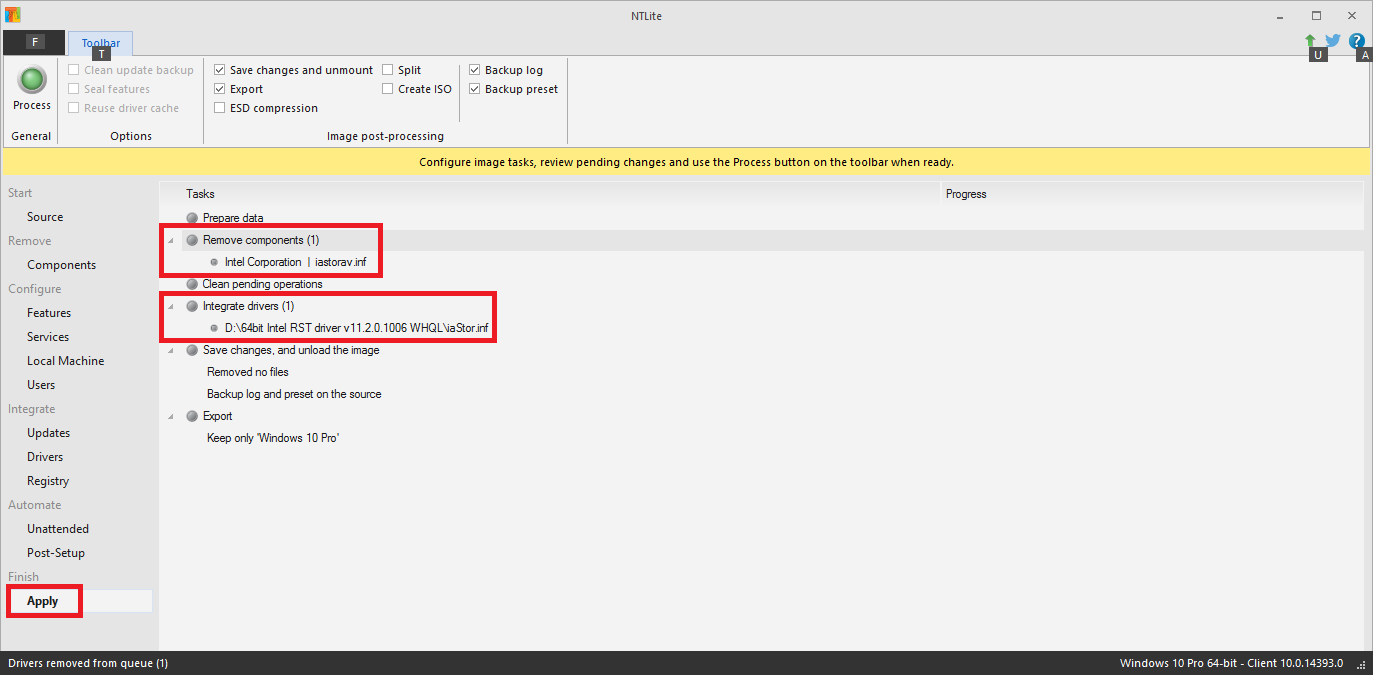
Tip: Before starting this task you should temporarily disable your currently running Antivirus Software to speed up NTLite's work.
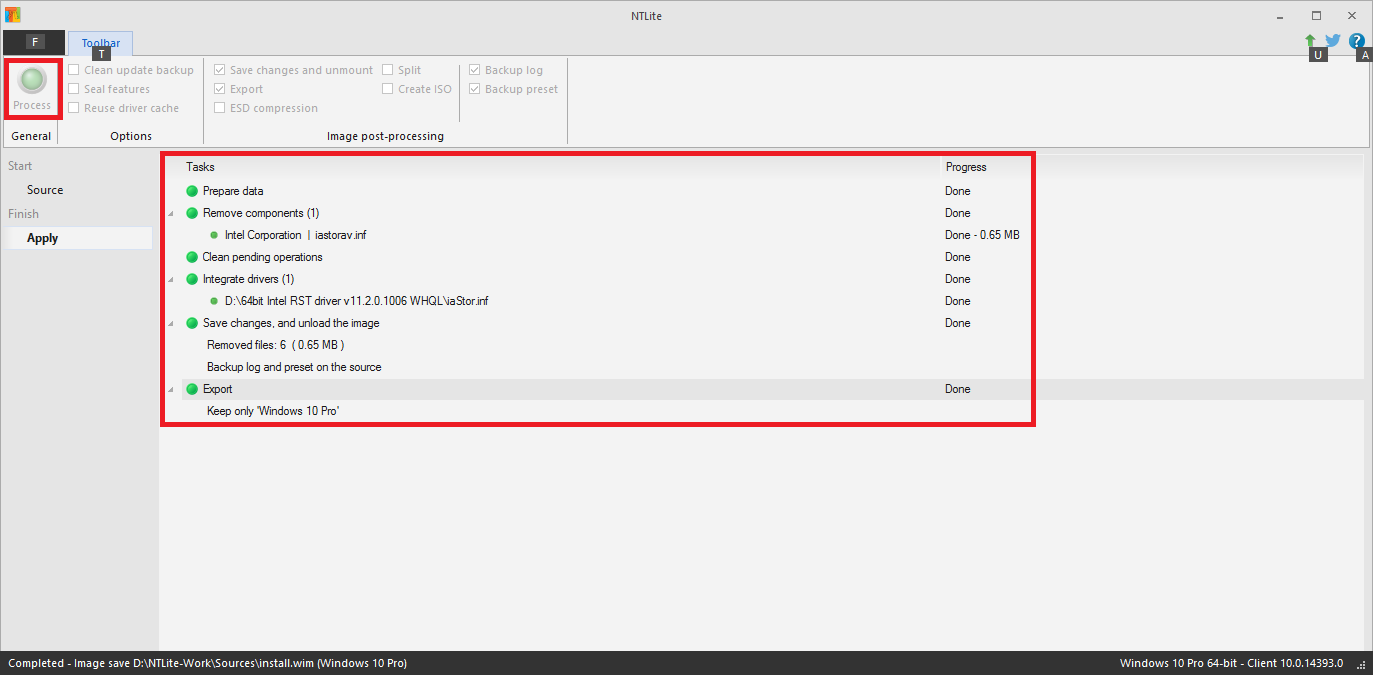
- If you want, you can now customize the other Windows images, which are supported by the INSTALL.WIM (shown by NTLite within the section "Operating Systems"). The steps are the same as written above.
Note: This guide is valid for the customization of a WinPE image as well (may require a special WinPE CD/DVD/ISO, for details look >here<)!
General Info:
The image file named BOOT.WIM contains just the data, which are required for the first part of the OS Setup. Contrary to the INSTALL.WIM the BOOT.WIM contains just the so-called "textmode/F6 drivers", which are required for the detection of the connected storage/USB disk drives resp. the management of the on-board AHCI/RAID/USB3 Controllers at this early stage of the OS Setup. That is why a driver customization of the BOOT.WIM file only makes sense, if the user wants either to boot off otherwise unsupported hardware or to force the usage of a better storage/USB driver from scratch. Since the storage/USB drivers are in both image files (INSTALL.WIM and BOOT.WIM), both of them have to be customized.
-
Loading of the Windows Setup image (= BOOT.WIM)
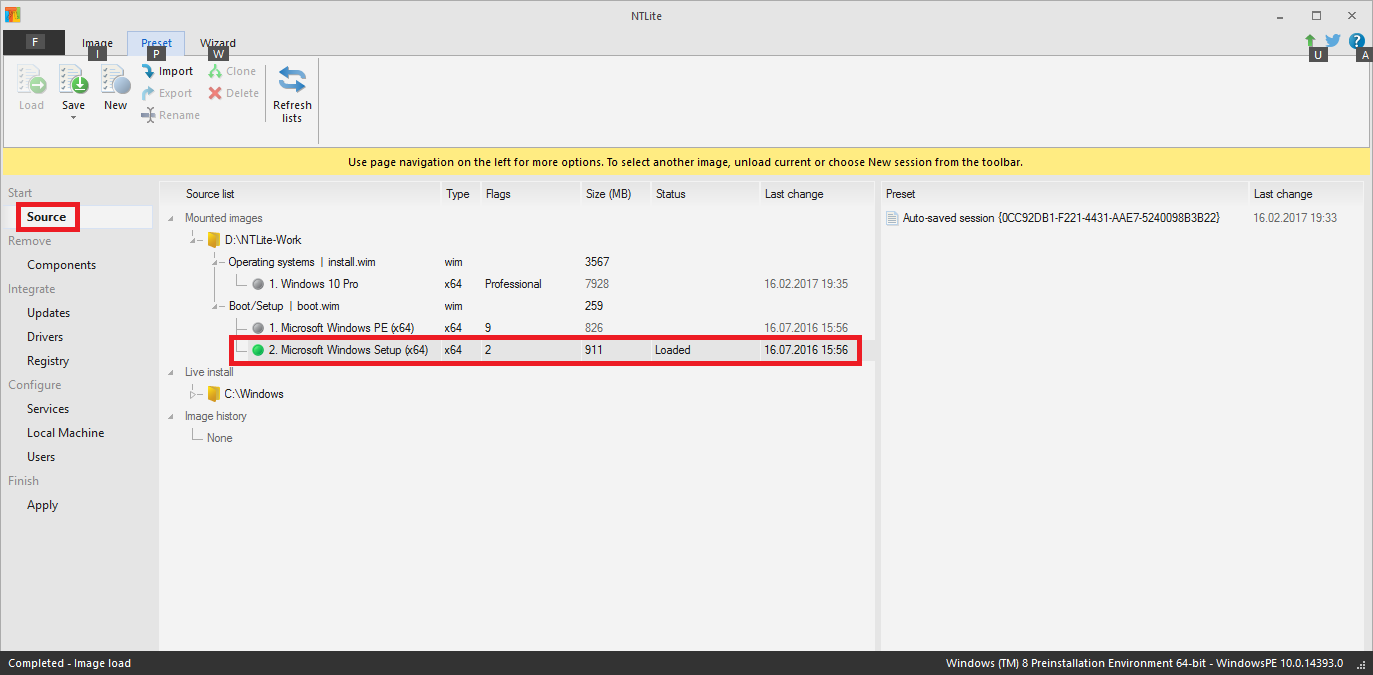
- Click onto the left hand "Source" field and then expand the NTLite "Image history" section and its sub-sections inclusive the "Boot-setup | boot.wim" one.
- Right-click onto "Microsoft Windows Setup" resp. "Microsoft Windows Setup (x64)", which is listed within the "Boot-setup" section, and choose the "Load" option.
- After having finished the loading process, the "Microsoft Windows Setup" line will look like this:
-
Integration of the desired storage driver into the BOOT.WIM
- Just repeat the same procedure as written above under for the INSTALL.WIM (see chapter B 2).
-
Optional: Removal of unwanted in-box drivers from the BOOT.WIM
Info: This step makes sure, that your desired and potentially older driver will replace Microsoft's default in-box driver even during the OS Setup (at the beginning of the OS installation).
Warning: Be careful with component removals and read the page warning. By the way: Driver removals are a bit safer than other removals. - Just repeat the same procedure as written above for the INSTALL.WIM (see chapter B 3).
- Click onto "Apply" within the left NTLite window.
This is what you should see now (here: removal of the in-box Intel RST(e) driver v13.2.0.1022):
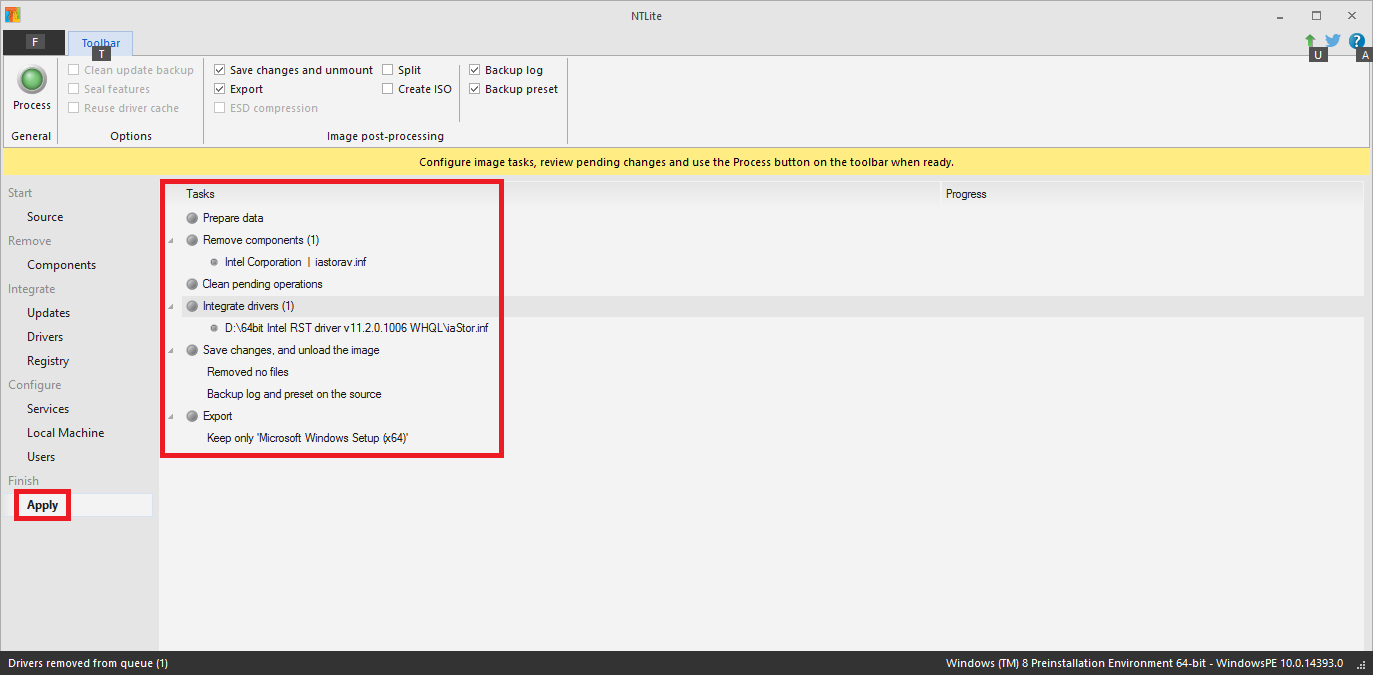
Tip: Before starting this task you should temporarily disable your currently running Antivirus Software to speed up NTLite's work.
Now NTLite will execute all the requested BOOT.WIM customization tasks (and additionally the creation of the ISO file, if you had checked the option).
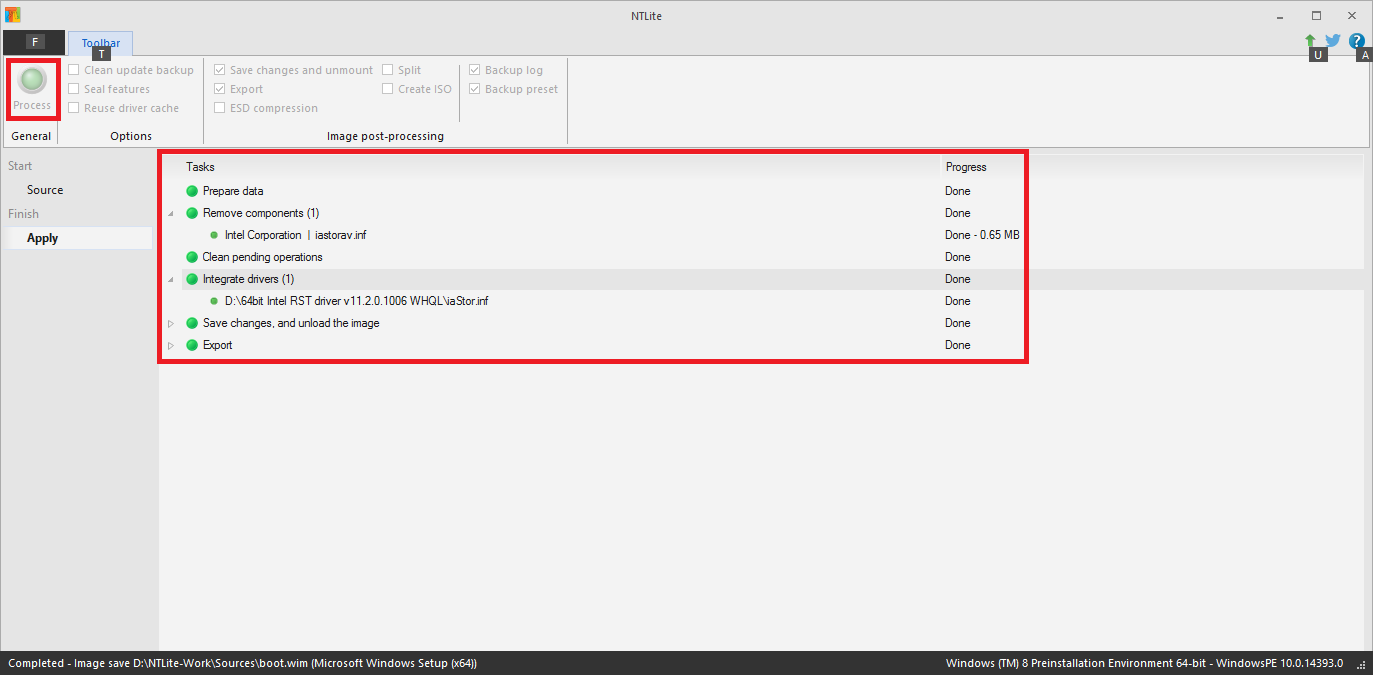
- Provided, that you don't need an ISO file or got it already, you can now close the NTLite GUI.
- You will find the unmounted customized OS image within the previously chosen NTLite processing folder (e.g. D:\NTLite-Work).
- If you should need an ISO file with the customized OS image, look into chapter D.
- If you have checked the "Create ISO image" option according Chapter B or C, that means before clicking onto the "Process" button, you will immediately get a popup window, where you can choose the storage destination, the name of the ISO file and its label.
The ISO file generation itself will be automaticly done by NTLite as last step, that means after having finished all other tasks. - If everything worked fine, you will get the above shown final success picture.
- If you should have forgotten to check the "Create ISO Image" option before having clicked onto the "Process" button, you can get the ISO file nevertheless.
This is what you have to do after having completed the INSTALL.WIM and BOOT.WIM customization:- Click onto the left hand "Source" field and then expand the NTLite "Image history" section and its sub-sections inclusive the "Boot-setup | boot.wim" one.
This is what you will see:
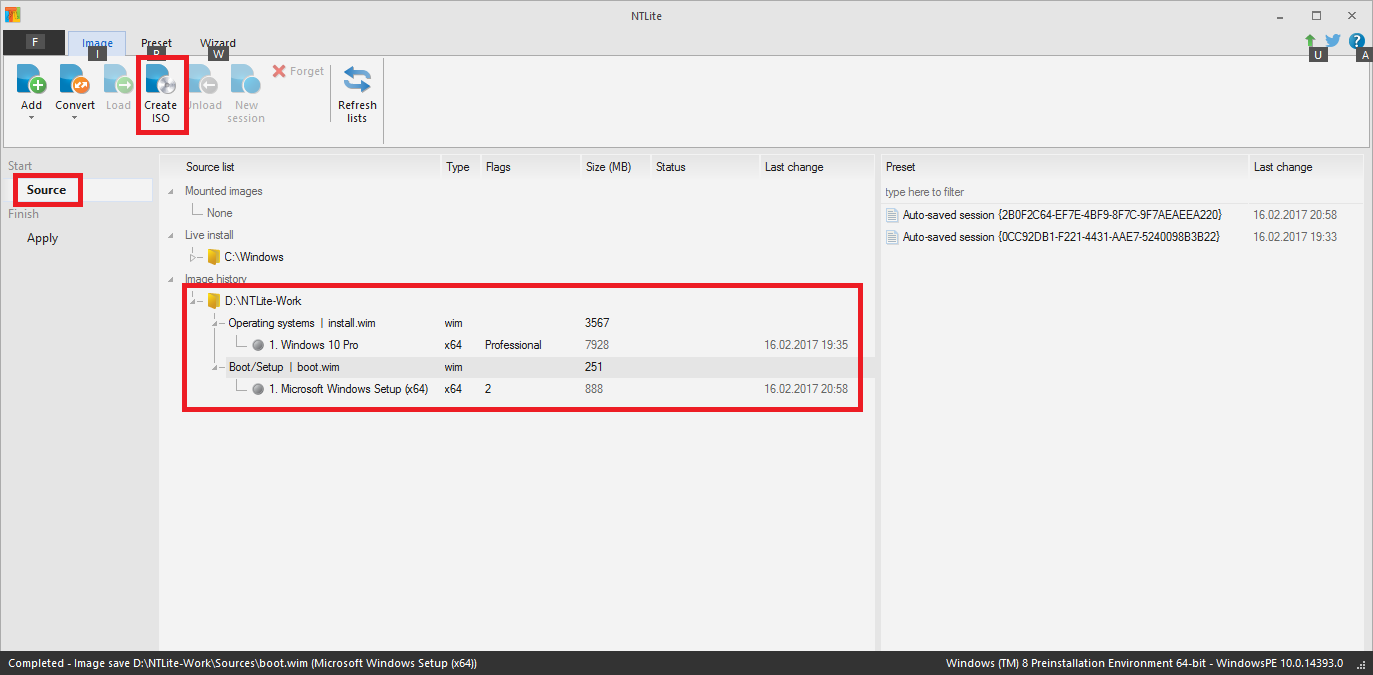
- Click onto the left hand "Source" field and then expand the NTLite "Image history" section and its sub-sections inclusive the "Boot-setup | boot.wim" one.
- Now you can click onto the "Create ISO Image" option within the NTLite toolbar and will get the ISO file as written above.
Managing the ISO file containing the customized OS Image
- You will find the customized ISO file within the storage folder you had chosen.
- Now you can either burn a bootable DVD or create a bootable USB Flash Drive with a tool like Rufus.
- Install the OS and enjoy the performance and stability of your system by having integrated the "best" drivers for your special system.
Good luck!
Fernando
Hi Fernando,
None of the linked screenshots is shown.
Regards,
Nemo
They are not yet visible, because I only had saved the text, but not the screenshots of the "old" guide. That is why I have to repeat the whole procedure by using NTLite v1.2, to re-catch the related pictures, to re-upload and to re-link them, but this will be done this evening.
Hi @Fernando ,
I’m a computer noob trying to figure out things. I always had weird problems with my pc.
After setting raid 0 I had some problems with installing system. Problems with raid drivers. System could not be fully installed. After messing with things and giving system raid drivers during installation finally I could finish installation process however there always were some weird problems after installation … Like my system (at the moment windows 7) cant read png files whivch makes a lot of problems. Some programs just cant be installed.
My motherboard is asus P9X79 DELUXE. Could you please let me know what raid driver I should integrate with system install cd using NTlite so everything works just fine? Sorry for maybe silly question but as mentioned Im a noob and there is so many driver versions, also your modded drivers … I’m a bit lost in this ![]() I want to install windows 10 RAID 0.
I want to install windows 10 RAID 0.
@kitniak :
Welcome at Win-RAID Forum!
If you want to know, which Intel RAID driver I recommend for X79 chipset systems, please look into the start post of >this< thread. At the bottom of it you will find a table with a list of my favorite drivers for X79 chipset systems.
Pre-condition is, that your on-board Intel SATA RAID Controller had been set before within the BIOS to "RST mode".
All these problems have nothing to do with the choice of the "best" usable Intel RAID driver version.
Regards
Dieter (alias Fernando)
Hello Fernando.
So I’m going to do a clean install of windows again on the XPS 9550. I just feel it runs better and faster in RAID. I was wondering if you could give me a few tips. I’m going to follow your nlite 1.3 version. I want to do this right and will be using either a 64g SanDisk extreme, or a 32gb SanDisk Ultra. I just have a few questions before I proceed. I have performed many clean installs before on USB but it was just a basic image from the media creation tool. So that is where I downloaded the image for this Install I’m going to do with the Nlite program. After looking at the image to make sure it had the instructed boot.wim and install.wim I was only able to find the “boot.wim” file. I did find a “install.esd” but no .wim. Is there a way to manually insert it? Or is there a better place to download the system image, that would include the install.wim?
My 2nd question is when you say: “Create a new folder outside the OS partition and give it any name” I know this sounds bad but do you mean and separate USB, or can it be on the USB that has the image on it, just in its own separate file. If you mean make the new folder on the system, how would I go about doing that when my system only has a 1tb SSD. My HDD and 2.5 SATA location is empty. I removed the TB WD blue HDD with the intention to and a SATA drive and run the RAID0 but never got round to buying the SSD 2.5 SATA drive yet. Will this be an issue if in fact I need to add this folder on a drive without my OS (Windows 10)?
Ok well those are the 2 questions I wanted to clear up before I start. I may order the SATA drive soon, but in the mean time if I can get this custom clean image installed that would be great. The XPS is running terrible, so I just want to start it over fresh. Now that I’ve been active on this forum I feel confident that I can make the system much better starting from scratch.
Thanks,
Erik
P.S. Can you also add the BIOS, MEI versions that go the best with the chosen Intel RAID driver? I basically want to put in anything you recommend for an Image that is going on a Intel 100/230c chipset computer.
@sealovererik :
1. I recommend to use a complete OS ISO file (with boot.wim and not encrypted install.wim) as source. If you shouldn’t have such ISO file, you can use a decrypter to create a complete ISO file from an install.esd file.
2. You can store the NTLite Work folder onto any Disk Drive, which is attached to your system during the work of NTLite and to which you will have access after having completed your NTLite work.
3. The Intel MEI driver version has nothing to do with the Intel RAID driver version. If you want to know, which Intel MEI driver you should take, please have a look into the start post of >this< thread. The currently latest Intel MEI driver is v11.6.0.1042 WHQL.
OK thanks,
So when I decrypt the “install.wim” with the decrypter, is this something that can be done to the image that I have? In other words…Should I format my USB with the already downloaded image from the MS creation tool, or can I just use the Image and decrypt the single install.esd file? Honestly I have only ever made an image off that MS C’tool. So Id say that by default it always has the install.esd. I’m not sure where I could get a safe, secure image with the file already decrypted. Lastly, is there a recommended service or 3rd party program to decrypt the file, and using the Nlite program would you say with a windows 10 image and a few basic drivers that 32gb will be enough?
Thanks,
Erik
Ok never mind. I got the necessary tool to decrypt the ESD file to make the win10 image customizable. I’m transferring the image now to the SanDisk. So now ill follow your tutorial on the nlite program install. I’m going to look over all your info on the best RAID settings, driver, and BIOS versions for a Intel 100/230 chipset. The only question I have, that I’m not 100% clear on is: Is it fine to add all the custom drivers/programs/or anything that you want to add to the ISO image on the SAME USB drive as the Image itself is on? Or do I need to put it on a separate USB? If in fact it can all go on the same USB is there any special placement of the custom folders? Or can they be copied/moved anywhere on the ISO image USB?
Thanks a lot!
Erik S.
@sealovererik :
You can customize the related Win7/8/10 Image Edition of your choice according to your demands (minimum: removal of the unwanted Intel RAID driver and insertion of the desired Intel RAID driver from the BOOT.WIM and INSTALL.WIM), but you have to keep in mind, that each added NTLite task may increase the risk of a later OS installation failure. Furthermore the final size of the INSTALL.WIM is limited to 4 GB.
That is why I recommend to create as first step a bootable OS Image, which just contains just the minimum requirements and nothing more.
On the basis of this minimum ISO file you can create a second ISO file, which contains all Hotfixes drivers and programs you may want to get added.
I’m a completly noob at this drivers thing… I want to add network drivers on the windows 7 installation… and maybe intel graphics drivers… is that even possible? for what i noticed, the links of drivers on the tutorial was for ahci and i didn’t find anything about network drivers… anyone can help me understand?
@nipodemos :
Welcome at Win-RAID Forum!
There are millions of different drivers from different manufacturers available and the users of my guide cannot expect, that the related download links can be found at a certain place of this thread.
So you have to search for the latest drivers, which are matching your special hardware and the architecture (32bit/64bit) of your desired OS yourself.
Provided, that you are planning a fresh OS install onto your host machine and have already the latest drivers installed onto it, the tool NTLite makes it very easy for you: All currently running drivers of your system are detected and automaticly offered for an integration. You will see them on the right-most part of the NTLite GUI after having chosen the task "Driver Intregration". So you just have to check the desired drivers and will get them integrated into your desired OS Image Edition.
Regards
Dieter (alias Fernando)
Thanks for the answer!! now i understand… there is no such thing as a universal driver or a pack with every network drivers that exists… it woul be too much !
thanks for make it clear for me, i’ll search a little bit on the internet, i’m pretty sure i can find what i need!
@Fernando ,
Hi dear, I tried to use NTLite then ISO Image loaded, Export to my USB Flash Drive 8GB, It’s Rufus 2.13, My desktop are windows 10 home edition, 64 bit, 1TB, Intel HD, Screenshot full here,
I have trying to BIOS Mode, a Secure mode is disabled, And Change to all Legacy mode. Save & exit to loaded for Windows 7 installation is up for me. But won’t control mouse and keyboard. I tried really USB 3.0 and 2.0 with USB Flash Drive doesn’t work.
Can you help me to TeamViewer? I can PM you in conversation.
Thanks.
@SamettoChan :
Welcome at Win-RAID Forum!
What is exactly your plan and what is your problem?
Which driver for which Device do you want to integrate?
Without any informations about the chipset of your system and the target drive specification I am not able to help you.
I don’t have the required time for any private support.
Regards
Dieter (alias Fernando)
go into the Pro1000 folder open any of the folders NDISxx, in that folder open the “readme” file it will describe which OS and if 32 or 64 bit
fyi, NDIS65 is the win 10 x64 folder
Ii have renamed the folders for easier usage in ntlite example: NDIS62 (win 7 x64) / NDIS65 (Win 10 x64)
and archived/zipped the other folders so they do not show in ntlite, but are still available from winzip if i need them
the latest intel ethernet cd is v22.3 (select the 22_3_CD.zip) then extract the file for all OS/DOS 32/64 bit drivers
for windows, most users only need the pro100 and pro1000 folders (the “xxxGB” folders are fiber channel nics)
https://downloadcenter.intel.com/downloa…-Connections-CD