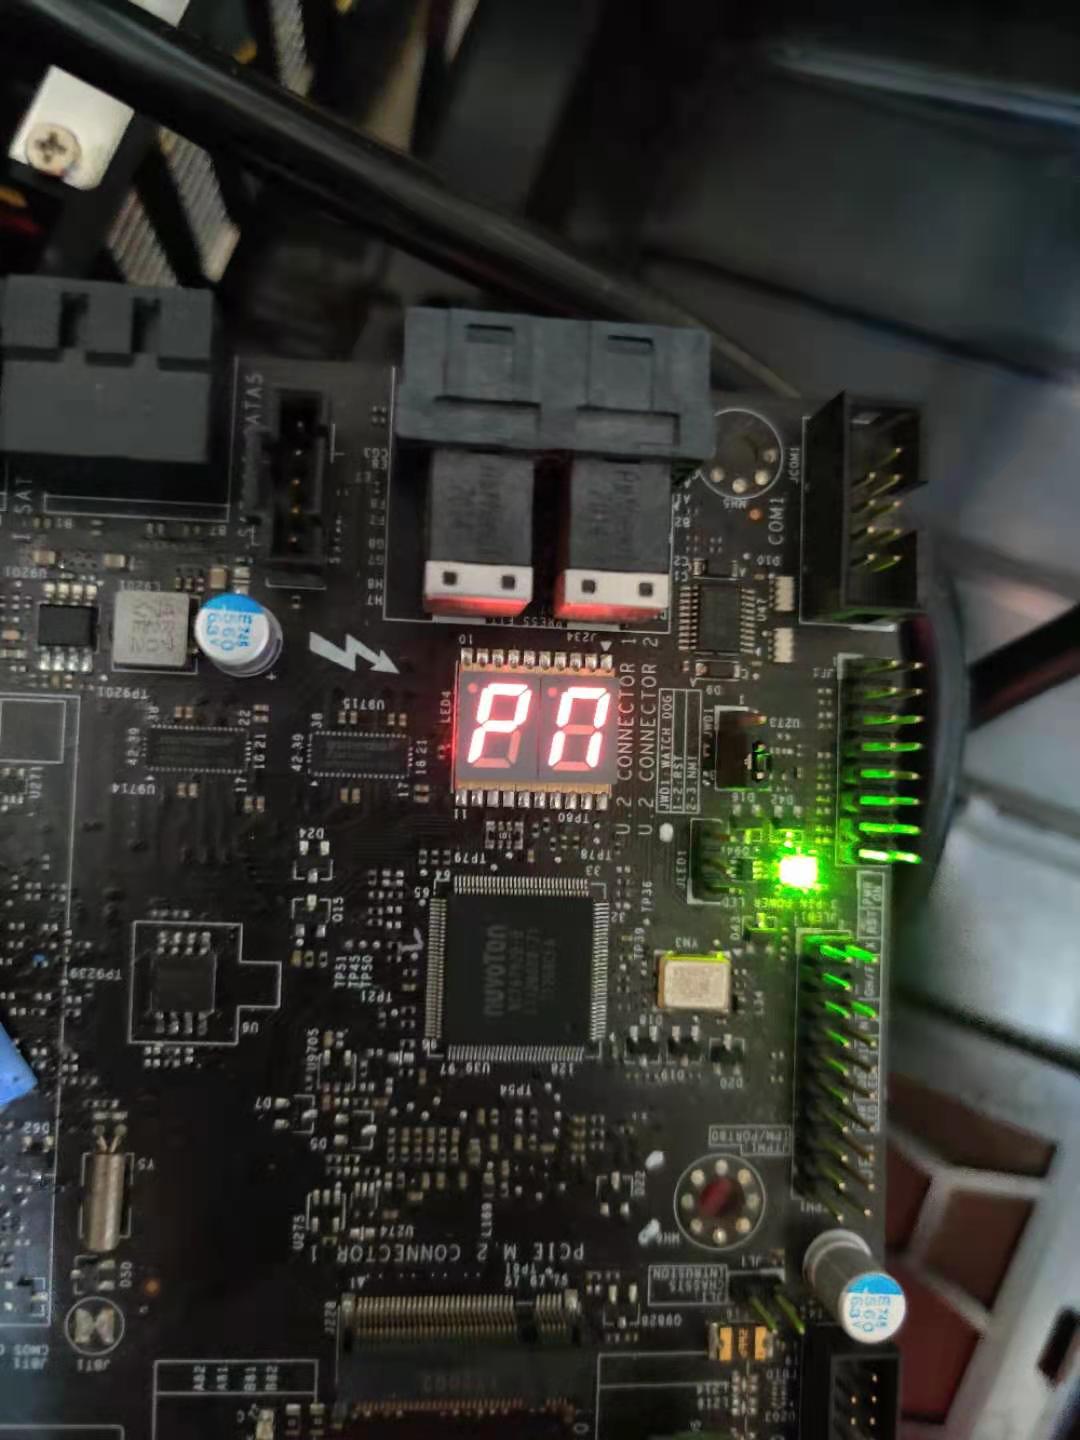
hello everyone: recently I’m working on a C7Z270-PG mb making it capable of using an xeon E2146G and 32G*2 memory kits, so after disabling the ME, I follow the dsanke’s 128G mod guide, extract the modify-required body, found the C786 pattern and change the 8000 to 0001. However after putting the modified bios back the mb just refuse to boot, giving me a post code which seems to be 0d
, meaning nothing according to what supermicro’s manual says. Does anyone knows how to make the mod work? thanks very much. and I’ve already set the HAP bits
OK,after doing some research I’ve done fixing the checksum now, however after switching the pattern from 8000 to 0001, the motherboard gives me 5 beeps which means memory problem when I stick a 32G ram, still confusing.
I never tested if 32GB DDR4 memory module works on Z170 with a BIOS Mod so unless someone else had success I can only assume only Z370 and later can use 32GB memory modules successfully after the BIOS Mod is applied.
well,I does my modification by following guides in this forum, so for questions concerning modifying bios, it will be more accurate to consult guides than repeating them myself.
for the minimal steps, I first follow dsanke’s 128G mod guide and found out the reason why the board refuses to boot is because supermicros’ board have PEI checksum checking.
So after locating the checksum by UEFItools, I fix the checksum via HxD and that’s it.
And as for the vbios and GOP fixing, it has nothing to do with memory, 5 short beeps indicates no graphics output so I’m only fixing it for using UHD630.
unfortunately I don’t have other 115x cpus right at hand so I can’t checkout non-xeon support for 128G ram, but I assume it’s just fine because they just share the same imc.
But this wasn’t a guide to walk through the procedure in more detail. Seeing you had a slight tumble before your success recently and now while it’s fresh in your memory is why I thought asking you describe all your steps to achieving the end result (success). I might be able to figure out a cleaner more efficient way based on your method to make a more thorough DIY guide from that to apply to other chipsets.
So from what you stated, maybe show the steps you did to do the PEI checksum fix.
Then regarding these two: The vbios and GOP fixing.
I’m interested in what you did here as I want to actually modify the VBIOS and increase / decrease the shared memory settings and possibly even relocate where the shared memory region begins above the 4GB memory boundary instead of below it to avoid hogging the vital 32-Bit memory region.
In the much older BIOS with iGPU you can decrease it down to 32MB at the minimum threshold which barely taps the memory region for 32-Bit while still accomplishing a lot. Now imagine if it can be modified to use larger shared memory than 32MB shared memory accessed above the 4GB memory region then you could have an 8GB, 16GB, 32GB, or 48GB+ shared video memory for your integrated Intel HD Graphics at your disposal for 32-Bit and 64-Bit operating systems. Imagine that compared to common 512MB to 4GB video cards what that could do with so much video memory?
I’m not a pro at bios editing, but if I can help you work out a thorough and well-applied guide in this topic I would be glad to help and describe my modification in a more detailed way! but it might delay 'cause I’m suffering from neck seizures these days, making me hard to concentrate.
and the guide you linked is exactly the one I follow, really a bit rough I would say.
But this wasn’t a guide to walk through the procedure in more detail. Seeing you had a slight tumble before your success recently and now while it’s fresh in your memory is why I thought asking you describe all your steps to achieving the end result (success). I might be able to figure out a cleaner more efficient way based on your method to make a more thorough DIY guide from that to apply to other chipsets.
So from what you stated, maybe show the steps you did to do the PEI checksum fix.
Then regarding these two: The vbios and GOP fixing.
I’m interested in what you did here as I want to actually modify the VBIOS and increase / decrease the shared memory settings and possibly even relocate where the shared memory region begins above the 4GB memory boundary instead of below it to avoid hogging the vital 32-Bit memory region.
In the much older BIOS with iGPU you can decrease it down to 32MB at the minimum threshold which barely taps the memory region for 32-Bit while still accomplishing a lot. Now imagine if it can be modified to use larger shared memory than 32MB shared memory accessed above the 4GB memory region then you could have an 8GB, 16GB, 32GB, or 48GB+ shared video memory for your integrated Intel HD Graphics at your disposal for 32-Bit and 64-Bit operating systems. Imagine that compared to common 512MB to 4GB video cards what that could do with so much video memory?
And this would be my full steps to enable 128G ram on this C7Z270 motherboard. One thing I’d like to mention at first is that the bios I got already have ME disabled for I want to use an xeon on this mb.
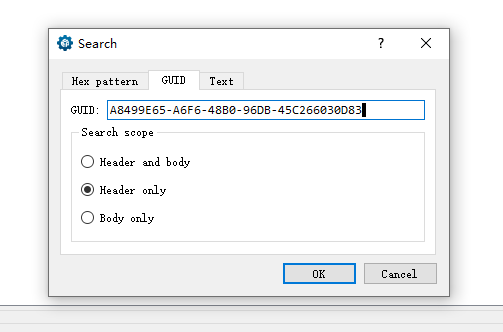
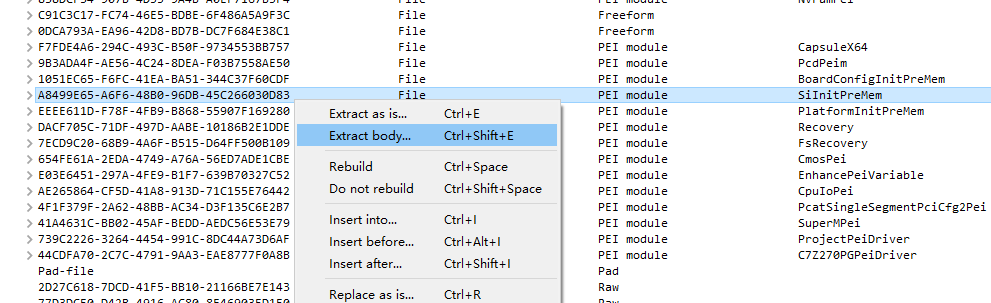
First, I open UEFItool 0.28.0, search for SiInitPreMem,GUID:A8499E65-A6F6-48B0-96DB-45C266030D83 and found two results,so I extract them all.
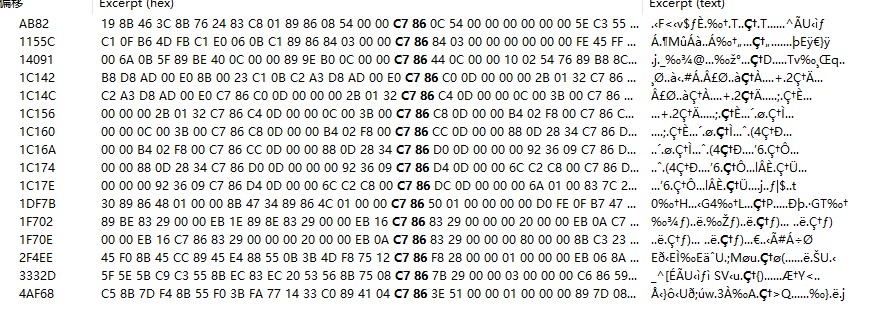
After the extraction, I open the body in a HEX editor, search for that pattern dsanke in his post mentioned (that C786…000000800000)and here is what I got.
It’s not hard to distinguish that the row with the offset "1F70E" is the one I’m looking at, and for this motherboard the full pattern is "C7 86 83 29 00 00 00 80 00". (diffrent motherboard just have different patterns except for that c786 and 8000 part, so that’s why dsanke is using dots to indicate hex value.)
Then, I use the HEX editior to open the BIOS file and edit it directly, search for that "C7 86 83 29 00 00 00 80 00" pattern and change that into "C7 86 83 29 00 00 00 00 01", two modification is made as this BIOS just have two "SiInitPreMem". I flashed this modified bios into the mb and boom, I got the POST code stuck in something like 0d, a reserve bit meaning nothing at all.
And that’s when I post this thread asking for help.
I also PM dsanke for help, and he kindly pointed out that while most mb don’t verify the PEI module’s checksum, supermicro does. SO I have to fix that checksum.
but where is the checksum? UEFItool 0.28 just shows that there’s two invalid checksum but don’t tell me how to fix it after the first modification.
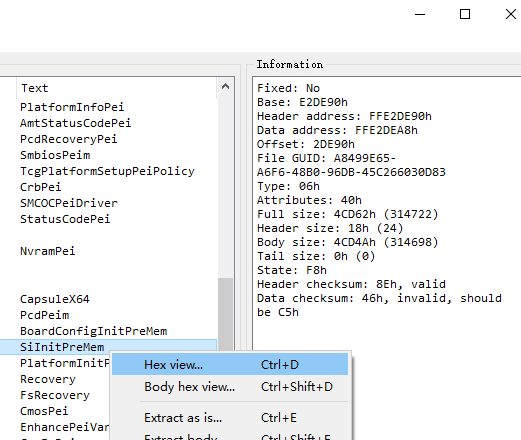
After some digging in the forum I found that UEFItool have different versions, and the A58 version have the ability to show you the PEI module in hex, making it able to locate the checksum location.
So I open the UEFItool A58, locate the module,
found out the checksum after the modification, and locate which hex value is indicating the checksum.
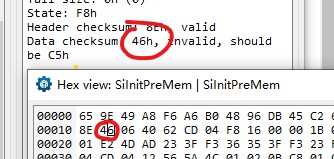
I open the HEX editor once again, locate this checksum by the hex pattern in front of it, change the value from 46 to C5, flash this new one into the MB, now it boots without failure!
As for the GOP update I mentioned earlier is basically a step can be ignored, for I misinterpret 5 short beeps to memory problem, which actually is 5 short beeps and 1 long, with the post code 55. And during later testing, I assume that’s just because I forgot to clear CMOS after flashing the new bios.
But this wasn’t a guide to walk through the procedure in more detail. Seeing you had a slight tumble before your success recently and now while it’s fresh in your memory is why I thought asking you describe all your steps to achieving the end result (success). I might be able to figure out a cleaner more efficient way based on your method to make a more thorough DIY guide from that to apply to other chipsets.
So from what you stated, maybe show the steps you did to do the PEI checksum fix.
Then regarding these two: The vbios and GOP fixing.
I’m interested in what you did here as I want to actually modify the VBIOS and increase / decrease the shared memory settings and possibly even relocate where the shared memory region begins above the 4GB memory boundary instead of below it to avoid hogging the vital 32-Bit memory region.
In the much older BIOS with iGPU you can decrease it down to 32MB at the minimum threshold which barely taps the memory region for 32-Bit while still accomplishing a lot. Now imagine if it can be modified to use larger shared memory than 32MB shared memory accessed above the 4GB memory region then you could have an 8GB, 16GB, 32GB, or 48GB+ shared video memory for your integrated Intel HD Graphics at your disposal for 32-Bit and 64-Bit operating systems. Imagine that compared to common 512MB to 4GB video cards what that could do with so much video memory?
And this would be my full steps to enable 128G ram on this C7Z270 motherboard. One thing I’d like to mention at first is that the bios I got already have ME disabled for I want to use an xeon on this mb.
First, I open UEFItool 0.28.0, search for SiInitPreMem,GUID:A8499E65-A6F6-48B0-96DB-45C266030D83 and found two results,so I extract them all.
After the extraction, I open the body in a HEX editor, search for that pattern dsanke in his post mentioned (that C786…000000800000)and here is what I got. It’s not hard to distinguish that the row with the offset "1F70E" is the one I’m looking at, and for this motherboard the full pattern is "C7 86 83 29 00 00 00 80 00". (diffrent motherboard just have different patterns except for that c786 and 8000 part, so that’s why dsanke is using dots to indicate hex value.)
Then, I use the HEX editior to open the BIOS file and edit it directly, search for that "C7 86 83 29 00 00 00 80 00" pattern and change that into "C7 86 83 29 00 00 00 00 01", two modification is made as this BIOS just have two "SiInitPreMem". I flashed this modified bios into the mb and boom, I got the POST code stuck in something like 0d, a reserve bit meaning nothing at all. And that’s when I post this thread asking for help.
I also PM dsanke for help, and he kindly pointed out that while most mb don’t verify the PEI module’s checksum, supermicro does. SO I have to fix that checksum.
but where is the checksum? UEFItool 0.28 just shows that there’s two invalid checksum but don’t tell me how to fix it after the first modification.
After some digging in the forum I found that UEFItool have different versions, and the A58 version have the ability to show you the PEI module in hex, making it able to locate the checksum location.
So I open the UEFItool A58, locate the module, found out the checksum after the modification, and locate which hex value is indicating the checksum.
I open the HEX editor once again, locate this checksum by the hex pattern in front of it, change the value from 46 to C5, flash this new one into the MB, now it boots without failure!
As for the GOP update I mentioned earlier is basically a step can be ignored, for I misinterpret 5 short beeps to memory problem, which actually is 5 short beeps and 1 long, with the post code 55. And during later testing, I assume that’s just because I forgot to clear CMOS after flashing the new bios.
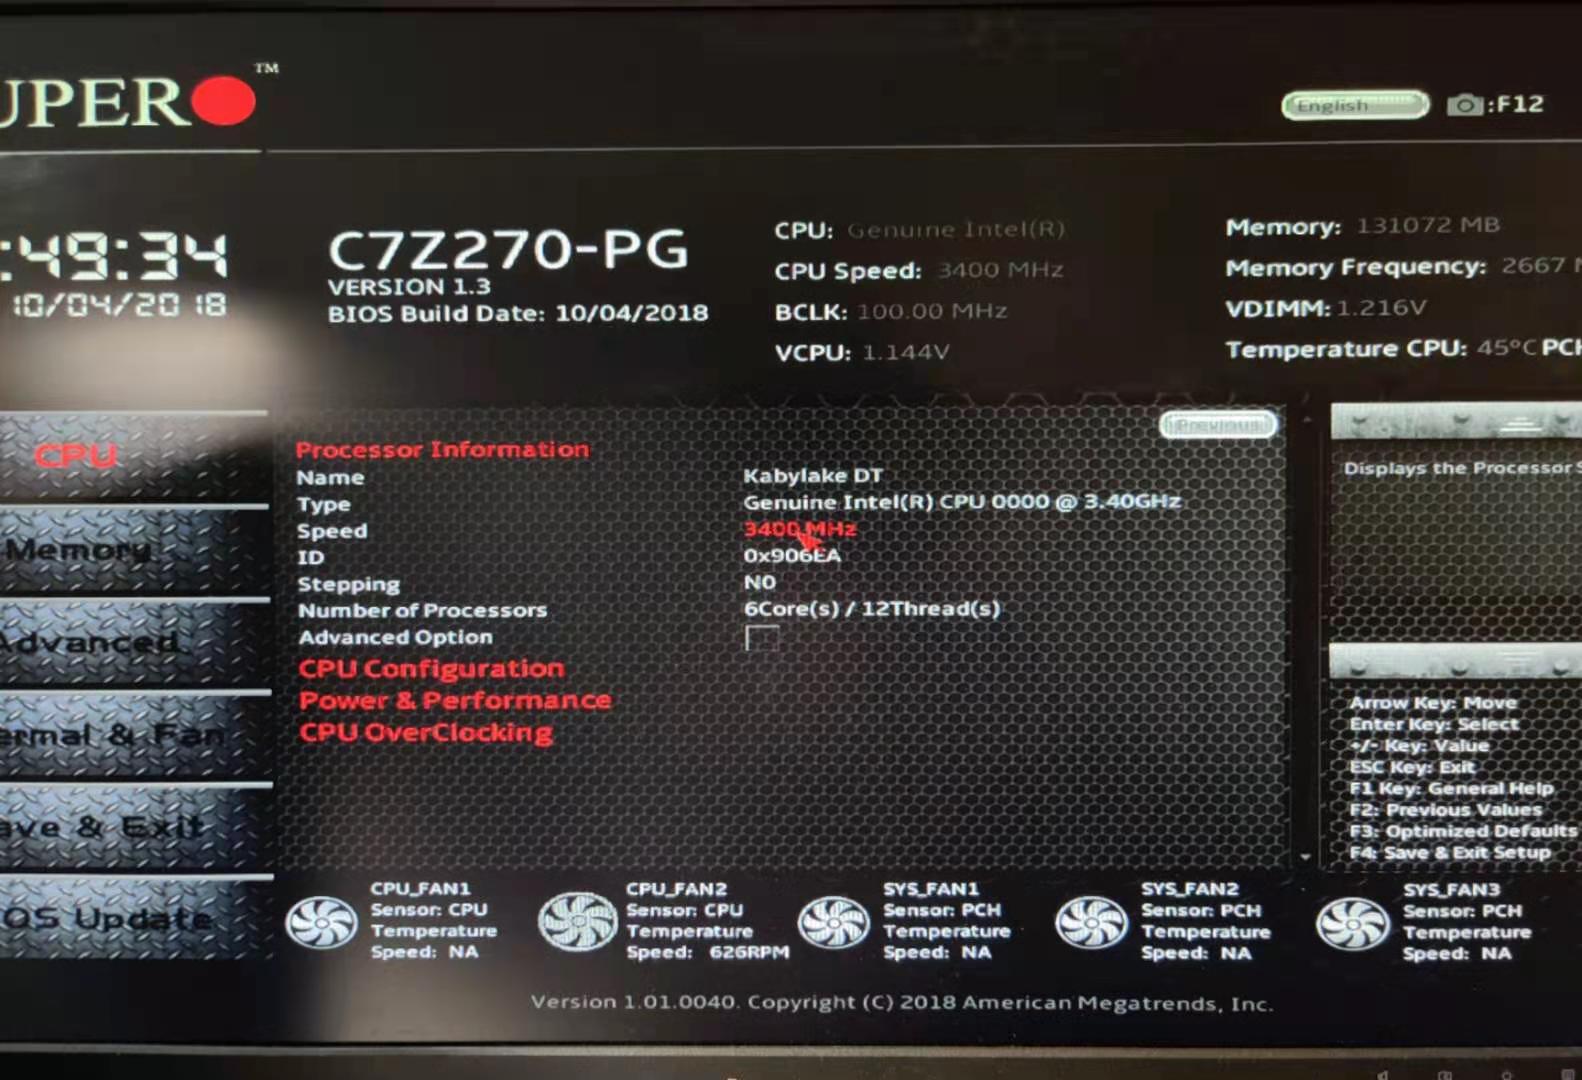
now the board work with 128GB well, and upon this post I’m still testing memtest86 with two loops. If nothing goes wrong later, I would call this a total success.
and the whole memtest86 finished twice without an error.