U900’s bios is an AMI BIOS witch have 2 flash chip
I dumped it with fpt with no me region
I tried to change access level to user & super then flash it back , but it didn’t work .
I find the magic string that was already 010101010101.
I want to use uefi boot , but the bios only shows legacy items in boot options.
I changed boot as uefi and reboot ,it will auto change to csm boot.
Need your help!!! 
 @Lost_N_BIOS
My bios region below:
https://mega.nz/file/SCwQwICS#XSaO5G5wK0…WZznAUtblM7KVAs
@jhsvip - Please flash stock BIOS using stock method, then dump BIOS region with FPT and upload for me to tinyupload.com or uploadfiles.io
Also, please link me to the stock BIOS download page for this system
Yes Sir!
address: http://s000.tinyupload.com/?file_id=15033939707403589936
Where is stock BIOS download page link? And what did you create the above file with?
Good afternoon Sir!
The Toshiba U900 stcok bios download page was missing
I flashed the stock bios before ,then I dumped it with no edit yet.
I dumped it with fptdos use command -d
----------------------
Hi Sir!
Sorry to bother you again
The bios uploaded is the stock bios dumped , I did not edit it yet.
I flashed it back to my nootbook now.
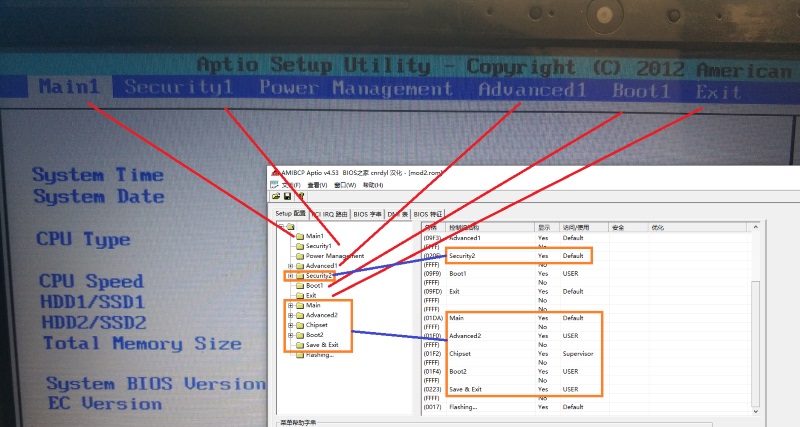
I took the bios screen photos below:
[[File:KF9VV)2J}PMW3P}S}H0.png|none|auto]] Advanced>>System configrition
[[File:0BQMU%P][K)M}02071C_QG.png]] Advanced
[[File:1]]DZC{9H9)6]EP(JL}DEFE.png]] MAIN
[[File:8E6F_8KZQMS)NEZ%[LQDTEV.png]] Power management
[[File:B_XX61$9P@$HGG3[{28W(34.png]] Flash devices
[[File:LZEQ]83PXO@PM]Y`DIGV{X.png]] Boot
I can not unlock the Chipset menu.
Have a good day!
Please put those images in a single zip with max compression, and if they are 2-5MB images please resize to 800px wide first, thanks. I do not need the “Flash devices” image, so you can leave that out of the archive.
Please attach this zip or rar to your forum post, or upload to tinyupload.com or uploadfiles.io
Also please confirm exact FPT command you used, in full, to dump above file.
And, please link me to the stock BIOS download page for this system, not sure what you mean it’s missing (you download BIOS from Toshiba when you want update correct?)
Hi Sir!
photos zip url: http://s000.tinyupload.com/?file_id=20980500761773446145
I dumped the bios regon with FPT FOR DOS used command [ftp.exe -d bios.bin -bios]
I mean that I can’t find the u900 bios on the official website of Toshiba.
I guess they don’t offer downloads for this model now.
Thank u!
Great, thanks for all the answers and photos in zip. I wonder why no stock BIOS download!!!
Hmm, I see BIOS downloads, but I need your exact full model # U900 is not complete model, what is the rest, check bottom of laptop for sticker (U900 doesn’t look correct either, should be U920 or U940/U945 etc)
But, I do see only U900 in BIOS, very weird!
Ohh well, lets see if I can unlock this chipset for you 

* Edit - I need one image showing security tab and exit page too, thanks! @jhsvip
Thank you for helping me!
I’M sorry I forgot the security.
Security Here it is http://s000.tinyupload.com/?file_id=07375557176643474526
Satellite U900 is the complete model ,It’s only sold in China.
Sticker photos here http://s000.tinyupload.com/?file_id=06537476732732917433
Product : Satellite U900 (U900-T10S1)
Machine type is PSUYQ-001001
SN:1D031417K
You’re welcome! You missed my edit Can you send one of exit too, put all three of those above in one package, thanks
Funny, in BIOS I see >> PSU6YQ-003001 (NoOS) I assume maybe means sold without OS?
& SN >> ZC018929K
1D031417K << Not found in BIOS?
None of this system info/details stuff ^^ matters for menu unlock though, I just always like to have stock BIOS to compare with dumps when I edit and so I have in case I need to reference something etc.
@jhsvip - Here, please test, and tell me which menu is now missing, Exit, or Main?
http://s000.tinyupload.com/index.php?fil…274829653125637
[PSU6YQ-003001 ]
[ZC018929K] These things are my laptop’s
Sorry I messed up again, I just find an other sticker photo on internet instaed of mine…
Last night, I searched the Internet, but I couldn’t find the Stock BIOS
@Lost_N_BIOS My laptop is home, I’ll Re-upload the photos all and test your moded-bios tonight at the latest.
@jhsvip - Yes, but I was just telling you what info is actually in the BIOS, so probably someone else flashed other boards BIOS in there to recover it bef, or someone swapped motherboard etc.
Ohh! You mean I found correct info, and the data (not images), you posted above is not correct.
No need for above BIOS - Just skip above test BIOS and use this, now you should have all menus maybe, ones you do not see still (AFTER flashing this), then do AMIBCP User Access Level test with AMIBCP.
Edit and test one menu at a time if needed, at ROOT of setup you change Access level once only, so you can figure out if you need to use User or Supervisor
http://s000.tinyupload.com/index.php?fil…391332934210183
Example, you still don’t see chipset after you flash this BIOS. Take this file, then set Chipset Access Level User and test, then if still missing, edit this file again for Chipset Access Level but this time to Supervisor and then test.
If any still missing from this BIOS as it is, then the above mentioned test should help you figure out which is needed to further set with AMIBCP.
You may not need anything set with AMIBCP, always test this way first, then one thing at a time in AMIBCP until you are sure which Access Level you need to use User/Supervisor.
This is magic string edit you first mentioned, but you need to add more 01’s for each menu you wanted (13 total in AMIBCP under setup, except “Flashing” not counted)
So, check and you will see the edit at Setup PE32 Before >> EE 2E 20 71 53 5F D9 40 AB 3D 9E 0C 26 D9 66 57
I explain how that works here - [Request] How to Access Locked/Hidden BIOS Menu Settings (16)
Also here, shorter - [Request] How to Access Locked/Hidden BIOS Menu Settings (12)
@Lost_N_BIOS
I tested the modbios, but it didn’t work.
I modified TOSHIBA-1.30-AllMenuMagicString.rom access level to user & super, but it still doesn’t work. It did not show me the blocked menus.
I uploaded the BIOS modified screenshot, BIOS file, all screenshots in BIOS, and my laptop label into a compressed package.
Download address:http://s000.tinyupload.com/?file_id=02818102582934625808
After that I changed [Disable If: {1E 82} True {46 02}] to [Suppress If: {0A 82} False {47 02}]in setup didn’t work either.
Another question Solved:[Is there any way to solve the problem that this BIOS can’t use UEFI BOOT?] I use amibcp to change some boot options to UEFI and UEFI Boot Works!
So with the BIOS I sent you, you tested it by itself, and nothing, and then for example you edited once to change Chipset Access Level to User and then tested, and then again same chipset to Supervisor, and nothing?
Please now then test initial BIOS I sent you and tell me which menu is gone, from post #10.
What did you change suppress if to false on? There is none blocking menus that I seen. Yes, you can boot UEFI, as you see
I noticed, there is only one advanced form in setup IFR, so you may not be able to get second Advanced, unless current advanced is not the one in setup, I haven’t had time to look again (* Edit - It is!). But chipset is there so we should be able to get to show up
How are you flashing in mod BIOS, with FPT? Please flash in the BIOS I sent you above, either one, then dump that BIOS and send back to me so I can check.
* Edit - OK, I see maybe why no change yet, I will get you more BIOS to test tonight when I get back online
Yes Sir!
I flashed these 3 modbioses (Minus1Menutest、AllMenuMagicString_SUPER、AllMenuMagicString_USER) used fpt with command fpt -f -bios ,and nothing changed.
Minus1Menutest: you sent me from post #10 noting gone.
AllMenuMagicString_USER : I changed Chipset Access Level to User , reboot and noting happend. Then Load Setup Defaults, reboot noting happend.
AllMenuMagicString_SUPER : I changed Chipset Access Level to Super , reboot and noting happend. . Then Load Setup Defaults, reboot noting happend.
After flashing,I dumped all of them.
Here is the dump file: http://s000.tinyupload.com/?file_id=87408965564579136163
I found these code are in front of the Chipset Form in IFR setup txt :
1
2
3
4
5
6
7
8
9
10
11
12
13
14
15
16
17
18
19
20
21
22
23
24
25
26
27
28
29
30
31
32
33
34
35
36
37
38
39
40
41
42
43
44
45
46
47
48
49
50
51
52
53
54
55
56
57
58
59
60
61
62
63
64
65
66
67
68
69
70
71
72
73
74
75
76
77
78
79
80
81
82
83
84
85
86
87
88
89
90
91
92
93
94
95
96
97
98
99
100
101
102
103
104
105
106
107
108
109
110
111
112
113
114
115
116
117
118
119
120
121
122
123
124
125
126
127
128
129
130
131
132
133
134
135
136
137
138
139
140
141
142
143
144
145
146
147
148
149
150
151
152
153
154
155
156
157
158
159
160
0x40736 		Disable If: {1E 82}
0x40738 			True {46 02}
0x4073A 			Checkbox: en-US, Variable: 0x0 {06 8E 00 00 00 00 1B 01 02 00 00 00 00 00}
0x40748 			End {29 02}
0x4074A 			Checkbox: en-US, Variable: 0x2EE {06 8E 00 00 00 00 1C 01 01 00 EE 02 00 00}
0x40758 			End {29 02}
0x4075A 			Checkbox: en-US, Variable: 0x225 {06 8E 00 00 00 00 1D 01 01 00 25 02 00 00}
0x40768 			End {29 02}
0x4076A 			Checkbox: en-US, Variable: 0x1 {06 8E 00 00 00 00 1E 01 16 00 01 00 00 00}
0x40778 			End {29 02}
0x4077A 			Checkbox: en-US, Variable: 0x9 {06 8E 00 00 00 00 1F 01 16 00 09 00 00 00}
0x40788 			End {29 02}
0x4078A 			Checkbox: en-US, Variable: 0x0 {06 8E 00 00 00 00 20 01 16 00 00 00 00 00}
0x40798 			End {29 02}
0x4079A 			Checkbox: en-US, Variable: 0x29 {06 8E 00 00 00 00 21 01 14 00 29 00 00 00}
0x407A8 			End {29 02}
0x407AA 			Checkbox: en-US, Variable: 0x23 {06 8E 00 00 00 00 22 01 14 00 23 00 00 00}
0x407B8 			End {29 02}
0x407BA 			Checkbox: en-US, Variable: 0x28 {06 8E 00 00 00 00 23 01 14 00 28 00 00 00}
0x407C8 			End {29 02}
0x407CA 			Checkbox: en-US, Variable: 0x22 {06 8E 00 00 00 00 24 01 14 00 22 00 00 00}
0x407D8 			End {29 02}
0x407DA 			Checkbox: en-US, Variable: 0x27 {06 8E 00 00 00 00 25 01 14 00 27 00 00 00}
0x407E8 			End {29 02}
0x407EA 			Checkbox: en-US, Variable: 0x21 {06 8E 00 00 00 00 26 01 14 00 21 00 00 00}
0x407F8 			End {29 02}
0x407FA 			Checkbox: en-US, Variable: 0x26 {06 8E 00 00 00 00 27 01 14 00 26 00 00 00}
0x40808 			End {29 02}
0x4080A 			Checkbox: en-US, Variable: 0x20 {06 8E 00 00 00 00 28 01 14 00 20 00 00 00}
0x40818 			End {29 02}
0x4081A 			Checkbox: en-US, Variable: 0x25 {06 8E 00 00 00 00 29 01 14 00 25 00 00 00}
0x40828 			End {29 02}
0x4082A 			Checkbox: en-US, Variable: 0x1F {06 8E 00 00 00 00 2A 01 14 00 1F 00 00 00}
0x40838 			End {29 02}
0x4083A 			Checkbox: en-US, Variable: 0x24 {06 8E 00 00 00 00 2B 01 14 00 24 00 00 00}
0x40848 			End {29 02}
0x4084A 			Checkbox: en-US, Variable: 0x1E {06 8E 00 00 00 00 2C 01 14 00 1E 00 00 00}
0x40858 			End {29 02}
0x4085A 			Checkbox: en-US, Variable: 0x2B {06 8E 00 00 00 00 2D 01 14 00 2B 00 00 00}
0x40868 			End {29 02}
0x4086A 			Checkbox: en-US, Variable: 0x2CD {06 8E 00 00 00 00 2E 01 01 00 CD 02 00 00}
0x40878 			End {29 02}
0x4087A 			Checkbox: en-US, Variable: 0x1 {06 8E 00 00 00 00 2F 01 12 00 01 00 00 00}
0x40888 			End {29 02}
0x4088A 			Checkbox: en-US, Variable: 0x0 {06 8E 00 00 00 00 30 01 12 00 00 00 00 00}
0x40898 			End {29 02}
0x4089A 			Checkbox: en-US, Variable: 0x8E {06 8E 00 00 00 00 31 01 01 00 8E 00 00 00}
0x408A8 			End {29 02}
0x408AA 			Checkbox: en-US, Variable: 0xF {06 8E 00 00 00 00 32 01 10 00 0F 00 00 00}
0x408B8 			End {29 02}
0x408BA 			Checkbox: en-US, Variable: 0xE {06 8E 00 00 00 00 33 01 10 00 0E 00 00 00}
0x408C8 			End {29 02}
0x408CA 			Checkbox: en-US, Variable: 0xD {06 8E 00 00 00 00 34 01 10 00 0D 00 00 00}
0x408D8 			End {29 02}
0x408DA 			Checkbox: en-US, Variable: 0xC {06 8E 00 00 00 00 35 01 10 00 0C 00 00 00}
0x408E8 			End {29 02}
0x408EA 			Checkbox: en-US, Variable: 0xB {06 8E 00 00 00 00 36 01 10 00 0B 00 00 00}
0x408F8 			End {29 02}
0x408FA 			Checkbox: en-US, Variable: 0xA {06 8E 00 00 00 00 37 01 10 00 0A 00 00 00}
0x40908 			End {29 02}
0x4090A 			Checkbox: en-US, Variable: 0x9 {06 8E 00 00 00 00 38 01 10 00 09 00 00 00}
0x40918 			End {29 02}
0x4091A 			Checkbox: en-US, Variable: 0x8 {06 8E 00 00 00 00 39 01 10 00 08 00 00 00}
0x40928 			End {29 02}
0x4092A 			Checkbox: en-US, Variable: 0x7 {06 8E 00 00 00 00 3A 01 10 00 07 00 00 00}
0x40938 			End {29 02}
0x4093A 			Checkbox: en-US, Variable: 0x6 {06 8E 00 00 00 00 3B 01 10 00 06 00 00 00}
0x40948 			End {29 02}
0x4094A 			Checkbox: en-US, Variable: 0x5 {06 8E 00 00 00 00 3C 01 10 00 05 00 00 00}
0x40958 			End {29 02}
0x4095A 			Checkbox: en-US, Variable: 0x4 {06 8E 00 00 00 00 3D 01 10 00 04 00 00 00}
0x40968 			End {29 02}
0x4096A 			Checkbox: en-US, Variable: 0x3 {06 8E 00 00 00 00 3E 01 10 00 03 00 00 00}
0x40978 			End {29 02}
0x4097A 			Checkbox: en-US, Variable: 0x2 {06 8E 00 00 00 00 3F 01 10 00 02 00 00 00}
0x40988 			End {29 02}
0x4098A 			Checkbox: en-US, Variable: 0x1 {06 8E 00 00 00 00 40 01 10 00 01 00 00 00}
0x40998 			End {29 02}
0x4099A 			Checkbox: en-US, Variable: 0x0 {06 8E 00 00 00 00 41 01 10 00 00 00 00 00}
0x409A8 			End {29 02}
0x409AA 			Checkbox: en-US, Variable: 0x0 {06 8E 00 00 00 00 42 01 0F 00 00 00 00 00}
0x409B8 			End {29 02}
0x409BA 			Checkbox: en-US, Variable: 0x294 {06 8E 00 00 00 00 43 01 01 00 94 02 00 00}
0x409C8 			End {29 02}
0x409CA 			Checkbox: en-US, Variable: 0x288 {06 8E 00 00 00 00 44 01 01 00 88 02 00 00}
0x409D8 			End {29 02}
0x409DA 			Checkbox: en-US, Variable: 0x293 {06 8E 00 00 00 00 45 01 01 00 93 02 00 00}
0x409E8 			End {29 02}
0x409EA 			Checkbox: en-US, Variable: 0x287 {06 8E 00 00 00 00 46 01 01 00 87 02 00 00}
0x409F8 			End {29 02}
0x409FA 			Checkbox: en-US, Variable: 0x292 {06 8E 00 00 00 00 47 01 01 00 92 02 00 00}
0x40A08 			End {29 02}
0x40A0A 			Checkbox: en-US, Variable: 0x286 {06 8E 00 00 00 00 48 01 01 00 86 02 00 00}
0x40A18 			End {29 02}
0x40A1A 			Checkbox: en-US, Variable: 0x291 {06 8E 00 00 00 00 49 01 01 00 91 02 00 00}
0x40A28 			End {29 02}
0x40A2A 			Checkbox: en-US, Variable: 0x285 {06 8E 00 00 00 00 4A 01 01 00 85 02 00 00}
0x40A38 			End {29 02}
0x40A3A 			Checkbox: en-US, Variable: 0x290 {06 8E 00 00 00 00 4B 01 01 00 90 02 00 00}
0x40A48 			End {29 02}
0x40A4A 			Checkbox: en-US, Variable: 0x284 {06 8E 00 00 00 00 4C 01 01 00 84 02 00 00}
0x40A58 			End {29 02}
0x40A5A 			Checkbox: en-US, Variable: 0x28F {06 8E 00 00 00 00 4D 01 01 00 8F 02 00 00}
0x40A68 			End {29 02}
0x40A6A 			Checkbox: en-US, Variable: 0x283 {06 8E 00 00 00 00 4E 01 01 00 83 02 00 00}
0x40A78 			End {29 02}
0x40A7A 			Checkbox: en-US, Variable: 0x0 {06 8E 00 00 00 00 4F 01 0E 00 00 00 00 00}
0x40A88 			End {29 02}
0x40A8A 			Checkbox: en-US, Variable: 0x277 {06 8E 00 00 00 00 50 01 01 00 77 02 00 00}
0x40A98 			End {29 02}
0x40A9A 			Checkbox: en-US, Variable: 0x276 {06 8E 00 00 00 00 51 01 01 00 76 02 00 00}
0x40AA8 			End {29 02}
0x40AAA 			Checkbox: en-US, Variable: 0x275 {06 8E 00 00 00 00 52 01 01 00 75 02 00 00}
0x40AB8 			End {29 02}
0x40ABA 			Checkbox: en-US, Variable: 0x0 {06 8E 00 00 00 00 53 01 0D 00 00 00 00 00}
0x40AC8 			End {29 02}
0x40ACA 			Checkbox: en-US, Variable: 0x1 {06 8E 00 00 00 00 54 01 0D 00 01 00 00 00}
0x40AD8 			End {29 02}
0x40ADA 			Checkbox: en-US, Variable: 0x1 {06 8E 00 00 00 00 55 01 0A 00 01 00 00 00}
0x40AE8 			End {29 02}
0x40AEA 			Checkbox: en-US, Variable: 0x0 {06 8E 00 00 00 00 56 01 0C 00 00 00 00 00}
0x40AF8 			End {29 02}
0x40AFA 			Checkbox: en-US, Variable: 0x0 {06 8E 00 00 00 00 57 01 0B 00 00 00 00 00}
0x40B08 			End {29 02}
0x40B0A 			Checkbox: en-US, Variable: 0x12 {06 8E 00 00 00 00 58 01 09 00 12 00 00 00}
0x40B18 			End {29 02}
0x40B1A 			Checkbox: en-US, Variable: 0x8 {06 8E 00 00 00 00 59 01 09 00 08 00 00 00}
0x40B28 			End {29 02}
0x40B2A 			Checkbox: en-US, Variable: 0x11 {06 8E 00 00 00 00 5A 01 09 00 11 00 00 00}
0x40B38 			End {29 02}
0x40B3A 			Checkbox: en-US, Variable: 0x13 {06 8E 00 00 00 00 5B 01 09 00 13 00 00 00}
0x40B48 			End {29 02}
0x40B4A 			Checkbox: en-US, Variable: 0x3 {06 8E 00 00 00 00 5C 01 09 00 03 00 00 00}
0x40B58 			End {29 02}
0x40B5A 			Checkbox: en-US, Variable: 0x0 {06 8E 00 00 00 00 5D 01 09 00 00 00 00 00}
0x40B68 			End {29 02}
0x40B6A 			Checkbox: en-US, Variable: 0x4 {06 8E 00 00 00 00 5E 01 09 00 04 00 00 00}
0x40B78 			End {29 02}
0x40B7A 			Checkbox: en-US, Variable: 0x9 {06 8E 00 00 00 00 5F 01 09 00 09 00 00 00}
0x40B88 			End {29 02}
0x40B8A 			Checkbox: en-US, Variable: 0x2 {06 8E 00 00 00 00 60 01 09 00 02 00 00 00}
0x40B98 			End {29 02}
0x40B9A 			Checkbox: en-US, Variable: 0x1 {06 8E 00 00 00 00 61 01 09 00 01 00 00 00}
0x40BA8 			End {29 02}
0x40BAA 			Checkbox: en-US, Variable: 0x10 {06 8E 00 00 00 00 62 01 09 00 10 00 00 00}
0x40BB8 			End {29 02}
0x40BBA 			Checkbox: en-US, Variable: 0x0 {06 8E 00 00 00 00 63 01 08 00 00 00 00 00}
0x40BC8 			End {29 02}
0x40BCA 			Checkbox: en-US, Variable: 0x0 {06 8E 00 00 00 00 64 01 07 00 00 00 00 00}
0x40BD8 			End {29 02}
0x40BDA 			Checkbox: en-US, Variable: 0x0 {06 8E 00 00 00 00 65 01 06 00 00 00 00 00}
0x40BE8 			End {29 02}
0x40BEA 			Checkbox: en-US, Variable: 0x0 {06 8E 00 00 00 00 66 01 05 00 00 00 00 00}
0x40BF8 			End {29 02}
0x40BFA 		End If {29 02}
0x40BFC 	End Form {29 02}
0x40BFE End Form Set {29 02}
0x40C04 Form Set: Chipset {0E A7 C8 34 FE AD E1 9A 8F 4F BE 13 CF 96 A2 CB 2C 5B 1F 00 20 00 01 71 99 03 93 45 85 04 4B B4 5E 32 EB 83 26 04 0E}
And I thought maybe these cods blocked the chipset menu,then i changed
1
Disable If: {1E 82} True {46 02}] to [Suppress If: {0A 82} False {47 02}
but it did not work either.
Thank you Sir!I will Wait for your modbios! Respect!
Thanks for testing report! Thanks for dumps too, I checked, all changes going in as we wanted, so it’s not a flashing issue
All the stuff you posted above, that’s above chipset in IFR is simply disabling those settings/variables by default, nothing to do with the menu itself)
They did try to make it hard to add stuff back, on purpose, more so than usual, due to 2nd advanced removed from setup. Due to that, about 2nd advanced, it may not work properly even if we make it show up in BIOS.
Hopefully you need chipset more, since it should at least work, once we make visible!
I see now, there is two setup modules!!! Do you have flash programmer? If not, please order one, you need CH341A + SOIC8 test clip w/ cable, let me know if you need linked examples. These are less than $7 total shipped for both items
We can test removing OEMSetup and see if it will fall back to proper AMI normal setup then, but if this works, you’d loose all original menus. Or, we can also test swapping around some menus (By ID Swap, in various areas)
But for any of that, it’s not really ideal to play around with if you do not have flash programmer, because it can brick BIOS easily and you want to be able to recover in minutes so you can carry on with more test (and have working system too)
I do not have much experience playing with AMICallback and dual setup’s split like this, but I know it’s possible to do both of the types of things mentioned above.
@lordkag is the only user I’ve seen with experience on that and he discussed it here some
[Sony VAIO] BIOS modding/hacking/unlocking - Some Questions (3)
Here’s my notes and findings, no matter what you do/try, leave the Magic String edit I did as it is, so all those menus (13) are enabled at the AMI default setup root level with 01
Sorry, I don’t think I can help more on this, due to the way they’ve replaced setup with their own instead, someone with more experience will have to help on this one.
I can however help you with swapping menu tabs if you want to try that, but it may be best to wait until you have programmer in hand and full BIOS backup made, checked by someone to confirm all OK, and then proceed.
At END of AMITSE SetupData Body
43 D6 87 EC A4 EB B5 4B A1 E5 3F 3E 36 B2 0D A9 00 00 00 00 - Varstore1
C4 C6 48 3A D8 8A E9 43 81 5E 2A 03 64 84 BA 7C 12 00 00 00 - Main (visible)
1C 84 12 6D E7 97 4F 41 A7 A2 31 4C 94 07 6E DE 15 00 00 00 - Security (Only in OEMSetup - Visible one)
EB D9 B2 22 AD 0D 85 4C 90 29 F7 E2 8A D8 D7 EF 11 00 00 00 - Power Management (visble)
9A D7 7A F2 49 EC F0 4F 86 EA 45 CA F1 ED 35 B3 13 00 00 00 - Advanced (visble)
EE EA 1C 98 1C 93 17 4A B9 C8 66 C7 BC FD 77 E1 10 00 00 00 - Security (referenced in both setups - Hidden)
D4 04 3C AD 9A 2E 22 40 AC 9D 44 ED 55 FE 2D A1 14 00 00 00 - Boot (Visible)
19 34 EC 6B 76 4B 7D 4A 97 70 46 D6 F6 80 70 43 16 00 00 00 - Exit (visible)
91 EE 5E 98 AC BC 38 42 87 78 57 EF DC 93 F2 4E 01 00 00 00 - Main (hidden)
FA 04 4F E1 06 87 53 43 92 F2 9C 24 24 74 6F 9F 02 00 00 00 - Advanced (hidden)
C8 34 FE AD E1 9A 8F 4F BE 13 CF 96 A2 CB 2C 5B 04 00 00 00 - Chipset (hidden)
E0 FF 33 8B 1C D7 82 4F 9C EB C9 70 58 C1 3F 8E 08 00 00 00 - Boot (hidden)
DC 03 3B A4 8A C1 B1 41 91 C8 3F F9 AA A2 57 13 20 00 00 00 - Save and Exit (hidden)
2E 20 E1 80 97 26 64 42 9C C9 80 76 2C 3E 58 63 40 00 00 00 - Recovery (from “Reflash” module in main BIOS DXE volume)
2nd OEM Setup (OEMSetuppage - C4 C6 48 3A D8 8A E9 43 81 5E 2A 03 64 84 BA 7C) = Actual BIOS you see, this setup holds that setup/settings, the other usual one only holds some of the hidden setup/menu/settings
In OEMSetupPage - Directly before EE 2E 20 71 53 5F D9 40 AB 3D 9E 0C 26 D9 66 57
EB D9 B2 22 AD 0D 85 4C 90 29 F7 E2 8A D8 D7 EF - Power Management (visble) (11 Above)
C4 C6 48 3A D8 8A E9 43 81 5E 2A 03 64 84 BA 7C - Main (visible) (12 “”)
9A D7 7A F2 49 EC F0 4F 86 EA 45 CA F1 ED 35 B3 - Advanced (visble) (13 “”)
D4 04 3C AD 9A 2E 22 40 AC 9D 44 ED 55 FE 2D A1 - Boot (Visible) (14 “”)
1C 84 12 6D E7 97 4F 41 A7 A2 31 4C 94 07 6E DE - Security (Only in OEMSetup - Visible one) (15 “”)
19 34 EC 6B 76 4B 7D 4A 97 70 46 D6 F6 80 70 43 - Exit (visible) (16 “”)
A0 97 00 80 01 00 00 00 E0 96 00 80 01 00 00 00 11 00 00 00 00 00 00 00 00 00 00 00 00 00 00 00
B0 97 00 80 01 00 00 00 00 97 00 80 01 00 00 00 12 00 00 00 00 00 00 00 00 00 00 00 00 00 00 00
C0 97 00 80 01 00 00 00 20 97 00 80 01 00 00 00 13 00 00 00 00 00 00 00 00 00 00 00 00 00 00 00
D0 97 00 80 01 00 00 00 40 97 00 80 01 00 00 00 14 00 00 00 00 00 00 00 00 00 00 00 00 00 00 00
E0 97 00 80 01 00 00 00 60 97 00 80 01 00 00 00 15 00 00 00 00 00 00 00 00 00 00 00 00 00 00 00
F0 97 00 80 01 00 00 00 80 97 00 80 01 00 00 00 16 00 00 00 00 00 00 00 00 00 00 00 00 00 00 00
At AMITSE PE32 Body - directly above EE 2E 20 71 53 5F D9 40 AB 3D 9E 0C 26 D9 66 57
43 D6 87 EC A4 EB B5 4B A1 E5 3F 3E 36 B2 0D A9 - Varstore1
61 DF E4 8B CA 93 D2 11 AA 0D 00 E0 98 03 2B 8C - Varstore2 (AMICallback << This is how OEMSetup is invoked), also many other varstore ID’s use same ID)
C4 C6 48 3A D8 8A E9 43 81 5E 2A 03 64 84 BA 7C - Main (visible)
1C 84 12 6D E7 97 4F 41 A7 A2 31 4C 94 07 6E DE - Security (Only in OEMSetup - Visible one)
EB D9 B2 22 AD 0D 85 4C 90 29 F7 E2 8A D8 D7 EF - Power Management (visble)
9A D7 7A F2 49 EC F0 4F 86 EA 45 CA F1 ED 35 B3 - Advanced (visble)
D4 04 3C AD 9A 2E 22 40 AC 9D 44 ED 55 FE 2D A1 - Boot (Visible)
19 34 EC 6B 76 4B 7D 4A 97 70 46 D6 F6 80 70 43 - Exit (visible)
91 EE 5E 98 AC BC 38 42 87 78 57 EF DC 93 F2 4E - Main (hidden)
EE EA 1C 98 1C 93 17 4A B9 C8 66 C7 BC FD 77 E1 - Security (referenced in both setups - Hidden)
FA 04 4F E1 06 87 53 43 92 F2 9C 24 24 74 6F 9F - Advanced (hidden)
C8 34 FE AD E1 9A 8F 4F BE 13 CF 96 A2 CB 2C 5B - Chipset (hidden)
E0 FF 33 8B 1C D7 82 4F 9C EB C9 70 58 C1 3F 8E - Boot (hidden)
DC 03 3B A4 8A C1 B1 41 91 C8 3F F9 AA A2 57 13 - Save and Exit (hidden)
91 EE 5E 98 AC BC 38 42 87 78 57 EF DC 93 F2 4E - Main (hidden)
E0 FF 33 8B 1C D7 82 4F 9C EB C9 70 58 C1 3F 8E - Boot (hidden)
EE EA 1C 98 1C 93 17 4A B9 C8 66 C7 BC FD 77 E1 - Security (referenced in both setups - Hidden)
DC 03 3B A4 8A C1 B1 41 91 C8 3F F9 AA A2 57 13 - Save and Exit (hidden)
72 C1 9F EF B2 A1 93 46 B3 27 6D 32 FC 41 60 42
Thanku sir!
1.I dumped W25Q32BV 4M with flash programmer
2.I changed desc with the dump
3.I flashed the desc unlocked dump back with flash programmer and dumped the full flash with Fpt -D full.rom
Full Dump here :http://s000.tinyupload.com/?file_id=80357697874165980262
waiting for you test rom
Hi Sir!
My programmer is ready and I want to try.
Could you help me to swapping menu tabs or tell me what I should do?
I tried to delete the OemSetupPage with uefitool,After that, all Menus gone, It just show me a blue background.
I think i don’t need the boot menu at all,I can control it with hotkeys. The Security menu doesn’t work for me either.
You can change boot menu and Security menu to the Invisible Advanced menu and Chipset menu ,I want to try it.
Thanks for all the help!
Keep waiting for your good news
So boot and security menus can be replaced, sounds like a good test then, lets hope we have some success that way.
Sorry this BIOS is such a pain! I’ve rarely seen this kind of menu replacement, and as you see lordkag complain too, it’s not usual or ideal!
Please wait, I will see what I can do right now and get you some files to test
@jhsvip * Edit -  I think this will fail, but you can try This is swap of Adv only for now, to see outcome
When you deleted OEM Setup page, did you do the 13 x 01 magic string edit too? If not, try second BIOS in above package
I also included one final BIOS, swapping in original setup body in place of OEM Setup Body. I suspect all edits here will fail, and you will have to either recover from DOS FPT if you can boot to DOS, or flash programmer, so be ready!
Sorry, this is outside my skill-set sadly, sorry 
http://s000.tinyupload.com/index.php?fil…475836797286382
I will try today and report immediately!
Thank U so much! Love u!