The Dell Alienware X51 R3 which have MSI manufactured Z170 motherboard , and I am modifying it for kaby/coffee lake support.
But after I flash BIOS , it doesn’t boot anymore.
I found Boot Guard was enabled.
Is there is any way to make Intel Boot Guard disabled?
@dsanke , to confirm, please check MEInfoWin.exe -verbose
Is that where you checked? If not, run that and check Measured + Verified Boot both enabled on left/FPF side at bottom of report. If both enabled there nothing you can do except replace PCH with one that is clean and does not have burned in signature to FPF fuses.
If they are disabled at left/FPF side of that report, then Boot Guard cannot be enabled properly (Thus can have no effect, even if enabled at BIOS or MW FW level). I have had user check this once before recently on this model, it was enabled like you said, but always best to check as sometimes it might not get setup correctly
https://www.bios-mods.com/forum/Thread-R…46011#pid146011
If you find it disabled at left/FPF side in MEInfo report, then some other reason for your bricked BIOS - if this is case please upload for me your original file and the one you edited
Please also show me image of output of >> MeInfoWin.exe -fwsts
1 Like
I see there are both "Enabled".
meinfo.zip (2.09 KB)
@dsanke - nothing you can do then with the BIOS until you replace PCH with a clean uncommitted PCH (no hash burned in fuses, ask specifically for that if you order from some China seller).
Some BIOS, certain areas can be updated/edited, but usually these are not areas we modify as a BIOS modding thing. You can see which areas may be editable w/ UEFITool NE, anything not in a yellow, cyan, or red region can often be edited.
After fixing my Dell XPS 13 9350 ME region I tried to update the microcodes of my BIOS with UBU as well, but it didn’t boot after flashing the modded BIOS with my CH341A programmer. The LEDs of the Laptop only flash 3 times amber and 3 times white. Which indicates that the device tries to recover the BIOS.
When I thought about it I remembered that I saw references to “Intel Boot Guard” in the decompiled Setup.sct. So I checked the BIOS file with UEFITool NE and saw this:
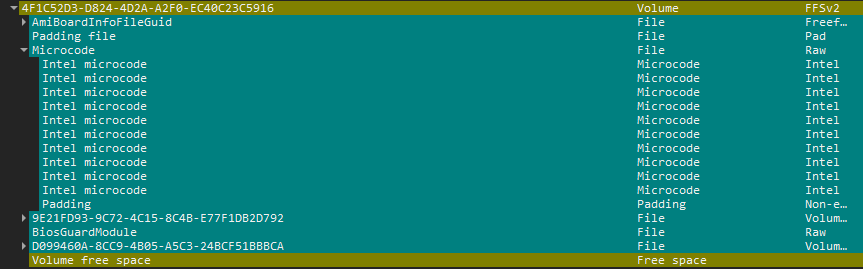
All microcodes are cyan. Does that mean that I will never be able to update them or is there a workaround / something I’ve missed?
TL;DR: You could, manually hex edit, but learn the structures and offset of the microcode GUID, and understand how it plays, just make sure the padding after the last microcode is read as Padding, not anything else, so if the structure changes say it is smaller or larger, you don’t just copy paste the padding after the bottom microcode, you need to adjust it accordingly, or else your bios structure would be a mess, that’s a challenge for you.
You could, by manually edit the microcode using hex editor like HxD. I Used to do that kind of thing for acer bios with coffeetime request, but it took quite a time for me since i dont really understand on how to make the bios modules within the cyan structures offset stays, surprisingly it worked somehow. It do have Bios Guard Module iirc since i cant update automatically using tools available here, and i have to adjust the other bios modules offsets so that the bios would be 1:1 as the original bios in terms of structures, with the difference are some extra microcodes.
Take your time to understand the offset of each microcode inside the bios, if the one you want to replace is smaller then maybe you need to make a filler (like if in the bios, non alligned before padding is FF, then fill it with FF’s) within the structures, or if it’s bigger, then you should know how to deal with the padding after the last microcode. Making sure the padding is read and not become anything else than Padding itself is your challange.
I suggest you to make a blank file in hxd that copies the whole cyan offset from start to finish, copy the backup bios, manual replace the microcodes (copy the hex from your microcode choice .bin, highlight the microcode you want to replace, paste write it), see if there is any changes within the size, then adjust your bios offsets accordingly until you are sure the structures is 1:1 with the original/backup bios with the difference is the microcode size, and then if there are FIT Table, fix the fit table (read the Bios offset, like if the Address in UEFITool is FFF37490h, then type fit 90 74 F3 FF from the right).
Don’t forget to share your experience and discovery here if you did managed to update the mcode and it is working successfully, it’ll help others with bioses that need manual edit.
I am very sorry i couldn’t remenber mine and what i did since im pretty forgetful about bios knowledge these days, but im pretty sure you could find my modded bios for Acer Veriton iirc, compare the modded and the dump given by the user or original bios of the model, compare both of the succeeded and working modded bios and original bios, you could take that as a reference because iirc i did “extend” the usable guid, since the mcode guid size is small but the entire guid are mostly full of FF’s between another guid, i increase the guid to insert more mcodes and it pretty much challanging.
Edit: i found the post, i remember a little bit of thing, I use any amiuefi bios thats the same size, extract as is the GUID from the boot guarded part (Say the one that contains bios DXE and Microcode), replace as is on the normal bios for the exact part (like DXE GUID to DXE GUID, Mcode to Mcode), do the updates here and there, read the start and end offset, copy paste and write the modded GUID offsets to the dump/original bios in Hex Editor, then adjust the hex to be 1:1 as the dump/original bios in terms of seen structures.
1 Like