@aquarc If you think, that very important messages/instructions are missing within the start post of this thread, feel free to start a new thread with a better/more complete guide. This may be a good idea anyway, because due to my age the time span to keep all my start posts up-to-date is meanwhile very limited.
To be able to understand why I called it a "mistake" what you have done, I recommend to do the following: 1. Optimize your current NVMe system drive C: and execute a benchmark test. 2. Take a backup of the complete content of your currently in-use NVMe SSD and store it outside of it. 3. Do a clean OS installation onto the NVMe SSD by following my guide. 4. Optimize the freshly created system drive C: and re-execute the benchmark test. 5. Compare both benchmark results. If there should be no noticeable difference, you can easily restore your cloned old system drive.
Why didn’t you follow the much easier and less DXE Volume space consuming method of my guide regarding this point?
Gigabyte GA-H61M-S1 (REV 3.0) successfully inserted the smaller patch and booted from the nvme drive at the x1 slot that is connected to the PCH. Thanks for the tutorial!
Would like to thank you for your exceptional guide about how to get full NVMe support in AMI BIOS and just to report the following success:
Just yesterday, 3x Supermicro X10SL7-F motherboards were successfully flushed with the latest available and modded Supermicro v3.4 AMI BIOS.
The modding was accomplished with some trials, as the pad-files were removed by both tools after processing with the insertion of the NvmExpressDxe_Small.ffs.
Finally the result was achieved utilising AMI UEFI MMTool following the guide and firstly removing all network-related drivers from DpcDxe to Udp6Dxe (please refer to picture, the network boot is redundant in my configuration) to increase available memory and inserting full version of the NvmExpressDxe_5.ffs driver.
Checked with Supermicro AOC-SLG3-2M2 passive 2x ports NVMe M.2 expansion card on all three motherboards in x8 lanes @x16 PCIe 3.0 slot - all work and boot with PCIe setting in EFI mode just fine (tried Win10 and PfSence fresh installations).
This particular model Supermicro PCIe NVMe expansion card is switchless/passive and motherboard X10SL7-F lacks bifurcation, therefore, as the result, always the only one SSD NVMe drive recognised by BIOS @ x4 lanes. Also, or because some hardware or BIOS incompatibility, the Hynix 128GB NVMe SSD was not accepted, but HP (Samsung) 256GB NVMe SSD was successfully recognised and is working just as suppose to.
For the further testing the ASMedia ASM2812 chipset based PCIe to NVMe 2x ports card was recently ordered, so will report additionally regarding the compatibility of the hardware/BIOS modding after tests and if any success to utilise all PCIe x8 lanes in 2x SSD configuration with this active card on X10SL7-F motherboard.
Could you try these? bios downloaded from your mobo website page, and added DXE5 and Samsung M2 DXE, without any removal of the other dxe (straight up stock just added nvmedxe5 and samsung m2 dxe).
Oh yeah sorry, i did use uefitool for it, and i see some pad files removed (due to uefitool nature) but the FIT table is fine (checked using uefitool NE), but it’s up to the user wether he wants to flash it and try it out if there is a problem at all, not recommending mine, but if op wants to i have it attached there
i’ve done many uefitool instead of mmtool on chipset 8 and under it (some of them is the lga 1156 chipset that got uefi, intel oem board (full dump bios)). Many of them didn’t complain yet so yeah, it’s up to the user wether op want to try it XD
But the “UBU” tool from the second guide didn’t go through exactly the same steps for me. The filesize did reduce by a few kB like the guide said it should, but I’m not sure if I can safely flash the file that I got.
I have an ASRock Z87 Pro3.
(Won’t let me add attachment since I’m a new user, I guess I’ll add the BIOS files when I’m able to)
Hello.
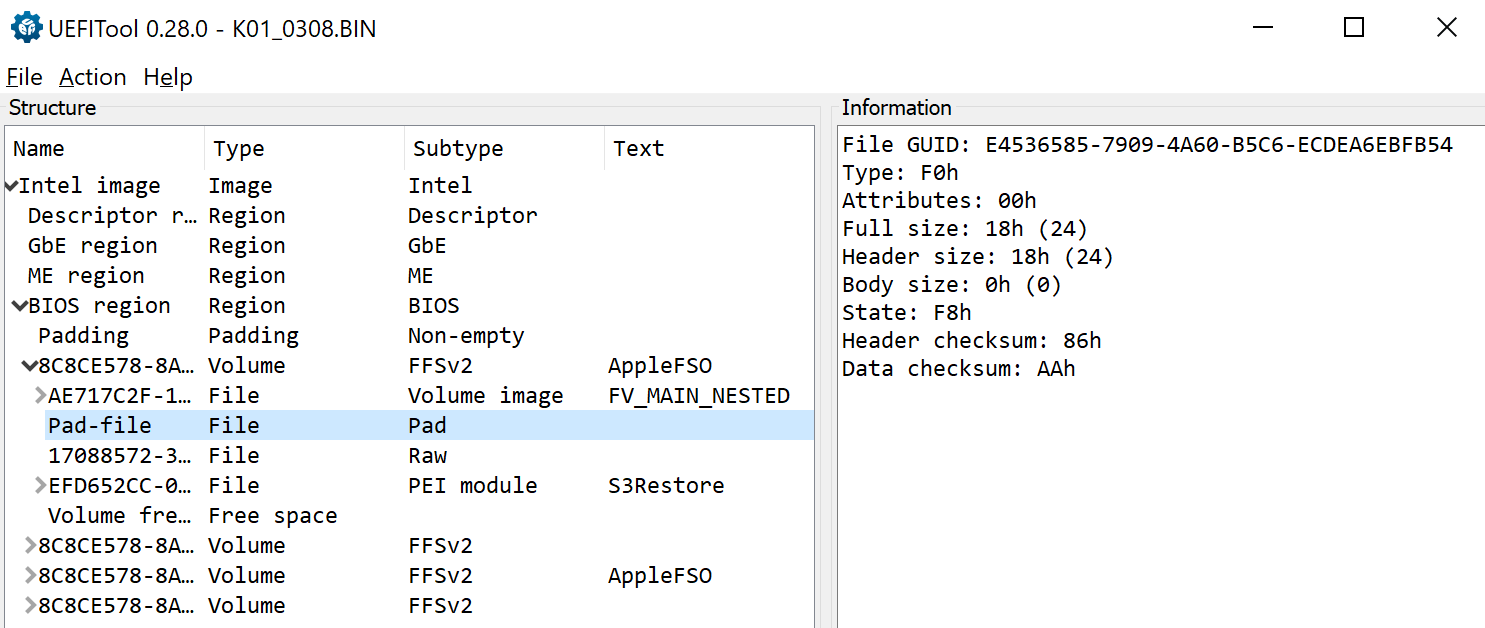
Excuse me for requesting a support, I have a problem with a 1 pad file being removed by MMTool Aptio 4.50.0023 in an image from a root volume 00 while modifying a DXE child volume 01:00-00.
I’ve found this corruption while validating the change using a UEFITool.
Modified image was never flashed.
Please advise.
Thanks for the suggestion.
I’ve just tried the UEFITool and it seems that it may corrupt the image because I’m unable to flash it due to an error while the original image file is flashing fine probably due to an unexpected discrepancy between an original one and a modified one by UEFITool.
Modification was performed using 0.28.0 release, result visually seems to be correct when comparing an original image with a modified one.
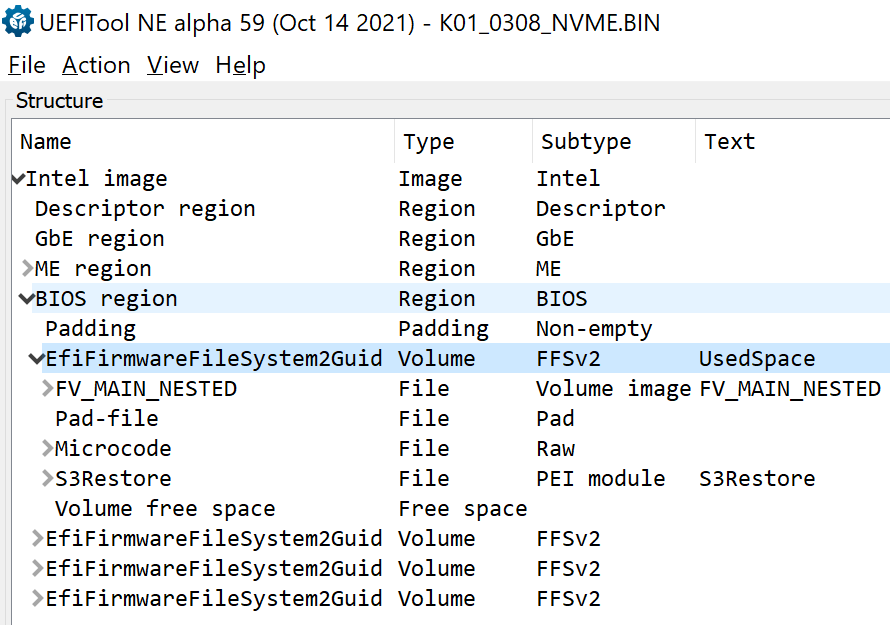
When comparing the differences using an UEFITool NE A59 release that doesn’t have a modification engine, root volume of a BIOS region receives a Text field value: UsedSpace. Original file doesn’t have any text.
I’m trying to flash it through a BIOS/UEFI Utility menu - there is an option to flash an image file.
Flasher starts to read the image and throws an error without any informative description.
Original image flashes fine.
Do I have to try to flash the modified image using the suggested tools like UBU or the resulting image is corrupted?
Edit:
I’ve corrected the ZeroVector and a Checksum of the root volume (file system), now it doesn’t have a UsedSpace text. However, the image still unable to be flashed.
Will try to flash it with UBU or something else.
@Thump
This is the thread about how to modify an AMI UEFI BIOS. Users, who want to know how to get a modded BIOS properly flashed, should read the start post of >this< thread and post their problem into the linked thread.
Sure, but can you please clarify if a modification of ZeroVector of the filesystem is OK?
It seems that UEFITool 0.28.0 always do this for my image file.
@Thump
If the UEFITool v0.28 is not able to insert the NVMe module without touching other BIOS modules, you should either change the in-use BIOS modding tool (e.g. by choosing one of the MMTool versions) or change the specific NVMe module (e.g. by inserting the “small” variant).
Please follow strictly the guide and don’t try to invent anything new.
MMTool removes the pad file in my case.
The problem isn’t connected with a module size: same UEFITools behavior in case of removal any module or even rebuild-only.
I just done it (NvmExpressDxe_4.ffs) with MMtool 4.x, PAD is preserved, but NOT with UEFItool 0.25/0.28 (CORRECTED)
Now as bios mod flash… users tend to forget that its a modified file that the OEM/BIOS security has a role here…they dont like those files.
Besides the last resource of using an SPI programmer, some HP motherboards can allow the mod by using the FPT tool, but it must have access to bios regions for writing, so do the mod from a FPT tool dump and mod it.
The access to bios regions on some motherboards could be already unlocked or not, manual unlock is needed or using (on some HP boards) the ME/SPI jumper to get this “unlocked” dump.
Now using the search box in this forum ( Search results for ‘Elite 8300’ - Win-Raid Forum (level1techs.com)), you will get several post in witch you can see all this and follow other users experiences, determine witch method can solve the mod flash issue, that its normal and happens a lot in OEM/Branded machines.
Thanks for your help. I am now able to boot on W10 from my SSD!
Finally, i removed some DxE drivers by following tips from BIOS Guru CodeRush. Many room was available, then i add NvmExpressDxe_5.ffs and I also unlocked some bios menus with AMIBCP v4.53
Here is the bios i use now (for ROG G771JM) Modded203_bios.zip (2.1 MB)
For W10 installation, i try to clone fresh installation without success (using clonezilla): SSD was visible in the bios + it was booting from SSD , but then BSOD appears
1st time i got SSD visible in the bios and almost W10 booting from NVME SSD!
so new fresh installation of W10-21H2 on the SSD (w/ USB and MediaCreationTool) => works perfectly
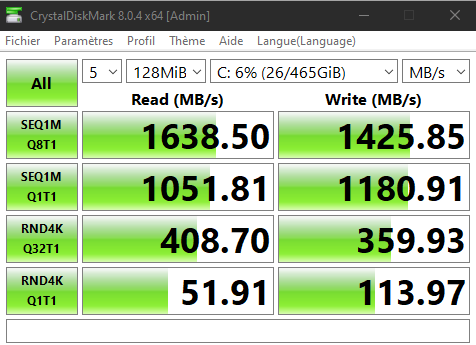
Here is a crytaldiskmark test with the 500GB SSD (samsung SSD 980)
My 2016 laptop is running better than before (maybe faster than when it was new)
Thanks @MeatWar, @Fernando for your support and answers! This forum is awesome! Big thumbs up to this community !