- Ultimately Windows 10 - I meanwhile tried with Ubuntu but got failure right after starting to copy the files
2. Windows 10 disk manager / Diskpart / Gparted
3. All sata disk removed, all raid configuration removed, bios reset
4. Skipped it - I will try again this evening flashing the Bios version with the standard module showing me PATA SS: in bios
5. Tried it with no luck
From your expert opinion, would you consider it possible to screw up a drive in a way that:
- It’s perfectly usable as data drive (toshiba tool tells me everything’s fine with it)
- Impossible to get it seen by the Bios
? ( Blind thinking → If partition table can still be written / disk can be formatted / written on, could it be so that the disk controller is somehow fucked up when it comes to boot on it ?)
This evening I’ll go over the point 4, documenting my tries, coming back to the community Ultimately in the weekend I could try on another computer.
Thanks a lot.
Update:
Redoing step 4 did the trick: Secure boot disabled, PATA SS stopped, booted like a charm. So I wouldn’t give my hand to the Bios Available page 25.
I included here : https://drive.google.com/open?id=0B_SC9Z…NWhkZ2xnaW5QS28 All the tools I used to craft the bios, if needed.
@pipould :
Your problems may be caused by the boot sector resp. the partition table, which have been created and changed during your various experiments to get the NVMe SSD working.
This is what I recommend to do:
- Modify the BIOS according to my guide (= start post), flash it into the mainboard BIOS Chip and choose the BIOS settings, which are required to get the OS installed in UEFI mode (UEFI Option ROMs prefered, Safe Boot and Fast Boot have to be disabled).
- Unplug all HDDs and SSDs except the NVMe SSD. It should be visivble within the BIOS with the name “PATA”.
- If not already done, let Rufus create a bootable FAT32 formatted USB Flash Drive containing the Win10 Edition you want to install in UEFI mode using the GuiMode Partition Table.
- Boot of the USB Flash Drive (shown within the Boot Manager with the prefix “[UEFI]” and choose the option “OS installation”.
- Once your NVMe SSD has been detected by the OS Setup, delete all existing partitions of it. Then choose to create a new partition for your future drive C. The Setup will automaticly create some additional (usually hidden) partitions.
- Install the OS onto the last (biggest sized) partition of the NVMe SSD.
- As soon as the system reboots the first time, unplug your USB Flash Drive. The installation of the OS should continue.
Good luck!
Update: As I just have seen, you succeeded already - congratulations!
I’ve to say it’s fairly crazy, now everything is up and running : Secure boot, Fast boot… I don’t understand what the hell was going on… I’ve to say my Z87Deluxe is nasty… (need to wait 5 min after bios update to accept boot, then boot with 1 stick of ram, then put others, audio is broken due to watercooling leak… )
Thanks a bunch for re-setting me on the right track ![]()
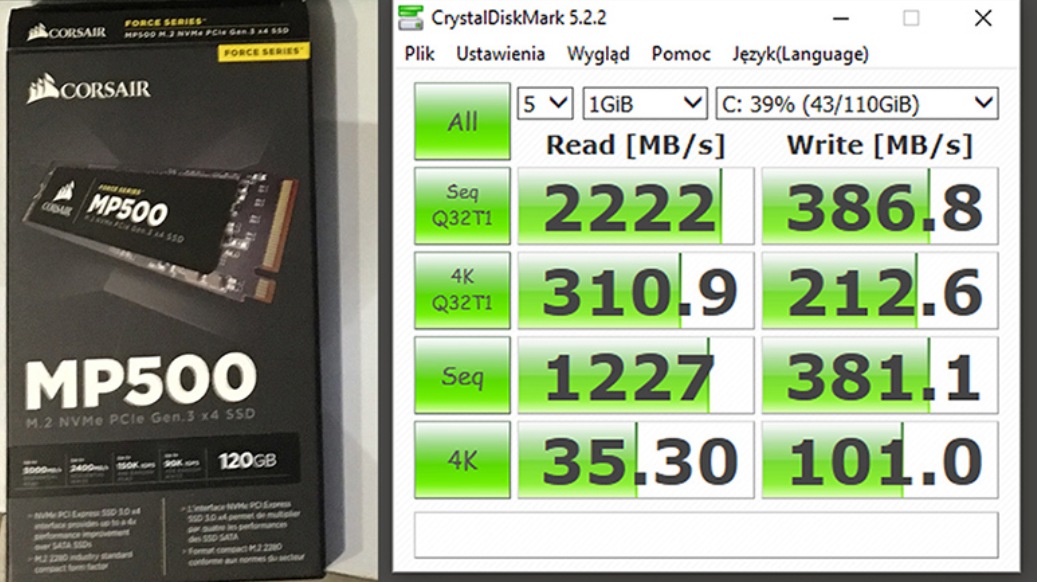
thanks for your help everything works as it is, the Corsair MP500 drive is a little slow:
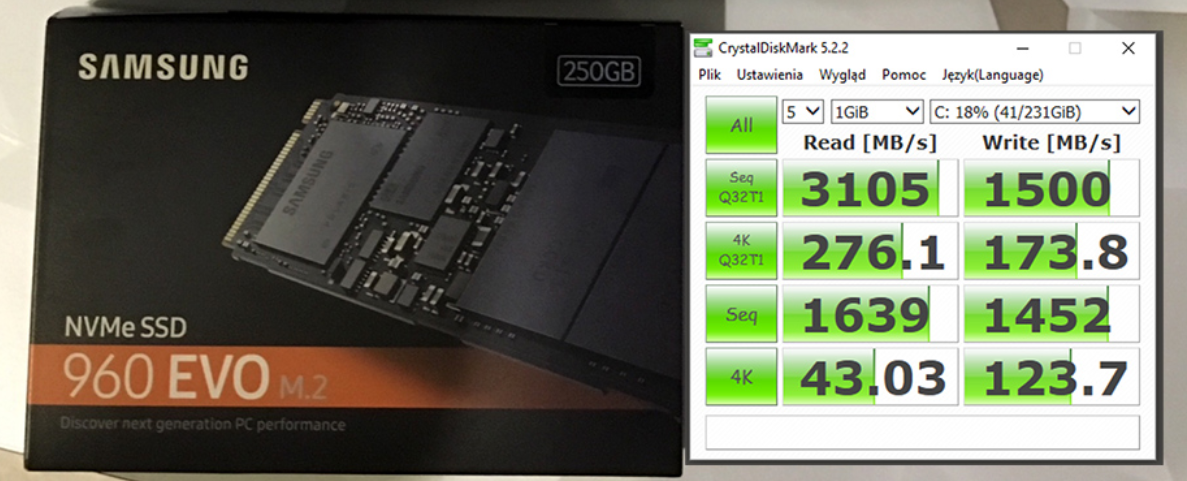
Update:
Samsung 960 Evo 250GB, probably the best option:
EDIT by Fernando: To save space within this voluminous thread, I have merged the 2 posts, resized the pictures und slightly customized the text.
Off-topic: I really can’t believe configs that are 5/6 years old are still just 5-10% slower than the top of today (in mixed use), and manufacturers just renew the market with planned obsolescence… I’d have never believed I could have trouble with my Z87… 20 years ago you was changing every 6 months lol…
EDIT by Fernando: This post has been natively written in German language.
Here is the original text:
Sorry, dass ich in einem englischsprachigen Forum deutsch schreibe.  Mein Englisch ist leider grottenschlecht. Ich konnte bisher kein aktuelles Forum in deutscher Sprache für mein Vorhaben finden. Auf der Suchen im Netz nach Infos zu SSD, M.2, AHCI, Raid usw. bin ich auf Artikel von Fernando gestoßen. Ich habe hier bei ihm angefragt. Er macht mir bisher als einziger Mut, eine M.2 SSD in meinen aelteren MSI Z77 MPower PC einzubauen. Er mein mir wuerde sicher im Forum geholfen werden.
  Das Thema M.2 SSD ist fuer mich einigermaßen neu. BIOS-Updates habe ich schon viele ausgefuert. Daher weiß ich auch, dass wenig Spielraum fuer Fehler ist. Man sollte dabei wissen was man tut und verstehen, was man liest.
Fernando hat mir diesen Abschnitt empfohlen.
[Guide] How to get full NVMe support for all Systems with an AMI UEFI BIOS
Ich habe schon erste Versuche gestartet. Es bleiben aber doch noch einige Verstaendnisprobleme. (Bing Uebersetzer ), die man mit ein Paar Infos sicher beseitigen kann. Ich baue seit Jahrzehnten an PCs.
Erst einmal danke, falls sich jemand meiner erbarmt.
Mein Englisch ist leider grottenschlecht. Ich konnte bisher kein aktuelles Forum in deutscher Sprache für mein Vorhaben finden. Auf der Suchen im Netz nach Infos zu SSD, M.2, AHCI, Raid usw. bin ich auf Artikel von Fernando gestoßen. Ich habe hier bei ihm angefragt. Er macht mir bisher als einziger Mut, eine M.2 SSD in meinen aelteren MSI Z77 MPower PC einzubauen. Er mein mir wuerde sicher im Forum geholfen werden. Das Thema M.2 SSD ist fuer mich einigermaßen neu. BIOS-Updates habe ich schon viele ausgefuert. Daher weiß ich auch, dass wenig Spielraum fuer Fehler ist. Man sollte dabei wissen was man tut und verstehen, was man liest.Fernando hat mir diesen Abschnitt empfohlen.
[Guide] How to get full NVMe support for all Systems with an AMI UEFI BIOS
Ich habe schon erste Versuche gestartet. Es bleiben aber doch noch einige Verstaendnisprobleme. (Bing Uebersetzer
), die man mit ein Paar Infos sicher beseitigen kann. Ich baue seit Jahrzehnten an PCs.Erst einmal danke, falls sich jemand meiner erbarmt.
Hello, I read FAQ and some posts by links and found answers to most of my questions. I already downloaded bios and inserted NVME module, but didn’t flash it yet, and didn’t bought SSD+controller m2, cause I’m not sure will it work in my system at full speed. I want to use Samsung 960 pro 512gb.
There are system specs:
Processor: Intel i7 3770k
Memory: 16GB 4GBx4 Corsair Vengeance DDR3-1600 CML16GX3M4A1600C9B
Mobo: ASUS P8Z77-V PRO
Video: Zotac Geforce GT440
Soundcard: Creative X-Fi Elite Pro
HDD: SSD Samsung Pro 840 PRO 256GB + 1.5TB Western Digital SATA2
OS: Windows 10
So the question is can I put the PCI-E 3.0 4x controller with m2 slot on it, into PCI-E 3.0 16-8x upper slot? Even if its physical size is bigger on mobo. Cause if I understood only this slot on motherboard is PCI-E 3.0 and would give the max SSD speed (and it would support 3.0 standard only if proper CPU used, mine seems is fine for that). So is it possible to use upper PCI-E 16x slot, for controller w Samsung 960pro, and will another PCI-E slot (not main) work w video card in same time (cause sometimes there is an issue if only one video card used it should be put into the main slot)? Also can i get full speed from this ssd if i would use other 2.0 pci-e slot (8x) on this motherboard ( i think probably not, correct me if I’m wrong). As i remember u used kinda same motherboard for testing NVME insertion, so which slot u used on mobo, and which slot\choice u advice to me.
Sorry if my English is a bit rusty. Thx in advance.
Hello everyone!
First, a big thank you to Fernando and everyone else who contributed to this guide! It’s been super-helpful.
I’ve been trying to move from a SATA SDD to an NVMe PCIe SDD on an x79 motherboard. I have some partial success to report, and a bug I could use some advice on.
System specs:
Motherboard: Gigabyte GA-X79-UP4
Processor: i7-3930k @3.2GHz (2011 socket)
Graphics: GeForce GTX600 series
Hard Drives:
Arch Linux: Micron M500 960GB SSH
→ Currently transitioning to Intel 750 PCIe 1.2 TB SSD.
Windows: Micron M500 960GB SSH
RAM: 4x Crucial Ballistix Tactical 1600 MHz, 8GB.
Previously, I had this system set up to “dual boot” either Arch Linux or Windows 7, but I never figured out how to make Windows play nicely with the bootloader, so I just use BIOS to pick which drive to boot off of. I started by cloning my linux SDD to the new NVMe SDD using rsync (following directions here: https://wiki.archlinux.org/index.php/rsy…l_system_backup), then modified the bootloader, fstab, etc. necessary to get everything to boot (following directions here: https://wiki.archlinux.org/index.php/mig…e#Top_to_Bottom).
Then, of course, I discovered that x79 motherboards can’t see NVMe cards as bootable options from BIOS. I tried upgrading to the latest BIOS (F7, for this motherboard), which didn’t help of course. I then used MMtool to put all three nvme modules into the F7 BIOS file and flashed it from a bootable DOS USB. AFTER doing this, I noticed that I did make a mistake here – I used the BIOS for the Rev. 1.1 motherboard, but I have the Rev. 1.0 motherboard. Not sure how bad this is?
Here’s the success part – that did successfully let me see the NVMe card as a boot option!
Here’s the failure part – now I cannot boot anything from BIOS using UEFI. I can see UEFI boot options for my old Linux SSD, the new NVMe Linux SSD, and the DOS bootable flash drive. If I select any of those for boot, the screen goes dark for about half a second and then the system goes right back to BIOS. I can boot just fine from DVD, the non-UEFI option for the DOS bootable flash drive, and my Windows SDD.
I’ve tried flashing using the correct revision number BIOS (both factory version and modded for NVMe support), as well as flashing back to the F4 BIOS. Didn’t help. I’m trying to do a CMOS factory reset now, but it hasn’t worked yet.
Any idea what would specifically make UEFI boot not work?
@Glavir
The NMVe x4 card will work in x16 slots without any problem. I just looked at the Asus P8Z77-V Pro manual and it shows slot 2 and 5 (the upper two PCIe x16 slots) as PCIe 3.0 or 2.0 (PCIe 3.0 with your 3770K). You can put the NVMe card in slot 5 and keep your video card in slot 2. If your video card currently runs in x16 mode, it will probably drop to x8 mode with the NVMe card in slot 5. Running the NVMe SSD in a PCIe 2.0 slot will definitely slow it down.
I recommend that you go into the BIOS and check the “Advanced” tab for your PCI express x16 slot settings. Default is probably “Auto”, so set the PCIe slot for your video card to PCIe 2.0 (or Gen2) and the PCIe slot for your NVMe card to PCIe 3.0 (or Gen3). The manual shows options of “Auto”, “Gen1”, or “Gen2” for these two slots; so “Gen1” must be PCIe 2.0 and “Gen2” must be PCIe 3.0, as there is no PCIe 1.0 on this motherboard.
I have an Asrock Z77 motherboard set up the same way with a 3770K and it works great (and it shows “Auto”, “Gen2”, or “Gen3” for the same two PCIe x16 slots).
@Carnmerion :
Welcome to the Win-RAID Forum!
What you have done, is not ok at all and hasn’t been proposed by me. If you want any help within this pure English language Forum, you have to post your request/problem in English.
I haven’t yet deleted your original post, but put it into a “spoiler” to give you the opportunity to translate it yourself or by using a tool like the Google Translator.
@Glavir :
Welcome to the Win-RAID Forum!
Please follow the advices given by Paulos7.
Good luck!
@sclamons :
Welcome at Win-RAID Forum!
Why didn’t you follow my guide (= start post of this thread)?
Here are my advices:
1. Modify the latest original BIOS for your specific mainboard according to my guide and flash it into the BIOS chip.
2. Prepare an UEFI mode bootable USB Flash drive containing your desired Win10 image by using a tool like Rufus.
3. Unplug all other HDDs/SSDs except your NVMe SSD.
4. Boot off the USB Flash Drive in UEFI mode and intall Win10 onto the NVMe SSD.
5. Once Win10 is up and running, you can reconnect your other HDDs/SSDs.
6. When you want to boot into your freshly installed Win10, choose the BIOS Boot order resp. Boot Manager option “Windows Boot Manager”.
Good luck!
Regards
Dieter (alias Fernando)
Hello to everyone that has contributed to this post!!!
I…like everyone else on this post have a nvme ssd and pci dapter that wont boot on my x79 board.
so after much searching i found win-raid and immediately joined without reading the rules in the welcome portal.
@Fernando my apologies for sending you a pm!!!
Should have read everything.
I have followed the start post and have modded my bios by following every step and will test tonight after work.
It was allot easier than I thought it would be.
Great step by step guide Dieter!!!
I will let every one know what my results are.
Cheers
@Tonnage :
Welcome to the Win-RAID Forum and thanks for your apologies regarding your unneeded and bothering PM.
We are awaiting your final report.
Good luck!
Regards
Dieter (alias Fernando)
I translated the guide with Google translator, leaving the content open with some room for interpretation.
I have created the MOD file.
NvmExpressDxe_3.ffs inserted after the last DXE driver.
When uncompressed NvmExpressDxe_3.ffs, a Chinese letter series is added after saving. Is that OK? Should I flashing?
I must now also learn English to learn Chinese to use a fast M.2 SSD. |addpics|huw-1-2eb4.png|/addpics|
@Carnmerion :
Welcome to the Win-RAID Forum!
I have moved your 2 posts into this thread, because it matches the best your request resp. project.
Yes, it is ok like it is.
You can flash it without needing to understand the chinese letters.
Regards
Dieter (alias Fernando)
That’s a great tutorial, I succeeded with my laptop, ASUS G751JT. There is something I have to add here, first I used WinPE and Windows installer to install the system on my nvme ssd, and second I used windows installation flash to repair boot. And it works. I didn’t figure it out, why can’t I directly install windows with the installation flash? Perhaps it’s because I was using legacy before, not sure… If someone can help me out I’d appreciate it.
@Firemov :
Welcome to the Win-RAID Forum and thanks for your success report!
You should be able to install Win10 directly onto the NVMe SSD, if the SSD is “clean“ or has been quickly formatted before.
Regards
Dieter (alias Fernando)
Hey Fernando,
To be perfectly honest, I got confused and followed another guide (I’ve had a lot of tabs open in the last few days!). I’ll try your tutorial, though, and see how it works.
Any reason it needs to be Windows 10? I’d actually like to put Linux on the SSD. I might have a Windows 7 disk around somewhere I could test with, at least…
Thanks again! I’ll let you know how it goes.
Ok, I followed your guide up to the Windows installation part, reinstalled the bootloader on the new SSD, and now it mostly works! There’s still some kind of boot problem, but I think it’s a Linux problem at this point, not a UEFI one.
For anyone else reading up on this, unplugging the other hard drives seems to have been really important!