@Fernando
Everything I can find online says no NVME support.
EDIT by Fernando: Picture resized and re-attached by using the Forum software (to save space)
@Fernando
Everything I can find online says no NVME support.
EDIT by Fernando: Picture resized and re-attached by using the Forum software (to save space)
hi guys,
im trying to get a samsung 970 get bootable with a P9X79PRO but everytime i try to flash a modded file from uefitool it says "security verification failed" or "The selected File is not UEFI BIOS"
i used asus ez flash
help me pls
But I see an NVMe DXE Driver within your attached picture.
@Fernando this is why I am confused. Should I try Nvmexpress?
@chrisgo - use USB Flashback and file must in in capsule format (not simply named capsule extension) and must be renamed to it’s recovery name (P9X79PRO.CAP)
@chrisgo :
Welcome to the Win-RAID Forum!
You cannot flash a modded ASUS UEFI BIOS by using the EZ Flash BIOS Utility.
You should use the ASUS USB Flashback feature (provided, that it is supported by your mainboard). If it should be not supported, please look into the start post of the thread “How to flash a modded AMI UEFI BIOS”.
Regards
Dieter (alias Fernando)
Please attach the latest BIos for your laptop and I will do a look into it.
@Fernando :
Linked below. Thank you.
https://mega.nz/#!3twRTAIC
@CoolAsIce :
The link cannot be used without the decryption key.
>Here< is the link.
Good luck!
My mistake, new MEGA user
https://mega.nz/#!3twRTAIC!fevziQoKpQYed…MFfkjluC0YYsjBg
@CoolAsIce :
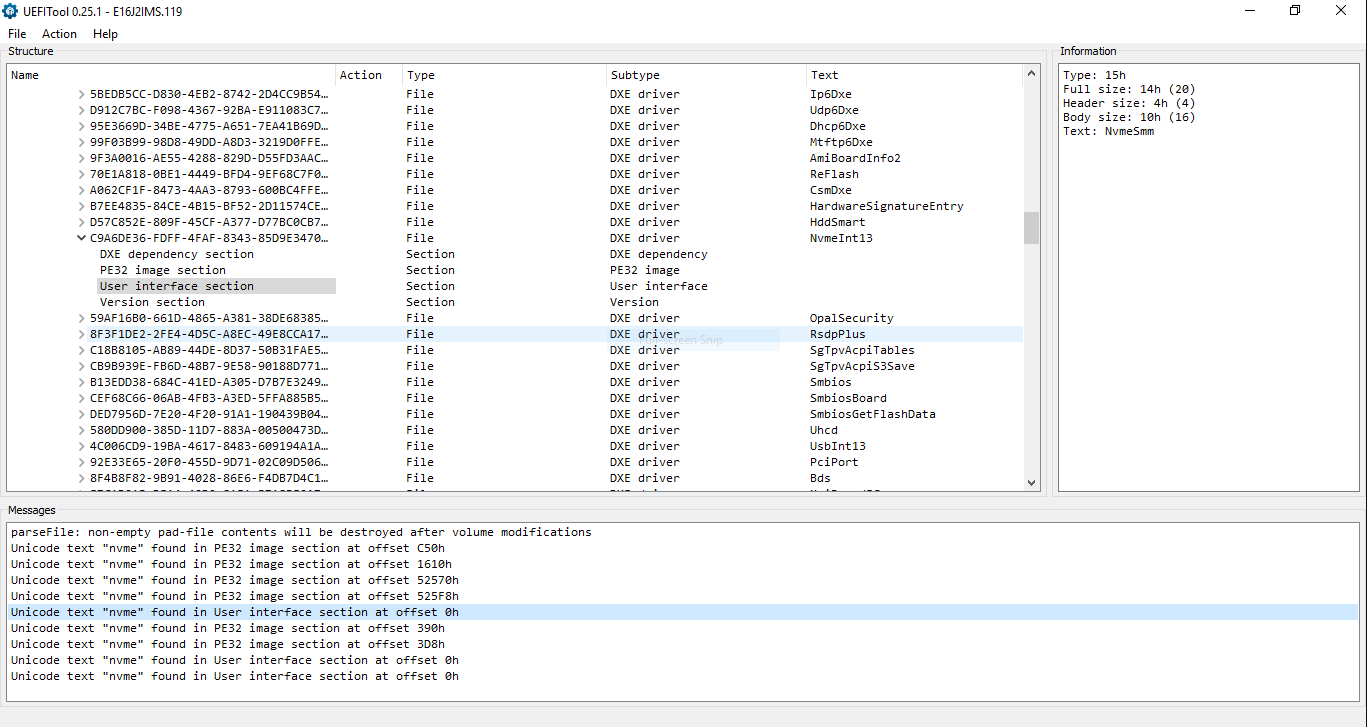
Contrary to you I found the nvme module. Look here:
Conclusion: NVMe seems to be fully supported by the BIOS.
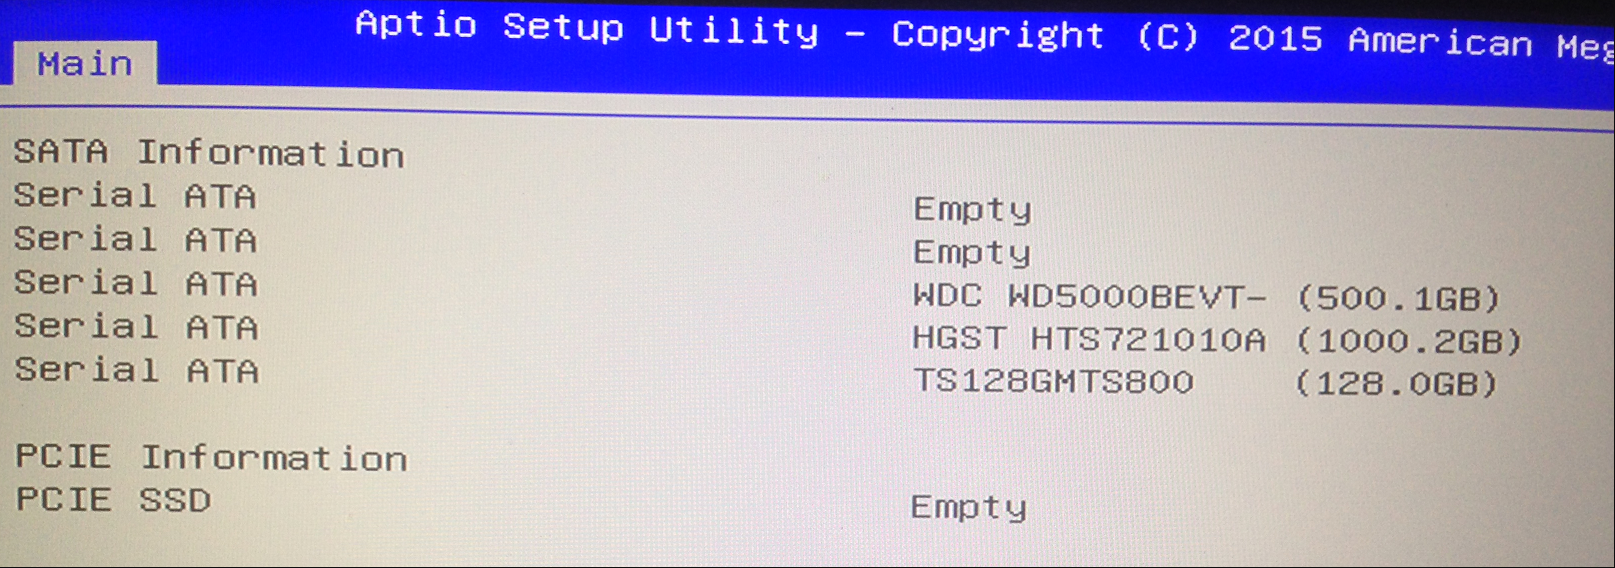
That is really strange. SSD does not show in BIOS at all. I removed all other drives as well.
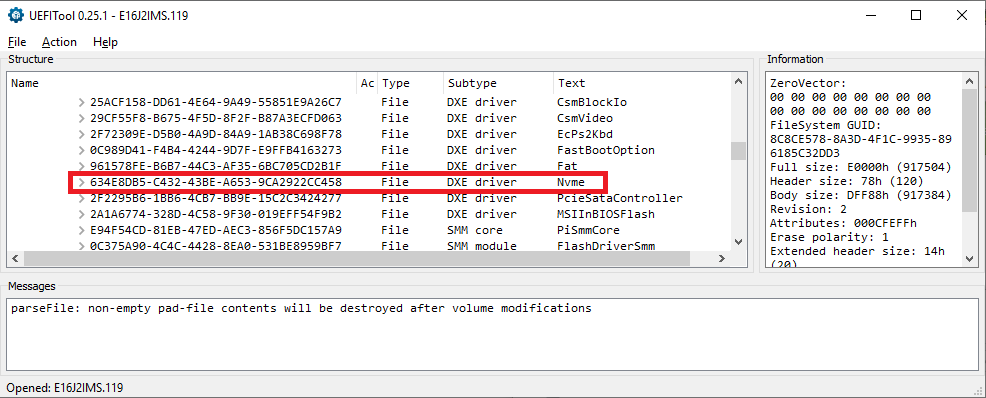
Not my picture but identical to this:
@CoolAsIce :
Put the NVMe SSD into the “Combi” M.2 slot, remove all other SSDs and try to install Win10 in UEFI mode onto the NVMe SSD.
Well, it works! I should have tried it really, but not showing at all in BIOS I thought it would not work.
Big thanks to @Fernando
@CoolAsIce :
It is fine, that you succeeded.
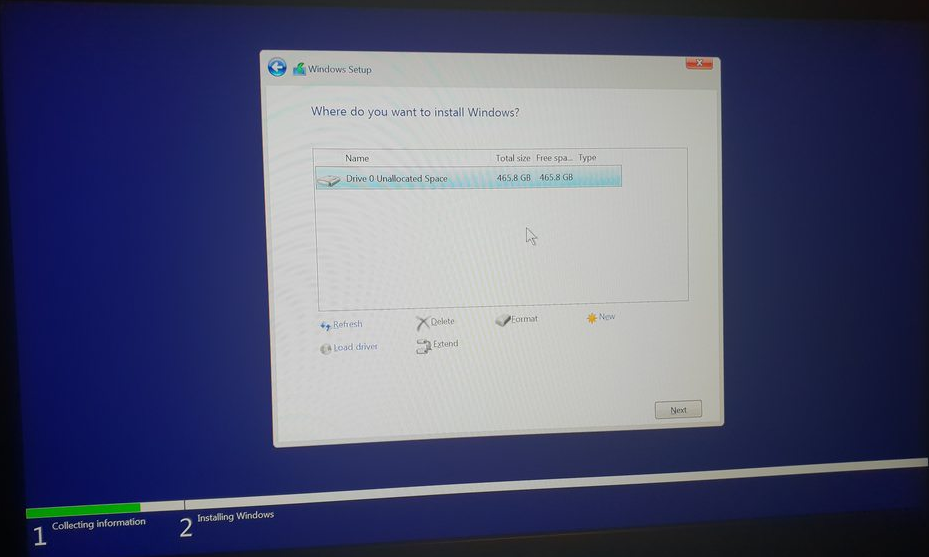
The NVMe SSD is not listed as bootable drive, because it is only bootable in UEFI mode - contrary to the previously used SATA SSDs.
First of all, Fernando does a great job by helping us with this modification guide. Thank you very much indeed, Fernando.
I would like to contribute some of my experience and thoughts after closely following this tutorial and making the whole thing work. Yes, it works!!
I have an Asus P8Z77-v lk motherboard. It supports NVMe now after the addition of a NVMExpressDXE_4 to my bios chip. It runs on Ubuntu 18.04 in UEFI-mode. I do not have Asus Flashback utility on my board, therefore I used CH341a to flash the bios.
The irony of such modification is that the whole concept is quite simple in theory, however, in reality, there are many landmines in each successive stage of the process, which is largely due to our lack of Bios-related knowledge.
There are three main stages for this modification: 1. Bios mod 2. Flash 3. OS installation
For Stage 1: Do everything Fernando instructs you to do with full confidence. Not much will happen. Use UEFI tool to insert the missing NVMe support file. The hurdle is to be familiar with the tool itself.
For Stage 2: This is the most difficult part of the job as far as I am concerned. There are a couple of ways to flash the chip. If you have a removable bios chip like me, I would suggest that you buy a CH341a programmer online and flash the chip externally. The benefit of using a external programmer is that it will not cost you that much if you f… up the flashing (or the programmer f…s up, which is entirely possible). In the worst scenario, you can replace your bios chip by paying rather low price, measured by monetary scale (I don’t think you can replace the psychological suffering in the meaning while). For Ch341a programmer, I am aware that there are two versions of it: the black and the green. I am able to get the job done with the green one. The version of the software I used is 1.30.
For flashing process itself, remember you can flash .rom file. Do not try to change .rom to .cap, which is for flashback. You don’t need it. Once you are successful in flashing the bios chip, the BIOS firmware will detect your NVMe SSD as PATA SS in the boot setting.
For Stage 3: It is better to spend some time to try to understand the difference between UEFI-mode and BIOS-mode(legacy) because it will help you a lot when you try to joggle with all the features in BIOS firmware, you know, all the fun stuff: CSM, Secure boot, Fast boot, Since NVMe only supports UEFI-mode boot, you can pretty much forget about clone drives or data migration. To finish last part of this modification, an OS with only UEFI-mode has to be installed on your NVMe SSD.
Thank you very much.
@cycliscs :
Welcome to the Win-RAID Forum and thanks for your contribution!
Your report and comments about your experiences while following the guide (= start post) are very useful and much appreciated.
Enjoy the performance of your NVMe SSD with your Z77 chipset system!
Dieter (alias Fernando)
Thank you, after reading your guide, I successfully installed Windows 10 on Asus Sabertooth Z87 with Intel 760p SSD bootable. Wonderful! Thx for all the guides and works! big thanks!
Just a little question, the most annoying thing "It is necessary to remove all other storage disks during the installation of windows 10" , after the installation of windows 10 with this method ,every 3-6 month windows 10 releases an anniversary update so the system upgrades itself with windows update or win10 upgrade wizard, do we have to remove all the storage disks during the procedure of anniversary update?
@evilhawk00 :
Welcome to the Win-RAID Forum and thanks for your feedback. It is fine, that you succeeded.
No, there is no need to do that.
The main reason for the related suggestion within my guide was to minimize the risk of a failure and to prevent, that the OS Setup puts the boot sector onto any other disk drive. Now the hidden EFI partition is there, where it should be (on the NVMe SSD) and this will not be changed by any OS update or upgrade.
Regards
Dieter (alias Fernando)