Thank you for pointing out that there are instructions that I had missed. Unfortunately, Q-Flash is what I have already used. There is no CSM option in the BIOS.
PS: I did manage to flash back to F9 with Q-Flash (previously I had tried my original backed-up F2 version) and then back to the modded F10 version. So I know that I am running the modded BIOS now. Unfortunately, I still don’t see any PATA drive. I’ve set everything to legacy but there is no CSM option
Ah ok, yes. I’ve had it set to “OS (other)”. There is also “Windows 8” and “Windows 8 WHQL”.
I did manage to get it to boot into Windows now! There is one catch though. I had to move the M.2->PCIe adapter card to the first x16 slot. For some reason, it doesn’t work in the x4 slot (the only other slot that fits), which is a bit annoying because now I either have to use onboard graphics or move the GPU to the slow slot.
If anybody know why that is, let me know. Otherwise, thanks alot for your help!
PS: Setting the PCIe speed of the port to 4x instead of leaving it on auto fixed the issue. Now I can also boot from the other slot!!
Hello friends,
Im trying to get my H61M-ITX to boot pcie nvme ssd but no luck.
To be honest I did not know when I started this build to get a MC server that I will need to mod the BIOS
I followed the guide and got modded BIOS using MMTool, got to the PAD file part and I’m almost sure I’m good but I wanted some of you smarter people to double check me.
Seems correctly inserted in the right bios volume, no changes regarding pad-files, so it appears ok.
This is not any kind of confirmation that all the operations will be risk free.
Good luck.
Thank you kind sir.
I understand that its all on me if it fails.
Fortunately I found ebay seller that sells already modified BIOS for 16$ so if it fails not all hope is lost.
@Castiel
Welcome to the Win-Raid Forum and congrats for having succeeded with your work!
Since you obviously have done the BIOS modding yourself by following my Guide (start post of this thread), I have moved your check request and MeatWar’s reply here.
It doesn’t make much sense to start a new thread for each BIOS modding check request.
I have followed the guide to install Windows 10 and after installation is complete there is no Windows Boot Manager option in the bios, I have reinstalled it 4 times with no luck, tried all pcie ports on my motherboard and the Rufus stick is made correctly and the NVMe drive is GPT.
Motherboard: GA-Z77X-D3H rev.1.1
BIOS: [OFFER] Gigabyte GA-Z77X-D3H NVMe mod
Only shown is PATA SS which I know cant boot.
Which Boot Options does the BIOS show and which NVMe SSD partitions does the Disk Manager show?
The Win10 installation in UEFI mode cannot be completed without the creation of the EFI Boot partition (whichever name it has).
Well in BIOS there is only 2 boot options, PATA SS and [UEFI] KingstonTraveller which is the USB stick with the OS on it . As for the partitions, you mean the ones in the installer disk manager? There’s 3, one for system, another one which I don’t remember and the actual partition for the OS. By the way thanks for helping me.
This verifies, that you didn’t follow my Guide regarding the OS installation.
The EFI boot sector (GPT boot partition) has to be created at the beginning of the OS installation (after the detection of the NVMe SSD by the OS Setup) and located within the NVMe SSD.
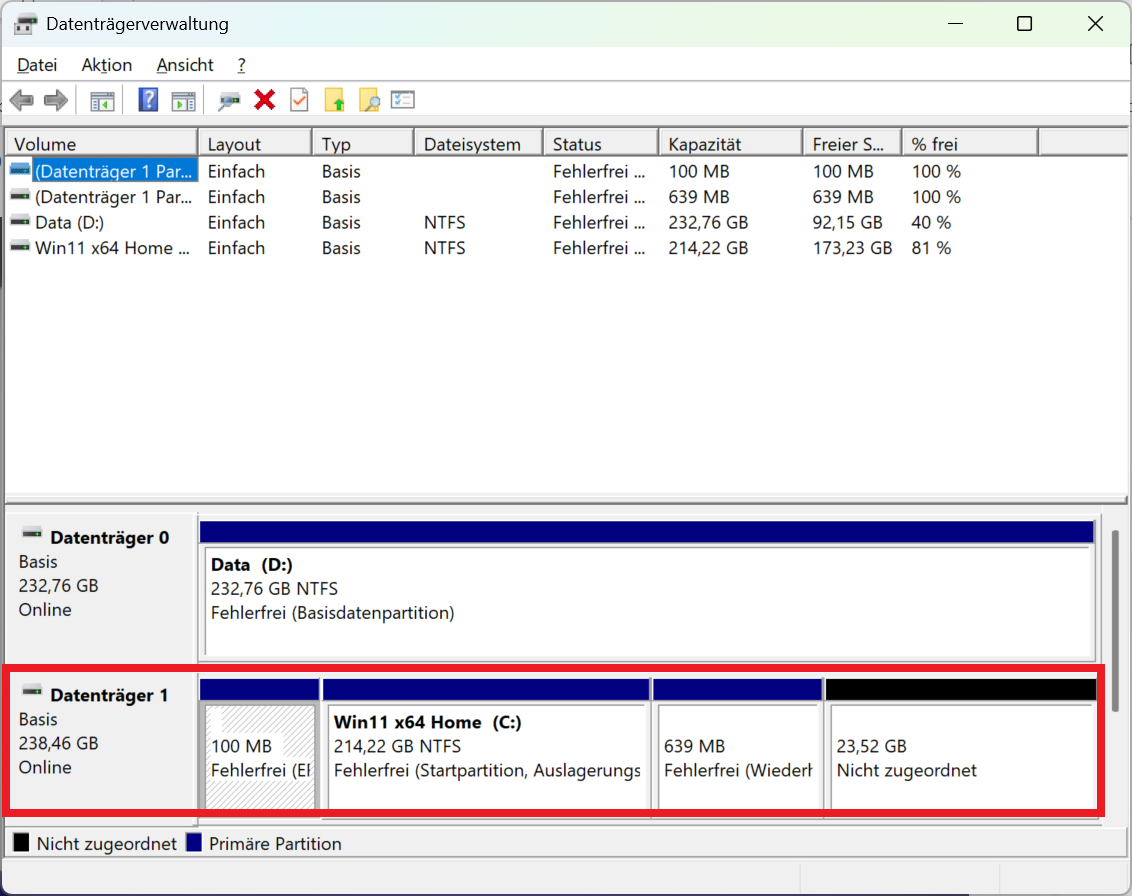
Please post a screenshot of the Windows Disk Manager showing the details about Drive C:.
The PATA SS indicates that CSM is AUTO or ON, turn it to OFF (PURE UEFI Enviroment) and boot the USB UEFI OS x64 setup, delete all partitions on disk (or make the desired ones) and hit next, if the USB is correctly done, windows setup will create the required partitions to the system and finish installation.
Re-do why? How did you do it in 1rst place? What source used?
Current MS ISO’s x64 are all UEFI capable, Win10/11.
EDIT: Then it should be ok and still visible as UEFI in bios and for installing. Just set the bios to UEFI (CSM OFF/Disable), cant remember how Gigabyte shows us that.
No??? What model? The GA-Z77X-D3H doesn’t have it??? Humm not possible if not mistaken, there should be.
Do you have Win 8 WHQL item? Set it ON or OTHER OS, cant remember…
If the USB OS setup doesn’t show in bios as UEFI boot device then remake it or if doesnt boot then was baddly made…