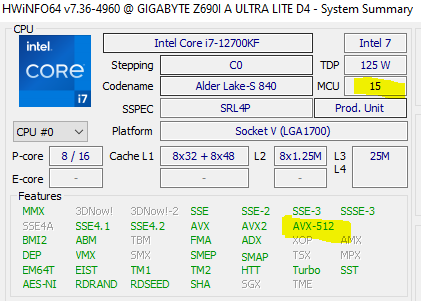
Z690i Ultra Lite DDR4 Owner here, I want to do this mod, only issue is Q-Flash isn’t showing the option to save my BIOS after I turned off my ECores, anyone else have this issue or know of a way to backup the BIOS a different way? I’ve tried BIOS Backup Toolkit 2.0 in windows but It’s unable to detect the BIOS. Any help would be greatly appreciated!
UPDATE: read my post below. You don’t need to disable ecores before applying this mod for this particular board, so go ahead and apply this mod directly to the latest stock bios image (F22, as of this writing). Then, after flashing the modded bios image, go into bios and disable all e-cores. AVX512 should then be enabled.
Exact same board here. Go ahead and download bios version F2 from Gigabyte website. That’s the highest version of bios for this board that allow the “Save bios” option in Q-Flash utility. I’ll start applying this mod and will write a step-by-step instruction soon (if successful, otherwise, just another complain post). Man, reading this thread is like solving a “The Room” puzzle. Make my brain spin a bit. And no, the backup tools posted by @Sweet_Kitten does not yield a valid bios image for this board (z690i aorus ultra lite ddr4).
Finally successful!

As promised, I’m writing a step-by-step guide, as detailed as possible.
Sorry, as a new user, I can’t mention more than 2 people, post more than 2 links, or upload more than 2 images.
- You dont need to disable HyperThreading to make system bootable/AVX-512 work.
- When I initially did it, there was no need to erase later microcodes from UEFI image. It’s actually Gigabyte problem, because in later ASUS versions they still have “enable avx-512” bios setting, but removed uCode v.15, so you can just add it to image and that setting would work again on latest preRaptorLake bios version.
Thanks @RussianE39 for the quick clarification. Do you remember approximately where the “enable avx 512” setting is, within the Gigabyte Aorus BIOS menu? I tried to find it under Tweaker → Advanced CPU Settings → AVX, but couldn’t find any AVX512 settings.
Hmm… I could not seems to find that option. However, on the bright side, I can confirm that I don’t have to disable e-cores before applying this mod, and the computer still boot up! Though I do need to go back to bios and disable all e-cores after flashing the modded bios image in order for AVX512 to be enabled.
In short, try applying this mod first to the latest stock bios image downloaded from Gigabyte. If your computer cannot boot up, you will need to find the stock image with “save bios” function in Q-flash, so that you can disable all e-cores and backup bios image before applying this mod.
Hell, as a new user, I can’t reply more than twice. What’s the deal with the 2-everything limit? @RussianE39
I’ve updated my github instruction, so please go to my previous post for the github link.
@thanghn90 Your guide is a life saver! I was easily able to enable avx512 on my 12700k on my Aorus 690i Ultra Lite DDR4. Looking forward to testing RPCS3 soon. Coming from a 3700x it should be a huge performance boost.
I’m glad I was able to help. Putting together all the puzzle pieces in this thread was fun, though I can’t thank all the contributors because I can only mention two people in a single post.
As for testing, yes, the 12700K chip definitely can handle RPCS3 God of war 3. Lowest framerate without any patches (and with avx512 enabled - it’s called “Increase avx instruction length of so”, in CPU tab) is around 35fps, and normal playing FPS is about 50-55. With patches and some additional settings, it’s almost always >45FPS and stay comfortably at 60FPS regularly. And this is of course at native resolution (720p).
I have to warn you though: 12700K is HOT, LITERALLY. Mine is constantly at 95C (after throttling I guess) using the Noctua air cooler while running RPCS3. So air cooler with this CPU and RPCS3 is not sustainable. I’m ordering a 360 3-fan liquid cooler and will see if it reduces the temperature.
Hi, yes you can buy a 12th/13th anti-bend buckle. I lower 10 degrees now I manage at rpcs3 65 to 70 degrees
Good advice! Ordered it. I remembered reading about alder lake bending issue but didn’t think it’s relevant back then. Now it all comes together. Thanks!
Yeah I got a cpu contact frame off Amazon for like 8 bucks. Tested RPCS3 and Infamous is playable 40+ FPS at 4k with my 2070 super and 12700k at 5 GHZ all P Cores OC stable at 1.285V with AVX512 Enabled temps below 75C with a cheap Thermalright Peerless Assassin Air Cooler. Thank you again for your detailed walkthrough!
Has anyone using the older Rocket Lake / Alder Lake microcodes noticed AVX-512 being forcibly disabled in newer Windows 11 insider builds 22623 or 22624?
Same for newest?
It is known that Windows is able to load an updated rev. of microcode. From @thanghn90 experience, literally: “AVX512 is consistently NOT detected until I removed ALL higher microcode CPU patches”.
If the issue actually is the microcode patch being applied, worth getting rid of mcupdate_genuineintel.dll which was supposedly updated in latest builds.
@chinobino
@Sweet_Kitten
My dear friends, I thinkk, you must to know about it.
At first time, microcode.
For AVX-512 last 0x16
cpu90672_plat03_ver000000FF_2021-11-11_PRD_0E7DD810.bin - really 0x16
cpu90675_plat03_ver000000FF_2021-11-11_PRD_0E7DD8F6.bin - really 0x16
Next, you must write to MSR permission for AVX512.
Yes, mcupdate_genuineintel.dll must die ![]()
Links
Actually the problem started with the Windows Insider Canary builds (25xxx) and not the Beta channel (22623 or 22624) as I first thought.
If you rename mcupdate_genuineintel.dll it still loads.
If you delete mcupdate_genuineintel.dll the PC will go into an automatic repair boot loop until you put the file back.
@chinobino
Sorry, I have Microsoft Windows [Version 10.0.19045.2908], I read about Windows CANARY, but as… Its new for me. Will think and search.
@chinobino
My friend, can you report what versions of the mcupdate_genuineintel.dll are on those Canary builds (25xxx) and Beta channel (22623 or 22624)
Thank you.
@MeatWar Here is the file itself from build 25346.1001 if you want to check it out.
mcupdate_GenuineIntel.zip (6.5 MB)
Thank you my friend.
If anyone is still considering getting a 12th Gen intel CPU for a working AVX-512 instruction set, it is still possible to achieve in late 2023! I myself use AVX-512 for my own programming requirements and not for PS3 game emulation. In some cases, AVX-512 has 3 times the through-put of AVX2 (depending on the instructions used). This is why I value it so highly…
Currently I have several intel 12th Gen CPUs (1 x Celeron G6900, 3 x i3 12100F, 2 x i5 12400F and 1 x i5 12600) and all of them have AVX-512 fully working. None of these CPUs have efficiency cores to disable for the AVX-512 instructions to work. They all have manufacture dates from 2021 according to their batch numbers and also have the now defunct halo logo! Three of them were bought brand new (1 in April 22 and 2 more in Jan 23). The other 4 were bought from eBay in the first half of this year (2023). Although it’s still quite possible to get a brand new 12th Gen intel CPU (Batch code from 2021) from an online retailer with some older stock laying around, but picking one up used is more likely.
Boards I have successfully BIOS modded and used are:
Gigabyte z690i Aorus Ultra Plus DDR4 (bytes changed and Microcode exchanged)
Gigabyte z690i Aorus Ultra Lite DDR4 (bytes changed and Microcode exchanged)
MSI MAG B660M MORTAR MAX WIFI DDR4 (Microcode exchanged? Can’t remember if it just worked out of the box!)
ASUS Prime B660M-K DDR4 (only Microcode exchanged)
The Asus Prime B660M-K DDR4 ver 1.02 (manufacture date 10/2022) was the last board I BIOS modded only yesterday to get the AVX-512 instructions to work on a i3 12100F CPU and I’ll describe that procedure down below for anyone new to the technique.
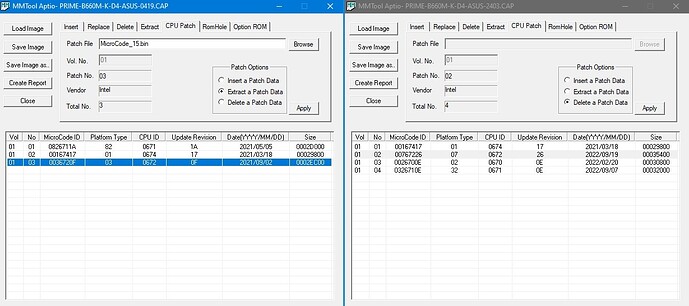
This board came with BIOS Ver 2403 and CPU-Z did not show AVX512F as being present. All I did was delete the Microcode revision 38 (hex 26), and insert Microcode 15 (hex 0F). I used MMTool_v5.02.0025.exe to extract and insert the relevant Microcode.
As you can see from the attached image, I opened up 2 instances of MMTool and loaded the BIOS files I downloaded from the Asus website. The MMTool on the left had the BIOS file version 0419 loaded (this appears to be the only BIOS file on the website for this particular board with the Microcode version of 15). Next I selected the CPU Patch tab and highlighted the item with the CPU ID of 0672. I named the Patch File to be extracted as MicroCode_15.bin, and in Patch Options selected “Extract a Patch Data” then clicked on Apply to extract to file.
With the MMTool on the right side of the image, I selected the CPU Patch tab, then highlighted the item with the CPU ID of 0672 (rev 26), selected “Delete a Patch Data” and clicked Apply to delete the Microcode patch. Next I clicked on “Insert a Patch Data” in Patch Options, then clicked on Browse and selected the Microcode Patch file I saved in the previous step and clicked on Apply to insert the Microcode. Finally I clicked on Save Image and overwrote the BIOS image file to the 2403 file that was loaded.
To flash the modded BIOS I used the flashing Tool inside the BIOS itself. After flashing and a restart, “BINGO”! 512 bits of glorious register programming now at my disposal!
