Lenovo M900 Tiny Bricked

tried already, no luck

There’s a recovery procedure described in the manual, it requires booting from an optical drive.

Otherwise locate the firmware chip(s), and according to their type buy a CH341, SOIC clip, 1.8v adaptor or consider a repair shop for desoldering (?) and reading out firmware chip.

If unsure post high resolution pics of the mainboard (both sides).

[Still warranty?]

my machine was out of warranty already, and i have rt809f bios programmer and wson8 cable

here is the dump of the bios chip here

can you help me to investigate the problem?

Well, that’s the first time I see 3 different versions combined in one bios region. Did you try to repair with a different version than first update try?

Do you mean i need to try download different model of machine bios? :open_mouth:

No, I thought thet there were parts of 3 bios versions in your bios but versions37 and 38 are quite similar in the last volume. But it seems it’s just 29 and 37.

But in addition it seems your ME is corrupt- MEA reports:
csmered

Bios region:
I’d propose you go back to 29

  • Download bios m3jjy29usa, unpack it (innoextract)
  • Run imageM3J.cap through AMI_PFAT_Extract
  • Take imageM3J.cap – 1_00 – AMI_PFAT_1_DATA_ALL from the ertracted folder, open it in a Hex editor, cut the last part so that the remaining file is exactly 0x1000000

Should look like this (not the bytes exactly, pic of another version)
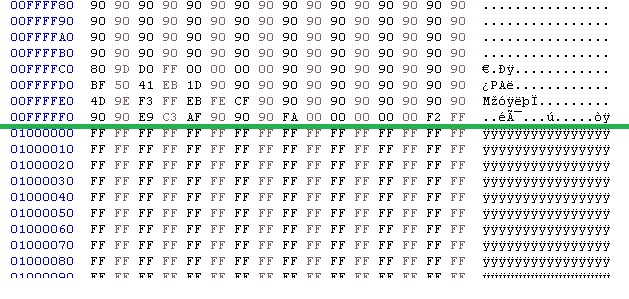
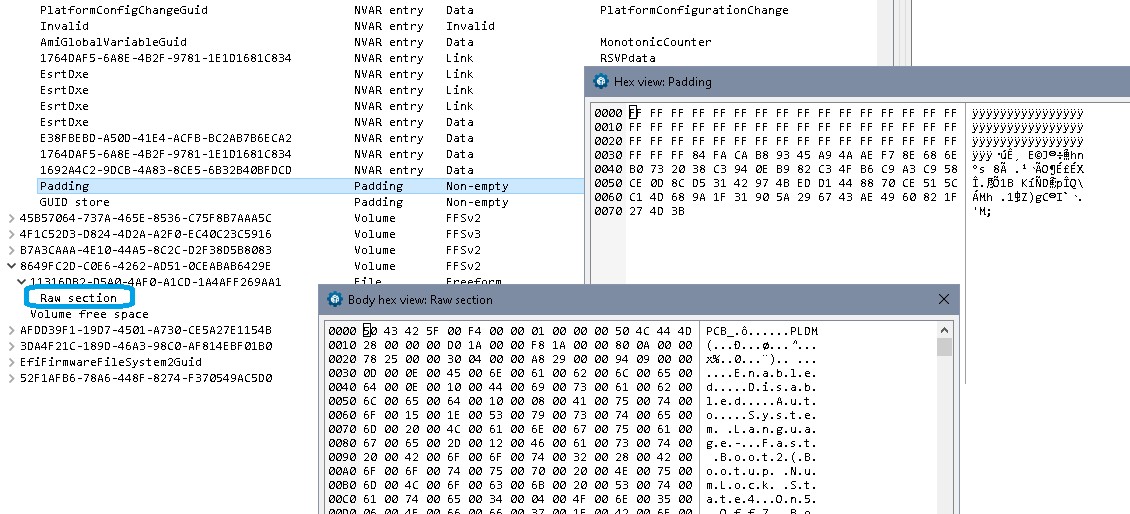
222222

For the structure:

  • Now take your own dump and take the first 0x10000 from the first padding in bios region, they contain machine specific data (0x1000000 to 0x1010000).

  • Take the extracte bios image m3jjy29usa
    Exchange the first 0x10000 with the 0x10000 you extracted from your own dump, file should be precisely 0x1000000 again (since only bios regios 0x0 to 0x10000)

  • Take your own dump and exchange the original bios region with the bios region you created (either UEFITool 028 ‘exchange as is’ or a hex editor)
    New firmware dump should be 0x2000000, bios region starting at 0x1000000

  • Now take this freshly created dump and run
    [Guide] Clean Dumped Intel Engine (CS)ME/(CS)TXE Regions with Data Initialization

This is a rather new machine, there might be interaction with a TPM for example. In addition there’s a difference in one of the UEFI volumes, seems som settings stored there- should get repopulated when started up again and the second NVRAM has probably GUID store data in padding and very little room left. You’ll start with 2 empty NVRAM volumes which should get repopulated at first start.

Expect the first starts to take longer time / to be incomplete causing several reboots and there is no warranty that this will work at all.

If in doubt somewhere in the process just ask and post the (interim-) results and of course if it worked.

1 Like

Hello lfb6

Thanks for your reply

I am new for bios modding, and i have some question to ask

Now take your own dump and take the first 0x10000 from the first padding in bios region, they contain machine specific data (0x1000000 to 0x1010000).

Is that mean i need to go to padding from my dump and right click HEX view, then try to copy the HEX from 00000 to 10000 like this?

Take the extracte bios image m3jjy29usa
Exchange the first 0x10000 with the 0x10000 you extracted from your own dump, file should be precisely 0x1000000 again (since only bios regios 0x0 to 0x10000)

which bios should i use? Modified imageM3J.cap or official bios?
and using hex editor to paste the machine specific data?

I’d use a hex editor like HxD, at least for inserting since UEFITool(NE) won’t help you here. This region should be quite easily to recognize since it contains system information in clear text

What’s the difference between modified imageM3J.cap and official bios?

This is the first step in preparing the stock bios region =>
imageM3J.cap => AMI_PFAT_Extract => imageM3J.cap – 1_00 – AMI_PFAT_1_DATA_ALL => cut to 0x1000000 => ‘stock bios region m3jjy29usa’
This file whatever name you used for it.

1 Like

Am i do something wrong?

After added the modified bios region to my dump image. Using latest version of UEFITool to view it, there have several parts colored in red or yellow.

Seems normal to me, the regions with colours will change since the addresses change when addint the other firmware regions.

Attach your result.

Need to wait a bit longer because my wson8 cable is broken :smiling_face_with_tear:

I need to buy it from AliExpress and wait for the delivery

Hello there, I too have a bricked M900 after a failed BIOS update, I have tried many roms now to try and unbrick it, using some of the suggestions I have read on this thread. I would greatly appreciate some assistance.

Unfortunately I’m new here so unable to yet post any attachments. I hope its ok to link to the rom dumps from Gdrive:

M900 Bricked Roms

I have included both the MX25l12873f (BIOS) and the MX25L2006E (I think this is the EC Firmware)

I’d be very grateful if lfb6 or one of the other experts in here could take a look and see if you can spot anything untoward. Thank you

That’s looks like a stock bios region. If this doesn’t work you might try to clean the ME according to

If you can confirm valid good flashing of the chip and it still doesn’t work it’s not related to UEFI firmware.

Thanks for the quick response , much appreciated. I will (retry) an ME clean and report back

Ok I followed the guide and cleaned the ME Region, however this device still refuses to boot.
I did verify the successful programming of the spi flash.
I’ve attached this rom fwiw:

M900_cleanedME.zip (8.7 MB)

As you say if the UEFI firmware seems ok I can only think the EC may be corrupt or there’s another rom on the board I’m not aware of that was flashed badly as part of the update.

I probed some of the pins of the SPI roms at startup with my 'scope, the UEFI actually doesnt seem to be doing anything, however I see a 50mhz clock on the EC chip’s clock pin, and some other activity, but not checked if its actually data or not.

Most of these ‘tried already’ machines are dead. Many of thoses firmwares floating around are messed with one or another way, so the results are mostly unpredictable. In addition there might be sub- versions with different ME settings and damage while disassembling several times or when trying to flash, Sometimes the EC firmware gets transfered from main firmware, another source of an introduced error when working with unknown firmware.
Without having the dump of the original firmware and starting there right in the beginning it’s in most cases a waste of time.

That’s rather disheartening to hear, but makes sense. I was hoping it was something just not fully flashed or something like the EC rom and UEFI rom were incompatible versions. Meanwhile, I ordered another motherboard. I just dont like to be defeated :slight_smile:
Just want to thank you for taking the time to assist.

Hey @lfb6 I hope you can help me with my M900 Tiny unit. It seems to have also taken a dive due to a bios update.

I have dumped the bricked bios, made two and they seem to both have the same CRC, so the dump looks good.

I’ve been watching Youtube videos and reading quite a bit but still have not wrapped the whole bios building around in my tiny brain!

Could you possibly assist with my bios and help build it to a working state?
Here is the dumped bios, using AsProgrammer 2.0.3a with a CH341a USB Programmer.

Update began at last uefivolume which is now in its beginning from bios version KTBF.

Download bios KT53 (old bios version), unpack it, open bios it in hex editor, copy 0x680000 to 0x6D1FFF. Open your own dump, replace 0xE80000 to 0xED1FFF in your dump with the copied bytes from stock KT53.

Use UEFIToolNE for a check of the structure.

Post/attach the result.

Corrected typo - should be 0x6D1FFF (not 0x61DFFF)