I would appreciate if you could mod the BIOS for me, because than I would have a reference file. Tomorrow I will try it again, and if I suceed, my file and your file should be identical.
Well, everything would be easier if changing the AMD microcodes in BIOSes would be as easy as with the Intel ones when using UBU…
OK, I will do the mod. I agree, it would be nice if AMD updating was as easy as Intel!
Watch here for edit tonight, I’ll put in link to mod once I’m done. I will also include the GUID microcode file itself, that would be inserted post creation/hex mod etc. (I create all new file, instead of editing into, it’s easier for me that one)
And I will try to outline method I used, maybe it’s easier for some to do my way? Editing BIOS now, will update thread soon.
@BlackArchon - Mod done! Here is method I used, and files so you can compare with your work as you go if you decide to do it again. My method is not the same as the one you followed earlier, and could even be more involved, I’m not sure which way is tougher.
Hopefully my method is easy for you to follow, I tried to remember to add each step into guide as I went, but much of it being second nature I may have skipped something little somewhere but I don’t think so as I read it over.

https://www.sendspace.com/file/qex7bk
Tools Used -
Hex Editor Neo
UEFITool_0.25.0
FD44Editor_0.9.2
MC Extractor 1.16.1 w/ R74 database
AMIBCP 4.55.0070 (For verification only)
MMTool 5.02 patched + 4.50.0.23 (For open/verification only)
1. Drag and drop BIOS file onto FFD44Editor to get “USB Flashback / Recovery” name = SABER990.ROM
2. Copy the original BIOS, rename copy to SABER990.ROM, this will be our working file.
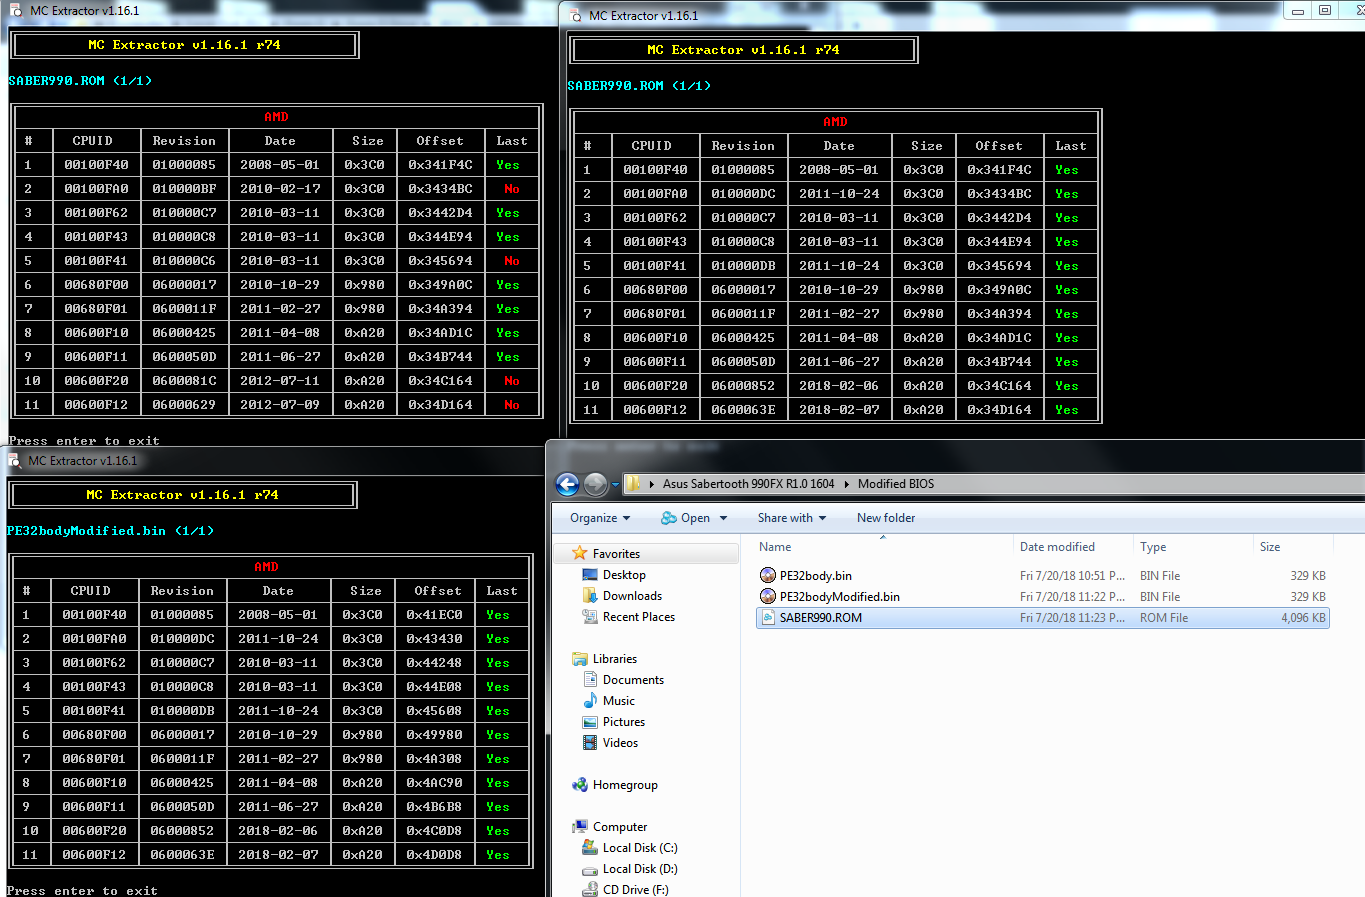
3. Drag-n-drop SABER990.ROM onto MC Extractor, Leave this window open for reference as you go. Gather all extracted microcodes from Extracted/AMD folder within MC Extractor folder.
Delete any files in there previously, or delete all and redo drag/drop scan if needed, so that you only have microcodes from this BIOS
4. From AMD Microcode Repository @Gitbub gather all updates you need, those shown as “No” on right side of MC Extractor when doing initial scan.
5. Put all microcodes into a folder somewhere handy for you. All those gathered from this BIOS extracted by MC Extractor + all updates you download from Github, then move all the older versions into their own folder for use later, leaving only the updated versions in the main microcodes folder.
Look back to MC Extractor initial scan window if needed to see which need updated. 4 microcodes need updated in this mod 00100FA0, 00100F41, 00600F20, 00600F12
6. Open first extracted microcode shown in MC Extractor with Hex editor, if you’re replacing this microcode, open the older copy because we will search BIOS for some of it’s code in UEFITool.
In this instance it’s CPUID 00100F40 already latest version so no older copy needed. Open that file in hex editor and copy first line of hex bytes
7. Open SABER990.ROM in EUFITool, do file > Search > Hex and paste in he hex you copied above from the 00100F40 microcode. One result instance will appear in bottom dialog area of UEFITool.
Double click this line of result, it will open BIOS in top area to exact location of this hex search result = Microcode files location.
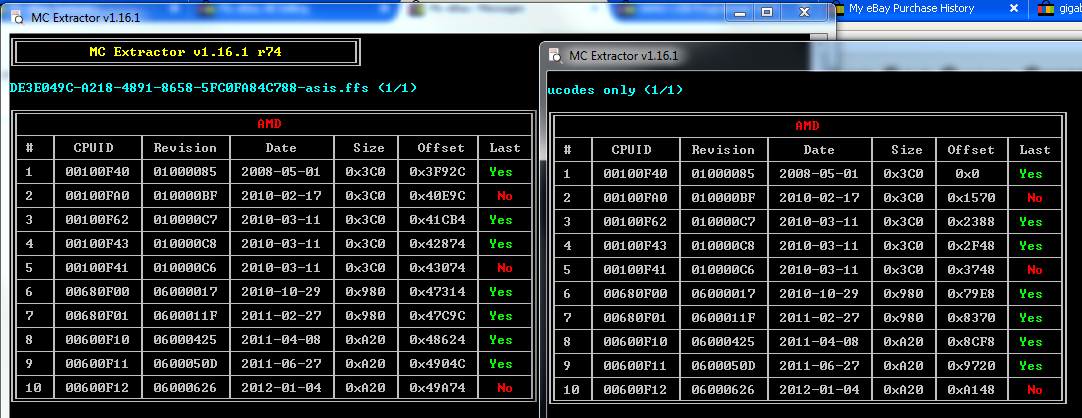
In this instance, that will be the PE32 file in sub-GUID DE3E049C-A218-4891-8658-5FC0FA84C788, under GUID 7A9354D9-0468-444A-81CE-0BF617D890DF. Right click the PE32 file image and select “extract body”, this is what we will update. Leave UEFITool open here
8. Open the above PE32 image body file in hex editor, along with copy of first old microcode you will update, and same version new microcode.
9. Copy entire first older microcode, go to PE32body image and search hex then “Find All” and paste all hex of old microcode into search, this will highlight all the old microcode for this CPUID.
Now, go to new microcode tab, select all and copy, then go back over to PE32body image again and hit paste on top of the highlighted older microcode.
This will overwrite the old code with new, you can look at beginning area while it’s still highlighted and end area, and do undo/redo and see that only this section was written to during the copy/paste
10. Repeat step 8 for 3 remaining microcodes, once done, save this PE32 Body Image as a copy of the file you were editing. Name it PE32Modified, PE32mod etc so you know you edited this copy
11. Now, drag and drop this new PE32 body image into another window of MC Extractor to check all microcodes are new and look correct (No dupes, none missing etc)
12. Go back to EUFITool still open from previous actions, right click the PE32 section again and select “replace body” This will do the rebuild action mentioned earlier in the thread once you save file
13. Done, now go to file save image and save this as a copy somewhere, named for now modifiedBIOS etc so you know it’s the mod.
Once done you can move this into it’s own mod folder so you know which is which, then rename the file again to the recovery name SABER990.ROM so you can use USB Flashback easier.
14. Take modified BIOS and open in all tools you can to see if it looks the same as the original. Open in MMTool 4.5 and 5.02, AMIBCP 4.5 and 5.xx etc, UEFITool, and makes sure it all looks OK, opens properly without errors,
But, if there is error it may be OK, if error show in original like in UEFITool, you want to make sure you see the same in the mod as the original, no new errors.
Many thanks for your efforts and this new guide! ![]()
Is there a specific reason why you chose to do things a bit differently than in MiesMosel’s guide on #5?
You’re welcome! Everyone does things a little differently, that’s all, no particular reason 
Hello!
@BlackArchon
I updated the modified Sabertooth-BIOS from Lost_N_BIOS with the actual UBU.
So that’s it …


Regards, MiMo
Updated BIOS.zip (2.43 MB)
Wow, thank you! ![]()
I will also try to integrate newer microcodes during the next days - I need practice because here are some more AMD boards in need of an update.
Not all AMD boards have issues that you need to work around like this, many can be updated directly with MMTools or UBU (Always try old 1.69 too if 1.7 gives issue)
@Lost_N_BIOS
Thanks for your thanks & for your work. I watched into your modified MINIX 890GX-USB3 BIOS.
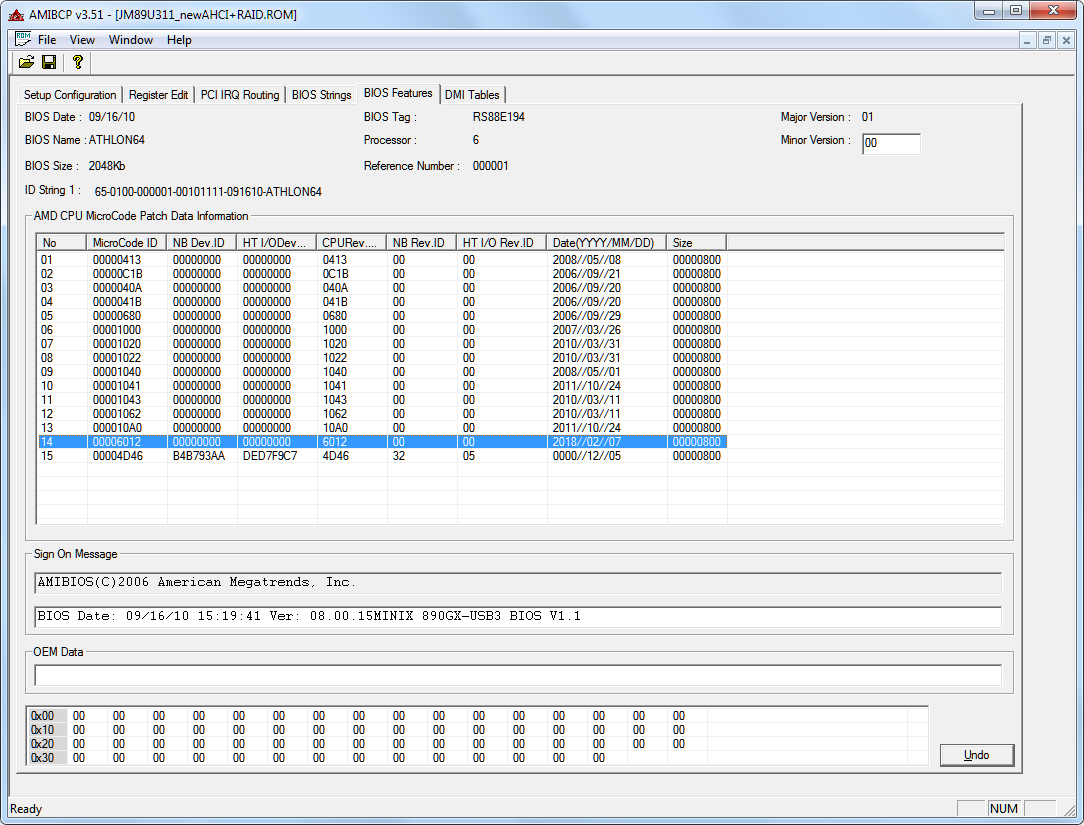
It looks not good, that the new MC 00600F12h has a size of A20h, while all the other CPU patch slots have only a size of 800h.
You can see that there’s a problem in the second AMIBCP* (picture 2) -> a lot of mad data (MC ID, Date, CPUID) in the last line.
*Could you please give me some AMIBCP-Tools in a DL-Link? Would be nice.
@Hexabit
I fixed it, but cannot guarantee/ensure 100% functionality. The board doesn’t support FXs official.
This isn’t really a board for an AMD FX-4100. AGESA not changed, that’s too difficult.
There are now 2 BIOS files:
1. patched with the new MC 00600F12 on the right line/slot (stepsize@800h).
2. patched and updated AMD OROMs for AHCI/RAID to v3.3.1540.19


Best regards, MiMo
Updated.zip (3.25 MB)
@miesMosel - thanks for checking. But that microcode update is now 2.53kb by default, that is why the size differences - https://github.com/platomav/CPUMicrocode…07_8187EA3E.bin
There is no way to update to latest microcode and keep 800h size, only older versions. Making all match sizes does not always matter, you can make even larger if you wanted, as long as everything is corrected after that.
But yes, I do see what you mean about the AMIBCP info now, thanks for catching this. However, your uploaded BIOS also has the same A20h size microcode, and same AMIBCP issue (
This is probably AMIBCP error, due to newer microcode format/size vs how old this program is, can be ignored most likely

And both of our BIOS have incorrect dates and such when checked with MMTool 3.26 as shown in your image above.
I think all these things you noticed, while great catch, are just errors due to this old software didn’t expect new microcodes of this size or format so don’t detect them properly
Yes, give me a second and I will package up all the older AMI tools I have for you, except for the new stuff which I’m sure you already have like MMtool 4.50 and 5.02, 5.0.07 and AMIBCP 4.55.0070 and 5.02.0023
PM coming for this
Hello Lost_N_BIOS,
the difference between our BIOS versions we made, is the beginning of the new microcode.
Yes I have the date-error, too. Otherwise my version has correct beginning & values.
So I think, the alignment ist important for the microcode to work.
Explanation: At the start of PC, the AMI BIOS would be read by the machine from the bottom.
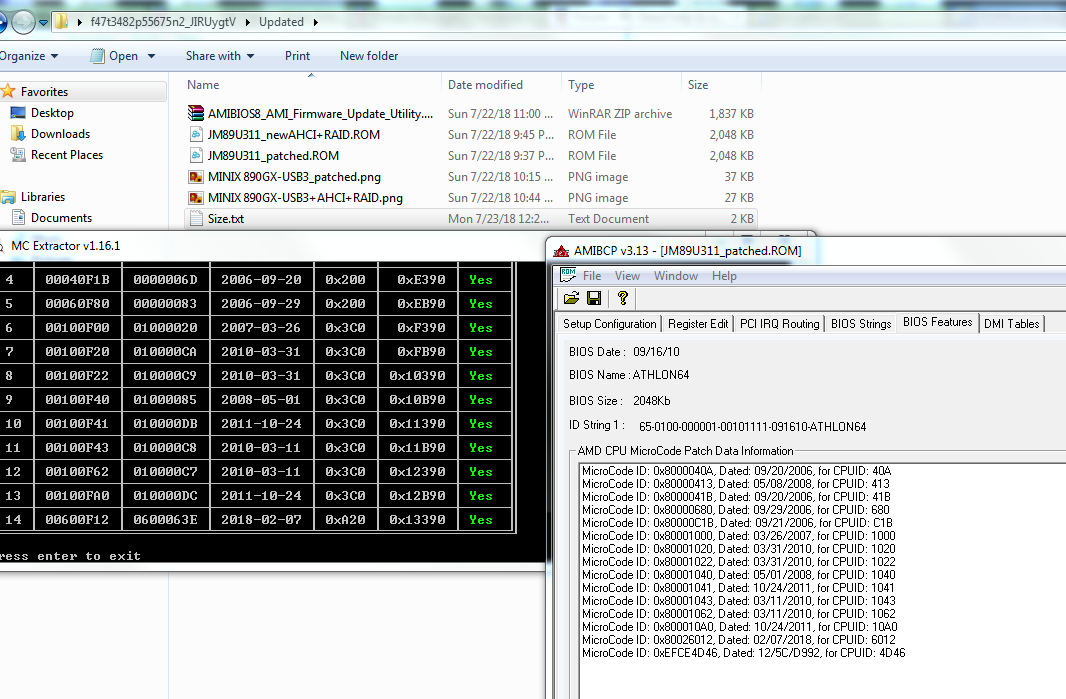
It finds the 15 microcode slots by offset-addresses @ CB90h, D390h, DB90h, E390h, EB90, F390h, FB90h, 10390h, …, 13390h (new MC) and 13B90h (incorrect values through oversized MC before). You can see it easily in the picture of MCE → offset.
In your edited BIOS the new MC starts @ 13950h and MCE/MMTool don’t find the beginning with the correct values (CPUID, Revision, Date, …).
So that’s why I had to find a new solution.
I don’t know, if it’s that important thing, that the offset must be correct - but I think so, it should.
And I also don’t know, if it could make problems, that the new MC is bigger and creates an offset entry, that could cause an errror.
I hope, that the oversized MC at the end should not be a problem. Important for the machine should be the offset address to find CPUID (& Reversion), that matches with the CPU inside (FX-4100).
It’s on @Hexabit to test it & give feedback, if he/she wants to find it out.
Best regards, MiMo
Thanks for explaining! You’re probably right about all that, I’m used to editing Intel microcodes and this is not an issue about sizes at all in most Intel, you can add padding, remove padding, have no padding any size codes etc, most of the time
Although I don’t understand fully how your file differs, it shows similar errors too so I don’t see how it’s changed for the better.
But yes, I do get what you mean about alignment better, but if that’s better why does the tools still give similar errors
If this were Intel BIOS, I think both files would work exactly the same probably 
The errors are not the same, they are nearly similar.
If you have a look into the pictures in #28, then you’ll see little difference.
The third picture shows the right beginning in slot 14 (blue marked) & you see the correct values for CPUID, Rev. & Date.
In the first picture you could see, that all microcode-slots ends with an offset of "0x…90". The offset alternates everytime with "0x…390" and "0x…B90".
In your BIOS the MC is on offset 0x13950. You can’t change that directly, because there’s no more place below the new MC.
So that’s why I rearanged a bit and delete one old MC to have enough space over two 0x0800h-slots.
![]() Maybe, maybe - could also depend on who made that BIOS on which basis (AMI, Award, Phoenix, Insyde, …).
Maybe, maybe - could also depend on who made that BIOS on which basis (AMI, Award, Phoenix, Insyde, …).
Is there an AMI based Intel board, you know, to proof that? . . . Oh, I find an ASUS P5G41T-M LE, there is enough space for new MCs without uniform slot-size (800h, 1000h, 2000h). That Asus BIOS is two years younger than the MINIX 890GX-USB3, but half big. ![]()
Thanks, I think I understand what you mean and why. I guess it didn’t occur to me, because like I mentioned on Intel I’ve never ran into an instance where it mattered the size or start of the microcode.
Some BIOS ucode all ran together without space between, others have space between each (of varying sizes) and any of those work OK with being re-created the other way around too.
And yes, I’m referring to AMI based BIOS too, I think all that is simply due to manufacturer BIOS coders all doing whatever they want and all doing differently with none of them probably following the rules they “Should be” 
Plenty, probably half or more modern Intel boards use AMI BIOS, where that applies. I often adjust microcode sizes to larger, sometimes lots larger than the previous one or it’s original size, never any issues.
You are right though, I don’t think I ever adjusted by 50, usually adding 200-400 or 800-1000 to ucode size.
I guess that x50 is what causes all these possible problems, so if I knew that in advance I would have increased ucode size, would that have fixed the layout in similar manner to how you adjusted?
Instead of 2.53kb adjust to 3kb total or 4kb, then it would be better?
Hi,I want to add microcode for fx8350 on ECS A990FXM-A V1.0 motherboard.
The lastest bios verison is 12/03/2012 ->http://www.ecs.com.tw/ECSWebSite/Product/Product_DOWNLOAD.aspx?DetailID=1265&CategoryID=1&DetailName=Feature&MenuID=115&LanID=0
I use the MC Extractor and find that the microcode of fx8350 is not in it.,but i can use fx8350 on it.
Please any help to update the microcode or add the microcode of fx8350 ?
That is weird CPU works, but no microcode is there for it! Does it currently work properly, all cores detected at right speed etc?
Here’s a good example @MiesMosel - lots of ucodes varying in size at random offsets in an AMI Aptio 4 BIOS. Padding is used between the ucodes, but the offsets are still all random.

Can you do this for him, I’m not sure how to add one in there, unless he doesn’t mind loosing one of the same size 2.53KB (600F10/600F11/600F12)
Yes,it can work normally.And fx8350 is in the cpu support list offered by ECS. ->http://www.ecs.com.tw/ECSWebSite/Product/Product_Support.aspx?DetailID=1265&CategoryID=1&DetailName=Feature&MenuID=115&LanID=0
I wonder how they do that! Maybe one of those other microcodes cover your CPUID too?
I guess they use 00600F12(fx8150) microcode to make fx8350 works. And the Cpuid display in AIDA64 is 00600F20(FX8350),but the Revision of cpu microcode is 00000000.
Maybe, but here I read, that there should be support for FX-8350 up from BIOS version 10/19/2012 (19th october 2012).
On that site there are only BIOS from 03/12/2012 (12th march 2012) or 11/22/2011 (22nd november 2011).
We have to find newest one … … I don’t find it.
I can give you my version in some minutes. I exchange another A20-MC with the 00600F20.
He said it’s working already, I wonder how!?! 