Newest Devices & Win 7,8 : You May Start Here!

Friends,
There is always a confusion where to start with while planning to install Win 7 or 8 on newest devices. There is a beautiful program to get help with the matter i.e. NTLite
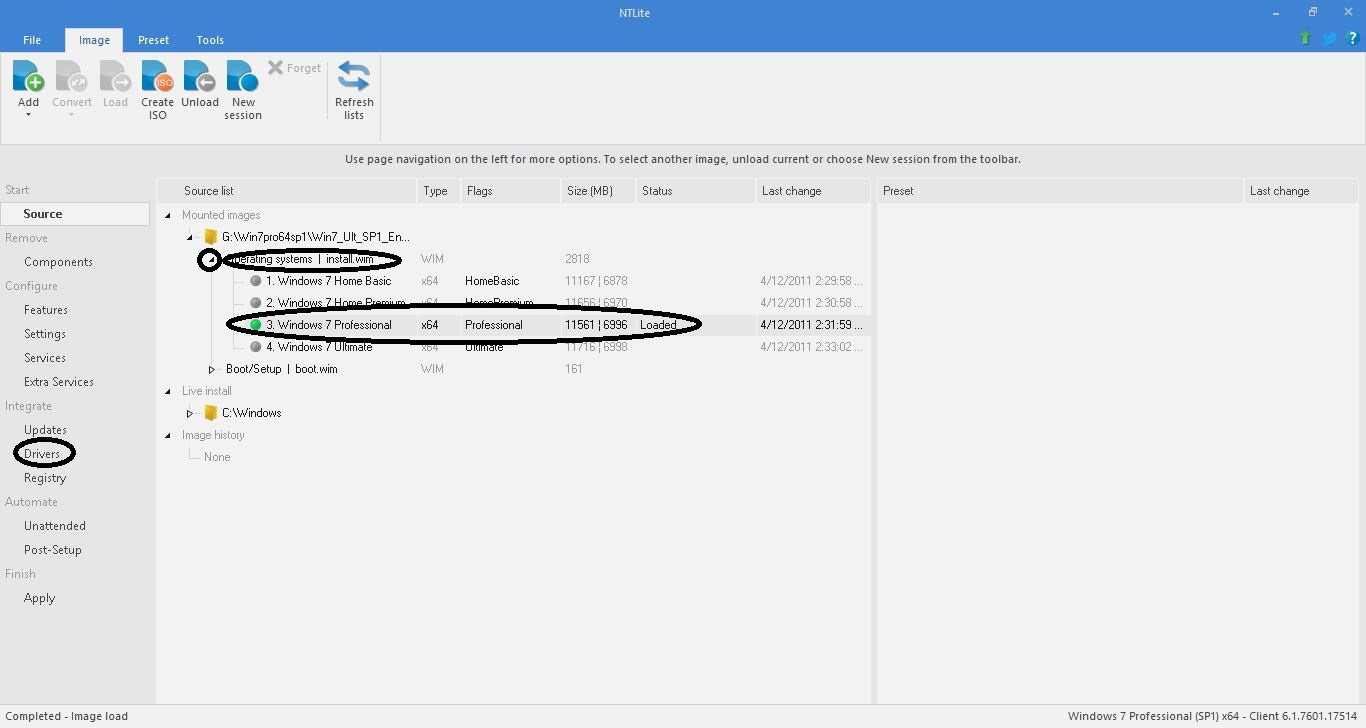
NTLite has an interesting feature : When a windows ISO is mounted & loaded into NTLite, It compares & tells about the missing drivers for that host pc in the loaded ISO. Besides, it can produce a hardware list for the host PC.

NTLite Drivers Window.JPG


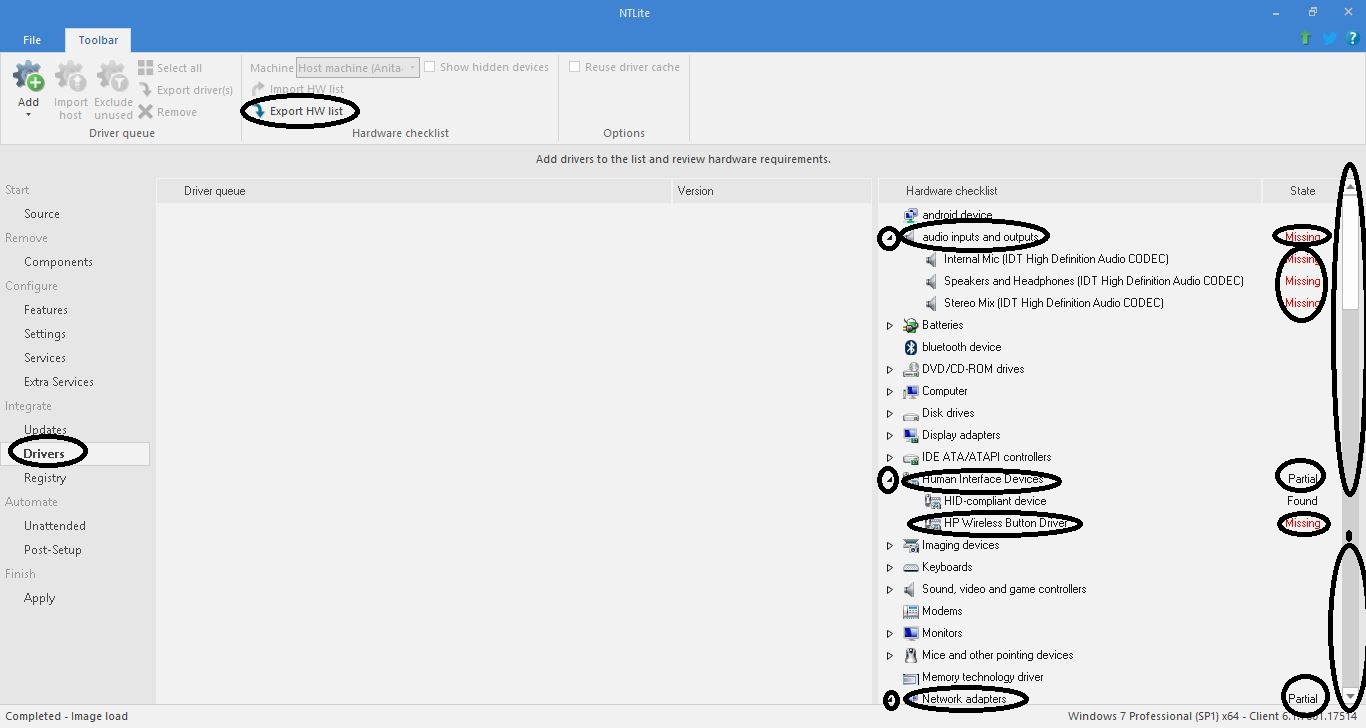
So, what I expect is that a person manually take note of the missing drivers / their classes from NTLite GUI & mention it here. And create & share the Exported Hardware List here.
Working with the two aspects & a little GOOGLE : DEVICE HUNT , we can easily mark out what are the missing basic drivers that need to be integrated into the ISO itself.( Though we will also get to know almost all of the missing drivers needed for / on the machine, we will focus on Integrating only basic drivers in the ISO, establish the minimum setup & then installing other drivers )

So, we are going to have some fun & get work done altogether!

There are basically two options to do so:

Have a Win 10 install on the Host machine, Install or Use Portable NTLite on it & load win 7 or 8 Images ( planned to be installed ). Its quite easy with prebuild systems because most newest machines are already coming with win 10 installed. But there is an issue where some drivers will be shown as missing & they are actually installed by some 3rd party apps like AV programs, Partition management programs Or serve to the personal interests of an user like virtual devices drivers.

The second way is to boot into a Win 10 PE/RE ISO with basic frame which has NTLite integrated into it & then load the planned ISO there. This is preferable because one need not install anything on the system or look for any drivers because win 10 is already very full. He has to just boot into the ISO, collect the information & come out. It will also rule out the possibilities of listing other drivers which are 3rd party or personal interests specific because its a minimum basic frame.

One can use my PE/RE!
OR
Make his own Win10XPE - Build Your Own Rescue Media
( Making own ISO would need to integrate NTLite on his own )

Preparations:

Get familiar with these two links :

(i) Integration Of Drivers Into A Win 7,8 or 10 ISO Image

(ii) Loading & Integrating Things Into Images With NTLite

( I expect that a person is able to load images into NTLite & Integrate drivers at least )

Preparations If you decide to go with my PE/RE :

Make These Downloads :

(i) HashMyFiles : ( To calculate Check Sums of my PE/RE)

HOME : https://www.nirsoft.net/utils/hash_my_files.html

Direct Download Links :

32bit : https://www.nirsoft.net/utils/hashmyfiles.zip

64bit : https://www.nirsoft.net/utils/hashmyfiles-x64.zip

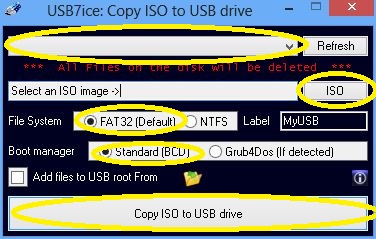
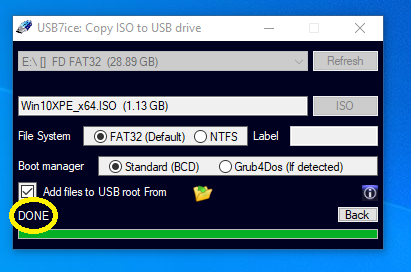
(ii) Usb7ice : ( Preparing USB bootable media with my PE/RE ) OR ImgBurn ( Preparing bootable DVD media with my PE/RE )

(a) Usb7ice :

HOME : http://theoven.org/index.php?topic=1996.0

Direct Download Link : http://theoven.org/index.php?PHPSESSID=7…6.0;attach=5129

( Can be extracted with 7 zip OR WinRAR )

OR

(b) ImgBurn :

Portable & Without Adware : SOFTPEDIA DOWNLOAD

(iii) My PE/RE based on Win 10 pro x64 ( 1903 release )

Download Link : My Win 10 Pro 64 PE / RE

INFO :

Filename : Win10XPE_x64.ISO

MD5 : bf04245c66a2ead734383e2640b50922

SHA1 : 7911a66d91b17216b286a044263d2a432eb8e4cc

CRC32 : 96d07d69

File Size : 1,749,288,960 KB ( APPROX.)

Extension : ISO

File Attributes : A

Thanks & Regards. …


[[[[

The Thread that can come helpful dealing with drivers : How To Extract Drivers From Different Types Of Driver Packages

Applicable to : Win 7, 8 & 10.

All Suggestions & Help is welcome!

I will complete / edit the thread according to the availability of time.

I will be able to help according to my resources. The primary objective would be to recognize & tell about the devices which require drivers. I request all friends to contribute to the cause.

]]]]

  1. To verify that my PE/RE is downloaded well, We would use HashMyFiles.

    (i) Extract the downloaded HashMyFiles zip.

    (ii) Execute / Launch HashMyFiles.exe. It will open a program window.

    (iii) Drop the downloaded ISO in the program window & let it complete the loading… Be Patient!

    (iv) Once it completes the loading, It will show the Check sums.

    (v) Now compare the calculated check sums with the ones I mentioned in the above post. If its identical, the download is all good.

    2. Preparing Boot Media

    (a) For preparing bootable Pen Drive, We will use Usb7ice :

    (i) Extract the downloaded 7z file.

    (ii) Execute / launch Usb7ice.exe

    (iii) Select Pen Drive > ISO > FAT32 ( Default ) > Standard ( BCD ) & finally click Copy ISO to USB drive ( Below Image )

Usb7ice.JPG


(iv) Let it complete the process… Be patient!

DONE.png


(b) For preparing bootable DVD, We will use ImgBurn.

(i) Execute the SOFTPEDIA download. It will extract the executable to a folder & make a portable ImgBurn with a desktop shortcut.

(ii) Launch the ImgBurn & write the ISO image to a DVD.

Take care to choose write speed not more than @ 2x

(iii) Let it complete the burning… Be Patient!

So,

The bootable media is ready!

This bootable media ( DVD & Pen Drive ) will boot in both UEFI & BIOS ( Legacy ) without any problem.

  1. Booting Into The PE/RE :

    We know the Bootable Media ( created above : Pen Drive or DVD ) is compatible with both UEFI & MBR configurations.

    Now we are going to boot into it.

    So,

    (i) Eject & Unplug all the external drives & media ( Pen drive, SD card & other USB drives, CD-DVD ) except the one.

    (ii) Restart the PC, keep pressing the One Time Boot Menu Function key & select the pen drive ( or DVD ) to boot from.

    (iii) Keep Patience! Somethings will load, some screens may change, some windows may open & close. Then in the boot, Network Configuration window will open. Let it close itself. We need not do anything here. Let the things & desktop be fully settled, stable & Calm.

    2. Working With NTLite :

    Useful Website : Loading ISO in NTLite

    (i) Launch NTLite > browse to the extracted ISO location ( ISO planned for installation : win 7 or 8) > click to Mount & Load the ISO.
    Be patient It will take long time!
    Look in the below image. The Windows 7 Pro is loaded.

NTLite windows load.JPG


(ii) Go to the Drivers section on Left Pane

(iii) Then manually note down all the Missing & Partial entries on the Right Pane. You may need to scroll to note down all the Missing & Partial entries.

NTLite Drivers Window.JPG


(iv) On the TOP menu, Click Export HW List & save it to a safe location.

(v) Click the Source section in the Left Pane. Unload & Unmount the loaded image. Be patient : It will take long time!
Look below image. Now everything is unloaded :

NTLite things unloaded.JPG


(vi) Now leave & close the NTLite app.

(vii) Now go to their locations & delete the Temp & NLTmpScratch folders.

(viii) Now you can shut down or restart your pc AND share the noted details & Export HW List file here!

NOTES : Keep some things in mind while using NTLite :

(i) When we are booted into the PE/RE, there are two drives / partitions listed in the Computer folder which stand / work for PE/RE. They are X: Boot & Y: (Pen drive or DVD)
Both are dedicated to the PE/RE & not to be touched / accessed anyway. Don’t copy, save or locate anything on them.

(ii) NTLite needs some 10 + 4 GB free space for Temporary Files & Scratching Space.
As soon as you try to Mount & Load an ISO in NTLite, it will prompt you & open the option window to change the location of Temp & NLTmpScratch folders.
Don’t get confused with the defined paths, the Image is for reference only:

[[File:NTLite Temp & NLTmpScratch settings window.JPG|none|fullsize]]

Place them in the root of the Fastest & Biggest partition on the system ( normally Internal Hard disk partition! ).
If you don’t have anything on the internal hard disk, no worry placing them. BUT
if you have an OS already installed on the internal hard disk, be careful that those folders are not located / placed on Recovery Partition(s)

(iii) To avoid any problems : Before leaving NTLite, Unload & Unmount the image.

(iv) After closing NTLite, Delete the Temp & NLTmpScratch folders.

That’s it!

Let me know,

Thanks & Regards. …

NTLite Temp & NLTmpScratch settings window.JPG

Reserved For Future.