EVGA quietly slipped out a new BIOS just over a month ago and I only just noticed today so here is the latest BIOS v1.18 unlocked (changes from previous mod in bold);
• Improves boot time for legacy M.2 NVMe devices when enabling Resizable BAR support
• Above 4G Memory Assignment has been added by EVGA - thank you!
• Resizable BAR Support has been added by EVGA - thank you!
• CPU Type, Signature (CPUID), Stepping & µcode displayed on ‘Overclock’ page at the bottom
• Memory Training Algorithm for Round Trip Latency enabled
• Memory ‘RTL-IOL Configuration’ menu unlocked (read only)
• Advanced ‘Power & Performance’ menu unlocked
• Advanced ‘OverClocking Performance Menu’ unlocked
• Advanced ‘System Agent (SA) Configuration’ menu unlocked
• Advanced ‘PCH-IO Configuration’ menu unlocked
• HPET unlocked
• Speedshift enabled by default
• XTU Interface enabled (shows ‘Memory’ tuning option in Intel XTU)
• XTU ‘Real Time Memory’ timing unlocked in XTU (shows Secondary and Tertiary RAM timings - read only)
• PL4 limit increased to maximum 1023999
• IRST Premium & OPTANE enabled by default & set to UEFI mode
• Restore AC Power Loss set to off by default
• VBIOS updated to 1062 (VBT 209)
• GOP updated to 1112 (VBT 228)
• RAID OROM updated to 18.35.0.4635
• EFI RAID module updated to 18.31.51.5346
• ME Firmware updated to 11.8.86.3909
• 906EA µcode downgraded to 70
• 906EB µcode downgraded to 72
• 906EC µcode downgraded to 84
• 906ED µcode downgraded to AA
1E379118_mod1.zip
[Edit] Note that this BIOS has earliest Coffee Lake microcodes to avoid performance penalties, if you want the latest microcodes for added security you can use UBU to update all of them at the same time.
@OneShot has just pointed me to BIOS 1.19 so here we have BIOS v1.19 unlocked (changes from previous mod in bold);
• Improves boot time for legacy M.2 NVMe devices when enabling Resizable BAR support
• Above 4G Memory Assignment has been added by EVGA - thank you!
• Resizable BAR Support has been added by EVGA - thank you!
• CPU Type, Signature (CPUID), Stepping & µcode displayed on ‘Overclock’ page at the bottom
• Memory Training Algorithm for Round Trip Latency enabled
• Memory ‘RTL-IOL Configuration’ menu unlocked (read only)
• Advanced ‘Power & Performance’ menu unlocked
• Advanced ‘OverClocking Performance Menu’ unlocked
• Advanced ‘System Agent (SA) Configuration’ menu unlocked
• Advanced ‘PCH-IO Configuration’ menu unlocked
• HPET unlocked
• Speedshift enabled by default
• XTU Interface enabled (shows ‘Memory’ tuning option in Intel XTU)
• XTU ‘Real Time Memory’ timing unlocked in XTU (shows Secondary and Tertiary RAM timings - read only)
• PL4 limit increased to maximum 1023999
• IRST Premium & OPTANE enabled by default & set to UEFI mode
• Restore AC Power Loss set to off by default
• VBIOS updated to 1062 (VBT 209)
• GOP updated to 1112 (VBT 228)
• RAID OROM updated to 18.35.0.4635
• EFI RAID module updated to 18.31.51.5346
• ME Firmware updated to 11.8.90.3987
• 906EA µcode downgraded to 70
• 906EB µcode downgraded to 72
• 906EC µcode downgraded to 84
• 906ED µcode downgraded to AA
1E379119_mod1.zip
WARNING: The user OneShot and myself have come across BIOS setting bugs (such as PL3 menu not accessible and freezing the PC) when applying a saved BIOS profile from an earlier BIOS. Therefore it is highly recommended to re-create your profile(s) manually if you experience a BIOS bug.
[Edit] Note that this BIOS has earliest Coffee Lake microcodes to avoid performance penalties, if you want the latest microcodes for added security you can use UBU to update all of them at the same time.
You’re the best. Thank you for continuing to post these new unlocked BIOS updates.
@enthusiastdre You’re welcome my friend
Dear owners of this miracle motherboard, do not forget if you install this bios with lowered microcodes, delete or rename this file "mcupdate_genuineintel.dll" after each major update or otherwise your windows install a more recent software microcode. I think this is a hint or a link to it should be added to every update message, as if this manipulation is not done, lowering the microcode is useless.
Thanks to @chinobino for the support, updates and tips on setting up the board.
Intel have released another firmware update (1.78.4.0.4) for the Coffee Lake LS-PCON (MegaChips MCDP2800BC) found in the 8th Gen NUC (NUC8i3BE, NUC8i5BE, NUC8i7BE) which is also compatible with the Z370 Classified K.
nuc8ixbe-hdmi-fw-update-version 1.78.4.0.4.zip
Mirror;
nuc8ixbe-hdmi-fw-update-version 1.78.4.0.4.zip
Before attempting the update please read the update instructions and follow them precisely (the pdf is also in the zip above if this link dies);
nuc8ixbe-hdmi-fw-update-guide-version 1.78.4.0.4.pdf
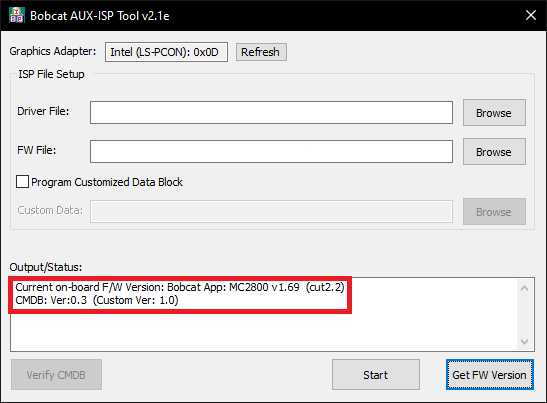
Most boards come with firmware 1.69 from the factory;

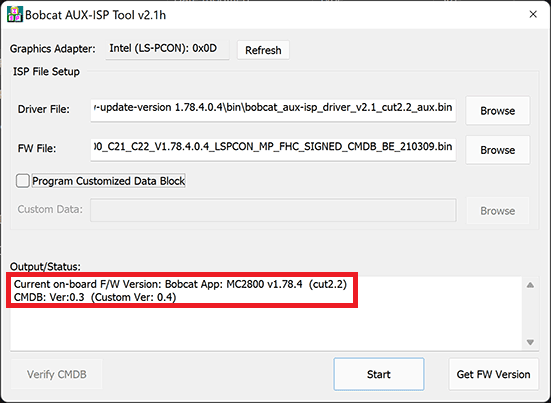
But can be updated to 1.78.404;

Notes:
- This only effects the onboard Intel iGPU HDMI 2.0a port so if you don’t use it you don’t need to update it.
- To run the firmware update tool (BobcatAuxISPTool) you must have a HDMI 2.0 monitor/TV plugged into the onboard HDMI 2.0 port so that the LS-PCON chip is activated.
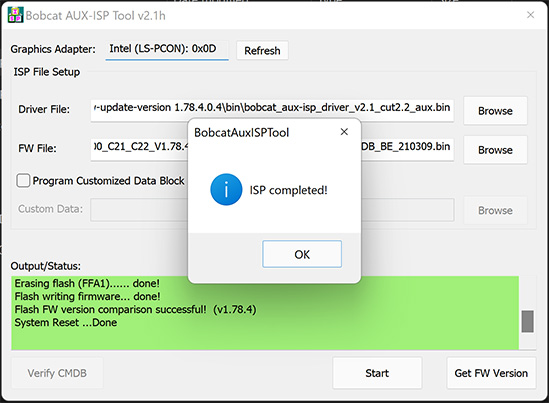
- The screen may go blank while updating DO NOT RESET THE PC wait until the update has finished!

Zitat von chinobino im Beitrag #106
Intel have released another firmware update (1.78.4.0.4) for the Coffee Lake LS-PCON (MegaChips MCDP2800BC) found in the 8th Gen NUC (NUC8i3BE, NUC8i5BE, NUC8i7BE) which is also compatible with the Z370 Classified K.
nuc8ixbe-hdmi-fw-update-version 1.78.4.0.4.zip
Mirror;
nuc8ixbe-hdmi-fw-update-version 1.78.4.0.4.zip
Before attempting the update please read the update instructions and follow them precisely (the pdf is also in the zip above if this link dies);
nuc8ixbe-hdmi-fw-update-guide-version 1.78.4.0.4.pdf
Most boards come with firmware 1.69 from the factory;
But can be updated to 1.78.404;
Notes:
This only effects the onboard Intel iGPU HDMI 2.0a port so if you don’t use it you don’t need to update it.
To run the firmware update tool (BobcatAuxISPTool) you must have a HDMI 2.0 monitor/TV plugged into the onboard HDMI 2.0 port so that the LS-PCON chip is activated.
The screen may go blank while updating DO NOT RESET THE PC wait until the update has finished!
Thank you so much for brining this to light, ive been having this exact issue for months now. Its very annoying and the only fix was to shudown and restart my PC.
Hi @fbmbirds , it’s good to know that I have helped someone with an extremely annoying issue that has not been well publicised 
I take it the issue is now resolved for you?
Ive been testing out my PC for the last couple of days and I can say for sure the issue has been resolved. Thanks again for this.
@fbmbirds That’s great to hear, thanks for reporting back that it’s fixed the issue.
This is amazing. I thought it was my display / Windows installation this whole time. I had tried everything to to fix this. Thank you for posting this.
Another update for 1.19 - this time it is only an ME Firmware update for security (changes from previous modified BIOS in bold and underlined);
• Improves boot time for legacy M.2 NVMe devices when enabling Resizable BAR support
• Above 4G Memory Assignment has been added by EVGA - thank you!
• Resizable BAR Support has been added by EVGA - thank you!
• CPU Type, Signature (CPUID), Stepping & µcode displayed on ‘Overclock’ page at the bottom
• Memory Training Algorithm for Round Trip Latency enabled
• Memory ‘RTL-IOL Configuration’ menu unlocked (read only)
• Advanced ‘Power & Performance’ menu unlocked
• Advanced ‘OverClocking Performance Menu’ unlocked
• Advanced ‘System Agent (SA) Configuration’ menu unlocked
• Advanced ‘PCH-IO Configuration’ menu unlocked
• HPET unlocked
• Speedshift enabled by default
• XTU Interface enabled (shows ‘Memory’ tuning option in Intel XTU)
• XTU ‘Real Time Memory’ timing unlocked in XTU (shows Secondary and Tertiary RAM timings - read only)
• PL4 limit increased to maximum 1023999
• IRST Premium & OPTANE enabled by default & set to UEFI mode
• Restore AC Power Loss set to off by default
• VBIOS updated to 1062 (VBT 209)
• GOP updated to 1112 (VBT 228)
• RAID OROM updated to 18.35.0.4635
• EFI RAID module updated to 18.31.51.5346
• ME Firmware updated to 11.8.94.4494
• 906EA µcode downgraded to 70
• 906EB µcode downgraded to 72
• 906EC µcode downgraded to 84
• 906ED µcode downgraded to AA
I have uploaded the modified BIOS to Mega rather than my usual host, let me know if you can’t access Mega:
WARNING #1: As Windows 11 forces you to have TPM enabled you may encounter issues with ‘Windows Hello’ (PIN & biometrics login when using a Microsoft Account) after flashing BIOS.
WARNING #2: If you are using bitlocker ensure you save your recovery key somewhere safe before flashing BIOS.
If you need further details about these issues read below:
Spoiler (click to reveal text)
On the EVGA Z370 Classified K the TPM device in Windows 11 is managed by Intel ME (Management Engine).
The TPM module effects ‘Windows Hello’ (logging in with a PIN or biometrics).
Flashing the BIOS or changing the BIOS chip that you boot from on the EVGA Classified K can cause the TPM device to fail to function properly, making you unable to login to Windows via your Microsoft account when using ‘Windows Hello’.
You will likely need to reset your PIN to log-in to Windows after a BIOS flash and also repair your TPM configuration.
If you use Windows Defender it may give you this warning when you login, “There is no TPM available. Please check your BIOS settings”
You can check the status of your TPM device in Windows 11 by typing tpm.msc to load the Management Console.
Under normal operation it should read “The TPM is ready for use”.
If you open the TPM console and it says “Compatible TPM cannot be found” you should check in Control Panel > Device Manager > Security Devices to see if the TPM device is either not present or has a yellow bang with a code 10 error.
If the TPM device is showing an error, right-click and uninstall the device then reboot and enter the BIOS and if there is no TPM device reboot and enter the BIOS.
In the BIOS go to Advanced > Trusted Computing and disable the security device, then hit F10 to save and reset and re-enter BIOS.
This time go to Advanced > Trusted Computing and enable the security device, hit F10 to save and reset and then boot into Windows.
The TPM device should now be working normally, check the status in the tpm.msc management console, it should say “The TPM is ready for use”.
You can now set a new PIN.
TPM FAQ
- Will clearing the TPM make BitLocker encrypted data unavailable?
Only if you don’t have the BitLocker recovery key.
If you clear the TPM, the encrypted drive will only be accessible using the recovery key.
- Is it safe to clear the TPM to reset the counter of wrong PIN attempts?
It should be ok to clear the TPM chip.
Afterwards, reboot and enter the recovery key.
@chinobino You the real MVP. 2023 and you’re still providing modded BIOSes for this board. Thank you.
WOW, thanks.
Also, my attempts to fight, TMP may disappear from the bios altogether if your memory is overclocked more than necessary, I do not know why, but with DRAM 3800, TMP disappeared from the bios after a reboot, so I had to set 3733, I am on the official firmware 1.14 as it seems to me in games there are fewer freezes on it, also you you can flash 1.12, but your 9xxxx processor will be like an engineering one, but as I remember, it has the least friezes and a large fps, note some sensors may not show the temperature.
Regarding Sound Blaster Recon3d on Windows 11, the audio driver works, but the effects of SBX pro Studio disappear, I do not know how to cure it, remember this, they are enabled, but if you restart the computer, the effects are disabled, only disabling and enabling helps.
This comment applies both to modified firmware and to official ones. I’ve tried all the firmware, both official and modified, it’s not windows’ fault, it’s poor support from the manufacturer in terms of audio and bios software
a couple of offtopic moments.
Nice to see @chinobino become a moderator. I like talking with you. you helped me a lot
@Lost_N_BIOS the kindest person who is always ready to help. you helped me a lot
@OneShot Good to hear from you again and thank you for the kind words.
The TPM problems and SoundBlaster control panel issues are annyoing but I have learned to live with them.
I don’t flash BIOS very often so the TPM issue is rare and like you I just re-enable the SBX Studio Profile after each reboot.
@chinobino
I didn’t put up with it and returned to windows 10 everything works there, as an option you can use the “SCOUT MODE” hotkeys enabling and disabling helps to enable “SBX Pro Studio” effects so that you don’t climb into the program every time.
Perhaps someone smarter can modify this driver so that the effects of “SBX Pro Studio” work fine…But I didn’t find a way.
@OneShot Nice trick! I will use that from now on.
I started using the mod again, it’s awesome
@OneShot Hey buddy, looks like we are both still using it in 2024!
Hello, is this bios compatible with Coffee Lake Xeons, or will this particular bios needs more modification for Coffee Lake Xeons? I can buy an E-2176G cpu for $70 usd, but I read, unless a Z370 bios is modified, E-2176G cpu can only be used with c236 motherboard, or z170/z270 modified bios. Thanks.


