[Problem] Bricked ACER PREDATOR HELIOS 300 PH317-52 BIOS

Sorry, didn’t read all of the text you wrote- it’s simply too much, so unclear what you did to brick your machine.

Download the bios version you had on your machine, use UEFIToolNE for structure. If there are several versions: The differences are often in bios region, unpack files and firmware images from fd- files and compare to your dump.
Ideally one version should have identical static parts to you bios region. Check for differences with an hex editor, serials, win code, other machine specific data are easily recognizable.

For your dump: The static parts of bios region are 100% identical to stock, so the two other possibilities are NVRAM and ME region.

haha sorry, I was detailed in order for people to understand exactly what i did (the encapsulated walltext between the “TLDR” tags is not nessesary to read for the subject at hand just provides a background story of the symptoms and what I tried to troubleshoot)

But apparently it didnt help but confuse so this is where I am at

I dont know which exactly is the vannyla bios (from Acer) that will work for me since their .exe has two images

fastupload. io/82b28d97e654aabc (Has more differences and first difference starts in line 00000100, but a user having an identical motherboard up to the revision letter said this worked for him, could the many differences be due to my bios being corrupted? )

fastupload. io/7860da34a7d9c602 (Has differences but I think at least 50% less differences and the first difference starts at line 00000140)

(comparisons have been made with my bin that I extracted and linked above but here is the link again: fastupload. io/00319b4e4a44049f)

So problem 1: which bios should I pick from the two to flash on my mobo? :stuck_out_tongue:

Problem 2: Can you elaborate a lil more cause I never edited bios roms in my life, what do you mean “use UEFIToolNE for structure”? Like I opened the bin with it but I dont see any structure options only the option to dump a report txt file (of my bios read with the ch341a) which I already uploaded in my first post ( fastupload. io/4c6279554943c43b )

Also you say “serials,win code, other machine specific data are easily recognized” but all seem like hex “20 00 FF FF FF FF FF FF FF FF FF FF FF FF F5 5C 58 12 21 42 60 AD B7 B9 C4 C7 FF FF FF FF 00 00 00 00 00 06 FF” spaghetti to me… I only know that FF probably means “blank area” :stuck_out_tongue:

Could you elaborate a lil more maybe there are strings of hex that serve as identifiers for a field e.g for “serial number” or maybe you can link me with a good tutorial on this? Thanks.

as for what you said in the last line where are those NVRAM and ME regions at? :stuck_out_tongue:

I really need a lil more dumbed down version of your reply cause it’s my first time :stuck_out_tongue:

Thanks a lot for your effort and time I really apreciate it and I am sorry that I didnt get what you try to say.

There’s quite a lot of structure visible in UEFIToolNE?

You don’t start in the beginning since the ME region get’s very early initialized (changes state in MEA from configured to initialized). ME configuration you’d read with FIT from Intel CSME tools, if necessary.

So you normally compare the bios region from the end of the firmware since changes are only supposed to be in NVRAM and in padding areas. If NVRAM isn’t first volume you check bios region from its start, too (here 0x600000).

Ok so let me get this straight in your screenshot you have selected the “bios region” tree header thingy (marked in blue).

On the information section (top right) of the screen shot it says “offset 600000h”

So I should go to my hex editor where I compare my bios dump vs acer’s bios I just downloaded turn the offset to hex (h) and go to area 600000 to check and compare the same region market in the UEFIToolNE in your screenshot?

So something like this?

and scroll down till I find a difference? and then what?

Correct understood, but missing one step:

The fd files contain the firmware images, but they have other stuff in the end and beginning…

Like this post, last 2 pics as example (not your firmware).

And for the beginning just compare from the end of the firmware/ bios region, it’s easier!

Ok I wrote the bios back and the laptop worked!!!
Kinda…

I have screen, keyboard and keyboard backlight works
mousepad works
USB ports work
the laptop posts and i am able to boot to a windows installation USB

but the installation doesnt see non of the disks ! (1 nvme ssd and one HDD)

diskpart also doesnt see them

In sata ports in the bios are enabled but bios also doesnt see the disks…

Nothing changes if I set the sata to ACHI or RST with optane mode…

the rest seem to work fine bios sees my CPU, me 32GM ram etc

Should I transfer some code from the old bios so that the disks work?

Which one did you flash- DH53F_1A of DH53F_10?

(Didn’t I write to flash a unchagend firmware?)

DH53F_10

Since I wasn’t sure what to do (also there wasnt much to check from my bricked bios file in UEFItool most VSSstore entries were labeled as “invalid”) I decided to yolo it and I googled online and found this forum topic where someone with the exact same motherboard as mine (even the same revision) asked for bios. (I tried after this DH53F_1A but with that the laptop doesnt even post)

https://www.badcaps.net/forum/troubleshooting-hardware-devices-and-electronics-theory/troubleshooting-laptops-tablets-and-mobile-devices/bios-requests-only/71253-acer-predator-ph317-52-dh53f-la-f991p-rev-1-c-bios

from SMDFlea’s reply in that thread.

Everything works fine, hdmi, USB, sound, I run a live Ubuntu usb, the Nvidia GPU drivers work I played games, video works, WiFi, bluetooth, webcam, multiple finger gestures on mouse pad etc all as it should EXCEPT that it doesn’t see the harddrives (not just in diskpart but also in bios… )

I also made a bootable windows on USB (usng a program called wintousb) and I also run windows from the usb stick without any issue with sound wifi video etc

I did that in hopes to download the bios exe from ACER but it wont patch since it seems that I already have the latest version… :frowning:

the Nvme and hdd themselves are fine if I plug them as external USB devices they work fine.

Funny enough it’s DH53F_1A which is in your own dump (4th_Read.bin). And ME config is different which explains why you’re missing some disks. Normally the 1A stock should work if properly flashed (check with a separate read!)

1a.zip (5.4 MB)

Dear friend thank you for your patience, but I dont know what to check :stuck_out_tongue: :cry:

Do you think that the bios in 1a.zip you uploaded will work?

if not what should I do to it?

EDIT: I just tried your 1a bios and it boot loops without posting or screen… maybe if you did the same ME stuff or whatever you did/copied but pasting it on the dh53f_10 I linked above (cause it otherwise works just fine ) ?

Also I tried a few others “ready to use” bioses that worked for other ppl with same laptop but those, didn’t work for me either.

I noticed thou that some came with an EC rom along with the bios rom in the rar file, there is an identical dh53f_10 to “mine” that also has in the same folder it came with an EC rom, you think this rom could be the culprit for hard drives to work ? If yes do you know where that EC chip is ?

Both ME region and bios region point to DH53F_1A. That bios region got updated to a wrong version seems not pplausible since ME is an rather old version that hasn’t been updated a long time (or never).

So if the system starts with disks not addressed with DH53F1A it might be that there’s an error with the disks and the other firmware works just since it doesn’t adress them.

I’d recommend flashing DH53F_1A (or my 1a.rom, it’s a stock bios with machine specific data preserved) again (it might need some restarts to boot up fully), and remove both harddisk and NVMe disk before trying to restart.

Well I don’t know what to say to you … maybe the issues started cause grub (back when I installed Linux on the machine ) mismatched something on the UEFI bios?

Or maybe the guy (from the forum mentioned above) I took the DH53F_10 which works for me just mishmatched the file name and its actually a DH53F_1A binary ?

All I know is that NONE of the DH53F_1A bios I found online (or the one you uploaded here as 1a.zip) don’t even boot like I press the power button and nothing happens ( yours spins the fans for a little bit opens the red light on the keyboard but no monitor light or signal no screen in general and it power loops for an eternity I left it for 15 minutes nothing changed it just reboots on its own spinning the fans for a few seconds after each boot and CPU cooler doesn’t get hot or even noticably warm even when fans are not working )

As of now only the DH53F_10 works perfectly

So this one in particular

it boots all the other IO works it runs operating systems just fine I run both Ubuntu latest version and win 10 pro from a USB stick and surfed the web played steam games watched videos etc without any crash

BUT and that’s a big but :yum: it can not see my nvme or my HDD in bios or in Windows obviously (like disk part or the special program it has for drives or in device manager ) but the drives themselves are good and I tested them by placing them in a USB drive enclosure and connecting them to this very laptop and read and wrote files on them and checked their health and everything is fine (I also tried to change from MBR to gpt etc of the nvme while on a usb enclosure but later when I plugged it on the m.2 port inside the laptop nothing it still didn’t get recognized by the bios not just as a boot device but on system info all SATA ports seem empty )

The DH53F_10 BIOS.BIN you linked is identical to the file one can extract from the latest bios update.

One of the main differences between DH53F_10 and DH53F_1A is a different SATA / RST config- see the differences:

These are the only differences between both firmware types in FD and ME.

Your bios (if the 4th_Read.bin is really a dump of your machine) is congruent with DH53F_1A both in bios region and ME configuration.

So for me this smells hardware since the board layout doesn’t change over night.

As far as I understand your last post correctly you didn’t try a DH53F_1A firmware without NVMe disk and SATA disk attached (the error is probably on the board, not in the disks). It might have been interesting if the machine would boot without load on these PCH PCIe lanes.

Since you probably won’t trust my conclusion pretending that DH53F_10 works ‘almost perfectly (but without disks)’ you might try the DH53F_1A FD and ME region (the first 0x600000) - that way getting RST / SATA ports properly configured - with a DH53F_10 bios region (the last 0xA00000).
The result should be pretty much the same as with a ‘pure’ DH53F_1A, since first hardware initialization done during ME boot will stop at the same point whatever bios region is following

I’m out of this at this point.

Good luck!

Noone said that I dont trust you, otherwise I wouldnt even patch the 1a.bin file, (and yes 4th_read allong with 1st,2nd…up to 6th are all my bios reads using AsProgrammer with ch341a pro usb and a 8 pin clip and all files seem identical with each other compared to HxD editor and fc.exe in windos cmd)

It’s just that maybe something happened during the period of dual boot windows/linux (which is when my system was 24/7 stable but if shutdown and boot again I had to endure some restarts like as if the mobo was training ram again, btw I bought new ram recently and run the computer with that now) or during the last big windows update a years or so back (that’s when the PC died and looped forever)

Having that said later today I will try to load the 1A.zip bios you uploaded without any Nvme or SSD attached lets hope it doesnt boot :stuck_out_tongue: cause otherwise it means I have to run windows using an external nvme usb type C enclosure 24/7 :frowning:

If that is the case are sata controllers like seperate small chips on the board kinda easy to unsolder and replace or would I have to change the entire northbridge die with its thousand little balls to see if I can make them work again?

Please wait a moment with flashing something!

I’m sorry, I didn’t recognize a single bit error in your dump and kept it into 1.rom since I used your dump and just put in a stock ME region and stock NVRAM volume!

1E 0001 1110
1A 0001 1010

Should have recognized it since it since the difference is visible in UEFIToolNE when you expand the volume enough:

This is enough to explain a brick, but flashing a stock bios 1A should definitely make the machine boot!

Otherwise the boot loop with my first try fits OK with an error in bios region, and it was different behaviour compared to when you had flashed stock bios 1A?

Please try this firmware:

2a.zip (5.4 MB)

Ο-Μ-G I tip my fedora to you sir when I grow up I want to be like you !! :smiley:

Thanks m8 you saved my laptops life and saved me from a lot of trouble since i didnt have any alternative other to revive it, you are the real mvp :')

How you found that one byte difference in this spagheti code wall beats me…
But I want to get more into this bios moding thing :stuck_out_tongue:

Do you have to recomend any good book or tutorials or manuals or whatever that will enlighten me and make me one day be near as good as you are? :slight_smile:

Speaking of moding, and I know I ask for too much but hope is the last to die :stuck_out_tongue: , when I was troubleshooting I bought a 3200 MT XMP ramkit to check if the ram died or can not pass the “trainning” phase (and that was maybe why it bootlooped I thought)

But it runs at 2666 I wonder since you seem you know what you are doing if you could unlock the OC settings of the bios I have seen screenshots of people with acer predator helios 300 laptops to have them unlocked so there should be there in the bios already but hidden.

Here is my bios in the current state (enabled some things but mostly windows did a firmware update and some others so maybe moding this particular one is better for a seemless reflashing on my side? you know better either use that or your previous 2A file :slight_smile: if you wont bother doesnt matter thanks again :slight_smile: )

But even if you dont I owe one sir, thanks again for your patiens and time you are really a good person nobody else cared besides you I hope you will get your goodness back 10 fold :slight_smile:

Thanks for the feedback, good to hear that it worked :+1:

I’m sorry, I don’t have much (any) knowledge of the modding part, maybe someone else did it already for a comparable model, you might search the forum or post a request for modding.

Your new dump is a fine backup, but there’s no newer firmware in it, the ME changed from configured to initialized and the NVRAM got populated again, that are the only differences and they’re expected.

Well on windows update it downloaded something called synde firmware or something like that and I thought I passed over the name “synde” or something similar while googling on details about my bios etc.

Anyway I am afraid I need to burden you a lil longer if you find free time and are able to help then you are more than welcome to do so :slight_smile:

So I looked a little bit into how to unlock the OC options and found this:

OneOf Prompt: "Overclocking Lock", Help: "Enable/Disable Overclocking Lock (BIT 20) in FLEX_RATIO(194) MSR ", QuestionFlags: 0x10, QuestionId: 0x167, VarStoreId: 0x3, VarOffset: 0xDA, Flags: 0x10, Size: 8, Min: 0x0, Max: 0x1, Step: 0x0
			OneOfOption Option: "Disabled" Value: 0, Default, MfgDefault
			OneOfOption Option: "Enabled" Value: 1
		End 
	End 

Which is located in this partof my bios

Bios region> EfiFirrmwareFileSystemGuid>1FD0BACE-6F0A-4085-901E-F6210385CB6F>Volume image section>EfiFirmwareFileSystem2Guid>SetupUtility/PE32 image section at header-offset 55CA2h

And I think it shows the “coordinates” of the flag to enable the Overclocking in my bios but I cant figure out where it points… since you are a master in binary spaghetti I wonder if you know which bit to change given the above info :smiley:

Yep, finding all the hidden bios options this way is well known, one might (re-) program the corresponding store in NVRAM, but there’s lots of connections/ connected values and conditions, I used it once to push SATA 3 mode on an Ivy Bridge laptop, but that’s som years ago- sorry!

Ok I figured out how to do it (some steps that I will designate with an asterisk may not be needed I just did them none the less cause I wasn’t sure if they needed to be done and wanted to lean towards the side of caution -which is risking my bios by adding complexity but didn’t care cause I had a back up of the working bios thanks to you :smiley: )

I am going to share my steps in case somebody needs to do the same since there is no unlocked bios for my particular predator variant as far as I checked online.

Having that said the following steps should be applicable to many other bioses/laptops out there if not all (obviously the hex values/id/flags could be different but the steps should be more or less the same)

So first of all I will quickly recoup.

I used the UEFItool found here Releases · LongSoft/UEFITool · GitHub (not the UEFIfind zip nor the UEFIextract zip you need to expand the list and find the zip labeled as UEFItool)

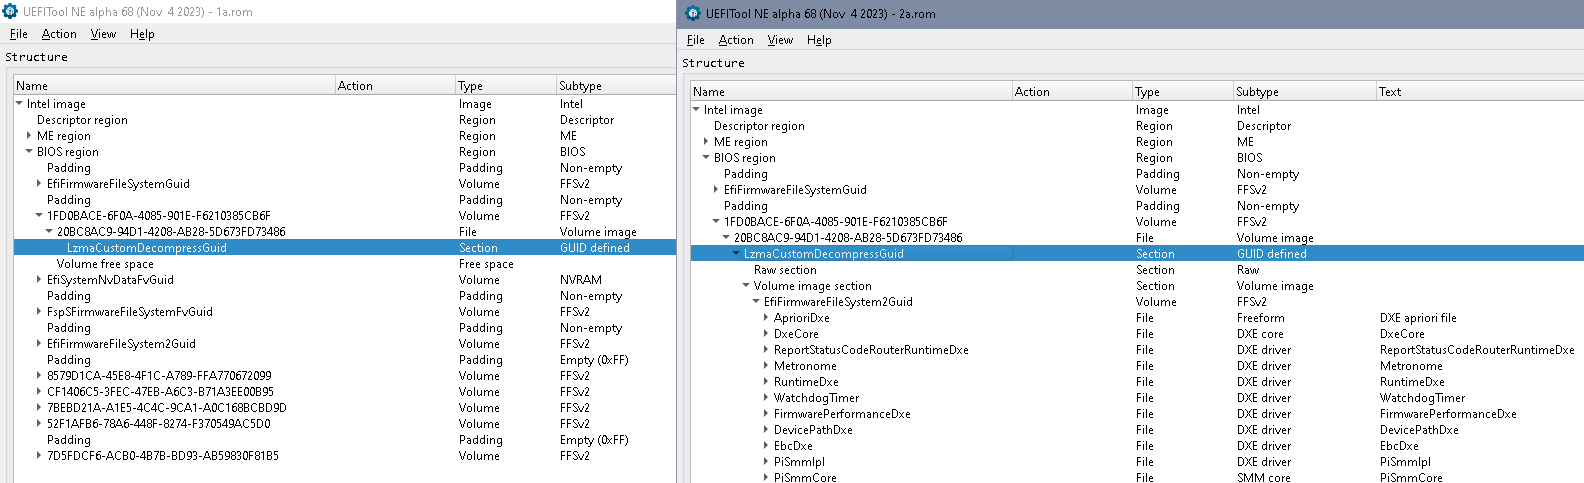
Step 1: I opened the UEFItool.exe and loaded my bios binary

Step 2: I searched (CTRL+F) for a string (don’t forget in the search dialogue to click on the “Text” format tab) namely this one “Overclocking Lock”

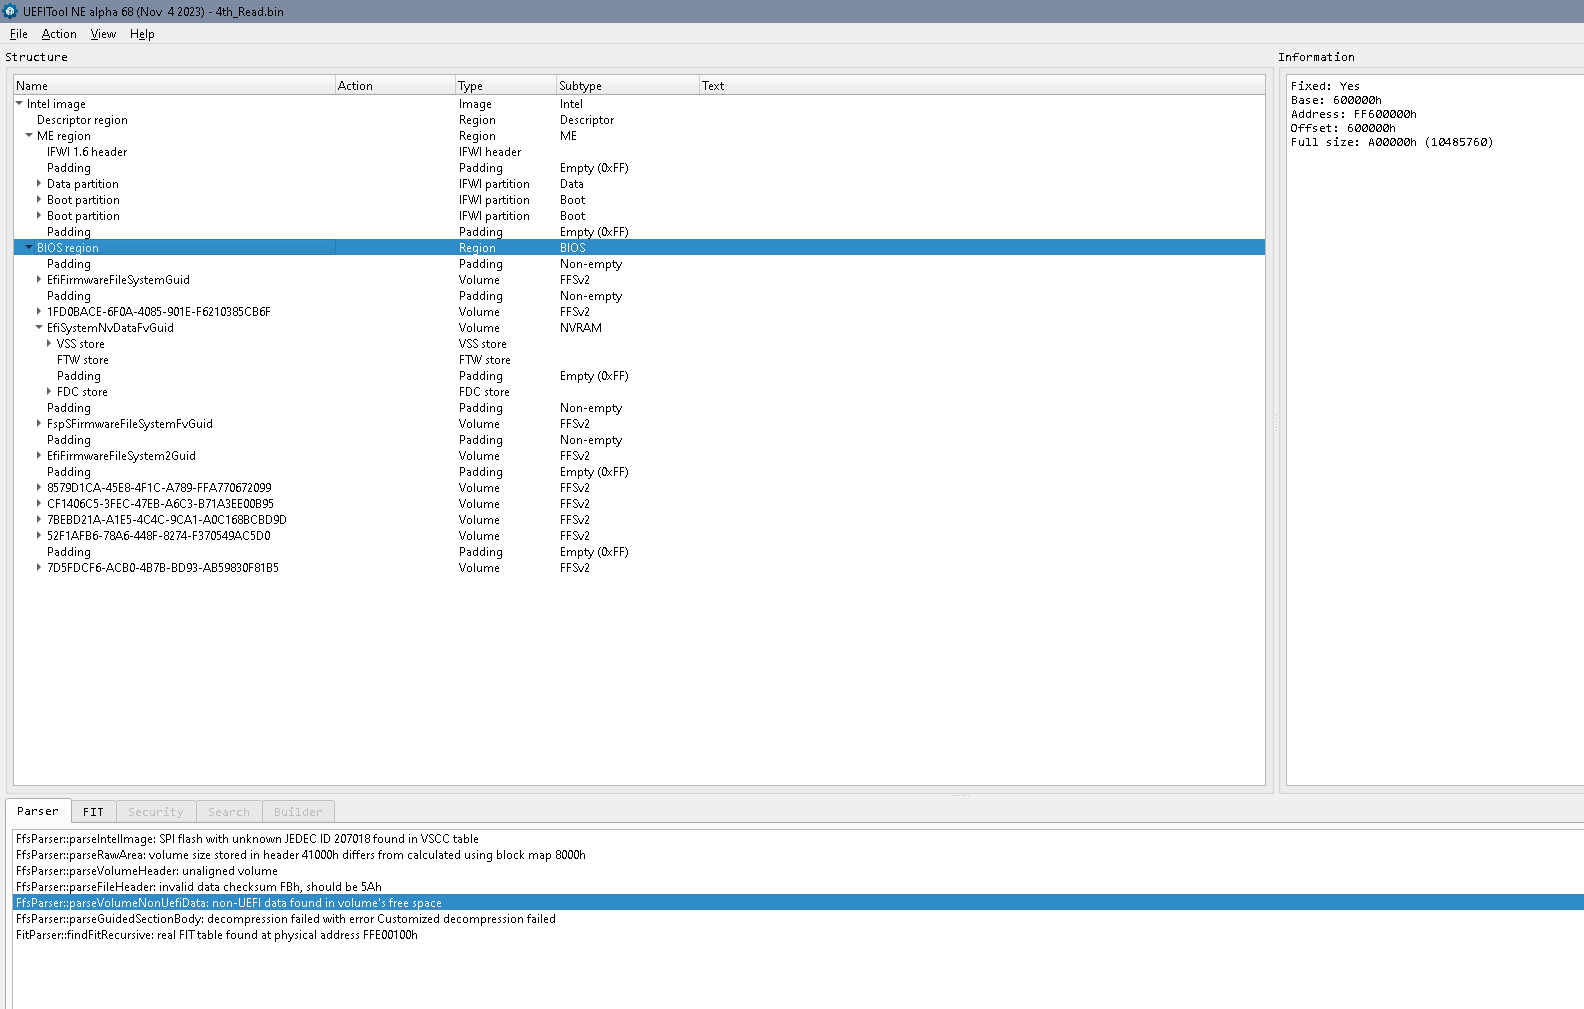
Step 3: Two results appeared in my case (and in my case they both lead to the same place but you should try all the results if you cant proceed to the steps that follow) I double clicked the first one and it pointed me to SetupUtility/PE32 in the Bios region (more on that here )

Step 4: I right clicked on PE32 and clicked on “extract as is” I saved the file in a directory I wont forget cause I will need it soon and also saved it as a .bin file eg “1.bin” .

Step 5: In order to make all that binary spaghetti code I just extracted a little more intelligible I needed a tool called IFR extractor which you can find here: Releases · LongSoft/IFRExtractor-RS · GitHub

Step 6: I extracted the executable in the same directory I extracted that PE32 bin file (need to extract there for convenience)

Step 7: then opened cmd as an administrator (probably not necessary ) and run the command ifrextractor.exe 1.bin

Step 8: the result was a lot of txt files but I focused on the ones that had big file sizes (cause probably they had bunch of text) and it so happened that the first big size text file had what we are looking for.

Step 9: I searched again within that txt file for the string “Overclocking Lock” I already know it’s here (cause of Steps 3&4) but what I want to get is the VarStoreId so that I can find the store name it belongs to, in my case the VarStoreId is 0x3 (as you can see in the post above) .

Step 10: Now that I know the store id, I search for a sentence in that text file that associates the VarStoreId with a varstore name and I found it by blindly looking for all the sentences containing the string "VarStoreId is 0x3 " but it so happens for all the store GUIDs to be listed on the very beginning of the text file :stuck_out_tongue:

The list looks like that (I will include only 3 members of the list as a reference)


VarStore Guid: 5432122D-D034-49D2-A6DE-65A829EB4C74, VarStoreId: 0x4, Size: 0x2B, Name: “MeSetup”
VarStore Guid: B08F97FF-E6E8-4193-A997-5E9E9B0ADB32, VarStoreId: 0x3, Size: 0x236, Name: “CpuSetup
VarStore Guid: 4570B7F1-ADE8-4943-8DC3-406472842384, VarStoreId: 0x5, Size: 0x6DA, Name: “PchSetup”

Step 11: So I know the store name but I also need to know the VarOffset value corresponding to the prompt labeled as “Overclocking Lock” in order to be able to edit/trigger it from “Disabled” or “0x00” to “Enabled” or “0x01

I do that by searching in the same text file, as previously, for the string “VarStoreId: 0x3” again, checking if it corresponds to a prompt that makes sense to unlock.

I say that because some/most do not need to, thankfully next to every prompt there is a help string describing what it does e.g “Processor trace” is a prompt you gonna end up with while searching for “VarStoreId: 0x3” prompts but it doesn’t make sense to enable/or disable it because it doesn’t seem to have anything to do related to “hide” or “reveal” advanced/hidden OC controls so the prompt looks like this

OneOf Prompt: “Processor trace”, Help: “Enable/Disable processor trace feature from CPU MSR. Enabling this feature will immediately start trace collection.”, QuestionFlags: 0x10, QuestionId: 0x33, VarStoreId: 0x3, VarOffset: 0xFE, Flags: 0x10, Size: 8, Min: 0x0, Max: 0x1, Step: 0x0
OneOfOption Option: “Disabled” Value: 0, Default, MfgDefault
OneOfOption Option: “Enabled” Value: 1

Its help section tells us basically that’s a debug feature that logs stuff the CPU executes so its not related… google can also help e.g googling “Bios processor trace” and give more context.

Also the default state of a prompt reveals if you need to note its offset down or not, like the prompt may be already related to revealing OC features but also is already enabled (as in the “Processor Trace” example above you see that the default value is Disabled

Or it simply may just be a prompt of a ranged option meaning there isn’t something to enable or disable so we ignore those too e.g “Core Max OC ratio” is just a prompt to enter the OC ratio you would like to have and NOT a prompt that enables or disables “Core Max OC ratio” as an option, that’s evident because there is no enable or disable values just a declaration of its default value (0)

Numeric Prompt: “Core Max OC Ratio”, Help: “Sets the maximum OC Ratio for the CPU Core. Uses Mailbox MSR 0x150, cmd 0x10, 0x11. Range 0-80.”, QuestionFlags: 0x14, QuestionId: 0x152A, VarStoreId: 0x3, VarOffset: 0x1B9, Flags: 0x10, Size: 8, Min: 0x0, Max: 0x53, Step: 0x1
Default DefaultId: 0x0 Value: 0

So I basically probably only needed to disable “Overclocking Lock” (it sounds counter intuitive but its a lock so by disabling a lock you get access to what it used to lock be mindful of that so that you wont need to repeat this step) but I did enable other stuff as well so I can’t be sure if without them this would work, on hindsight I just assume it would…

Anyway, these are the values who’s offsets I noted down (or you can make a txt file and take a photo or just do that in a second pc and look at that machine’s monitor while you are using these offset values in your laptop)

Mind again that your actual VarOffset values may probably be different than mine so I recommend that you don’t copy them unless you are absolutely sure you have an identical machine (from the posts above lisint my mobo sku and revision my laptop model and part number as well as my bios revision. )

*“CFG Lock” VarOffset: 0x3E <-I Disabled this.

“Overclocking Lock” VarOffset: 0xDA <-I Disabled this.

*“OverClocking Feature” VarOffset: 0x1B7 ← I Enabled this.

*“XTU Interface” VarOffset: 0x1B8 <-I Enabled this.

Step 12: So now that I know the store name (CpuSetup) and the VarOffset address/value of each prompt in said store, I need a tool to edit the “active” bios within my laptop, because I don’t know how to find these things in the binary of my bios :P, so I used grub which you can find here: Releases · XDleader555/grub_setup_var · GitHub
I downloaded the x64 version of it cause my CPU is 64 bit, the i386 version is for older 32bit CPUs.

Step 13: I took a USB stick (the smaller the size the better, cause some motherboards have issues reading large size USBs during post, I wouldn’t also recommend creating partitions to logically convert your e.g physical 256GB USB stick to a logical 8gb partition and leave the rest unallocated/or even formatted, it could work but wont work every time for everyone imho), I formatted it as FAT32 then I created a folder named EFI, inside that folder I created an other named Boot and inside that boot folder I pasted the grubx64.efi file (from step 12) but I renamed it to bootx64.efi (and this is necessary)

So the directory should look like this: x:\EFI\Boot\bootx64.efi ← where “x” the letter associated to your USB stick.

Step 14: I booted my computer into the bios (in my case spamming the F2 key multiple times right after pushing, the power on button boot the computer, in your case it may be the delete key or something else) then disabled the option labeled as “Secure Boot” usually found in a bios tab labelet as “boot” or “boot priority” or “UEFI” something or an other :stuck_out_tongue: (when we are done with the steps you can reenable this option if you wish) and set the USB as first boot device saved and exited the bios (obviously the USB stick from step 9 should be plugged into the laptop :P)

Step 15: Now you are booted into the grub command line you need to take a look at the VarStore name we are interested in ( namely in my case CpuSetup) and VarOffset addresse/value list that I listed at the end of step 11 and use the setup_var command to read the value and then edit it.

The command works like this:

setup_var [VarStore name] [VarOffset address] //<-- For querying/reading a value//

setup_var [VarStore name] [VarOffset address] [new value] //<-- For EDITING the existing value// 

e.g

setup_var CpuSetup 0xDA

Will give us the value of 0x1 (since 0xDA is for the Overclocking lock which is enabled)

We want to disable it though so we gonna enter give it a new value that corresponds to the disabling trigger so 0x00 (and 0x01 enables )

setup_var CpuSetup 0xDA 0x00

It will tell us that it wrote that value successfully (hopefully :stuck_out_tongue: )

Then it would be wise to query the same offset to be sure that the value changed (I also recommend doing the first query before editing the value just to be sure of what’s what)

so again:

setup_var CpuSetup 0xDA

And hopefully it will read that the value is 0x00 if don’t repeat editing it giving it the new value of 0x00

and do the same with the rest of the offsets of the list (at the end of step 11) if you wish so (again I don’t thing its needed but I done it only one time and when I done it I edited all the ones I mentioned )

And in theory you will be done congratz you know have an unlocked bios and can get into OC settings :smiley: (only caution dont mess with stuff you are not completely sure what they do or what the tolerances are cause user moded bioses dont have the same fail saves as factory unlocked ones in gaming desktops and what not you could end up frying your CPU for good)

But in my case that wasn’t enough…

Acer (at least in my case with the Acer Predator Helios 300 PH317-52) decided to put an extra lock you cant unlock by your own at least not if you aren’t a seasoned and well educated with the subject hacker which you probably are not since you read thus far into my post :stuck_out_tongue: (I think they did it through a series of conditionals in the code I assume since I saw some conditional IF statements when browsing the text files I extracted to english from binary e.g if this and this and this flag then dont get into unlocked bios :stuck_out_tongue: )

The good news is that Acer themselves revealed the way on how to access the hidden features! :smiley:

The bad news is that its a cumbersome ritual…

So here it is

Enter the bios normally by pressing/spamming F2 (either by cold boot or restart)

enter your password in case you have one, if you dont have dont worry you dont need to create one, do not do anything in the bios now just keep the power down button pushed until the computer shuts down (yea I know, but its not bs that’s how you do it I tried to avoid steps but no :stuck_out_tongue: hence I called it a ritual)

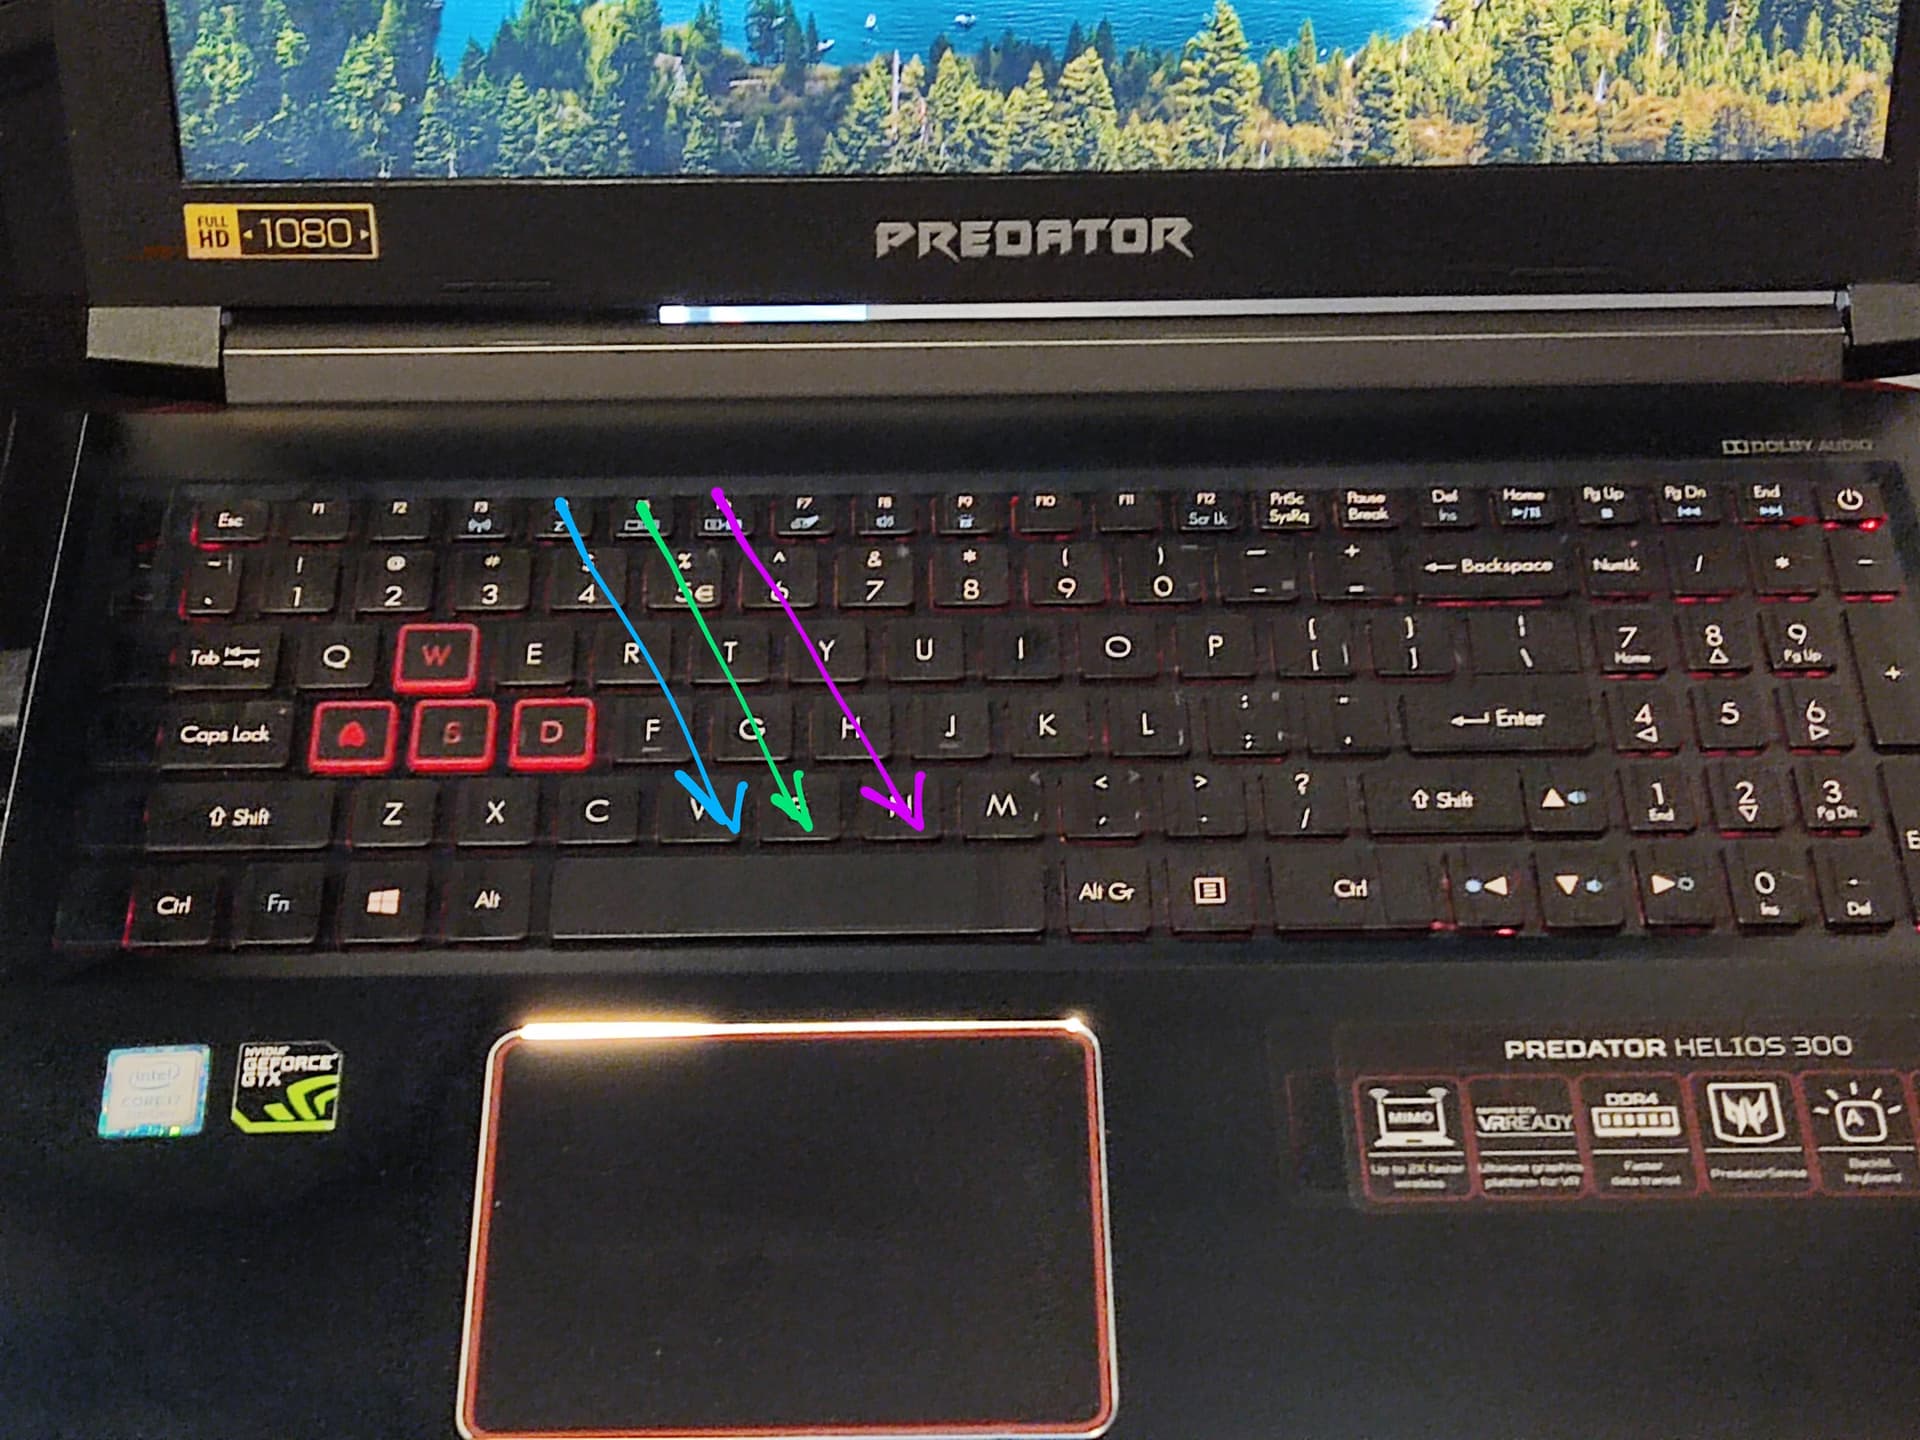
then you need to push these buttons , while the laptop is turned off (yes I know but seriously it’s no bs) in the exact series as they appear in this pic (first blue then green then purple)

You dont need to push them simultaneously just in series namely this series:

F4, 4, R, F, V, F5, 5, T, G, B, F6, 6, Y, H, N

And then after you do that you need to push the power on button and spam the F2 key again before windows loads so that you enter the bios, you know should have two “Advanced” tabs on your bios and all the OC (and more) features unlocked!!! congratz :smiley:

Also don’t worry I didn’t waste your time with all these steps you needed to do the above steps anyway (learned that the hard way because after having some performance issues, cpu package consuming to little power and thus not raising good clocks, I had to load bios defaults which I didnt think would revert all the steps above too but apparently it does :stuck_out_tongue: ) otherwise the above “ritual” doesn’t work I tried, it only started to work again when I edited (via grub) the offsets once more.