[Problem] Unable to program modified AMI V5 bios

Introduction:
I recently bought a “CHUWI Herobox Mini PC Intel Celeron J4125 Quad Core 8GB RAM 256G SSD” but it has a bios with a known problem. And because of this The Wake On Lan feature is not working.
I contacted the manufacturer but they do not have a bios update available (yet, but I don’t expect anything soon).
That’s when I started my quest to fix this problem.
I’m currently at day 5 of my quest, I’m almost at the point of giving up and I decided I need some help.

Problem “18 - Error: Secure Flash Rom Verify fail.”:
I’m not able to flash any modified bios to the board.
If I use the “AFUWINGUIx64” tool I get the following error “18 - Error: Secure Flash Rom Verify fail.”
I also tried the non GUI version “AFUWINGUIx64”
And tried flashing from the Uefi shell.
Every time I get the same “secure flash” error.
I managed to flash a modded bios using a SPI flash programmer, but this bios did not work.

BIOS mod:
Created a lot of modded bios versions I thought I was doing something wrong and corrupting the binary thus preventing it from flashing. I now assume this is most likely not the case and something else is preventing the modified Bios from running (Intel Management Engine?). To verify this I’m trying to flash a simple mod were I replaced only the Splash logo. (instead of the bios with unlocked features and updated lan drivers)

Changed the splash logo to a custom one using the “MMTool 5.2.0.25” , “UEFITool 0.28”, “AMI ChangeLogo Tool v5.0.0.2”

Things I tried:
#1 Flashing using the AMI AFU for Aptio V tools
As described above, tried all of the tools without success.

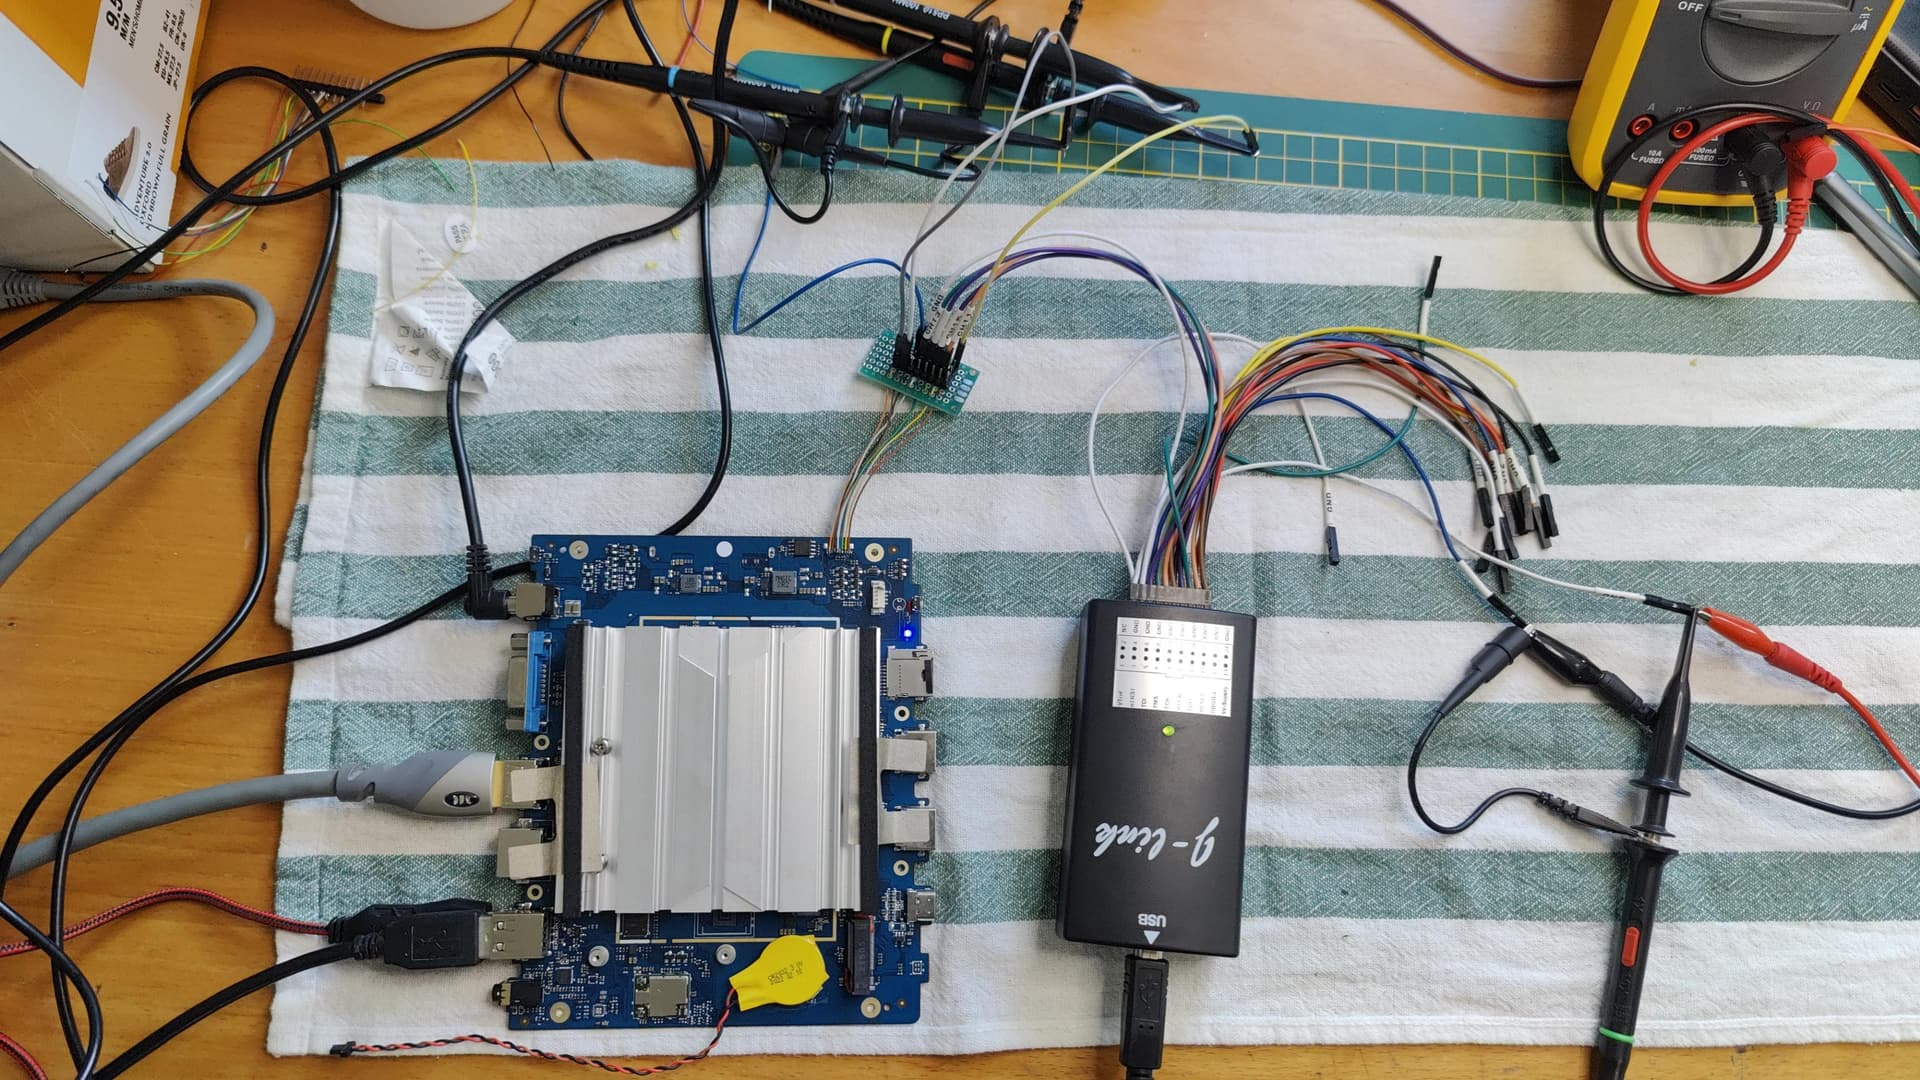
#2 Flashing the modded bios using a SPI flash programmer.
I disassembled the mini PC and located the BIOS flash chip. “GD25LB64CVIG - GIGADEVICE”
Connected my Segger-Jlink clone to it and was able to read the flash memory, and also tested writing it back.
Everything seemed to work, but I was not able to get the modded bios functioning.
The bios shows up very shortly and gives the following error:
“flash update failed”
“flash image invalid or not found”
“system will reset in 5 seconds”

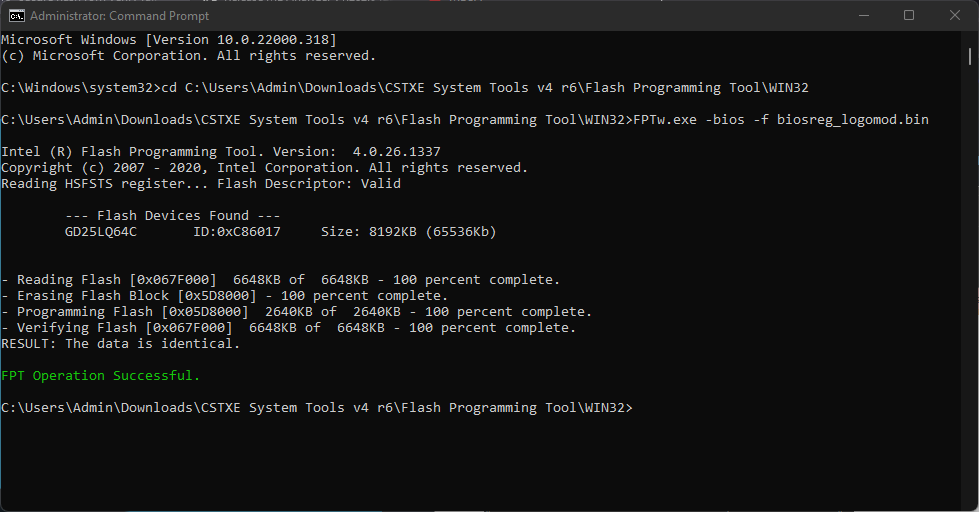
#3 Flash using the “FPTw.exe” tool
After reading this topic: 18- secure flash rom verify fail please help me!!!! - #4 by Lost_N_BIOS
I discovered I need to use the FPT tool for programming the bios so I check my “Intel ME Version” using the HWiNFO tool.
"
Intel Manageability Engine Features
Intel ME Version: 4.0, Build 1524, Hot Fix 32
Intel ME Recovery Image Version: 4.0, Build 1524, Hot Fix 32
Intel ME FITC Version: 4.0, Build 1337, Hot Fix 26
"

I have version 4 so I downloaded the “ME System Tools v4 r1.rar”
But running the FPTw.exe tool result in a error (currently I have Windows 11 Pro X64 running on the system):


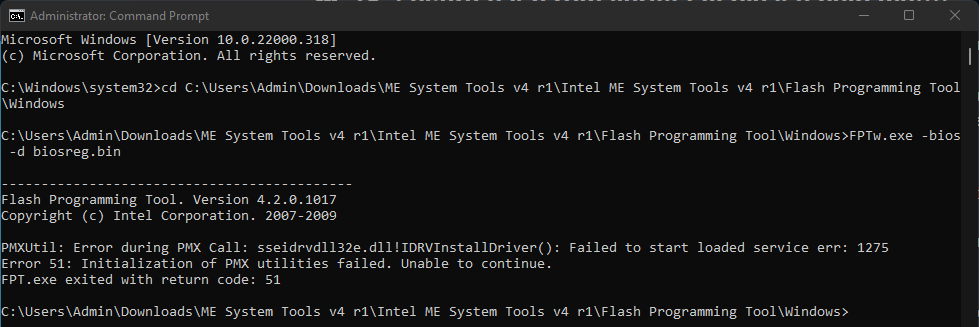
In addition I tried other versions V15, V16, V2, V3 but none of them work.

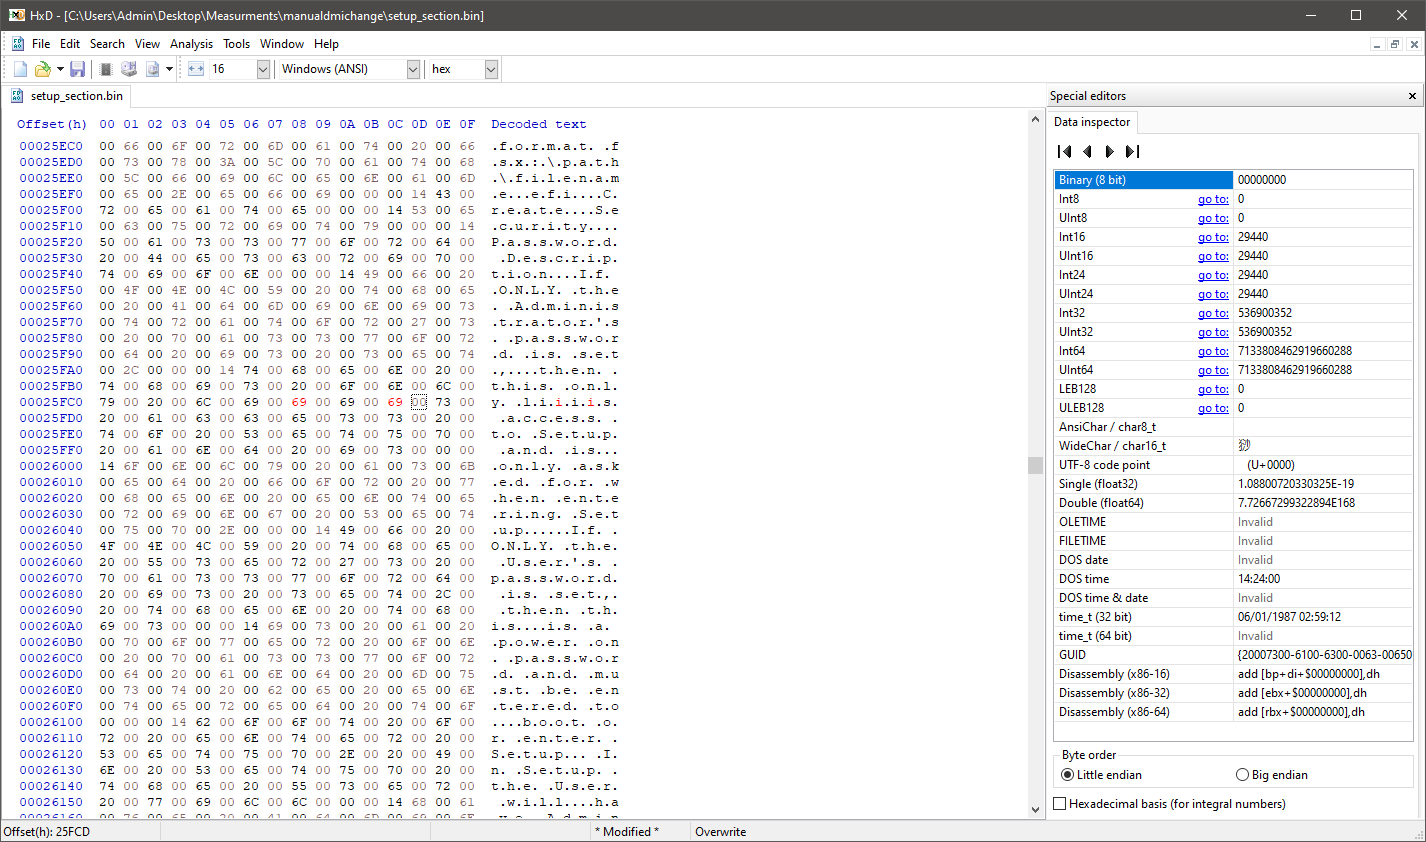
#4 Disabling the Bios lock using ami setupwriter from efi shell
The bios lock variable offset is 0x161, but looking at the IRFE extract report this value was not set (bios unlocked by default).
Still tried disabling it using the ami setup writer from uefi shell, got the confirmation it was already turned off. Tried flashing a modified image afterwards but this failed.

#5 Tried signing the bios image file.
I’m able to add keys inside the bios so my thinking was if I sign the modded image using a self signed certificate and add this certificate to the bios it might work. The bios has the option: “Enroll Efi Image” “Allow the image to run in secure Boot mode. Enroll SHA256 Hash certificate of a PE image into Authorized Signature Database (db)”
But I’m not able to sign a BIN file. It is not supported by the microsoft signtool. So this was a dead end.
If someone know the correct way to do this please let me know (I’ve tried this to sign the image Self-signed certificates for testing code signing - Mustafa Mohamad)

#6 Hardware mod
I discovered a unpopulated connector footprint on the PCB near the BIOS flash chip most of the pins of this connector are connected to the SPI flash chip, however two of these pins are not connected to the flash chip or power/ground. I’m not sure for what purpose these are used. Maybe this is a way to disable the TPM or other method to disable Secure flash. I will try multiple logic levels on both pins if there is no other solution available to me, for now I do not want to apply voltages to pins I do not know the purpose of.

How to proceed?
I don’t know how to proceed anymore I believe I have tried everything and that’s why I have created this topic asking for help. Did I miss something or am I out of luck and is it really not possible to flash a modded bios to this system?

Files
Original.rom (original bios extracted using segger-jlink ans J-flash SPI software)
Spalshmod.rom (modified boot logo using AMI ChangeLogo Tool v5.0.0.2 tool)
https://drive.google.com/drive/folders/1KC63DRbYjjvLafZZMjK7k4QjJlj6TQiF?usp=sharing

Other info
System OS = windows 11 pro x64
Secure boot is turned off

Seems that you used CS ME tools package but your FW is CS TXE, get the right and ONLY package that works on your system, you cant use random package tools…

https://winraid.level1techs.com/t/intel-converged-security-trusted-execution-engine-drivers-firmware-and-tools

v4 r6

Use ME Analyser, drop the dump on the tool: GitHub - platomav/MEAnalyzer: Intel Engine & Graphics Firmware Analysis Tool

AMI Change logo tool most of the times, breaks security on modern Aptio V bios on saving.
Your best chance is dump with fpt tool the bios region only, mod and flash it again with fpt, of course youll need access to the spi regions.

1 Like

Dude thank you so much, just tested the FPT tool. it works and I was able to extract the bios region!
I will have a closer look at it tomorrow, I will sleep much better now knowing hope is not lost :grinning:

Well shit I bricked the system :thinking:. Guess I have to take it apart again and solder back on the SPI programmer and hope I can revive it.

I’m pretty sure I did the mod correctly, could someone verify this for me? (All files I created are available on the google drive link attached to the end of this post.)

I backed up my bios region using the following command: “FPTw.exe -bios -d biosreg.bin”

Opened this binary in UEFITool.exe V0.28 looked for the “logo” string, found the logo raw data and extracted the body as “logo.raw”:

Img 01

Edited the “logo.raw” image (colored the ‘U’ red) and saved it as “logo.jpg”

Next I replaced the body of the raw logo section in the biosreg.bin using the replace body option and selected the “logo.jpg” file.

Img 02

afterwards I saved the modded bios as “biosreg_logomod.bin” and flashed it to the system using the “FPTw.exe -bios -f biosreg.bin” command.

Lastly, I rebooted the system, and observed a failed flash message. I can not enter the OS or bios anymore.

It shows the bios screen for 1 second with “flash update failed” message before automatically rebooting (in a loop).

Img 03

Files: HeroBox_bios_logo_mod – Google Drive

(I’m not able to embed more than 1 image inside my post so these images are also available on the link above “img xx”)

Update: I cleared the CMOS. Now the system is showing the modified boot logo but it is still in a bootloop and the bios briefly shows the “flash update failed” message before rebooting. I have added a video of this to the google drive called “bootloop.mp4”

If I did the mod correctly, I assume I did. I’m at dead end again. Any recommendations on how to proceed from here?

Most likely its the logo edition itself, original splash.jpg has 15,8kb, moded has 43,4kb…

EXIF header data is present on new file…but not in original splash.jpg

EDIT: Sorry, not me.
If changing a logo breaks the system, further more mods even harder.

Managed to restore the system using flash programmer. (I now have a proper setup were I can easily connected the flash programmer to the board so I can restore the system if needed.

Once again thank you for your reply, For sure I though I did everything right this time but clearly I have a lot to learn. I will have a look at it (do not fully understand as of writing but think I will figure out using your hints about the size and header).
My current goal is to find out if I’m able to run a modded bios at all on this system and proceed from there.

Hi MeatWar,
I tried lots of things the past few hours but I’m not able to get any kind of modified bios to work.
My last try was. opening the biosreg.bin (exported using FPTW.exe tool) exported the “Setup” section using the UEFITool (extract PE32 as body). opened this file in hex editor HXd, looked for a string and changed just 2 characters.


saved this file, and used UEFITool replace body function, to replace the original setup section with the slightly modified one. saved the bin file and used the FTPW tool to flash it on the system. This also failed and results in a “flash update failed” message before automatically rebooting (in a loop).
This should work right? I’m at a loss, I just can’t figure out what is going wrong here. Would you mind (or anyone else) creating a moddified bios for me (moddification does not matter), so I can try that one and make sure its not something I’m messing up.

Files:
Original Bios, full contents of the SPI flash chip (same files but saved as different formats)
“bios_backup_1800mv.bin” “bios_backup_1800mv.mot” “bios_backup_1800mv.rom”
Original bios, content downloaded using FPTW tool
“biosreg.bin”
https://drive.google.com/drive/folders/1s-cFy2rjQcN6D4t48FYoDp4DhHnBG0K5?usp=sharing

Seems that there is a unsolved protection problem with the “Gemini Lake” bios mods.
Found the following topic on this forum:

I successfully modified the logo using the Phoenixtool 2.7, and no annoying messages appeared. But when I try to unlock Setup(change DXE image), the “flash update failed” message appears again. I personally guess that the BIOS has integrity verification for DXE volumes and does not allow unauthenticated modifications. The reason why the logo image can be edited may be that it is not included in the verification area.