Thanks for the feedback! Good to hear that everything works!
My motherboard was bricked from using the bios flashback tool and an 11th gen processor, it would not respond to the power button and had absolutely zero function.
I was able to fix this flashing the smaller (Winbond 25Q64JVSIQ 64mbits) ME (Management Engine) chip, with
Section_Raw_63F23E9D-5FDA-415E-9C2A-64C4E2A6ECE8_body.zip
And flashing the bios chip (MXIC MX125L12872F 128mb) with STRIX Z490-E GAMING BIOS 2701
The board works again, thank you for sharing the file [Section_Raw_63F23E9D-5FDA-415E-9C2A-64C4E2A6ECE8_body.zip], without this I would not have been able to recover this board.
For anyone who wants to covert the ASUS bios from a .CAP to a .BIN file for flashing these are the steps I followed:
Download UEFITool: https://github.com/LongSoft/UEFITool…_A55_win32.zip
Open the bios with UEFITool ,select “Extract Body” , save as .bin
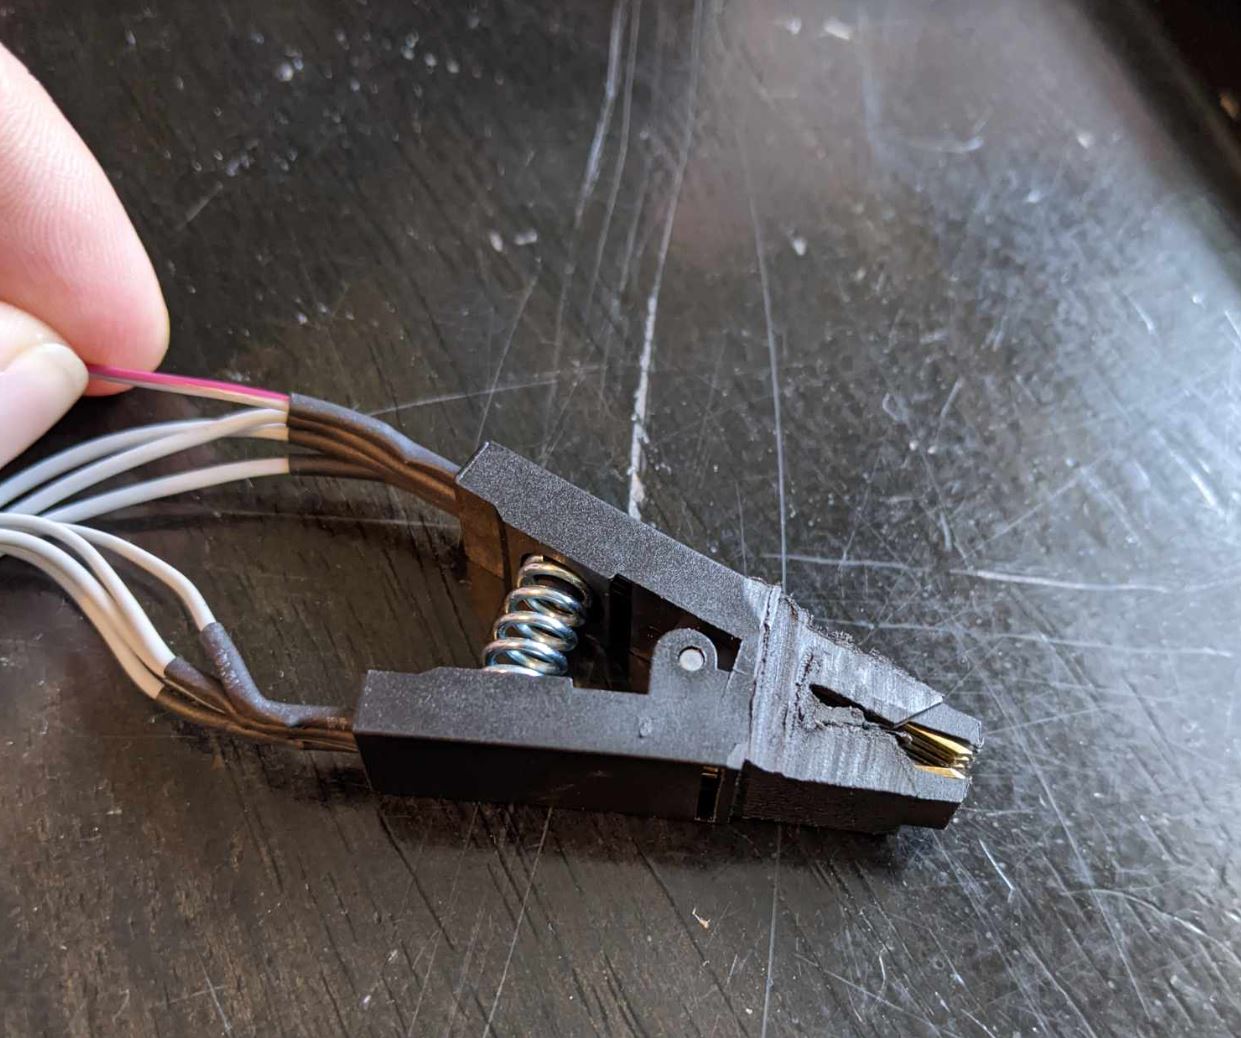
Additionally, I did have to file down one side of my clip to get it to fit the ME chip and clear the PCI slot, it looks like crap but it worked.
I did like you to file the pliers for what pass. I thank lfb6 again for saving my card at the time, thank you for taking the time and explaining as best as possible to achieve problem-free operation. Fortunately there are people like you lfb6 dedicated to wanting to help .
Hello everyone, this is my first post here.
While browsing the Internet, I came across this thread and I actually see that there is only one chance to save my motherboard.
Maybe from the beginning:
My younger brother and I are building his first PC
Let me point out that this is not the first PC I am building
We chose the ROG Strix z490-H Gaming motherboard as the basis for the machine, an Intel 11900KF processor and an RTX 2070Super
I won’t write too much here, I wanted to update the bios to support the 11th generation of processors and I bricked the board.
Exactly the same situation mentioned in the thread: 3 restarts in a row and currently no response to the power button.
The BIOS from the pendrive is accepted without any problems, I have tried many versions but without any effect.
The main difference is a slightly different motherboard model than yours, but the problem is clearly the same.
I see that there are people on the forum who really know the subject well and I am full of admiration for their work. Here’s my question, would you be able to help me and guide me through trying to resurrect this motherboard?
While reading this thread yesterday, I found out that I will need a CH341A programmer with a clip. I have already ordered the equipment, it should be delivered on Wednesday at the latest. I’ve never flashed the bios this way, but I think I can do it with your help. I’m not worried about physically connecting to the integrated circuit, but more about what to upload to it.
Reading the posts, I see that the bios needs to be prepared (divided?) in some way before uploading.
There are two BIOS sticks on the motherboard:
AH2009
25B64CSIG
UAH615
and
Winbond
25Q128JVSQ
2012
Can I prepare something while waiting for the delivery?
Do I need to convert the programmer to 3.3V?
And should I remove the cmos battery when connecting?
Finally, I will add that I made every attempt to start the motherboard (second power supply, different processor, no RAM stick, no additional components) without success.
Thank you in advance for any suggestions and tips
Welcome to the forum
For now and when possible, you’ll have to dump both ICs with the CH341A.
We have to try to preserve mb specific original data (MAC, SN, UUID etc…)
From there, the guidance from lfb6 on post#16 may be needed, but files need to be analyzed.
Do not erase or try to program anything before salvaging the contents of at least the bios region.
Many guidance and tips from other users recoveries in this thread, that you should take in consideration, besides different models but the principal is the same as they’re all dual IC and Asus Z490 family.
“Do I need to convert the programmer to 3.3V?”
Most of latest CH341A black versions are set to 3.3v range, a 1.8v adapter is required if there’s an IC with such requirements only.
Seach the ICs pdfs on the web for correct voltage identification and pin assignments.
Thanks for the answer
In that case, I will wait and check what programmer I will get and look for a data sheet for bios sticks.
To be sure, in my case I will ask:
Stick 25B64CSIG is an 8MB chip and 25Q128JVSQ is a 16MB chip?
8MB contains data for operating the processor and 16MB is the BIOS itself?
Sorry for the stupid questions, I have more experience with electronics and electricity than programming.
Yes, if you get the pdfs like i instructed to, you’d know this already, don’t make me lose time and repeat myself.
A GigaDevice GD25B64C and a Winbond W25Q128JV, this is done by detailed visual inspection of the ICs.
And no, also you’d know this if you read the tread a bit, it should be EC/ME FW on the 8Mb and Bios Region on the 16Mb…
Same as Electronics…you’ll have to know the specs of the component…
I ask a lot of questions out of fear of the unknown ![]()
I have already received the programmer and analyzed the datasheet of the sticks. I extracted the contents from both chips. I merged them into a 24MB file. I checked everything with MEAnalyzer.
According to the program, everything seems to be fine.
Unfortunately, as a new user, I cannot upload files, so I will share them via wetransfer.
I hope it will not be a problem.
What steps should I take next?
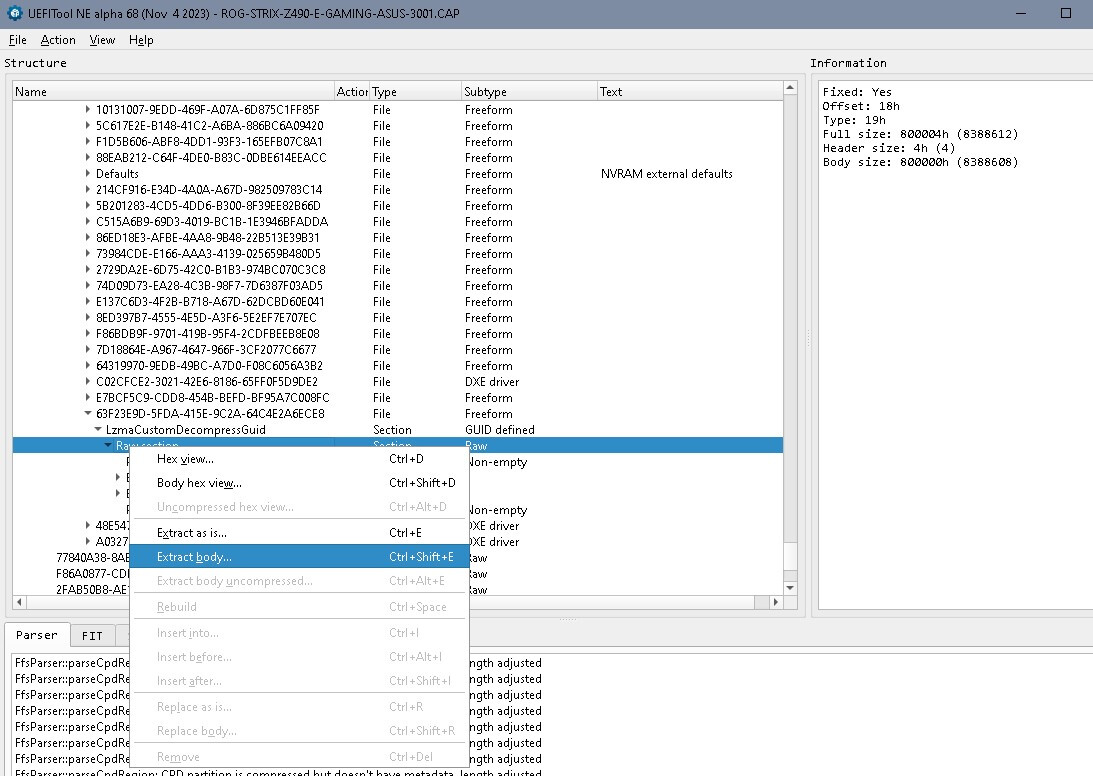
GUID raw 63F23E9D-5FDA-415E-9C2A-64C4E2A6ECE8
Follow guidance on post #124
Get the Asus bios file 2701
Extract the GUID from it, its the ME FW image, yours is corrupted as shown in post#120
EDIT: You also cant follow and read a guide? You have a serious problem my friend… try again.
“Open the bios with UEFITool ,select “Extract Body” , save as .bin”

Sorry, this is a lot of news for me. And the guide is very extensive, not entirely understandable to me, but this is due to my lack of knowledge in the subject. To be sure, we are talking about the same guide? [Guide] Clean Dumped Intel Engine (CS)ME/(CS)TXE Regions with Data Initialization
I am sending the correct file.
Section_Raw_63F23E9D-5FDA-415E-9C2A-64C4E2A6ECE8_body.zip (1.8 MB)
Thanks for your patience
The guidance on post#124 from rogerfuk is very extensive?
I dont need that file, its you who need it to program the GD25B64CSIG with it now.
Hello, I have the same motherboard, which also has problems. The computer restarts 4-5 times each time until it finally starts properly. As soon as Windows loads, I always get the message that my MEI driver is not installed. The ME firmware version 0.0.0.0 is stored under BIOS. So something is wrong with the BIOS. I bought the CH341A program with the hope that it would work. I had previously bought the BIOS chip. Unfortunately, I then saw that there were two chips on the mainboard and I couldn’t get any further.
@Bobo331982 @MeatWar @lfb6 @LEKA @68k-dude @rogerfuk @Damian93 @S3riou5
This thread was sorted into the Forum Category “Offers: Already Modded Special BIOSes”, but contains reports about different BIOS problems with the related mainboard (and possible solutions).
That is why I have moved this thread into the Category “BIOS Modding Problems” and customized its title.
Gigadevice backup:
winbond backup.rar
ME Analyzer results
i think i have to use also 14.1.51.1528_CON_H_A_PRD_EXTR.bin but i dont know how to do it ![]()
Put the two dumps together, smaller (FD, ME) first, larger (bios region) second. That’s a complete firmware image which will open in FIT.
Then follow this guide:
If you finish the process correctly it’ll give you one complete firmware and files for the two SPI chips. You only need to flash the smaller (8- MByte) chip.
Hmm ok, i hope i can do it ![]() i think its too high for me
i think its too high for me ![]()
Well, it’s up to you. The other (possibly better) solution would be to download the latest Asus ROG STRIX Z490-E GAMING BIOS 3001, open it in UEFIToolNE
Expand this volume:

.
Almost at the end of the volume you find 63F23E9D-5FDA-415E-9C2A-64C4E2A6ECE8. Extract the body of the shown Raw section of the update:
That’s exactly the content of the 8 MByte chip and this way you’d bypass the Asus trick with the placeholder PHY P partition…
Good luck
Thank youuuuu. ![]() it worked, the restart problem is gone
it worked, the restart problem is gone ![]() thank youuuuuu
thank youuuuuu