Request Clean Me region Asus X541na confused

Hello this is my first post on the forum, I see there’s lot’s of knowledgeable people in here, I do mostly laptop component level repair. Poorly I’m not that knowledgeable on ME region cleaning, I’m learning trying to understand every bit how me region works even in low level , I like to go really in depth . But for now I came across this machine from a friend of mine which suddenly shuts down out of nothing , he didn’t say if it was exactly after 30 minutes, but I suspect it’s Me region related. I reinstallled Windows 10 latest build, and update bios from asus site to latest release.
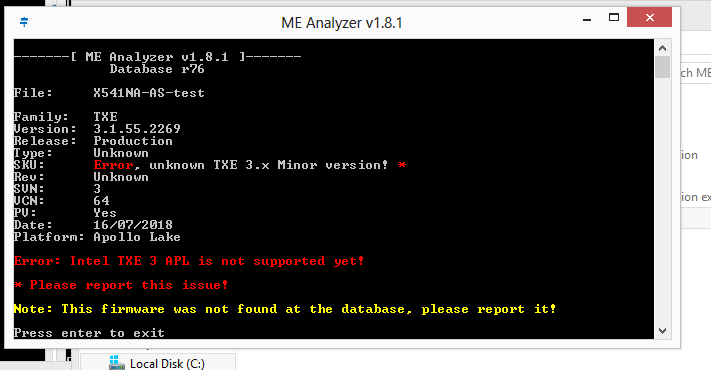
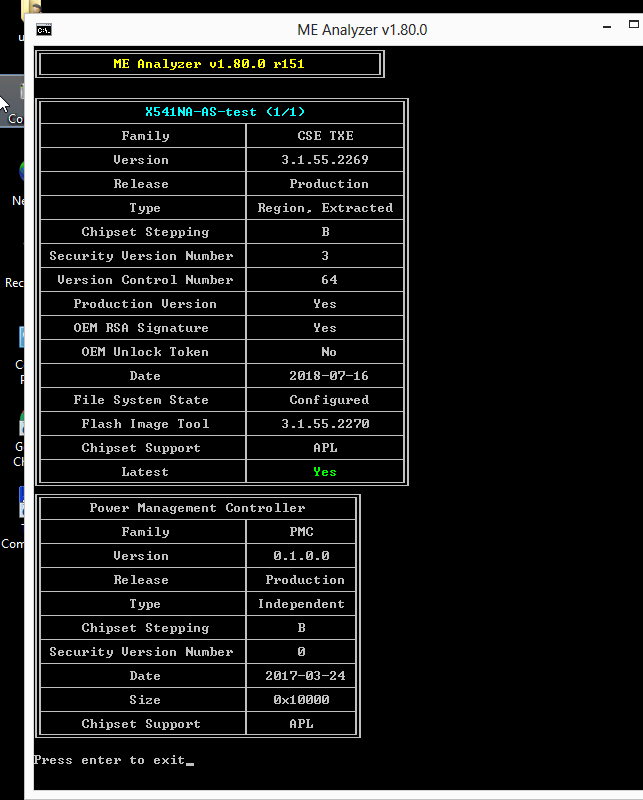
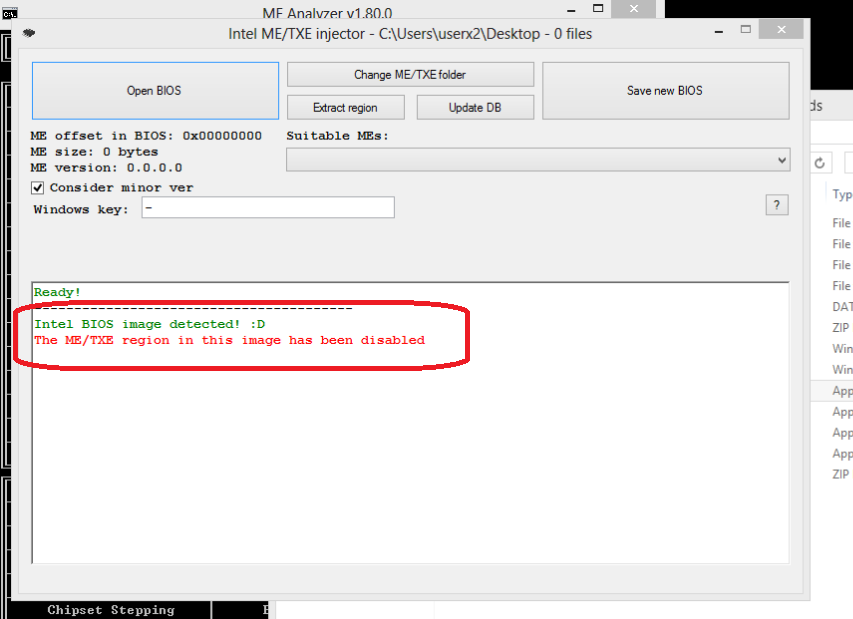
I read about cleaning me region , but problem is that I tried to use Me injector and it says ME/TXe region disabled. But when I use Me analyzer I get a different output .

meanalyzer.png


meinjectt.png


So if you can please help me understand what’s going on here I’ll be more than grateful. I would also like if someone can make a Me region clean (and also explain how it’s done here) I tried loading on FITC tool but said error as well.

I’m attaching 2 files one I’ve edited manually with hxd (X541NA-AS.bin) to remove the EC region so we’re left with the main rom. The other it’s the File from asus site (X541NA-AS(original).323 ) which includes EC+Main rom .

https://drive.google.com/file/d/1K1hfII7…iew?usp=sharing

https://drive.google.com/file/d/1OLMQWEn…iew?usp=sharing

Thanks for helping !

Send me Working Bios which you want to clean


Thanks , my friend took his laptop , so he’s going to bring it hopefully tomorrow. Can’t you work with the .bin I edited from asus site which is the main rom ? . Can you please explain why Meinjector says TXE/ME region is disabled but MeAnalyzer shows it’s got TXE. Also I tried using FIT tool but says file can’t be processed. Do I have to run specific version of FIT tool related to the platform vesion of me ? Thanks again. Will upload later the machine dump once I get the machine and dump it with my programmer.

Ok this is strange I used other version of ME analyzer previous one 1.8.1 and says there’s no SKU, This bios file it’s not a machine dump, it’s the one from asus site but should be equivalent to the machine dump as I removed the EC segment

meanalyzer180.png

This needs updated or fixed ME FW, looks like it corrupted or someone disabled improperly etc
Or possibly even, someone modified the BIOS itself, and the ME FW is fine, shutting down system every 30 minutes due to Intel Boot Guard violation (that’s usually instant = looks like brick, but it can be set to shut down at any timed period)
Probably messed up ME FW though as you suspected


To fix this you need flash programmer, such as CH341A or similar + SOIC8 test clip with cable. Unless you want to try pinmod (See section E.1- [Guide] Unlock Intel Flash Descriptor Read/Write Access Permissions for SPI Servicing
This = physically short audio chip while powering on, to temporarily unlock FD to allow you to dump FD, edit it to allow ME FPT flash, then program it back, then fix ME FW

To work with that ME FW, you need V3 TXE System Tools in section C.2
Intel Trusted Execution Engine: Drivers, Firmware & System Tools

Use the cleanup guide, to do a settings transfer, to same or newer ME FW (Same would be easiest)
[Guide] Clean Dumped Intel Engine (CS)ME/(CS)TXE Regions with Data Initialization

Here is Repo for that ME type (Intel CSTXE 3 Firmware Repository r9 - (2019-09-14)) - See section "C"
Intel Engine: Firmware Repositories

If you are not 100% sure you know what you’re doing with the ME FW, ask and someone can make you a properly done ME FW, but you will still need Flash Programmer or Pinmod…
Unless, ME FW is not corrupted right now, just not correct, and ME FW update tool still works? If it does, then you can put back in fixed ME FW, but I doubt this is possible.

Actually, you do not need to clean or update ME FW etc, only issue here is programming in a fixed one.
I mean you can extract fixed working ME FW from stock BIOS and write that to ME region with FPT after unlock FD, or with programmer (Dump BIOS with programmer, replace ME region only from stock BIOS, program back)
This is from 1000h >> 8B440h = ME FW Region - First “padding” inside “BIOS Region” when you open stock BIOS with UEFITool

Asus Stock BIOS is a partial BIOS update, and will be NOTHING like a programmer dump (and never should be considered or used as such in reverse either)

Yes, once you have programmer, and dump the BIOS, one of us here can fix it for you to program back
Programmer and system in hand makes it much easier for someone to help you fix this kind of thing, glad to hear you have programmer

Wow such an complete and dedicate answer, thanks mate. I’ll do step by step answering


To be honest , I didn’t dissasemble my friends laptop. I just supposed it had something to do with crappy win10, I wanted to install win7 but as it’s UEFI mostly and has no CSM to enable it’s impossible , not to say there’s no support for apollo platform on windows7 , so I finally ended up with windows 10. The time I used his machine I didn’t have a single problem with or without AC plugged. Machine didn’t restart. but then he had the problem when he tested, it not quite sure if 30 minutes 1 minute or whatever… but yes it’s Me Firmware related.
The bios I attached are from Asus site, the one from Asus site it’s a fusioned bios has Main+EC altogether which works with EZflash from bios. So I hex edited it and removed the EC portion that’s what I meant. I don’t think removing the EC portion might render the .bin I edited corrupted or damaged the ME region firmware. So It’s strange. I still can’t understand why ME analyzer shows no SKU , and Meinject says TXE or Me region is disabled. But again you said once I have the laptop to make a full dump a raw dump from the SOIC IC. But why ? there’s no way of working with the .bin from asus site the one I Hex edited? Just asking… I want to know the technical reason if possible. Let’s follow…


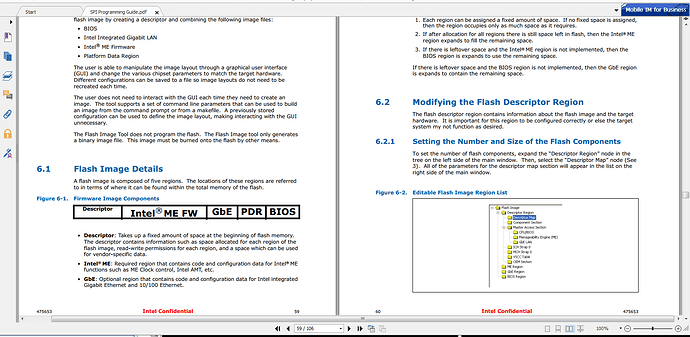
About this procedure, I do have an RT809H programmer, so that’'s not an issue, but wow there’s an already tested scheme doing a pinmod… what’s all this about Unlocking Flash descriptor. I really want to understand how to fully initialize the ME region if possible. I know you need FITC tool, ( by the way I’m also reading an intel confidential whitepaper explaining about all different variables.


But I’ll follow… I know we need FITC tool but do we need a specific version of FITC tool so it loads the dump correctly ? I mean a specific FITC tool version according to ME platform version? or that’s not mandatory.


Of course right now I’m not experienced with me region clean and intializing. So I prefer someone to make this for me. BUt I’d like to fully understand all variables within fitc tool and how to properly do it myself as I’m doing laptop repairs for living and will eventually need to have this fully mastered . Most guys in here just have it handy and are used to doing it blazingly fast :wink: . But sorry, why did you say I do not need to clean or update ME FW ? when you say issue here is programming a fixed one … I thought all these issues related to me engine firmware about shutting down , fan , sensors etc… need a clean initialize. What do you mean I did understand when you said to extract fixed working ME firmware from stock bios… so why can’t we do this with Asus bios (again the one I edited so we’re left with main rom) , or do we need the full dump already flashed on laptops SOIC IC ? . when you say unlock FD i’m lost. But yes I understand dumping bios, and then I thought you can extract me region from dump and clean it .
So when you say Asus Stock Bios from their site it’s a partial update, the total file size it’s not the entire dump programmed to the SOIC IC ? :wink:

Sorry to many questions ! Thanks again

I did not look at anything you attached, no need (especially since it’s not a programmer dump)
MEInject should not be used here, so I didn’t and wont comment on that. ME analyzer shows the ME and PMC fine here for me, on the full stock BIOS or the extracted ME FW

Yes, as I mentioned, you can, and should, extract the ME FW from the stock Asus BIOS, and replace that with the currently messed up region once you dump the BIOS. That is as far as, and the only time/reason, the Asus stock BIOS download should be used.
Do not program that to the chip, you will loose your serial, UUID, NVRAM and possibly LAN MAC ID as well. Stock BIOS is only meant to be flashed with stock BIOS tools.methods, do not program it in (you only need to fix ME region here anyway)

In a normal situation, unlocking flash descriptor allows you to write any region with Intel’s FPT program, which we need unlocked ME region here to write the ME Region
However, on this BIOS the way it looks in the stock file, there is not a specific ME region, it’s in a padding file at location I stated above, within the BIOS region)
So, ideally, as I mentioned above, dump the BIOS with programmer, open in UEFITool, replace that padding that contains the ME region with the padding from stock BIOS that contains the working ME region = done >> Program back.

FITc is not used here either, you are working too hard. Stop, before you make things worse.
Wait on programmer and system to be in your hand, the steps to fix this are quick and easy as I just mentioned, dump BIOS, extract ME FW at first padding in UEFITool, open dumped BIOS with UEFITool, replace that same padding, done, program back

ME Cleaning, is really not that, it’s replacing same version or higher, and transferring settings from original ME FW to the new one. Guide for this I linked you to in my reply above.
I said you do not need to clean or update ME FW because that is already done for you in the stock Asus BIOS file… See my above comments If you did not have that, then yes, you would need to go through that process, but it’s not needed here to fix this systems issue.

You do not need to, nor should you, edit any BIOS from Asus and use it for anything here. If you are still lost, please do not do anything, dump the BIOS and verify it, then send me the file and wait (DO NOT erase or write) I will send you back fixed file to program in


On the edit you are making, you have been taught wrong things, or misunderstood what you are doing etc. You are removing the BIOS security capsule, not the EC FW.
This is a security encapsulated BIOS, first 800h (2KB) is the capsule, then 80000h (8192kb) is the BIOS body (Rom/Bin etc)

When I say it’s partial update file I mean just that, this is not meant as a complete BIOS to run a system, this is a BIOS “Update” to update your BIOS with Asus BIOS update procedures for this system (EZ Flash, or whatever tools the system has for download that you can update the BIOS with)
Not all BIOS can you straight program to the board and it will boot and run. Aside from this, stock BIOS update files are missing NVRAM, and all user specific info that is in the BIOS on the board, this is kept in place when updating BIOS using standard procedures with the stock partial update files provided for download

File size has nothing to do with what’s contained within. I can give you a empty file that’s 8MB, or I could give you two empty files that were both 8MB that compress into 1KB because nothing’s in them.
You can remove 50-95% of the stock BIOS, save it, and it will still be 8MB etc. Main point I meant was, not always is a BIOS you download, especially from Asus, a BIOS you can program directly to the board and run it, those are meant as in-place updates/upgrades not complete BIOS files.
Yes, sometimes they do provide a complete BIOS that will run a board, but if you program that in without editing, you loose all board specific stuff I mentioned above.
As for is this one that type, or partial, I cannot say for sure until you send me a dump, but either way, do not program the stock BIOS to the board, even after you remove the capsule.
Ok so perfectly understood now I think, . I got some things wrong from the first place:

1) I thought the Bios from Asus available 8,390,656 bytes in size was the complete entire bios programmed into the 8 pin SOIC on the board. And what I manually edited and removed was the EC region. So you’re telling me what I removed was the encryption capsule header, perfect !

2) When you mean we need to replace the messed up region once I dump the one from the board. We extract this healthy Me region from the Asus Stock bios right? the one from asus site.

3) Like I told you before I did already programmed the Asus stock file available, entering bios and selecting this file, and machine updated and booted fine. So does this mean machine screwed some vital data.?

4) This is really important for me to understand , when you mean "UUID,NVRAM, LAN MAC ID" and other important data this information is never cleared from SOIC memory region offset or where is it initially stored PCH?

5) Excellent what you explained about ME cleaning, tell me if I’m wrong. So Asus or any other manufacturer offers the Stock bios (new bios update) always with ME region cleaned?. That’s what I misunderstood. And in case we need to correct a badly Me region ( causing issues like shutdown, problems with other variables like sensor, fan etc) we need to dump the raw data from the board SOIC IC, and then update it with this stock Me region data , to perform a me region cleaning?.

6) In cases were people upload a specific Bios for a board part number, and say this BIOS dump has me region cleaned, say for a Lenovo,Asus,HP board. I can program this dump to the SOIC ic and machine will initialize properly , I mean exchange all necessary data back an forth from PCH to bios and it will boot up fine?

7) Here in this video I’m selecting the offset you said 1000h to 8B440h to extract me region FM from stock asus bios, can you please verify if it’s ok.

https://www.loom.com/share/5f841e7e07894eab85bf806246594b87

8) So what I removed was the encapsulated header, good !. To properly select the KBC bios, like I found from a dump which is 131057 length in total. KBC bios I verified start with this descriptor "ENE Haru. . . " To extract it from the main rom , I need to select this block from descriptor up to 131057 in length, right?now I got it !!

9)


This means after 800h, all we are left is with Main rom ( with cleaned Me region ) + KBC EC bios ?

10) Again thanks for explaining and patience. Last if I get the Asus stock bios, remove the 800h (capsule) , then extract main rom save it to a file, extract KBC EC save it to a file. Can I program this main rom with my programmer straight into the SOIC IC ? or we need to add some data to Me region.

Thanks! will let you know when I have the full dump with my programmer. For the time being it’s been more that an excellent explanation from you!

  1. Yes, this is removed during flash and 8192KB is programmed into the chip (if/when full BIOS is used, otherwise some data is skipped over, left in place, some remains untouched, other blocks get uopdate etc) Main point here is BIOS chip if 64Mbit can only hold 8192kb (800000h)
    2. Yes, as I mentioned at post #5 >> from 1000h >> 8B440h = ME FW Region - First “padding” inside “BIOS Region” when you open stock BIOS with UEFITool
    3. You are confused here, updating the BIOS with normal/standard BIOS update procedure outlined by Asus (ie EZ Flash within BIOS, or whatever software they provide to update from DOS or windows) is not same as “Programming” with a programmer, not the same at all, in many ways very different
    4. This is your board specific info, Serial #, UUID, LAN MAC ID (without this you cannot use Ethernet), NVRAM contains many board specific details, control settings etc (this not in stock BIOS).
    No, this is left in place, when you update BIOS using normal update methods Asus intended you to use. This is stored only in the BIOS chip, and why I warned you not to “Program, with hardware programmer” the stock BIOS into the chip - Remember per #3 Program /= Flash BIOS/Update BIOS etc

    5. No, sometimes there is no ME Provided with BIOS upgrade/update package, and as I mentioned, this one may also be only partial ME FW in there too.
    So #2 may not be 100% correct, I need to see dump from programmer from you, before I can say anything for sure (But in this case, I do think it’s complete)
    But yes, if ME FW is included with the BIOS download as part of the “BIOS” then it’s clean and programmed per that specific model.
    And no, only in this case you’d do as we’re discussing. Other cases may be similar, but in a normal situation, I’d either dump ME FW with FPT, update (or use stock same version) and transfer settings using the guide, then insert back into BIOS and program in or FPT flash ME Region only.
    There is MANY ways to do this, not all are possible in all cases, and some cases only way will be programmer dump, and use stock ME or some other dump where you know ME works.
    Then to settings transfer update (or same, clean stock, to transfer settings into), then proceed to get it into the chip by whatever means is possible on the system

    6. Up to you, I never risk that unless it’s last resort. Using some other dump (if actual dump) would contain other boards serial, UUID, LAN MAC ID etc.
    75% of “Dumps” you see online are not dumps, but terrible people uploading a stock BIOS “upgrade” compiled into a complete BIOS and calling that a “BIOS dump”, because they know in that case the board will start with such BIOS as they’ve tested it or sell BIOS chips pre-programmed like that etc
    Such a file is not a “BIOS Dump” But will run a board, user specific info may be stripped if they upload an actual dump, but not always, and in some cases they replace these areas with stock copies (lazy).
    That is just as bad as sticking stock BIOS region into “Dump” and calling it a dump", it’s not and they should have taken time to single out the exact details and remove instead, or stop sharing files online as "Dumps"
    End of rant here, I hate those kind of “Dumps”, they make it terribly hard to find an actual dump, near impossible sometimes, for people who need an actual dump to find something’s location in BIOS or format/layout etc

    7. No, I can’t verify things like that. Use UEFITool, expand BIOS region, right click first padding file, extract as-is, much easier that way.

    8. Yes. KBC I know nothing about, but generally that and or EC FW is not part of the BIOS, it’s on another chip entirely (but may be included in the stock BIOS “Update” and is programmed into the other chip during the standard updating process (if and when)
    Sounds like you have located it in BIOS, there you go. I assume it will be same in your dump, maybe a few bytes different due to monitoring changes (fan speeds, checksums, temps etc).
    The “Dump” you mentioned finding, is from the secondary chip I mentioned (this is not part of the on-board BIOS in BIOS Chip, there will be a second chip on the board)

    9. Yes, after 800h to end of BIOS is the “BIOS Upgrade package” rom/bin, as mentioned this is not always a complete BIOS, and when not contains only partial BIOS volumes, modules etc, and as you’ve found, may even contain data that gets flashed to another chip entirely.

    10. NO I’ve said many times, stop considering this. Dump the BIOS, send to me, and let me look at it, then I’ll tell you what you can do.
    However, even if you “Can” program to chip directly, that would only be done in a last resort recovery procedure, otherwise you need to take the time to copy out all board specific details from your original dump, put back into a known good full dump, then program in.
    None of this applies to your situation, you are only trying to fix ME FW - ideally you do not touch BIOS modules or EC FW etc.

    Best to wait and have someone help, so you don’t brick anything, then you can use the provided fixed files to inspect and learn from later.,

    You’re welcome! And sorry if anything sounds abrasive, I try to remain calm always, but some days I repeat myself 20 times a day in 10 different threads, so you know, it can sound rough coming out sometimes

    And, finally, once I have a BIOS dump from you, I can give much better and more direct answers about this systems BIOS and what it does or does not contain and how the stock BIOS package compares to what’s in chip etc.

Excellent ! hope I come across a single guy like you every day. You’re not sounding rough nothing at all. And yes I can imagine you’re over many threads taking your time to answer carefully. So nothing more than being thankful to all your help and explanations. Once I get the laptop , dissasembly it and make the bios dump , I’ll let you know. So you can explain me much better. By the way if you got some other resource explaining in much better detail how to do all this Me region manipulation please send me the links. I know this site contains mostly everything. But it would be good if you have in mind some other tutorial I can take a peek at . I know everything is on the net… but sometimes it’s best when you get precise information from masters like you :wink:

Again thanks ! and you’re welcome if you need any questions regarding board level repair regarding notebooks,cellphones,tv’s .

Oh this is a video , please tell me if It’s right how I used uefitool, first padding … extract as is (this contains me region from stock bios? )

https://www.loom.com/share/b4f0fc58090243a0b8b7f74da5743be8

Help me Sir


===============================================================================
Intel (R) Flash Image Tool. Version: 3.1.50.2240
Copyright (c) 2013 - 2018, Intel Corporation. All rights reserved.
1/07/2020 - 7:36:28 pm
===============================================================================

Using vsccommn.bin with timestamp 16:58:30 01/31/2018 GMT

Command Line: E:\Asus_X541NA=8=X541NA_Bios-Ver_314\Asus X541NA=8=X541NA Bios-Ver 314\Intel CSTXE System Tools v3 r7\Intel CSTXE System Tools v3 r7\Flash Image Tool\WIN32\fit.exe

Log file written to fit.log

Loading E:\Asus_X541NA=8=X541NA_Bios-Ver_314\Asus X541NA=8=X541NA Bios-Ver 314\Intel CSTXE System Tools v3 r7\Intel CSTXE System Tools v3 r7\Flash Image Tool\WIN32\config.xml

Loading XML file: E:\Asus_X541NA=8=X541NA_Bios-Ver_314\Asus X541NA=8=X541NA Bios-Ver 314\Intel CSTXE System Tools v3 r7\Intel CSTXE System Tools v3 r7\Flash Image Tool\WIN32\config.xml
Isolated memory range setting “Imr09” is disabled in the CSE FW image.
Isolated memory range setting “Imr11” is disabled in the CSE FW image.
Isolated memory range setting “Imr14” is disabled in the CSE FW image.
Isolated memory range setting “Imr15” is disabled in the CSE FW image.
Isolated memory range setting “Imr18” is disabled in the CSE FW image.
Isolated memory range setting “Imr19” is disabled in the CSE FW image.
Executing pre-build actions
Building objects
Processing attribute: GpioProfile
Executing post-build actions

GPIO Profile ‘Profile 0’ saved to file:
E:\Asus_X541NA=8=X541NA_Bios-Ver_314\Asus X541NA=8=X541NA Bios-Ver 314\Intel CSTXE System Tools v3 r7\Intel CSTXE System Tools v3 r7\Flash Image Tool\WIN32\Int\gpio_Profile_0.bin

Committing ME configuration.

Building SMIP data.
Executing pre-build actions
Building objects
Processing attribute: SmipData
Executing post-build actions

Full Flash Image written to E:\Asus_X541NA=8=X541NA_Bios-Ver_314\Asus X541NA=8=X541NA Bios-Ver 314\Intel CSTXE System Tools v3 r7\Intel CSTXE System Tools v3 r7\Flash Image Tool\WIN32\SmipSubPartitionRaw.bin
Writing map file E:\Asus_X541NA=8=X541NA_Bios-Ver_314\Asus X541NA=8=X541NA Bios-Ver 314\Intel CSTXE System Tools v3 r7\Intel CSTXE System Tools v3 r7\Flash Image Tool\WIN32\SmipSubPartitionRaw.map
Building objects
Processing attribute: BuildSettings
Processing attribute: FlashLayout
Processing attribute: FlashSettings
Processing attribute: CpuStraps
Processing attribute: FlexIo
Processing attribute: PlatformConfiguration
Processing attribute: IntelTxeKernel
Processing attribute: IsolatedMemoryRanges
Processing attribute: PlatformProtection
Processing attribute: PreciseTouch
Processing attribute: SecureNfc
Processing attribute: Gpio
Processing attribute: IntegratedSensorHub
Processing attribute: IUnit
Processing attribute: Debug
Processing attribute: Dnx
Processing attribute: IfwiBinaryLayout
Executing post-build actions
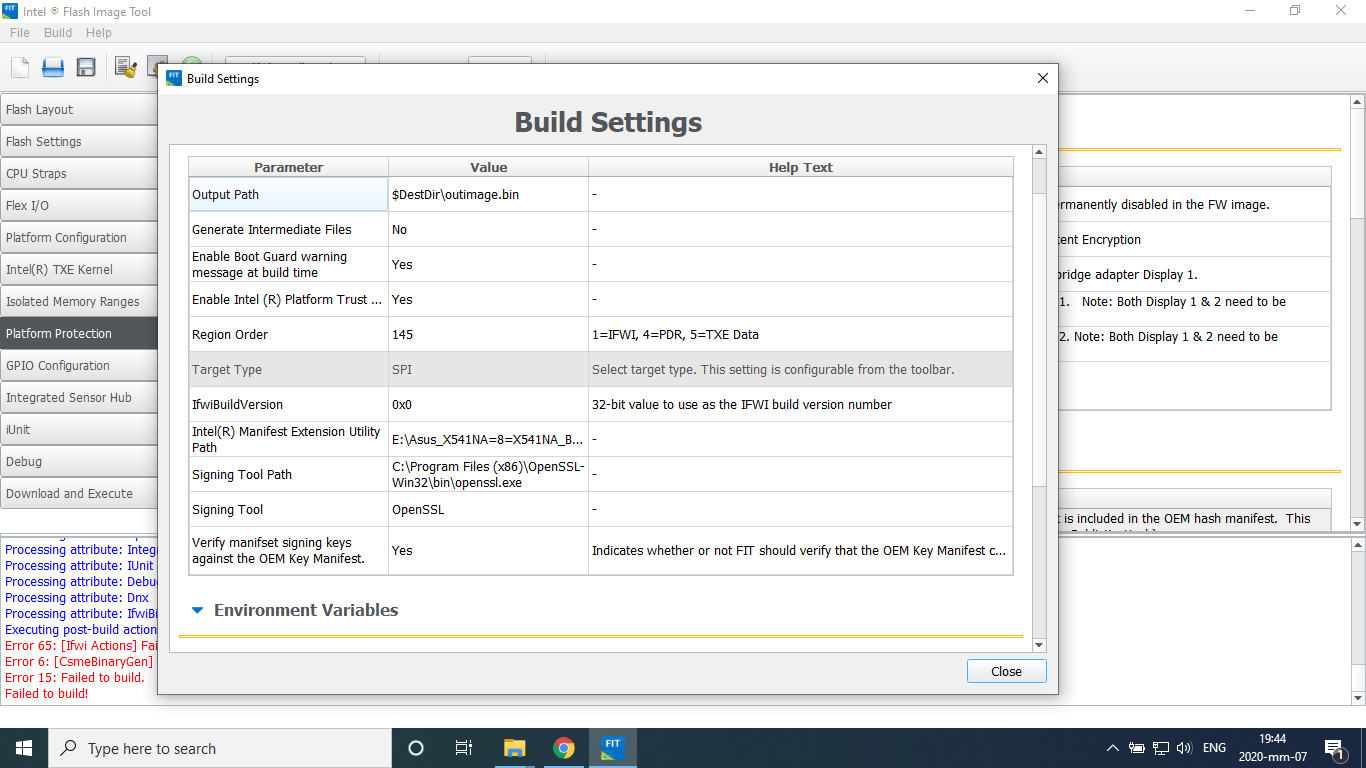
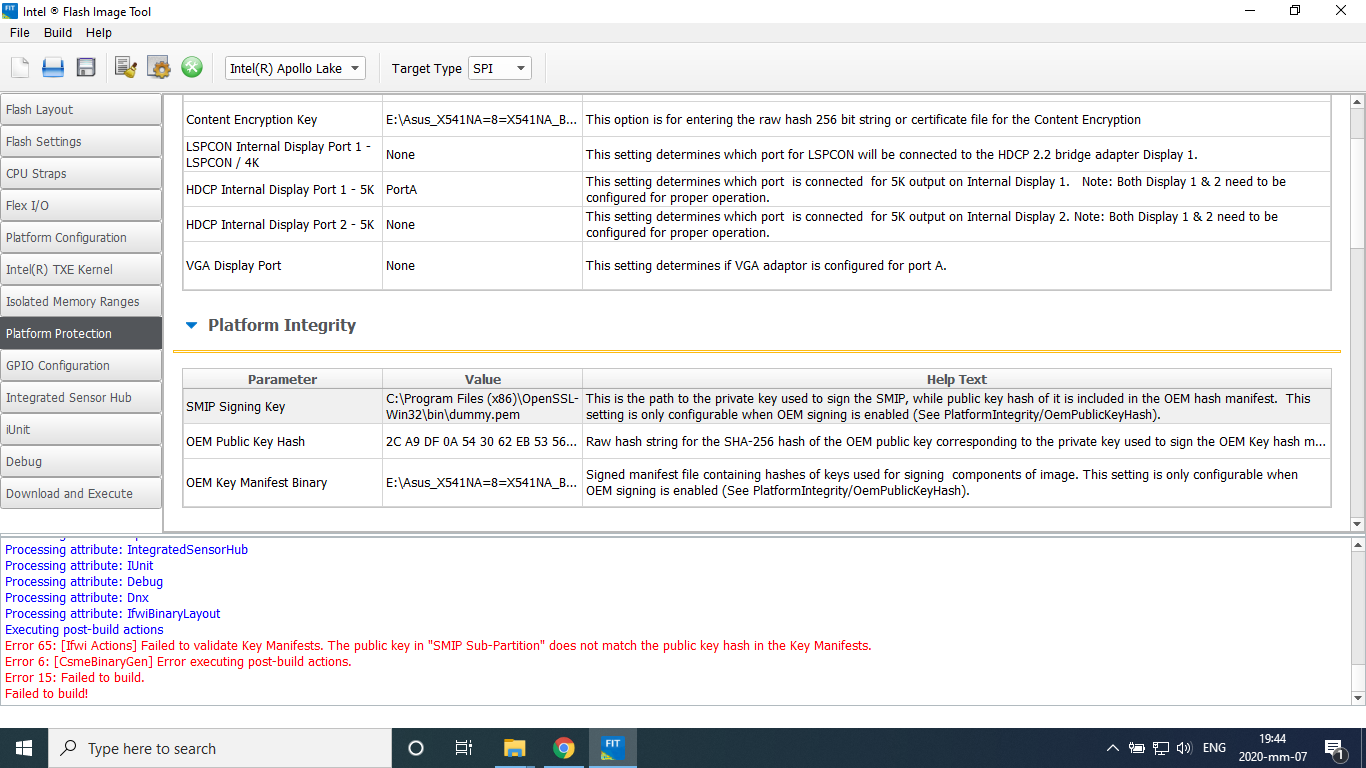
Error 65: [Ifwi Actions] Failed to validate Key Manifests. The public key in “SMIP Sub-Partition” does not match the public key hash in the Key Manifests.
Error 6: [CsmeBinaryGen] Error executing post-build actions.
Error 15: Failed to build.
Failed to build!
Executing pre-build actions
Building objects
Processing attribute: GpioProfile
Executing post-build actions

Screenshot (3).png

Screenshot (4).png


Sorry but I just saw youe post, what’s your problem, I was trying to fix some problems with a friends X541na.

I’m triying to CSTXE firmware update for x541na… but CSTXE System Tool error…
so i am post this forum my error log . and request expert sir solution for this error.

@dssence - You’re welcome, and thanks for your kind words!

Cleanup guide I linked at post #5 is all you really need for this, while you are in the middle of that process, you can look at and change some ME FW settings if you want, but be careful some may not work or mess up system etc.
Yes, you are correct in your video, you can confirm that by dropping the padding file on ME Analyzer, then you will see it’s the ME FW - https://github.com/platomav/MEAnalyzer
Also, please do not use that old UEFITool, use version 25 - https://github.com/LongSoft/UEFITool/releases/tag/0.25.0
I use 25 for editing, and 51 for inspecting, extracting etc - here is 51 - https://github.com/LongSoft/UEFITool/releases/tag/A51

@raj2020 - I doubt any key like that is used in this BIOS, so it’s not something you need to be adjusting or inserting etc. Are you following the guide?
Send me your un-edited BIOS dump, I will see if I have same issue. What are you trying to do, just update ME FW?

[quote=" What are you trying to do, just update ME FW?[/quote]

Yes Sir, I’m trying to me firmware update.

X541NA.314.rar (5.28 MB)


Sir i am success my update …
here is my log.
===============================================================================
Intel (R) Flash Image Tool. Version: 3.1.65.2309
Copyright (c) 2013 - 2019, Intel Corporation. All rights reserved.
1/08/2020 - 4:26:46 pm
===============================================================================

Using vsccommn.bin with timestamp 17:25:46 01/16/2019 GMT

Command Line: E:\Asus_X541NA=8=X541NA_Bios-Ver_314\Asus X541NA=8=X541NA Bios-Ver 314\Intel CSTXE System Tools v3 r8\Intel CSTXE System Tools v3 r8\Flash Image Tool\WIN32\fit.exe

Log file written to fit.log

Loading E:\Asus_X541NA=8=X541NA_Bios-Ver_314\Asus X541NA=8=X541NA Bios-Ver 314\Intel CSTXE System Tools v3 r8\Intel CSTXE System Tools v3 r8\Flash Image Tool\WIN32\CONFIG.xml

Loading XML file: E:\Asus_X541NA=8=X541NA_Bios-Ver_314\Asus X541NA=8=X541NA Bios-Ver 314\Intel CSTXE System Tools v3 r8\Intel CSTXE System Tools v3 r8\Flash Image Tool\WIN32\CONFIG.xml
Isolated memory range setting "Imr09" is disabled in the CSE FW image.
Isolated memory range setting "Imr11" is disabled in the CSE FW image.
Isolated memory range setting "Imr14" is disabled in the CSE FW image.
Isolated memory range setting "Imr15" is disabled in the CSE FW image.
Isolated memory range setting "Imr18" is disabled in the CSE FW image.
Isolated memory range setting "Imr19" is disabled in the CSE FW image.
Executing pre-build actions
Building objects
Processing attribute: GpioProfile
Executing post-build actions

GPIO Profile ‘Profile 0’ saved to file:
E:\Asus_X541NA=8=X541NA_Bios-Ver_314\Asus X541NA=8=X541NA Bios-Ver 314\Intel CSTXE System Tools v3 r8\Intel CSTXE System Tools v3 r8\Flash Image Tool\WIN32\Int\gpio_Profile_0.bin

Committing ME configuration.

Building SMIP data.
Executing pre-build actions
Building objects
Processing attribute: SmipData
Executing post-build actions

Full Flash Image written to E:\Asus_X541NA=8=X541NA_Bios-Ver_314\Asus X541NA=8=X541NA Bios-Ver 314\Intel CSTXE System Tools v3 r8\Intel CSTXE System Tools v3 r8\Flash Image Tool\WIN32\SmipSubPartitionRaw.bin
Building objects
Processing attribute: BuildSettings
Processing attribute: FlashLayout
Processing attribute: FlashSettings
Processing attribute: CpuStraps
Processing attribute: FlexIo
Processing attribute: PlatformConfiguration
Processing attribute: IntelTxeKernel
Processing attribute: IsolatedMemoryRanges
Processing attribute: PlatformProtection
Processing attribute: PreciseTouch
Processing attribute: SecureNfc
Processing attribute: Gpio
Processing attribute: IntegratedSensorHub
Processing attribute: IUnit
Processing attribute: Debug
Processing attribute: Dnx
Processing attribute: IfwiBinaryLayout
Executing post-build actions

Full Flash Image written to E:\Asus_X541NA=8=X541NA_Bios-Ver_314\Asus X541NA=8=X541NA Bios-Ver 314\Intel CSTXE System Tools v3 r8\Intel CSTXE System Tools v3 r8\Flash Image Tool\WIN32\outimage.bin
Writing map file E:\Asus_X541NA=8=X541NA_Bios-Ver_314\Asus X541NA=8=X541NA Bios-Ver 314\Intel CSTXE System Tools v3 r8\Intel CSTXE System Tools v3 r8\Flash Image Tool\WIN32\outimage.map

Can you pls explain it?. how can you do it step by step.


Already explain this process…
So please follow it…

[Guide] Clean Dumped Intel Engine (CS)ME/(CS)TXE Regions with Data Initialization