Hi @latorware , saw your name in the Gigabyte forums, I believe you too have the new Aero 15 Question for you, how do you move along the bytes and get to 0600 range? I tried Ctrl+page up/down but it doesn’t seem to do anything - I only see the first page starting with 0000 down to 00F0 - am I missing something?
TLDR is that Comet Lake, apparently all 10th gen Comet Lake CPUs, do not undervolt well. About half as well as their 9th gen counterparts, sometimes less. There is very little info out there on the 10870h, but given that it’s a lower-binned 10875h I’d expect undervolting to be even harder than the 10875h experiments in that thread. I’ve finally been able to go a couple days with -74 core and -70 cache, -40 iGPU without running into shutdowns at idle or when closing the lid. Cinebench R23 giving me 9833 on the multi core test, which is almost 700 points higher than my initial pre-Throttlestop benchmarks. Temps still do run pretty high but they are not throttling nearly as often, and performance is nearly 10% better.
Just be careful undervolting these new 10th gen Aeros, maybe you’ll get lucky and get a high-binned CPU but most people aren’t.
Hi @renmod , yes you’te correct I have the new Aero 15 XC (rtx 3070). It’s strange that you cannot move with Ctrl+page up because I have not had any problem. Maybe it’s because your keyboard is not the english version and has some keys in different positions? (Ru receives inputs as if the keyboard is the english version) Maybe try plugging in an external keyboard. And by the way, just like you in my case Ru also takes only a small portion of my screen, but I think that’s because of our screens being 4k, and Ru software having a much lower resolution.
@BDMaster@latorware figured it out it was scrlLK button -had to press it once to enable going to proceed with finding the correct places and checking what values are set per previous instructions
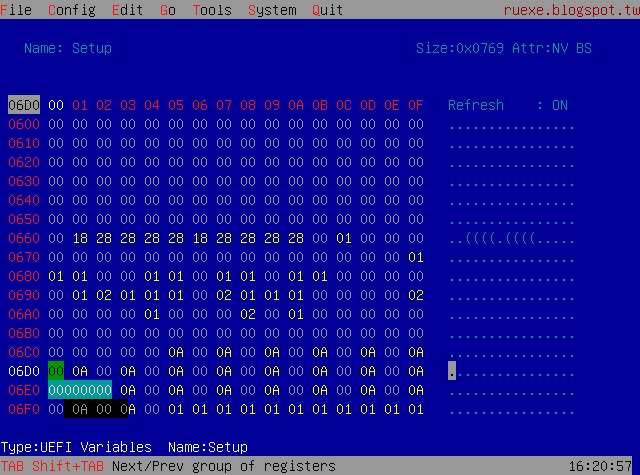
per your instructions I was able to find these offsets
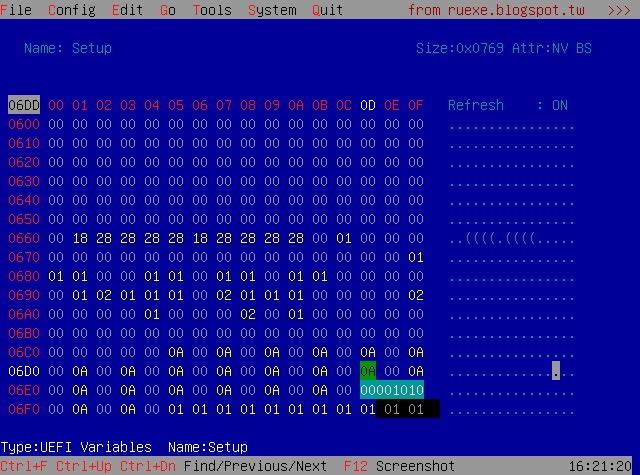
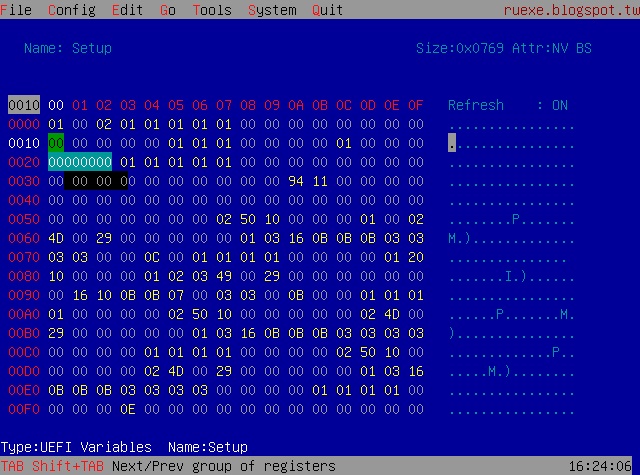
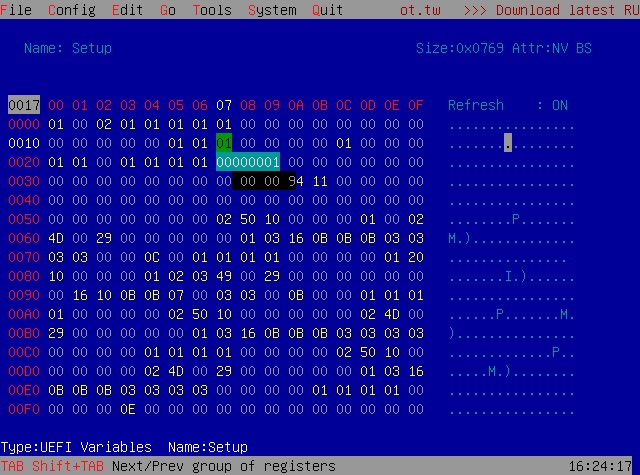
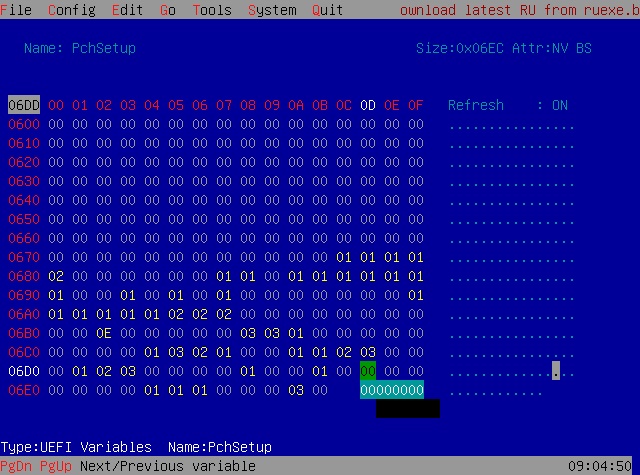
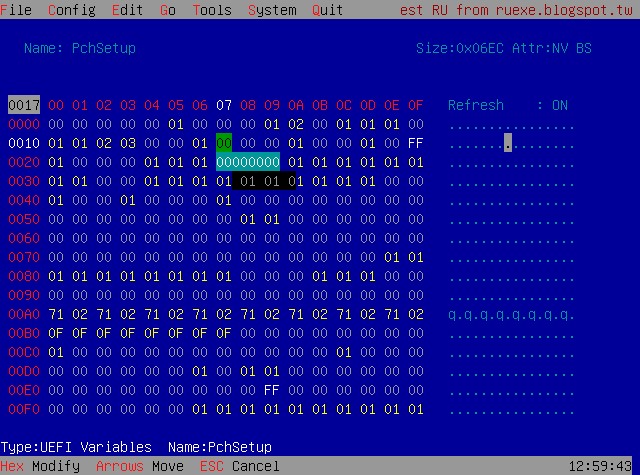
" Go to offset 0x6DD and change the 01 to 00 (This is at line 6D0 >> out to line 0D = 6DD) the default value at 6DD appears to be 0A instead of 01 Go to the offset 0x17 and change the 01 to 0x00 (This is at line 10 >> out to line 07 = 17)" default value looks correct here showing 01
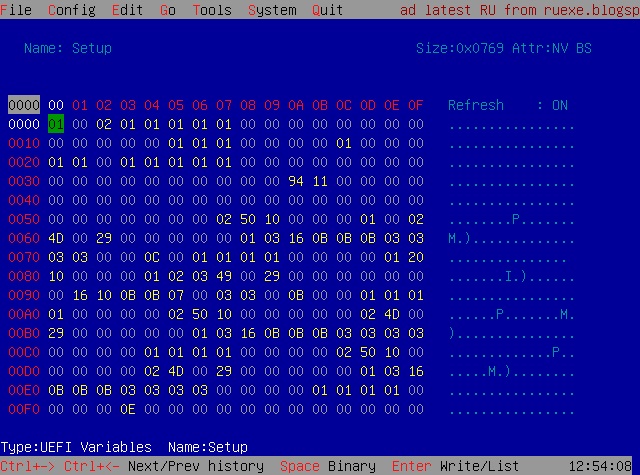
I have not made any changes yet - took screenshots of each to show the default(factory) value to confirm these look correct before making any changes.
No there isn’t the right value 0x01 only for variable 0x17 = 0x01 then on 0x6DD = 0x0A is wrong so as i wrote before … So is you get 0x0A you are into different GUID … you have to find this one “EC87D643-EBA4-4BB5-A1E5-3F3E36B20DA9” = Setup You have to go into the largest “Setup” with GUID - EC87D643-EBA4-4BB5-A1E5-3F3E36B20DA9 - !!! Let me know Regards
there is only one “setup” option in UEFI variable list ( see screenshot) - It appears to have the GUID you mention starting EC87D643-EBA4-4BB5 however the rest of the GUID is cutoff - is this not the correct UEFI variable? I don’t see any other setup other than SetupMode, SetupCpufeatures but these are clearly different - let me know if I am doing something wrong here
Change this one first, then reboot and change the ones above
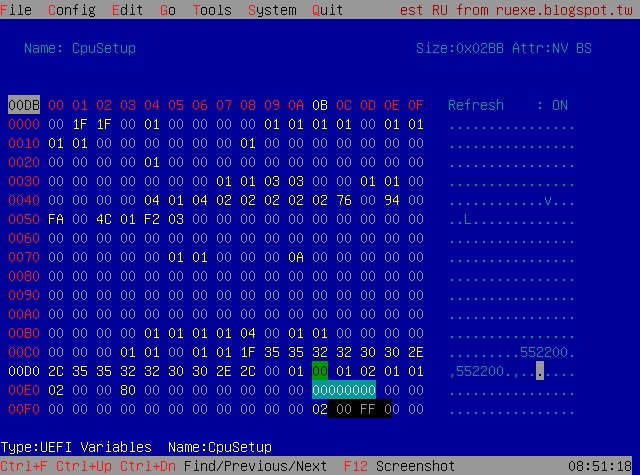
BIOS Guard, VarStoreInfo (VarOffset/VarName): 0xDB << Located in CpuSetup - B08F97FF-E6E8-4193-A997-5E9E9B0ADB32
So these are the step :
1. Boot into RU Shell 2. Find GUID B08F97FF-E6E8-4193-A997-5E9E9B0ADB32 - CpuSetup 3. Change variable 0xDB from 0x01 to 0x00 4. Find GUID 4570B7F1-ADE8-4943-8DC3-406472842384 PchSetup 5. Change bariables Flash Protection Range Registers (FPRR) 0x6DD form 0x01 to 0x00 and BIOS Lock 0x17 from 0x01 to 0x00
then reboot and try to make a biosreg.bin file and reflash again to check the errors, if all is gone well you have bypassed the locks.
Commands to backup and reflash :
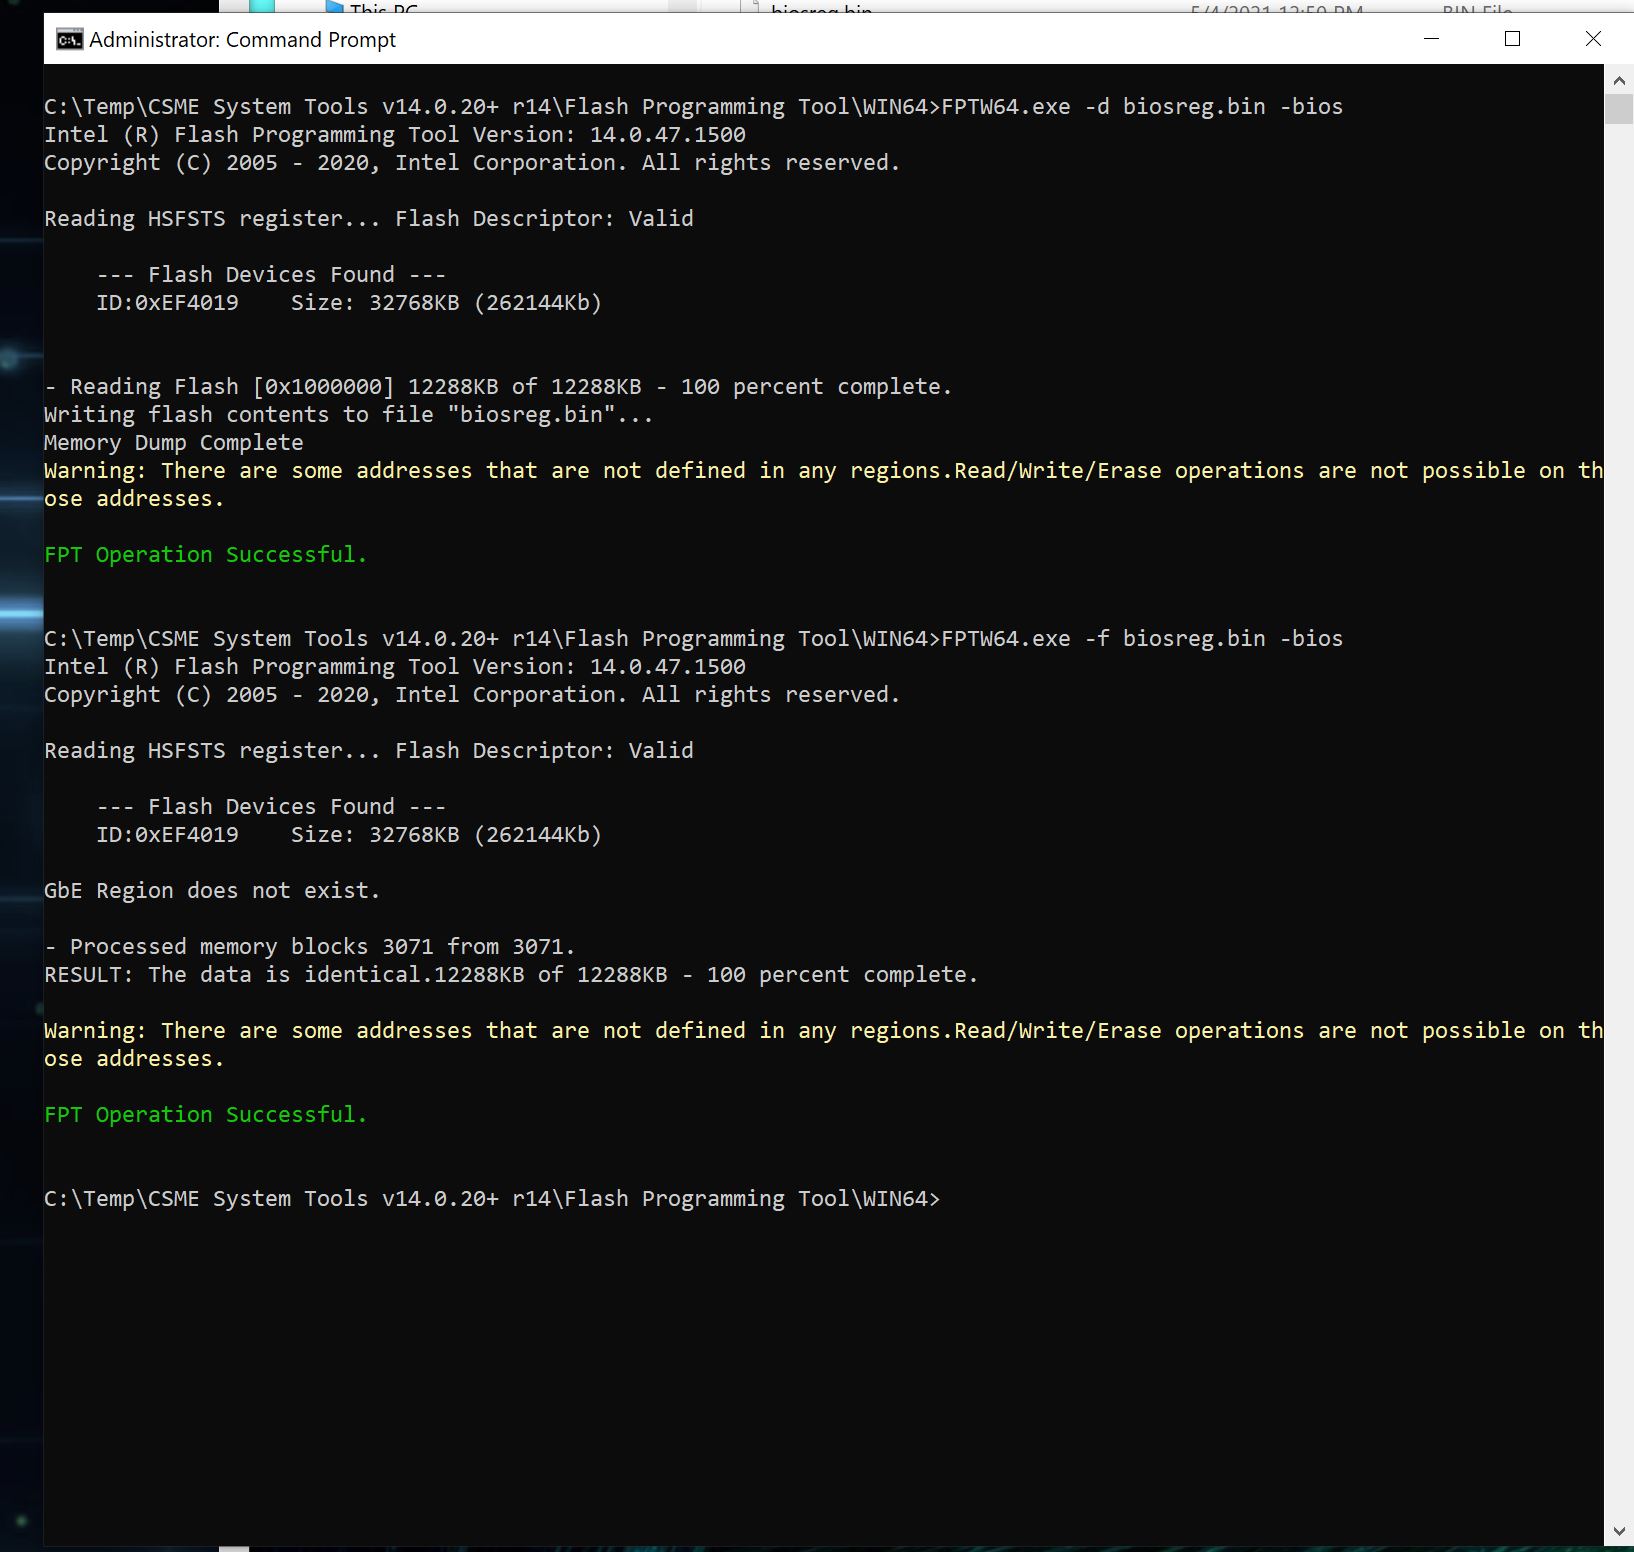
Fptw64.exe -d biosreg.bin -bios
Fptw64.exe -f biosreg.bin -bios
Then we can use AMI SCEWin too.
Make so ,
1. Hit ALT+C to expand the Config menu, then select UEFI variable. 2. Then go to PCHSetup (4570B7F1-ADE8-4943-8DC3-406472842384) via up/down arrow keys. 3. Then make change about the variables. 4. Then CTRL+W to save 5. Then ALT+Q to exit 6. Then reboot, go back into RU and check to be sure what you changed was saved. 7. Then FPT bios backup (like biosreg.bin) and send me the file.
per instructions I went to CPUSetup and PCHsetup and took screen shots of current factory values (no changes made yet) for variables 0xDB, 0x6DD, 0x17 - it appears DB and DD values are 00 - see screenshots 0x17 shows value 01 - let me know how else to proceed.
Done! changed register 0x17 value from 0x01 → to 0x00 and wrote changes. Rebooted and confirmed value for 0x17 is now 0x00 - Rebooted and performed Fptw dump backup and flash, both appear to have executed successfully! (see screenshots below) let me know what’s next - appreciate all the help and effort @BDMaster
 Question for you, how do you move along the bytes and get to 0600 range? I tried Ctrl+page up/down but it doesn’t seem to do anything - I only see the first page starting with 0000 down to 00F0 - am I missing something?