Microcode updates for 10729 China DIY 1280P
Good day friends, I need help, although I have studied all the instructions that were here on the forum, I cannot update the microcodes in my bios for the Chinese motherboard (mutant) 10729 DIY Gaming MB with Onboard 14C20T
In the attachment to the request I attach the original BIOS dump merged via Linux - FlashBIOS. Also in the attachment is the BIOS update file that the seller from China provided me, assuring that there are updates and fixes, but when comparing these two versions, I did not find any differences =)
https://www.mediafire.com/file/gyxvpjcr3bxgoec/Bios_for_1280P.rar/file
@sacredx72 Hi and welcome to the Win-RAID forum.
The BIOS files that you supplied have a lot of microcodes for many different models;
CPUID 90671
CPUID 906A0
CPUID 906A2
CPUID 906A3
CPUID 906A4
CPUID B06A2
CPUID B06A3
CPUID 90671 is for Alder Lake-S LGA1700 socket CPU
CPUID 906A0, 906A2, 906A3, 906A4 are for Alder Lake-P BGA1774 socket CPUs
CPUID B06A2, B06A3 are for Raptor Lake-P BGA1774 socket CPUs
You did not state which CPU you actually have, 14C20T is not enough information - you need to state the model and/or S-spec and if it is an Engineering Sample (ES).
@chinobino
Good day friend, thanks for the quick reply =) It’s nice to be on this forum where there are many smart people
I have an Intel I7-1280P ES processor. Yes, this is an engineering processor from China =) Below I offer the output of information about the processor from the Linux server and I understood that my main problem with working with this processor in the Linux core is “Stepping: 0” Such microcode in the Linux database did not seem to be loaded =( that’s why I think that maybe fixing the microcode on the BIOS side will change my problems =)
CPU(s): 20
On-line CPU(s) list: 0-19
Vendor ID: GenuineIntel
BIOS Vendor ID: Intel(R) Corporation
Model name: Genuine Intel(R) 0000
BIOS Model name: Genuine Intel(R) 0000 To Be Filled By O.E.M. CPU @ 3.4GHz
BIOS CPU family: 1
CPU family: 6
Model: 154
Thread(s) per core: 2
Core(s) per socket: 14
Socket(s): 1
Stepping: 0
CPU(s) scaling MHz: 54%
CPU max MHz: 4500.0000
CPU min MHz: 400.0000
BogoMIPS: 1996.80
I still don’t understand which microcode “CPUID 90671 CPUID 906A0 CPUID 906A2 CPUID 906A3 CPUID 906A4 CPUID B06A2 CPUID B06A3” refers to ES 1280P i7 Intel =)
@sacredx72 It appears you have a very early i7-1280P ES with the CPUID 906A0 and the latest microcode (1C) for that CPUID is already in the BIOS - so there is nothing to update.
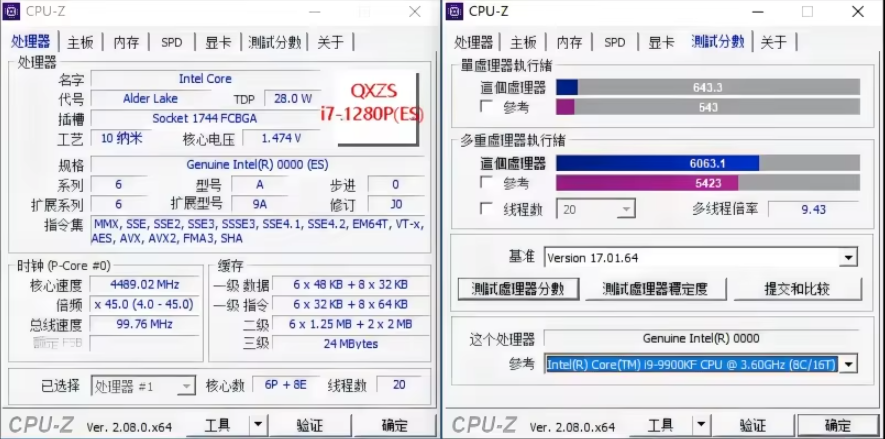
Here are two CPU-Z validations for the i7-1280P ES:
(1) CPUID 906A2, Revision K0
(2) CPUID 906A3, Revision L0
Here is a CPU-Z validation for the retail i7-1280p:
CPUID 906A3, Revision L0
Looking at an lscpu probe of a retail i7-1280P, it also shows the later stepping of 3 for CPUID 906A3:
CPU(s): 14
On-line CPU(s) list: 0-13
Vendor ID: GenuineIntel
BIOS Vendor ID: Intel(R) Corporation
Model name: 12th Gen Intel(R) Core™ i7-1280P
BIOS Model name: 12th Gen Intel(R) Core™ i7-1280P CPU @ 1.7GHz
BIOS CPU family: 198
CPU family: 6
Model: 154
Thread(s) per core: 1
Core(s) per socket: 14
Socket(s): 1
Stepping: 3
Oh, you confirmed my fears, which means this is a very early engineer who most likely does not have the working SR-IOV virtualization functions that I need. I keep getting errors like
[ 23.494142] i915 0000:00:02.3: [drm] ERROR GT0: GUC: mmio request 0x4100: failure 201/0
[ 23.494149] i915 0000:00:02.3: [drm] ERROR GT0: Failed to retrieve hwconfig table: -ENOENT when trying to use the SR-IOV function and as I understand it, it is related to the BIOS and CPU
Here is a photo of my product from the seller’s page, yes stepping 0 / J0
1 Like
@sacredx72 Yes, that QXZS S-Spec 100% confirms it, bad luck unfortunately.
https://www.bilibili.com/opus/832508942808514562
Settings for erying 12500h seems to work fine for him
3 key bios settings to look at
The following settings are based on the Intel 12700H motherboard
- Enable VMX (VT-X) in BIOS
Advanced — CPU Configuration — Intel (VMX) Virtualization Technology
- Turn on VT-D (located in the graphics card settings)
Advanced — Graphics Configuration — VT-d
- Enable MMIO allocation above 4G
Advanced — Graphics Configuration — Above 4GB MMIO BIOS assignment
- Turn off UEFI secure boot
Other settings such as CPU overclocking, XMP, etc. are available for you to set
No other operations are required during the installation of PVE. Please install it yourself according to various tutorials.
SR-IOV works fine for me on my 12700h ES TOPC boards which I think are very similar to the 10729 stuff anyway this got it to work for me.
I had a horrible time on proxmox kernel 6.8.* but 6.5 is great and 6.11 seems ok too
if you hit the freezing issues consider getting laptop ram with slow timings and a sodimm to dimm adaptor or TEAM and silicon power make some dimm modules with loose timings
If you can speak mando why didnt you check bilibili?