No rush from my end!  I will add BCP edit’s on top in duplicates from here on out, just in case. If the above fails I’ll immediately send you those duplicated with BCP edit too.
Sometimes it’s needed, other times, not, hard to say especially when I couldn’t get it sorted without assembly in this case.
Mainly it’s because this is newer BIOS style/internal layout, if it was older then the other methods I already tried would have worked, or I would have found magic string to easily enable too.
*edit - here x4 more, same assembly edit but 2x each + BCP edit, in advance in case those fail still and you need to try more while I’m out
http://s000.tinyupload.com/index.php?fil…756782090588652
Tried both 1 and 2 … no change whatsoever in BIOS ![]() I see no extra options or menus enabled. Since weekend is approaching, I will have more time to test so send whatever you need me to test (at your convenience).
I see no extra options or menus enabled. Since weekend is approaching, I will have more time to test so send whatever you need me to test (at your convenience).
EDIT: Didn’t see the ones you newly posted, will try those…
EDIT: Tried all 4 additional ones above (1BCPS, 1BCPU, 2BCPS, 2BCPU) and same, no change.
Not lookin’ too good here huh? This is just a tricky one to unlock it seems. If it makes any difference, access level comes up as Administrator and system mode as User (as you can see in the OP BIOS pics under Security menu).
Thanks for report back so quick, I guess no change is better than trashed boot/bricked BIOS  Onto next routine, will attach more test BIOS soon, thanks again from everyone for being willing to run through all these tests
Don’t give up so easily, that was only one change, plenty more to go through before we say not looking good. Yes, I did see your images saying Admin/User, that’s why I send both ways when I do any BCP edits.
@CPL0 - I could do this a lot easier if I knew how to find each menu or tab ID, like in this example for Insyde BIOS
http://web.archive.org/web/2016111807325…power-tabs.html
I used this think maybe it’s these, but then I see 30+ others similar later, and I get stuck/unsure.
unk_1D020
unk_1CFF0
unk_1D000
unk_1D010
unk_1D040
unk_1D2B0
unk_1D030
I’m sure there is an easy, known way for AMI like the insyde method shown above, but I can’t find it. Do you know anyone else good at assembly and AMI that could maybe stop in here and give me some tips?
I think I’m looking to edit these three routines next, almost certain one of these is the main menu/tab selection
SUB_1C7E4
Sub_13C2C
sub_E48
Sub_6F1C >> Sub_179E0 + Sub_1B7C8
Sub_12A0
@oldirdey ?
Edit @nimaim - new test, thanks
http://s000.tinyupload.com/index.php?fil…964563160923217
@Lost_N_BIOS , thanks for still trying to get this working for us … tried all 3 files above, still nothing.
That’s a nice tutorial above! I’ll definitely read through it over the weekend to learn more about how this works.
@nimaim - You’re welcome, and thanks for quick report back! So nothing new, anything missing main tab/section-wise?
That tutorial above is only meant as a reference to show CPL0 what type of tab header/ID I meant that I was trying to find. None of that tutorial applies to this BIOS, at all, it’s for Intel Insyde BIOS, this BIOS is AMI
That will give you a short example of how assembly editing works though, but none of the details are in regards to this BIOS or this BIOS type etc.
Onto the next edit! We’ll get there I’m sure, just take sometime to find since I’m blind editing due to not being able to for sure ID the tabs themselves.
*edit - @nimaim I noticed when saving via BCP it saves as “Saving unsecured rom” How are you testing these, flashing in? If yes, do you see any difference while flashing between the regular mod vs the two BCP ones?
Just something I’ve been thinking of, if we continue to see zero changes maybe we need to look into this, create some mod we know we’ll see the change of and then see if both BIOS edited with and without BCP reflect that change or not after flashing in.
I expect some crashes, failed bootup, BIOS visible menu looses, etc, eventually from some of these changes, if not I think we’ll need to look into that eventually.
New test - http://s000.tinyupload.com/index.php?fil…610333849970283
@Lost_N_BIOS I am flashing in FPT (from Intel ME 12 package) with a freedos bootable stick with command fpt -f bios.rom -bios. I cannot flash with AFU as it gives me a secure policy error. Should I be using something else, different options, etc?
Change wise I see zero changes between the menus whatsoever. There are no added or missing options. I think we need to start with something that will def show a change as well just to get a baseline.
I will test the new ones in a little bit.
If it helps, on my model (GJ5CN6E) editing string "System information" to "System information1" through BCP 5.02.0023 and flashing it via fpt actually applied and on the main tab I was able to see "System information1" instead of old label
@nimaim - thanks, good to know the method at least, FPT forces in and erases before writing, so any kind of security check would be ignored.
Thanks for the AFU info again too, I forgot someone already mentioned that error with AFU, that must be what this refers to in BCP, like Asus security capsule, only this one must be hidden capsule within the BIOS like Asrock does.
No, FPT is great choice, I only asked how so I’d know.
@truelecter - thanks, I will test to confirm one with nimaim too, since I’ve been using a different BCP (5.02.0031 - 2017) than the one you mentioned.
Here nimaim, please test this too once you have a chance, enabled via AMIBCP >> Advanced page (Set User) >> Shared Memory setting, show SLIC Table, and USB Camera Setting
http://s000.tinyupload.com/index.php?fil…618034790577858
How did the test go with E48 set?
Just to let you know I’ve not been well these last couple of days, hopefully back up and running soon.
No worries man, family and health always first … this stuff here is just for fun ![]() Hope you feel better.
Hope you feel better.
@Lost_N_BIOS will test the last few you posted today. That way hopefully we will know which mode is sticking (default, supervisor, or user) and you’d only need to produce one file for me per every test.
EDIT: No luck with E48 set, no changes …
EDIT: Good news with stock changes! The options you unlocked in stock BIOS works! I now see Show SLIC Table, USB Camera Support, and DVMT options in first stock Advanced menu. But we know this works, @pcfr33k reported this earlier. But at least we know something is happening and USER mode seems to work. Now we just have to figure out how to unlock the hidden ones ![]()
I don’t know if it can be useful. But I decompiled the Control Center and i found how values are written in the ECRAM.
1
2
3
4
5
6
7
8
9
10
11
12
13
14
15
16
17
18
19
20
21
22
23
24
25
26
27
28
29
30
31
32
33
34
35
36
37
38
39
40
41
42
43
44
45
46
47
48
49
50
51
52
53
54
55
56
57
58
59
60
61
62
63
64
65
66
67
68
69
70
71
72
73
74
75
76
77
78
79
80
81
82
83
84
85
86
87
88
89
90
91
92
93
94
95
96
97
98
99
100
101
102
103
104
105
106
107
108
109
110
111
112
113
114
115
116
117
118
119
using System;
using System.Collections.Generic;
using System.Linq;
using System.Management;
using System.Text;
using System.Threading;
using System.Threading.Tasks;

namespace MyColor2
{


    static public class WMIEC
    {
        static private ManagementEventWatcher watcher = null;
        static public bool WMIReadECRAM(UInt64 Addr, ref object data)
        {
            try
            {
                ManagementObject classInstance =
                    new ManagementObject("root\\WMI",
                    "AcpiTest_MULong.InstanceName='ACPI\\PNP0C14\\1_1'",
                    null);

                // Obtain in-parameters for the method
                ManagementBaseObject inParams =
                    classInstance.GetMethodParameters("GetSetULong");

                // Add the input parameters.

                Addr = 0x10000000000 + Addr;
                inParams["Data"] = Addr;

                // Execute the method and obtain the return values.
                // Wordaround to avoid busy flag
                System.Threading.Thread.Sleep(200);
                ManagementBaseObject outParams =
                    classInstance.InvokeMethod("GetSetULong", inParams, null);
                // List outParams
                data = outParams["Return"];
                return true;
            }
            catch (ManagementException err)
            {
                Console.WriteLine("GetSetULong failed" + err.Message);
                return false;
            }
        }
        static public String WMIWriteECRAM(UInt64 Addr, UInt64 Value)
        {
            try
            {
                ManagementObject classInstance =
                    new ManagementObject("root\\WMI",
                    "AcpiTest_MULong.InstanceName='ACPI\\PNP0C14\\1_1'",
                    null);

                // Obtain in-parameters for the method
                ManagementBaseObject inParams =
                    classInstance.GetMethodParameters("GetSetULong");

                // Add the input parameters.
                Value = Value << 16;
                Addr = 0x0000000000000000 + Value + Addr;
                inParams["Data"] = Addr;

                // Execute the method and obtain the return values.
                // Wordaround to avoid busy flag
                System.Threading.Thread.Sleep(200);
                ManagementBaseObject outParams =
                    classInstance.InvokeMethod("GetSetULong", inParams, null);
                // List outParams
                return outParams["Return"].ToString();

            }
            catch (ManagementException err)
            {
                Console.WriteLine("GetSetULong failed" + err.Message);
                return "Failed";
            }
        }
        static public void StartWMIReceiveEvent(EventArrivedEventHandler WMIHandleEvent)
        {
            try
            {

                WqlEventQuery query = new WqlEventQuery("SELECT * FROM AcpiTest_EventULong");

                watcher = new ManagementEventWatcher(new ManagementScope("\\\\.\\Root\\WMI"), query);
                //Console.WriteLine("Waiting for an event...");

                watcher.EventArrived += WMIHandleEvent;

                // Start listening for events
                watcher.Start();


                return;
            }
            catch (ManagementException err)
            {
                Console.WriteLine("An error occurred while trying to receive an event: " + err.Message);
            }
        }
        static public void EndWMIRecieveEvent()
        {
            if(watcher != null)
            {
                watcher.Stop();
                watcher = null;
            }

        }

    }
}
EX. Fan setting in Auto Mode :
WMIEC.WMIWriteECRAM(1873UL, 0UL);
@Lost_N_BIOS , I’ve found interesting thread on another forum related to TONGFANG GK5CN* ( http://forum.notebookreview.com/threads/…gk5cn6z.815943/ DOWNLOAD LINKS sections ) models and they have multiple bioses version from different rebrands of this model. And on of the comments ( http://forum.notebookreview.com/threads/…0#post-10736345 ) mentions that “Configurable TDP in Bios: Fireying Z5 shares the same base as Mech Z2 so I flashed lasted Z2 bios to get configurable TDP. 35, 45, 55 watts”. So this can be somehow related to unlocking hidden features as well.
@CPL0 - hope you’re feeling better soon, I hate being sick, feel for you!
@Nimaim - thanks for reports back! I still wanted to know about BCP changes for two reasons, one I’m using a newer build than others mentioned, and two I wanted to know if User worked or if we needed to set Supervisor (Due to your screenshots access level)
Tonight I will make some tests for you relating to NVRAM changes, a few with different settings changes, and one without NVRAM - so we can rule out control of menu’s being there. Then back to assembly, since it’s always controllable there, just have to find where it’s bypassing the other menus
@truelecter - thanks, yes I noticed several threads there on these, and a few users have posted other systems info here using similar/same BIOS too.
For settings you mentioned, someone posted an app that can change too, all this we can easily change with AMIBCP or via setup_var with grub, so it’s useful for some that don’t want to modify BIOS, or wait on a mod, request a mod etc but it doesn’t help with unlocking the hidden menus.
Thanks for looking and taking notice though, if you see anyone talking about unlocking second advanced, chipset, other root menus that’s what needs to be done here. We need hidden/Root/Menu unlock info.
For now, if you don’t want to wait, or anyone doesn’t want to wait, any setting you see in AMIBCP hidden or not, you can change it’s default value, save and reflash and you will have those settings applied as default even when you cannot see them in the BIOS.
Tell anyone flashing via FPT, to first backup BIOS region (FPTw -bios -d -biosreg.bin), then make their edits, then reflash BIOS region (FPTw -bios -f modbiosreg.bin), otherwise they may loose system specific details.
I will look into FPTw, does this run from a Dos USB flash or can be done in windows terminal? I’ll find a copy of FPTw give it a try. Already did a backup with a Programmer. Does FPTw save all the chip information as a programmer can dump?
I want to make changes specifically disabling HD630 to see if I can boot into MacOS High Sierra using the Nvidia Web driver. I know there is no support yet for MacOS Mojave. Asus disables the Intel HD graphics on many Gaming Laptops. I just need to figure out where to go probably chipset and disable exactly what, there is so much there. I looked over my G750-JX Asus Laptop Bios, it gave me no clue as to what they disabled for the internal graphics, and only discrete Nvidia enabled. Some Bios have the disable Optimus option in the Bios Menu, I don’t know what that equates to exactly in the Chipset menu section, and like I said I did not see anything obvious when I loaded the Asus Bios into AMIBCP v4.
@pcfr33k - You can use FPTw from DOS, EFI Boot, or Windows (Command prompt only) Yes, FPT dumps like a programmer, that’s why I gave the warnings. What you want can be done via AMIBCP, Chipset > SA > Graphics Config section (Internal graphics disable, I assume that’s what you wanted)
See also Advanced >> Switchable graphics for the Muxless setting (never mind, muxless is only option  ), but on page mentioned above you can disable default SG anyway if you wanted, once done with testing other setting changes
For this BIOS use AMIBCP 5 - here is latest version - Unlock Aptio V Z170 Board Menu Chipset unhide and other Menu
Interesting, I did not know this … even if the menu is hidden, you can change default value of any option and it will stick on flashing with FPT?
I will look into FPTw, does this run from a Dos USB flash or can be done in windows terminal? I’ll find a copy of FPTw give it a try. Already did a backup with a Programmer. Does FPTw save all the chip information as a programmer can dump?
I want to make changes specifically disabling HD630 to see if I can boot into MacOS High Sierra using the Nvidia Web driver. I know there is no support yet for MacOS Mojave. Asus disables the Intel HD graphics on many Gaming Laptops. I just need to figure out where to go probably chipset and disable exactly what, there is so much there. I looked over my G750-JX Asus Laptop Bios, it gave me no clue as to what they disabled for the internal graphics, and only discrete Nvidia enabled. Some Bios have the disable Optimus option in the Bios Menu, I don’t know what that equates to exactly in the Chipset menu section, and like I said I did not see anything obvious when I loaded the Asus Bios into AMIBCP v4.
My understanding (which is probably not accurate) is that if Optimus is used and system is using a muxless setup like this one, there is no way to hard set dGPU / iGPU to OFF in the BIOS, I thought that was a software specific thing at that point. The gaming laptops you mention have a normal (non Optimus) card hence why you can toggle it in the BIOS. My HP Omen 15 was like this.
If Lost_N_BIOS is correct, that would be great. I looked at the option he mentioned and in the control help string it says "Keep iGFX enabled based on the setup options" so in theory maybe you can force disable it? Would you set this value in e.g. optimal and then load optimal settings?
So changing Primary Display three places from SG to PEG and disabling internal graphics won’t work? See screenshot below:
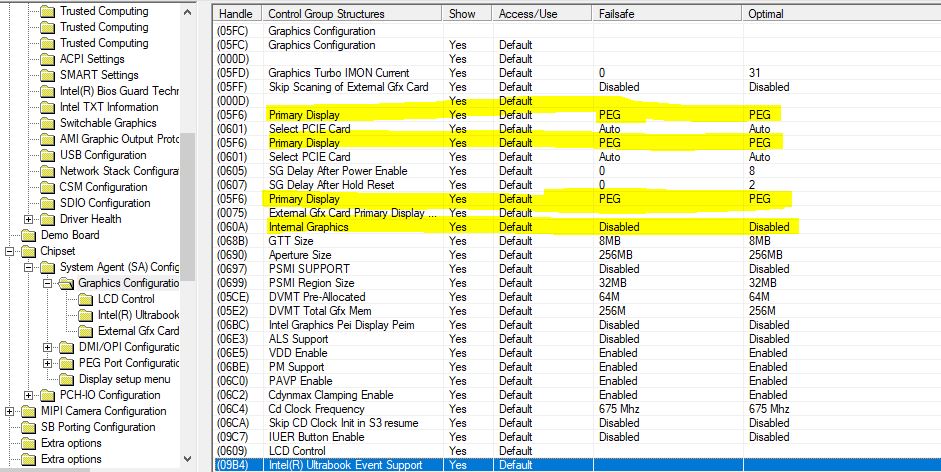
@pcfr33k , is that a question or statement? If that doesn’t work, it definitely does not support it. Setting to PCIe graphics (PEG) and disabling internal is what I would do as well. I can test this later myself. Linux kernel outputs are a lot more descriptive than Windows and I can see exactly what driver its using.
EDIT: Maybe you have to load optimal settings (F3 in BIOS) to force it to set these options?
It was a question sorry about that, I wonder if I can test with an Ubuntu Live USB flash drive. The way the switching graphics is setup now does linux boot to a black screen?