Hi everyone i had problems with my z370 gaming wifi bios i downloaded the bios from the official site and tried to write it but after verify it gives me that error Chip main memory with the contents are in disagreement i figure out that i need to do something to the bios file first before flashing it but i don`t understand it really i need some help
@dimdim - What is your BIOS chip ID? Read if off the chip, do not rely on what any software tells you. Not all software version work for all chips. If it is REALLY MX25U12873F then you need 1.8V adapter and to use the version of software in folder of package below named >> CH341A v1.31(1.4) (CH341AFree) Choose correct size and type first https://ufile.io/p21lj9ck
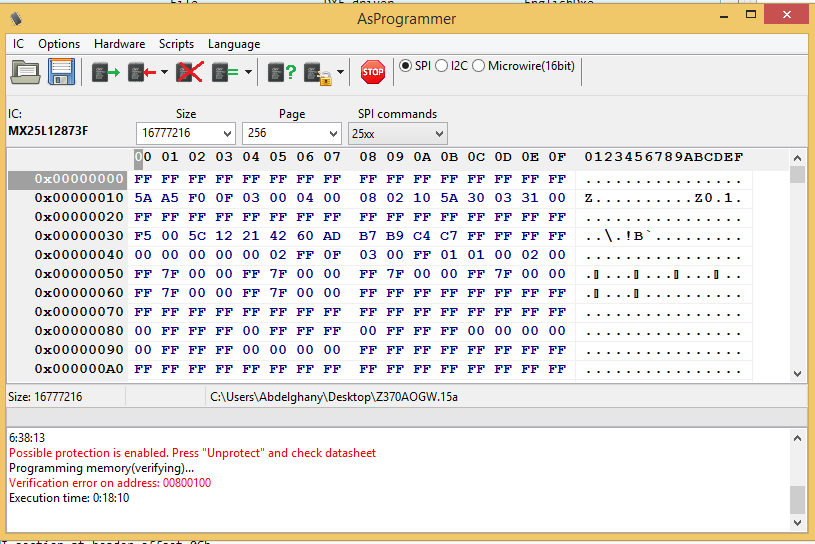
@Lost_N_BIOS Hi i was really waiting for you to comment so thx for the fast replay My chip is the l one its a 3 volt one i connected it without troubles but i forgot to remove the cmos battery is it bad for the chip? And i tried the free edition 1.4 but i get a strange chip name like cc27 something not my chip mine is mx25l12873f i tried 1.34 in the photo up there it gives me this error and tried asprogrammer and tried to unprotect then erase then blank check still nothing when i write the bios file do i let it as it’s there’s no. Bin there there’s nothing only f15a
You’re welcome! You can leave CMOS battery, it’s OK Use the version I mentioned, choose correct chip type (25) and correct chip size (128/16MB) and that is all, then erase, blank check, open BIOS file, write, verify. Ignore anything on left 24 side, that is not about chip ID, chip ID is not detected or shown to you when doing what you’re doing here with type 25 chip
@Lost_N_BIOS So you mean that i need to use the 1.4 even if it’s not showing the right chip id? Just put the chip size and this settings and another question can i flash the backup bios first then flash the main bios after booting with the backup bios? Or i will need to flash the main bios first and thanks for everything -------------------
And what about the bios file do i go flash the official site bios straight or do i need to edit something in it first
@dimdim - Yes, use the version in the folder I mentioned, from the download link I gave above >> CH341A v1.31(1.4) (CH341AFree) Select 25, then select correct chip size 128/16, then do as I mentioned (you can use “detect” or not, does not matter)
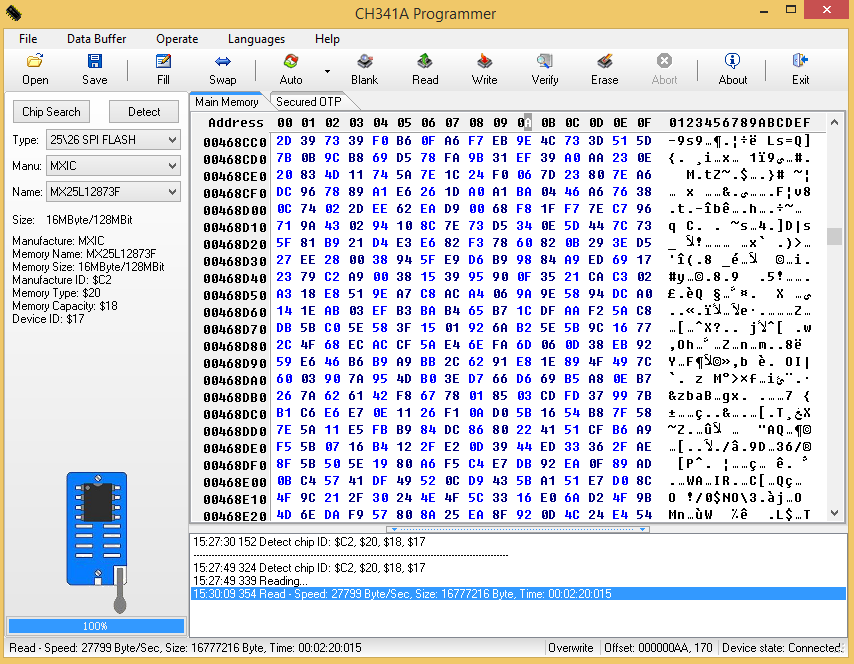
Ohh, sorry about the ID and my comment before, I see what you mean now! I forgot this one does show you the flash ID in hex format >> This is correct for > C2201817 = MX25L12873F (same/same) You will see that same ID/Info in 1.34 and ASProgrammer too, see your images at post #1 - Well at least for 1.34, ASProgrammer you’d only see if it you scrolled up at the bottom info section >> Manufacture ID >> C2 Memory Type >> 20 Memory Capacity >> 18 Device ID >> 17
= C2201817
About Main/Backup, just get Main BIOS working first, then worry about backup. If you have a BIOS switch, then you can flip that while in Qflash to flash the backup. Otherwise, once fixed, you can just choose to also flash backup from Qflash with another BIOS reflash, or by using the /DB switch with EFIFlash.
Sorry, I assumed you already had BIOS ready to program in. Gigabyte does not put serial or UUID in BIOS, but Ethernet LAN MAC ID will need transferred over before you program it in, or you can fix that later with FPT, up to you. Send me your dump and I will tell you where LAN MAC ID is located, or you can check if you know how to use UEFITool (use 25.0 version) Look in dump and GBE, it should be at beginning of GbE region, but may also be at 1000h of GbE too (both places same) You can extract GbE from your dumped BIOS, and replace into stock BIOS, then program in. Or, you can fix in OS later once your up and running again via >> FPTw.exe -gbe -f gbe.bin (using the dumped GbE with your MAC ID in it already)
@Lost_N_BIOS unfortunately i couldnt wait and i flashed both chips with your version without changing my mac so now its working thanks to you ofcourse but i have two problems now i my xmp profile wont turn on and i dont know if my main bios flashed or not but its working now , if you can (have time) can i upload my bios dump for you so you can give me my mac address and which one that i give you my backup or the main
@dimdim - Well, slow down, always, when it comes to BIOS!! Glad to hear you are now booting What do you mean you flashed it with “My version”?? My version of what? I didn’t post any BIOS here for you, so I’m lost as to what you mean there
Give me dump of MAIN and I will give you MAC address. Or, you can get off sticker on your board Usually it’s on side of 24 pin, or near the LAN port (check all sides of metal block), or sometimes on SATA Ports too, or top/bottom side of PCI/PCIE Slots.
XMP issue, probably you need to either reset ME FW state via full 1+ minute power drain (remove 8/24 pin cable, press and hold case power on button for 10 seconds, then wait 1+ minute) Or, you can issue this command with Intel FPT software if you are familiar with using that and have correct version for your systems ME FW (I think you need V11 ME system tools) >> FPTw.exe -greset If neither of those help, then you may have corrupted write, or you may just need to clear CMOS then, load optimized defaults in the BIOS, save and reboot, then try again.
@Lost_N_BIOS i meant the ch431a programmer app version and yeah i have my motherboard box i will try to do that tonight because i am fixing it from 7 hours i think and i want to sleep --------------------
@Lost_N_BIOS for real you saved my day thanks again
@dimdim - Ohh, you mean software version? If yes, OK, I gotcha MAC ID wont be on the box, it will be on a sticker on the motherboard itself. Or, if you can’t find, you can send me ANY previous full BIOS backup you made and then I can tell you the MAC ID Then, if needed, I can show you how to dump GbE and how to edit to put MAC in there, then how to program it back
You’re welcome, happy to be able to help you save your board and sanity Get some sleep now that you can rest easy!
hey @Lost_N_BIOS i got a sweet 10 hours of sleep after 15 days and thats because of you thanks again for now i did what you said exactly and after i did that i cleared my cmos before i put my 24 pin cable back now its working i have my xmp working again theres one last thing about the mac address i will send you a photo with 2 numbers i just wanna know which number is my mac address and more info about that FPT i dont know thing about it
When I click read it works (it take 3 minutes), then I click erase and it shows success (it takes 5 seconds), but when I click read again it shows “disconnected”.
I plug-out CH341A and next plug-in it again into USB and click read, it shows a lot of 00 or FF, but in half of data there starts random symbols like 63, AC, 1D.
When I chose BIOS file and click write it will work (it takes 4 minutes), but verification shows difference and motherboard won’t start (Gigabyte Aorus X370 Gaming 5).
I use CH341A with 1.8V adapter and Clip, I checked with multimeter and all pin have connection.
I used a lot of version of NeoProgrammer, ASProgrammer and software from this website https://khandishnetwork.com/2021/01/28/ch341a-flash-erasing-error-solution/, so I try to disable protection of this chip, but it shows is unprotected.
Can you help ? @Lost_N_BIOS
The user Lost is no longer an active forum member for more than a year.
Recent Gigabyte new bios files contains CAPSULE, not a valid FW image for SPI programming, try older versions.
EDIT: Strange behaviour to point out directly on SPI corruption…the loop suggests other issue, 2 SPI broken???..humm…seems more RAM controller IC/CPU VRM or even possible a failure on the AMD chipset as it controls the SPI access on pré-post initialization.
My opinion only, wait for other users.
Thanks for reply @MeatWar, but I’m using old wersion of BIOS “F5 6.9 Mb 10/04/2017”, it’s third oldest version, because only old version support A-series APU. Before I had one of the newest version “F51d 10.8 Mb 13/12/2021” with my Ryzen 5 1600X but some day system starts normaly, works a few hours and I saw the LED of main and backup BIOS swapped about 30 seconds and it was cycle without end, I reboot computer, but it don’t start on both BIOS chip. Motherboard shows RAM and CPU failure, but before rebooting it works normaly about few hours.
I bought new motherboard and CPU, but I tested my old CPU on new motherboard and it works, also RAM works.
Because my graphics card is in computer with new motherboard and new CPU, I decided to try repeair old motherboard with CPU containing GPU, so I took A12-9800E. Old motherboard supports that CPU until F25 BIOS version, so I try F25 and F5, the oldest is F3.
On Ryzen 5 1600X before removing that motherboard from computer I had difrent code on display on motherbord “50~55 Memory initialization error occurs”. Now with A12-9800E after flashing BIOS with CH341A i had code 00, it isn’t on the list, next time after another flashing i had “9C Detect and install all currently connected USB devices”, but one more time LED of main and backup BIOS swapped and swapped again and again.
I desoldered BIOS chip and use socket SOP8 200~209 mil with CH341A programmer.
With that I was able to properly erase and write that BIOS chip so I did that.
Next I soldered the chip into motherboard and finally motherboard is working.
My problem is solved.
I experienced exact same issue with a Gigabyte X470 Aorus Gaming 7 WiFi motherboard (which has dual BIOS) neither of which would post - it came with a 3900X chip and previous owner specified the BIOS was bad (apparently from Windows Updates?). Knowing about DualBIOS I figured it’d be an easy switch to Backup BIOS and reflash MAIN, I was very wrong. Neither BIOS would even POST, cycling error codes on the qLED, no beeps, nothing.
This was my first BIOS fix via CH431a experience:
0. I read several guides on WinRAID including this one
Great YouTube video from Miyconst on how to use the programmer and clip: Link
I was only able to find the B_BIOS chip (soldered on the board) initially, after several attempts with the clip and various tools, I was able to read the chip. However, VERIFY would always fail, and very quickly as chip contents did not match the buffer.
After many more hours of testing, researching online, I determined the following:
a) comparing to Gigabyte’s official BIOS .bin files, the dump appears to indicate version F30 which is older than F40 needed to support Ryzen 3000 series chips
b) however, I’m still unable to read/verify the B_BIOS chip
Eventually I found the M_BIOS chip, Gigabyte actually has this neat little “BIOS Socket” which houses the M_BIOS chip unsoldered in a little housing, allowing for easy removal and access.
I removed the M_BIOS chip, clipped to the CH431a reader, and this time I was able to read/verify the chip.
Using this as baseline, I then wrote to the chip (mistake) and verification failed. What many guides neglect to mention is what Lost_N_BIOS has mentioned the order of operations should be:
a) Read
b) Verify Read
c) Save copy (if needed)
d) Erase
e) Check Blank/Zeroes
f) Write
g) Verify Write
After flashing F40 to M_BIOS chip and replacing into the BIOS socket on the board, it POSTed and I was able to revive the board.
With that success I decided to try again and update the B_BIOS just in case M_BIOS becomes corrupt again, once again the CH431a is unable to read/verify the soldered chip. I realized it’s probably electrical issues related to the chip being connected the remaining circuitry onboard.
I decided to take the easier route - boot into Windows with M_BIOS active, then use the GigaByte @BIOS tool which allows updates to both BIOS chips and update the B_BIOS, flashing both to F50 first.
Now that B_BIOS supports Ryzen 3000 series, I was able to use the BIOS selector switches onboard to POST and update via qFlash to F61 which is the latest version for Ryzen 5000 series and G version support.
Thank you to everyone on the forums for all your knowledge!
Would you mind helping me with some details on how you got the bios working again? I have the exact same issue. Both bios bricked, and the B_Bios won’t verify.