Aha, I suspected something like that when you mentioned the “entrypoint”!
I did try the Hex Editor but got lost in it since I realized I didn’t know what I was looking for ![]()
Thank you again for the help! I feel almost ashamed to keep bothering you with this issue but the again it’s also a great learning opportunity for me for future references.
The .exe file is just a self-extracting file.
Here’s the link to the original F9D BIOS.
Best Regards
@Bittornado :
Thanks for the original BIOS.
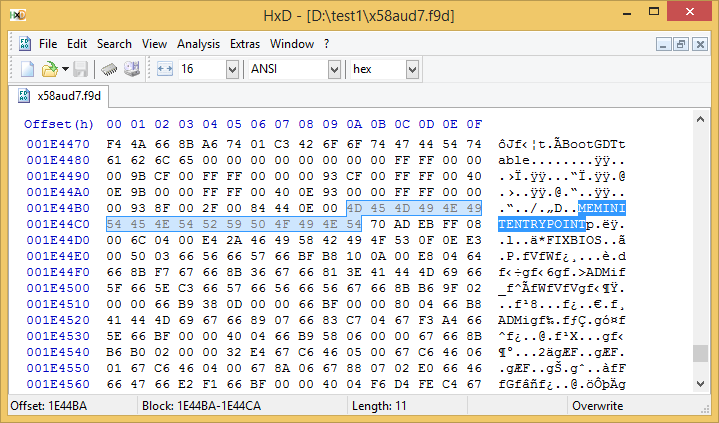
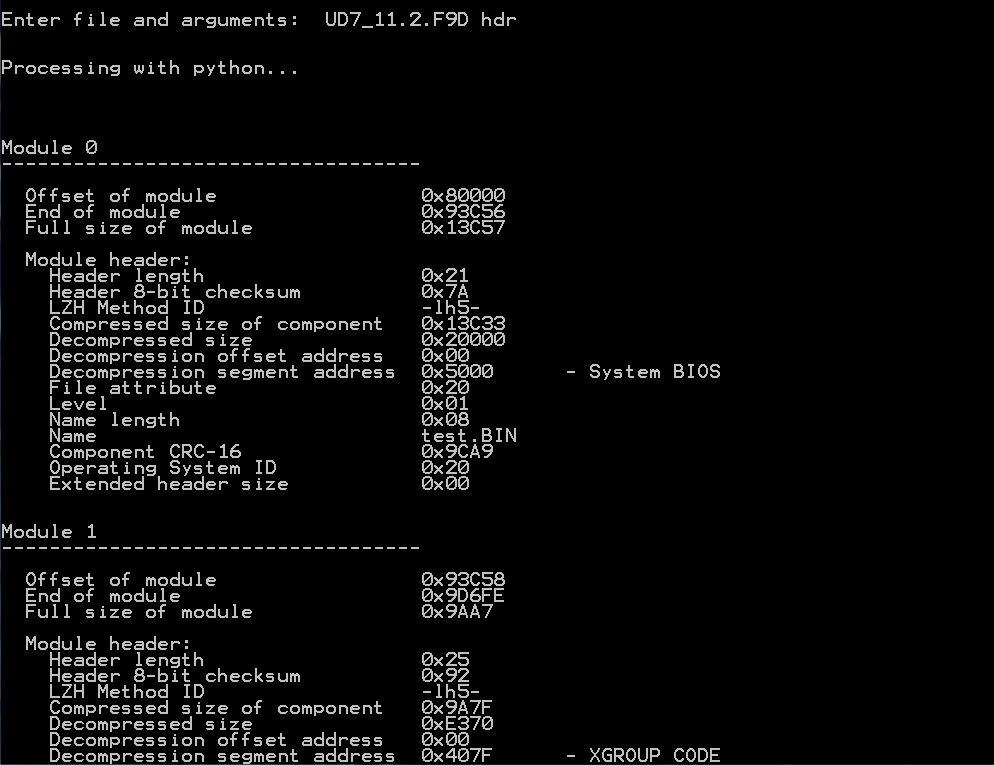
Look here:
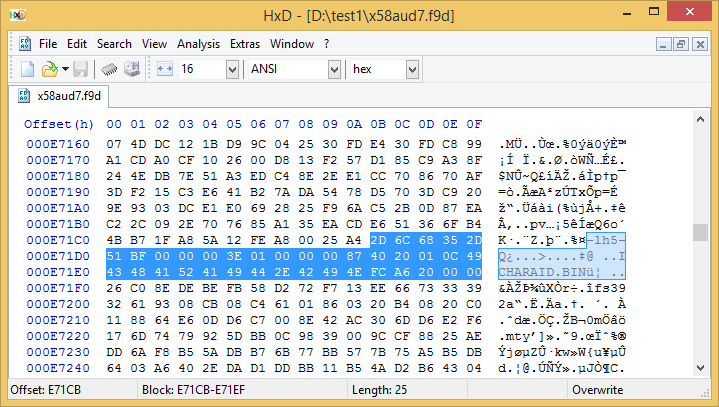
And here begins the compressed module named ICHARAID.BIN:
Oh thank you!
Now I can check the entrypoints, And by reading <here> (SummoneR’s post) I can now also change the name of ICHARAID.BIN to dummy.dum.
So I can now simply create the dummy.dum file in exact the same size as the [B] file being taken away, and put it in the place for the PCI ROM[B] and now I also know how to make the changes so that I get the [E] order for the dummy file.
There is ONLY one thing I still don’t understand how to figure out m8…how on earth do I use either CBROM_155 or CBROM32_198 to put the newly dummy.dum PCI ROM[E] directly in the same order under PCI ROM[A] in the BIOS layout?
Here’s what SummoneR is trying to give the instructions in his post:
"2. Modify the Decompression Segment Address to an address non-existing in the module list. E.g. this is showing up as PCI ROM[‘x’] so Dummy has to be in our case
PCI ROM[E] since in the default module layout we only have A, B, C and D. Of course then the new/updated module(s) shall point to the same segment(s) as in the
original layout, so they can be invoked the same way as before. The segment address for PCI ROM[A] is 4086, so Bytes 11-12 in the header in little endian order are 86 40.
Easiest is to keep in mind that 86 is for PCI ROM[A], 87 for B, 88 for C, 89 for D, 8A for E and 8B for F."
Where do I look for those bytes? I can not figure that one out because the byte numbers for my PCI ROM[B] which gives out it’s order in the BIOS layout are not the same as the one in this example.
As long as I can not put the dummy.dum file exactly in the same place, I don’t think it’ll help.
I have submitted the original PCI ROM[B] a.k.a ICHARAID.BIN in this post…are you able to figure out what section in this file gives the layout order in the BIOS so that I can use that for my dummy.dum file, so that it won’t be placed as the last file in the module list in the BIOS layout?
When I look at SummoneR’s post, he has his PCI ROM[E] dummy.dum right in place for the one he modded…whatever I do the dummy file goes in as the last file after insertion and I know that is the default behavior, but how do we change that?
I had to put a .txt suffix to the bin file so that it could be uploaded here so please just remove it after downloading ![]()
Regards,
-Sebastian
ICHARAID.BIN.txt (79.5 KB)
None of the CBROM tools is able to do this, because they all insert a new Option ROM module to the bottom of the list, just above the last module named NCPUCODE. If you really want to insert a module into a certain location of the BIOS, you have to do it with an Hex Editor.
Within the original BIOS X58AUD7.F9D the Intel RAID ROM named ICHARAID.BIN is listed as PCI ROM [B], that means, that you have to search for the hex code "87 40". If you look into the lower picture of my last post, you will find this code within the blue highlighted area at the offset E71DAB/C as the Bytes 11 and 12 after the compression signature (text code: -lh5-).
As far as I understood SummoneR’s guide the easiest method would be to let the module named ICHARAID.BIN where it is within the BIOS, but make it unusable by
a) renaming it (e.g. to DUMMY.DUM"),
b) changing the hex code regarding the PCI ROM letter and
c) changing the Vendor and DeviceID hex codes to not existing ones.
Furthermore the checksum of the module has to be corrected.
What I do not exactly know is, how to do all this. AFAIK the related compressed Intel RAID ROM module has to be cut out from the BIOS by using an Hex Editor, expanded, modified as I just have mentioned and then reinserted as a compressed module into the previous BIOS location by using an Hex Editor again.
After having done all that, the desired Intel RAID ROM module can be inserted the usual way by using CBROM32_198.
Maybe I am wrong, but this is how I understood SummoneR’s guide.
I understand m8, thank you for all the explanation.
I have made a help post at overclock.net now for this issue, I hope someone sees that and can help me out, because I don’t know how either how to cut and paste stuff directly into HxD to get this right…
Best Regards,
-Sebastian
Another idea would be to post your request into >this< thread (disadvantage: You may not get knowledge about how the modification has been done).
Please give us your feedback, if you should get a proper working modified BIOS.
Another idea would be to post your request into >this< thread (disadvantage: You may not get knowledge about how the modification has been done).
Please give us your feedback, if you should get a proper working modified BIOS.
Great tips m8, thank you!
At this point I basically don’t care how it might get done, as long as it gets done somehow! I’ll make a request there…the thread seems to be fairly active so I really hope someone could help out
Dieter,
I was wondering…if worst case scenario happens and no one can help me out integrating the “Universally TRIM modified” Intel RST RAID ROM v11.2.0.1527 with TRIM in RAID0 support to my F9A or F9D bios, and I decide to go with the already modded bios with Intel RST RAID ROM v11.6.0.1702 with TRIM in RAID0 support, which was offered at the tweaktown.com made by CPL0’s older method (since it does flash successfully to my board after all) and since it can give me TRIM support for my RAID-0 array (even if it hurts the Marvell controller but let’s say I accept that glitch, maybe I still can use my 2 x Marvell SATA3 ports with a couple of regular HDDs, as long as I get TRIM support for RAID-0 with my Intel SATA2 ports along with a fairly acceptable read/write speed then maybe I should be satisfied with this finished bios mod)…then what IRST software version would you recommend with this bios mod version?
Would you still recommend that I install Intel RST AHCI/RAID Drivers & Software Set v11.2.0.1006 WHQL along with modded bios with Intel RST RAID ROM v11.6.0.1702 + TRIM in RAID0 support… or would it be better to go with Intel RST(e) AHCI/RAID Drivers & Software Set v11.7.4.1001 WHQL (your info says the latter will best match Intel RAID ROM v11.6.0.1702).
@ Bittornado:
If you want to reflash the modded BIOS, which contains the LEGACY mode TRIM modded Intel RST(e) RAID ROM v11.6.0.1702, I recommend to install the Intel RST(e) driver v11.7.4.1001 WHQL or the related complete Set.
Thank you again for the rapid reply sir, truly appreciate all the help ![]() I will wait some time to see whether someone could help me out with making a new mod or not, if not, I’ll test out the legacy one.
I will wait some time to see whether someone could help me out with making a new mod or not, if not, I’ll test out the legacy one.
BTW right now I’m using my second Gigabyte GA-X58A-UD7 Rev 1.0 board, the other one is still not working. I just found and bought an i7-920 which should work with F2 bios, and when I get it I’ll test it and see if the "bricked" board can go over to the back up F2 bios version by itself! Multiple problems right now in other words!
Have a nice weekend m8!
Can I also give a shot?
Since I made for myself a little script to quickly get a dummy.bin of any size and also to change the header of the compressed bin to any name/PCI I want in a matter of seconds, I thought it will be a walk in a park with Award modding. Sadly, after adding all the updated modules in place and a dummy.bin to have the same structure (just in case), I went to finish with CBROM and got to a dead point. All I needed was to re-add rtegrom.lom (was moved to fit the bigger OROMs and dummy.bin dropped in place) and update Marvell GRAID.BIN. But CBROM 1.98 and CBROM 1.99 made changes to compressed code of EXTBIOS.BIN - quick way to get a brick. Not sure if it was CBROM or Gigabyte funky way of assembling.
So I used CBROM 1.55 to add rtegrom.lom and GRAID.BIN at the end, then a manual labour in hex to replace the other OROMs, then fix the checksum again with CBROM 1.55. I just couldn’t use any higher version because it messed EXTBIOS.BIN. While this sounds simple and fast, it got me a while to compare all the steps and figure what CBROM to use and when. What I have updated:
- updated Marvell IDE-AHCI 1B4B-91A3 from 1.0.0.1003 to 1.0.0.1033. The latest is 1.0.0.1038, but needs testing, might not work with every board.
- updated Intel RAID to 11.2.0.1527 with CPL0 mod.
- updated JMicron AHCI-RAID 197B-2363 to 1.07.28. The mod from TT has 197B-2362 ID, which is just AHCI. There is also a 1.08.01, but it is possible that it was pulled off because of bugs. Also needs testing.
- updated Realtek PXE+RPL to 2.61.
What is left:
- Marvell Firmware.
- cpu000106A5_plat03_ver00000011 to cpu000106a5_plat03_ver00000019
- cpu000206C0_plat13_verFFFF0016 to cpu000206C0_plat13_verFFFF001C
cpu000206C2_plat03_ver0000000F + cpu000206C2_plat03_ver00000014 to cpu000206C2_plat03_ver00000015
The microcodes might not be needed at all, but the Marvell Firmware is a little bit tricky. I had mixed results when going after Marvell FW, so I will leave this to your choice.
x58aud7-mod-F9D.rar (1.13 MB)
@ lordkag:
Thank you very much for your work, which really looks good.
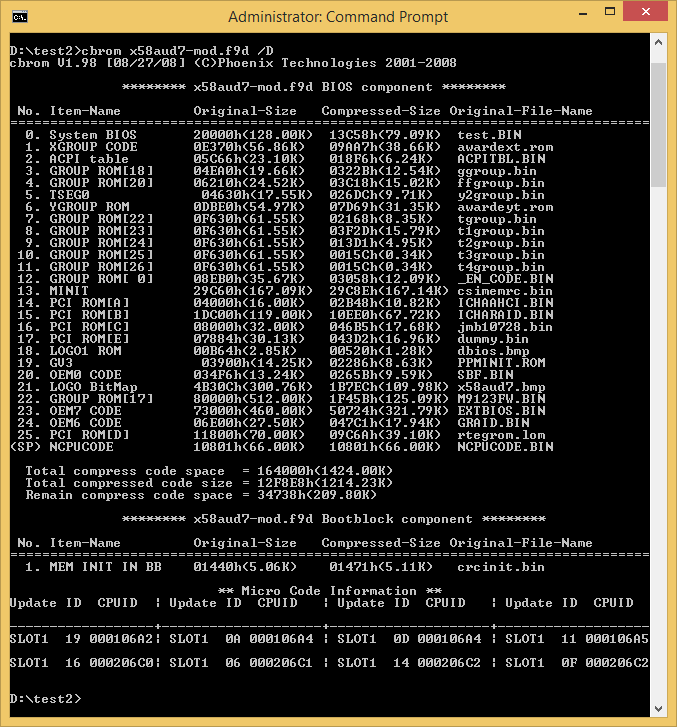
Here are the pictures with the content of the original BIOS (left) and the one, which has been modded by you:
@ Bittornado:
Good luck!
@ Fernando:
M8, well, one of the experts at gigabyte support page for bios modding at tweaktown.com helped me out and made the mod with the new RAID ROM v11.2.0.1527 !!!
Just flashed the bios of my other Gigabyte GA-X58A-UD7 Rev 1.0 motheradand and it was updated to the correct and desired version at first attempt!!!
I was so excited that I just rushed here to give you the message, next I’ll be setting up Win 7 on my RAID-0 array to test out the TRIM functionality and let you know how it goes!
Looking at the modded bios with cbrom, there was no need for a ghost module, and the ICHRAID.BIN is sitting at the correct order in the list!
Don’t ask me how he accomplished that…but he did!
Here’s the modded BIOS if you’d need it for future references:
http://forums.tweaktown.com/gigabyte/480…html#post496248
Best Regards,
-Sebatian
@lordkag :
Thank you a million times for taking the time to offer a method and directions how it might be done!
NoJuan999 at Tweaktown.com made the mod although I have no idea how!
But I’ll settle up now with your directions which looks nearly the exact same result mod I got from tweaktown and will try to understand all the steps. Half the enjoyment of it is to understand how it can be done ![]()
Just to add…the Marvell firmware module was the exact same module I had trouble with getting right as well. When being reinserted it simply make changes to other modules for some unknown reason, so that was my result as well.
Again than you for the help m8, I know what I’ll be doing all day today, lol!
There wasn’t really the need for a dummy, because MEMINITENTRYPOINT is at the end of BIOS, past any modules and not movable during CBROM operations. I only added it to be absolutely safe.
NoJuan999 definitely didn’t use CBROM 1.98, because it would have had the same result like we did, a writing over the compressed code of EXTBIOS.BIN. It appears he also didn’t used CBROM 1.55, because the modules would have been added at the end. What he did has to replace the compressed code of the OROMs one by one, then subtract FF padding after the last module (EXTBIOS.BIN in this case) until the files size is 0x200000. The final step would have been the checksum fix, which was done either by hand or by re-inserting the last module with CBROM 1.55.
Just as a notice:
- he used an Intel RAID OROM that wasn’t checksum fixed, like Fernando is offering. Not important if you don’t get any error message during POST.
- he used an older Realtek OROM 2.58. Not important if you don’t use PXE Boot.
- he used an older Marvell Firmware 2.2.0.1125 with Autoload 2.0.0.0611 and BIOS 1.0.0.1033. The latest is FW 2.3.0.1007 with Autoload 2.0.0.061D and BIOS 1.0.0.1038. But this latest one might have compatibility issues with IDE ports, so I count this as not important.
- he didn’t updated GRAID.BIN from 1.0.0.1003 to 1.0.0.1033 or 1.0.0.1038, which is the Marvell RAID OROM. I know it is a little confusing, but Marvell is using one OROM as RAID module and the other as BIOS in Firmware.
@lordkag & @Fernando :
Thank you for the clearing that up.
Yeah I actually noticed afterwards as well that the Marvell fw was an older rev. I don’t mind that at all since I will only be using them for regular HDD use so no worries there.
Also I never use PXE Boot so the Realtek OROM 2.58 works fine for me really.
The only checksum “quiery” I got was during the flashing process. Although I usually get that when using Q-flash. It has no side effects during POST after BIOS has been successfully flashed, so I felt confident to let that one go.
I suspect that he must have used the core from the already modded F9D BIOS from here:
http://www.mediafire.com/download/ji8c74…UD7_mod_F9D.zip
This seems to have the same specs for other OROM versions being used in the new mod which you mentioned, but the Intel RAID ROM module has been remodded to the Universally modded v11.2.0.1527 one which Fernando offers. Otherwise it seems to have the same specs and OROM versions of that F9D BIOS image (specs found here: http://forums.tweaktown.com/gigabyte/480…ified-bios.html):
Intel SATA AHCI 1.20E
Realtek LAN 2.45 to 2.58
JMicron ROM 1.07.28
Marvell BIOS Version 1.0.0.1033 / Firmware 2.2.0.1125
But is GRAID.ROM the Marvell OROM??
I thought it was the Gigabyte’s JMicron RAID Controller onboard…my mobo has 6 x ICH Intel SATA2 ports, 2 x Marvell 1928 SATA3 ports, and 2 x Gigabyte SATA2 ports which from what I understand uses JMicron controller. So I thought GRAID was Gigabyte’s JMicron controller RAID ROM…but I’m certainly wrong ![]()
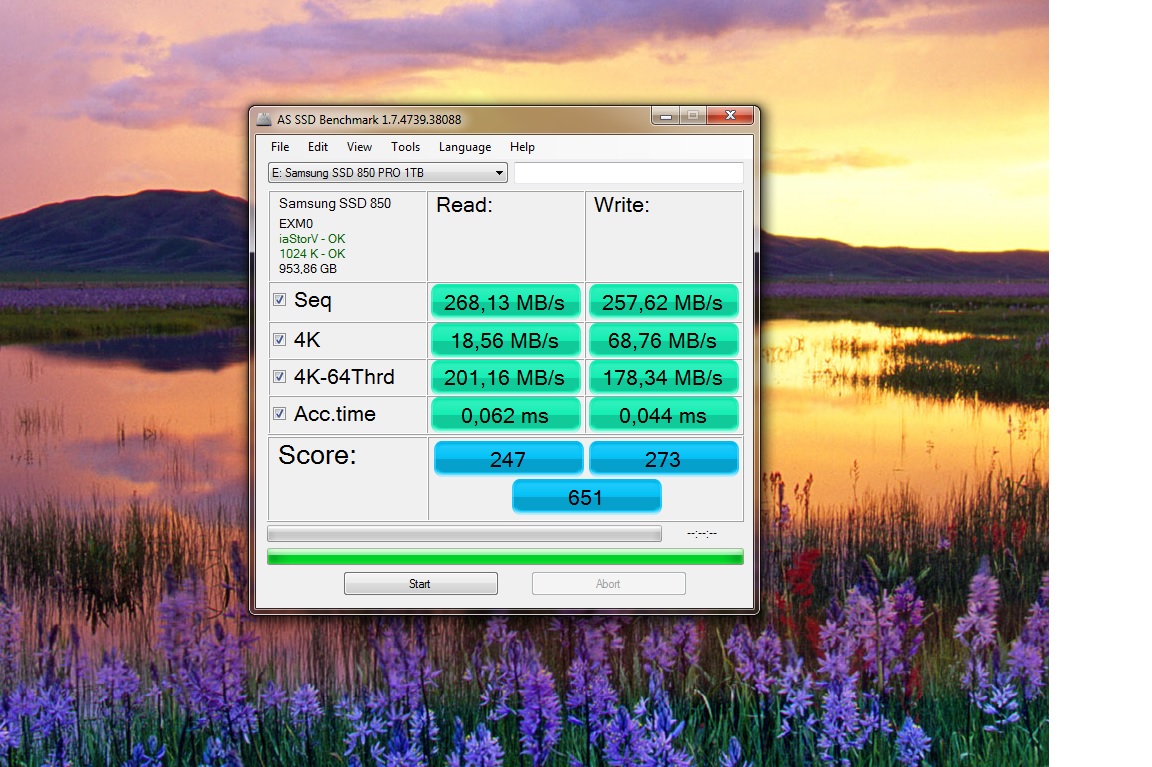
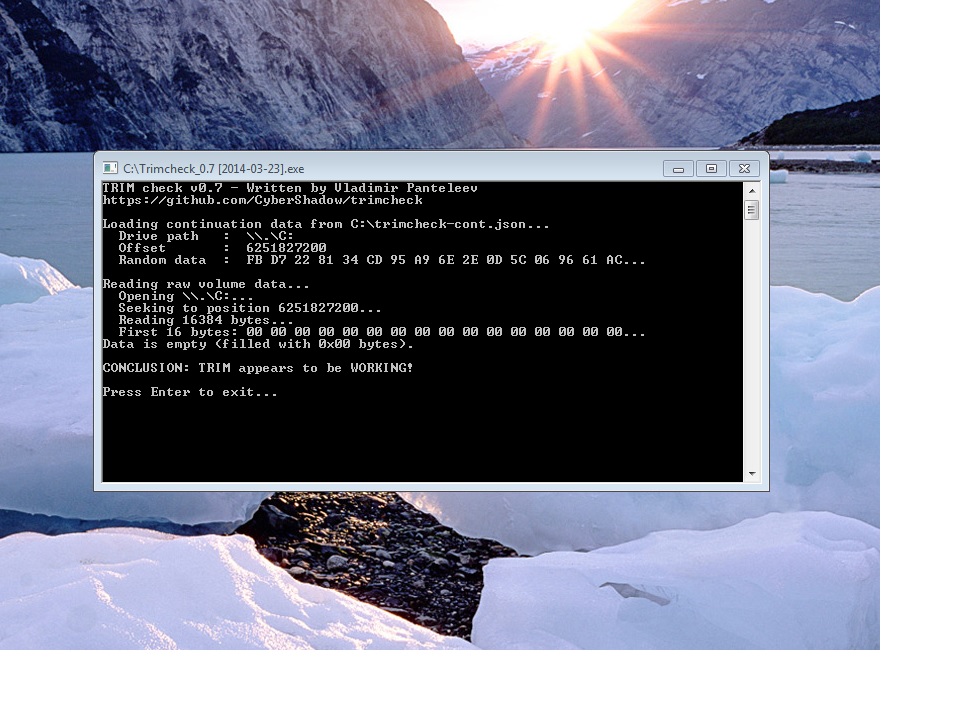
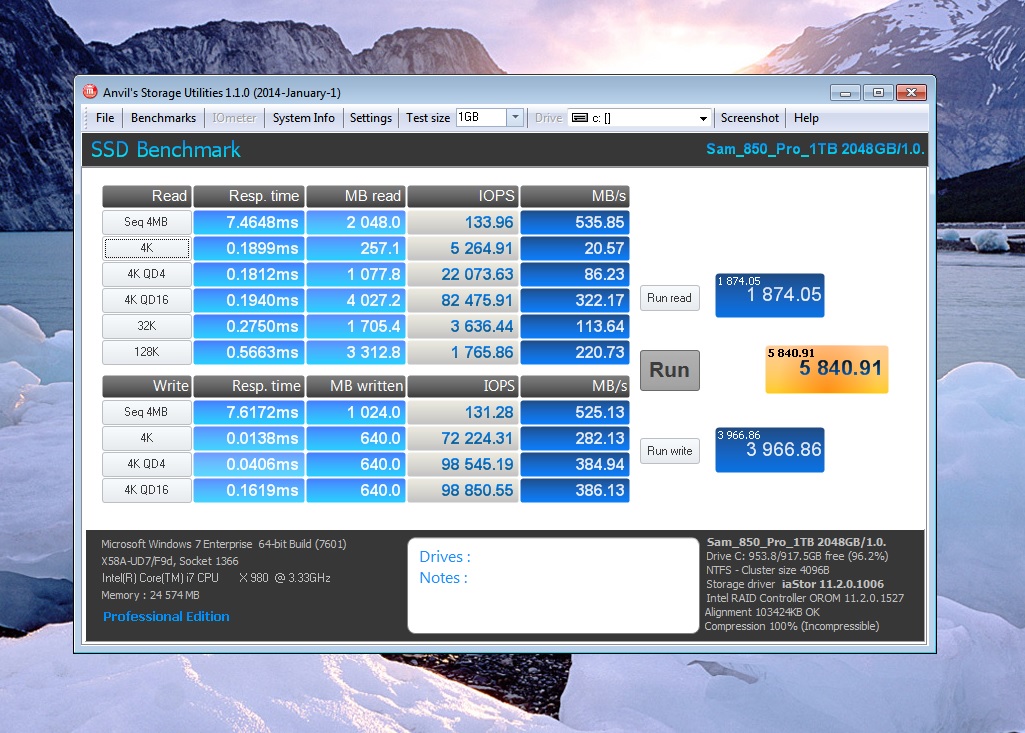
Anyways, TRIM-Check gives a positive test result for TRIM with my RAID-0 array on Intel SATA2 ports, and the speeds are fairly good. I have submitted some benchmark pics in this post.
The there are a couple of things that I’m kinda puzzled over…
1. Samsung Magician Software which is supposed to handle my Samsung 850 Pro 1TB SSDs doesn’t even recognize my Samsung SSDs at all and simply is blind to my RAID-0 array. ![]()
2. I have overall good speeds when benchmarking (even though the sequential Read/Write could have been better as Intel SATA2 ports cap at 700 MB/s but I’m satisfied with what I get here)…although, I don’t understand why my 4K Read speed is so crappy?? I would have expected at least triple that speed…
3. I have tried to do all the necessary optimizations for my SSD, although I just remembered that I forgot to disable superfetch and prefetch but not sure they would have such impact on the 4K Read speed being so low.
4. I have installed IRST v11.2.0.1006 Win x64 WHQL but I can not find a “performance” tab in the Console Software anywhere to disable the Link Power Management (LPM).


@ Bittornado:
First of all I want to congratulate you, that you got at least what you wanted and that your new RAID0 system is running fine inclusive TRIM support.
Samsung’s Magician was never able to detect Samsung SSDs, which are members of a RAID array.
You are right, the 4K Read speed should be much better. Did you choose the "High Performance" Power Option?
Only much newer Intel RST Console versions have the "Performance" tab. You should not overestimate this missing option. Nevertheless I always got the best performance with a RAID0 system, when I used the Intel RST Drivers & Software Set v11.2.0.1006.
Note: Maybe you can disable the Link Power Management within the BIOS.
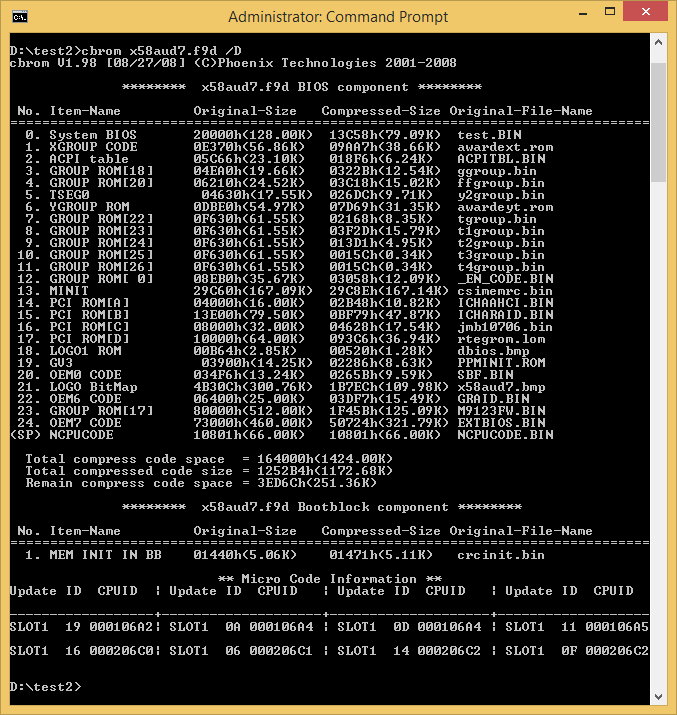
GRAID.bin is Marvell RAID OROM, jmb10706.bin is JMicron AHCI/RAID OROM and M9123FW speaks for itself.
Anyway, I use this post more as an excuse to post new things. Since I got tired of doing this Award stuff by hand, I wrote something to ease the work.
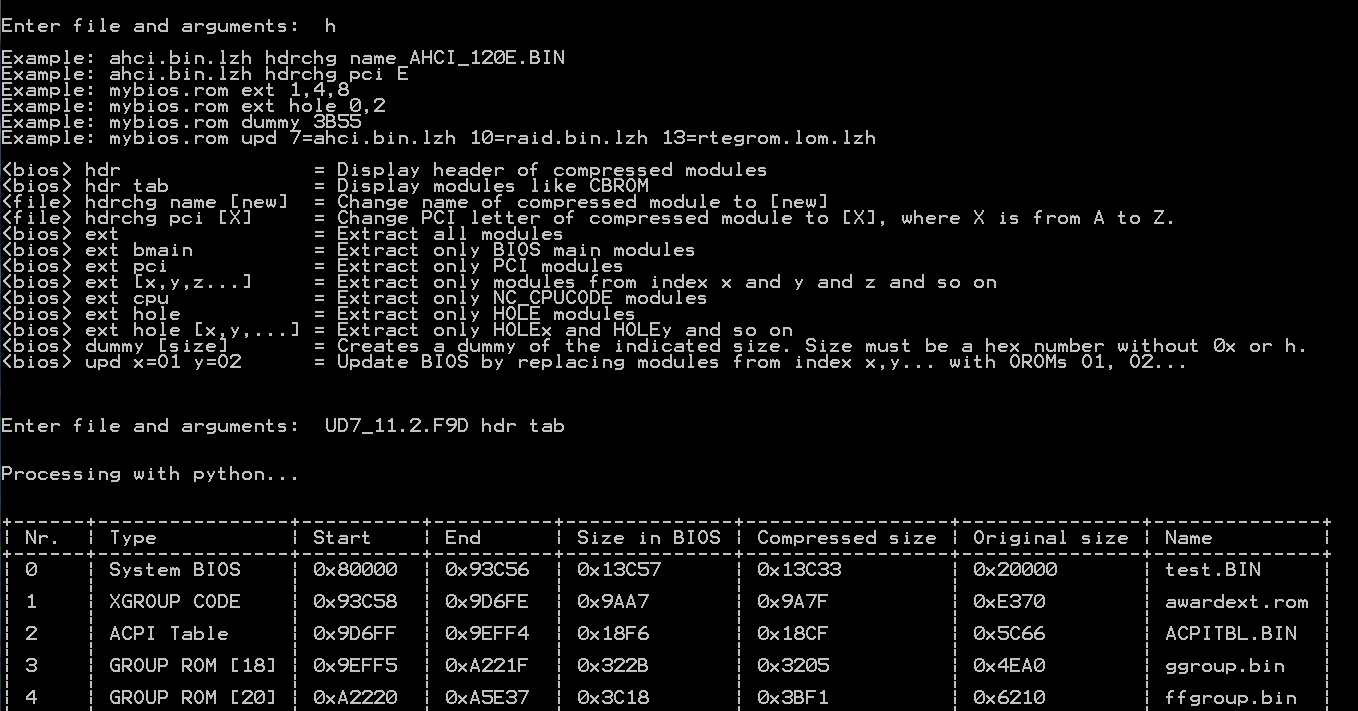
This is for your BIOS, truncated to fit the page.
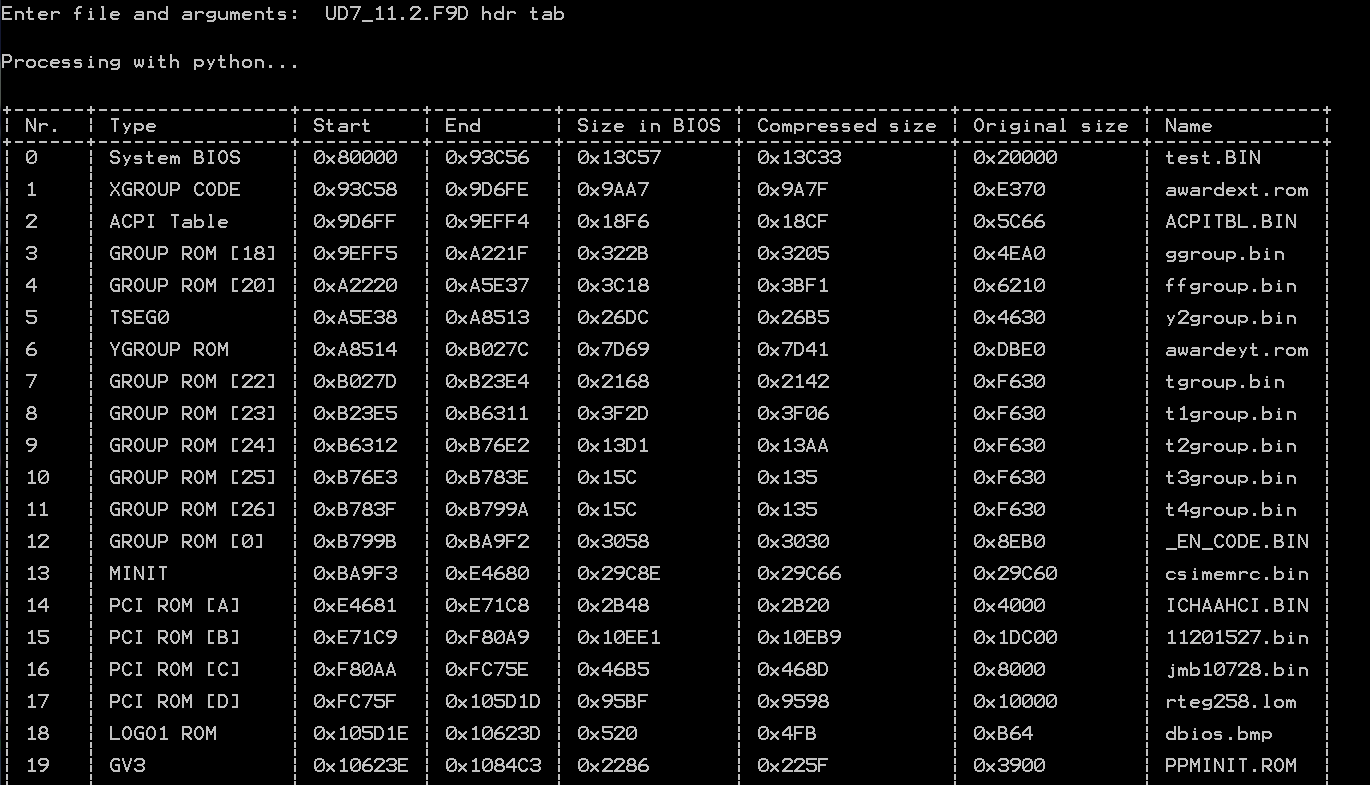
Everything is mostly done, but I need to test "upd" command, because it is done with the hardest case in mind: updating with dummy.bin. This is how it should look if your BIOS would have needed a dummy.bin, which no version of CBROM would fix.
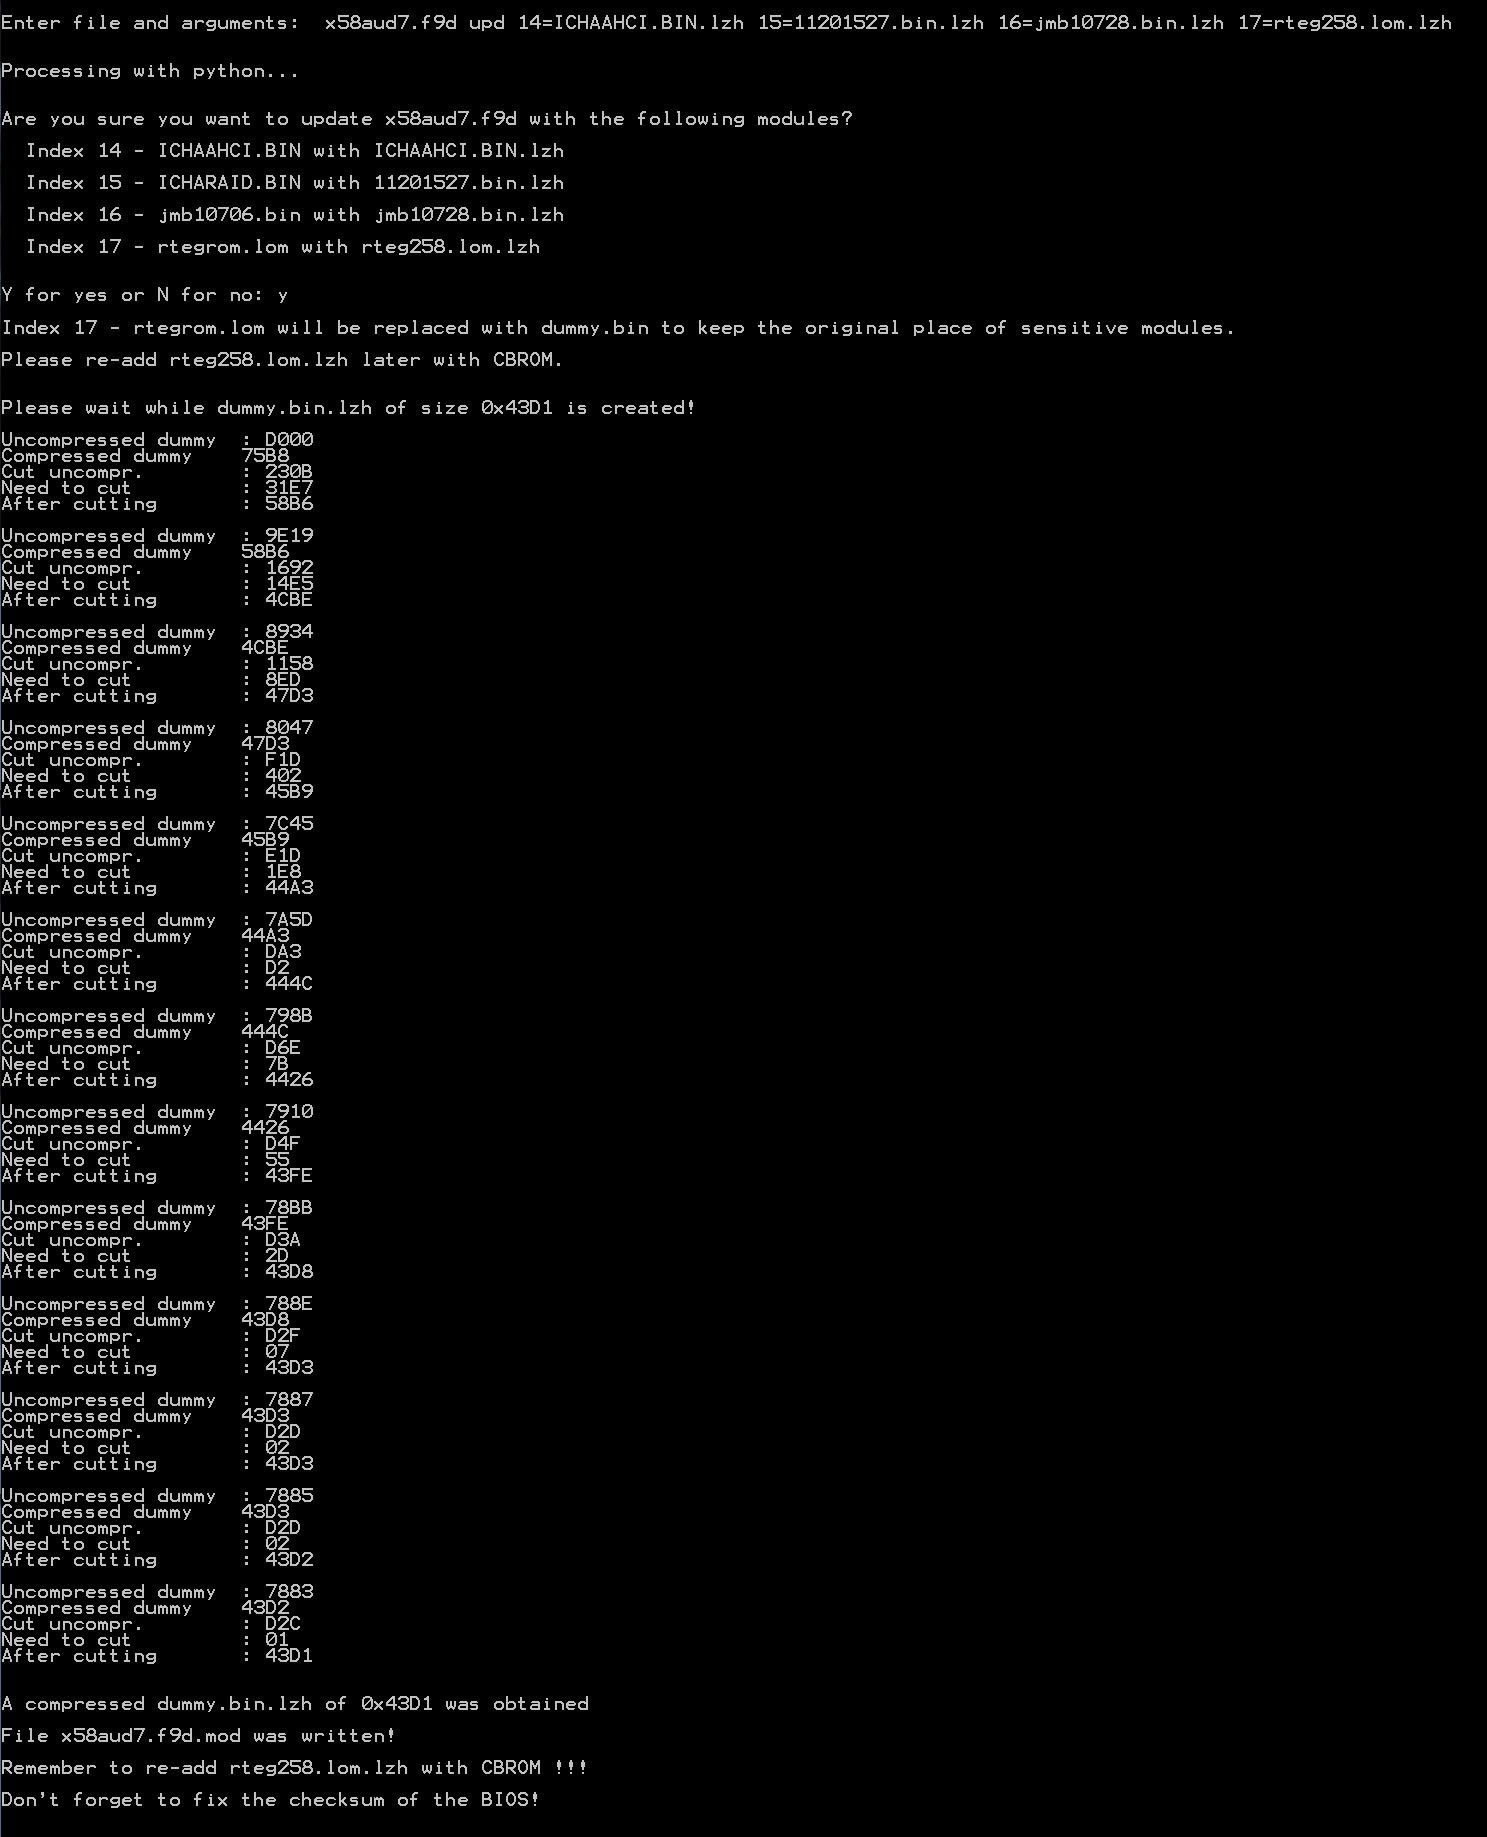
Also attached the tables for comparison. The mod file only needs rtegrom.lom re-added with CBROM, which will also fix the checksum. I am working on adding the "hdr" and "ext" part to AMI non-Aptio, but I need to reverse the format. Half way there.
x58-work.rar (2.26 KB)
@ lordkag:
What you have created is phantastic and very useful!
When you are ready with your tool, please write an easy to understand guide about how to safely update an Option ROM module of an Award BIOS without touching the location of any sensitive module.
Furthermore I would rather like to know, where and how to correct the BIOS checksum.
@lordkag :
That lookes really good! I would like to give that a try if you don’t mind ![]()
Will report how it goes and if every goes smoothly I’ll put up some scores here to compare to the other ROM version from Gigabyte Tweaktown as well ![]()
@Fernando :
I did try the Performance option m8, but still the same crappy 4K Read speed. The rest looks fairly good. Very strange that an isolated 4K Read score shows up pretty bad when other parameters looks fairly good…do you happen to have any other ideas as to why that might be?
Also, I tried only one of the SSDs without RAID. Although the other parameters subsequently and rationally became lower, the 4K Read score basically was essentially the same (only marginally lower) with one SSD non-RAID as in with 2 SSDs in RAID-0. I have submitted a picture.