Problem after flashing firmware to Marvell 9123 addon SATA3 controller
I have recently downloaded and installed the Firmware for MV-91xx Version 2.2.0.1125b onto the Marvell 9123 onboard SATA3 controller of my Asrock x58 Extreme3 motherboard (BIOS 2.80).
Since then, I have not been able to boot from the channel 1 of the controller from my Samsung 840 Pro SSD drive.
So far the controller address the ports as following:
Port 1: SATA3
Port 2: SATA3/eSATA
I have performed different tests and found that the port is fully functional, but the computer refuses to boot from it. The drive connected to port 1 will not boot, the screen remains with a blinking cursor. If I switch the disk to port 2 on the controller, it boots perfectly.
RAID configuration manager is functional, and BIOS sees the drive while connected on any of the two ports.
After booting, if I plug any other disk to the Port 1, Windows sees the drive and I can access it.
I have downloaded the upgrade tool from the page:
http://www.station-drivers.com/index.php…vers/47-marvell
File: http://www.station-drivers.com/download/…rivers.com).exe
So far I have tried by resetting to defaults the BIOS (did not clear the CMOS), and reflashing the current motherboard BIOS to check if it reflashed the controller as well (as I have seen that some motherboards do reflash the controller on reboot/reflash BIOS).
Also, I reflashed many times the controller package (if it matteres, I did not disable the controller in the BIOs prior to flashing).
While looking for a solution, I have found your page, together with the firmware post.
Based on your knowledge, could you suggest a possible way to fix this?
I have not yet done a cMOS reset, although as it is an external controller I do not know if it will fix anything.
Considering that there might be a problem/bug in the used firmware/bios, would it be possible to flash your posted firmware with the “go.bat” tool from the provided link?
If so, what would be the steps to create the rigth flashing image?
I have checked the Image Creator tool that rebuilds a image for flashing, but would not like to mess with it.
Any help/hint will be really appreciated.
Regards
EDIT by Fernando: The thread title has been customized by me, because I wanted to open it for all problems regarding the update of Marvell SATA BIOS modules.
@ Gaudi:
Welcome at Win-RAID Forum and thanks for your contribution.
Since I don’t have any own experience with the update of the Marvell 91xx SATA3 Controller Firmware, I hope, that someone else will help you to solve your problem.
Regards
Fernando
Thanks for the prompt reply.
I have been looking at the thread: AHCI & RAID ROM Modules
where I came across with >Marvell 91xx AHCI/RAID ROM v1.0.0.1038 for DEV_9123< (>MIRROR<)
I carefully read the instructions, but still cannot conclude on how to proceed.
I have also read the thread linked: http://www.win-lite.de/wbb/board208-spec…ed/index11.html
How should I use the above listed ROM module?
I have checked the BIOSes for my motherboard (8 mb AMI BIOS), and found no trace of the controller ROM inside it, which indicates that the update is done externally (as I have already done).
Would it be possible to inject the controller ROM into them in order to reflash it?
Latest Official BIOS:
ftp://europe.asrock.com/bios/1366/X58%20…e3(2.80)ROM.zip
Beta BIOS:
ftp://europe.asrock.com/bios/1366/X58%20…3(L2.81)ROM.zip
Many thanks!
@ Gaudi:
Meanwhile I have checked the latest BIOSes for your ASRock mainboard and couldn’t find a Marvell OROM either.
So there is no chance to update this specific OROM module. Furthermore I doubt, that you will be able to successfully insert any Marvell 91xx AHCI/RAID ROM module into the BIOS (no conjunction with the system BIOS, not enough space within the BIOS).
So the only chance to get the Marvell 91xx SATA Controller better working may be to flash a newer Firmware by using the related Firmware installer.
Hi Fernando, thanks for the reply.
I will be asking for your help as an experienced bios modder because you may have some more background than I do.
I went ahead and did some more research. I have found that there is a way to use the Marvell Flash Tool (found on different forums) to dump an image of the firmware of the onboard controller.
It is by using the "go.bat -r -v" command, which is a "frontend" to the mvf_mag.exe tool.
The help for it is as following:
I have managed to dump the image. Find attached both the image included (wich is the one I flashed into my controller) "image", and the dumped one "IMAG_RB.BIN".
I tried to rename the IMAG_RB.BIN into "image", but reflashing throwed an error. Files are different size. I have hex edited to see the content, and at some point there are similarities, but that is the best I could do.
I have also found that the package includes a Image_Creator folder that has a tool to rebuild an image to flash. Perhaps this dumped image can be splitted and rebuild into a usable file.
As of that, I have found another user with this very same motherboard who is willing to help.
Based on your knowledge, can you suggest how to dump the image from a working MB and reflash it into mine?
Thank you!
MArvell 9123 Dumps.rar (227 KB)
@ Gaudi:
Since I never had a System with an on-board Marvell SATA Controller, I don’t have any own experience regarding the Marvell Firmware flashing procedure.
Nevertheless I hope, that someone else will be able to help you.
Regards
Fernando
@Gaudi ,
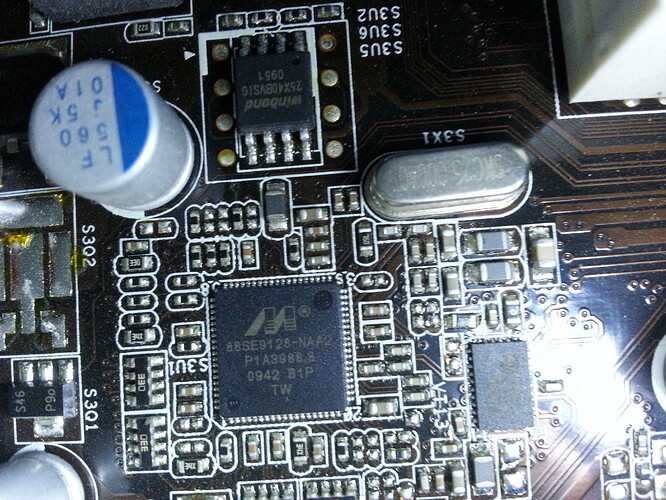
can you tell me what type is the SPI flash chip near marvell controller ?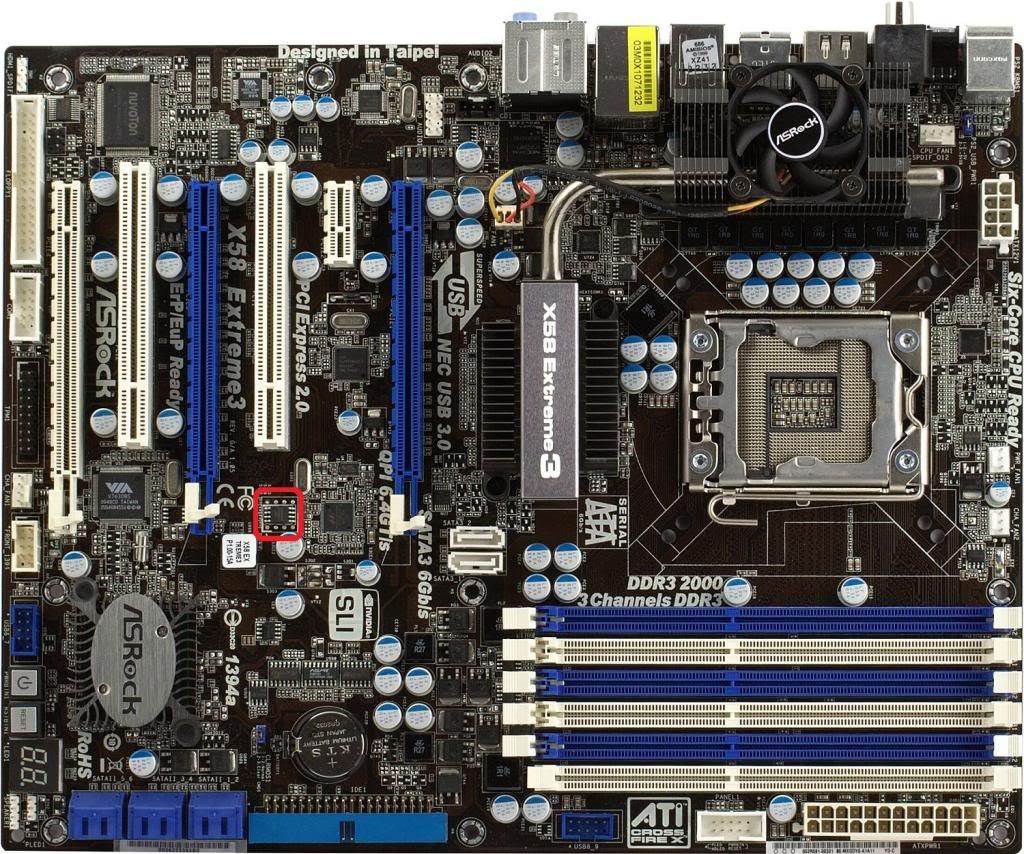
I am trying to recover from a badflash an add-on pci-e Marvell Card with 9128, we may help each other with info.
Hi, thanks for the contact.
Please find the attached pictures with the requested info.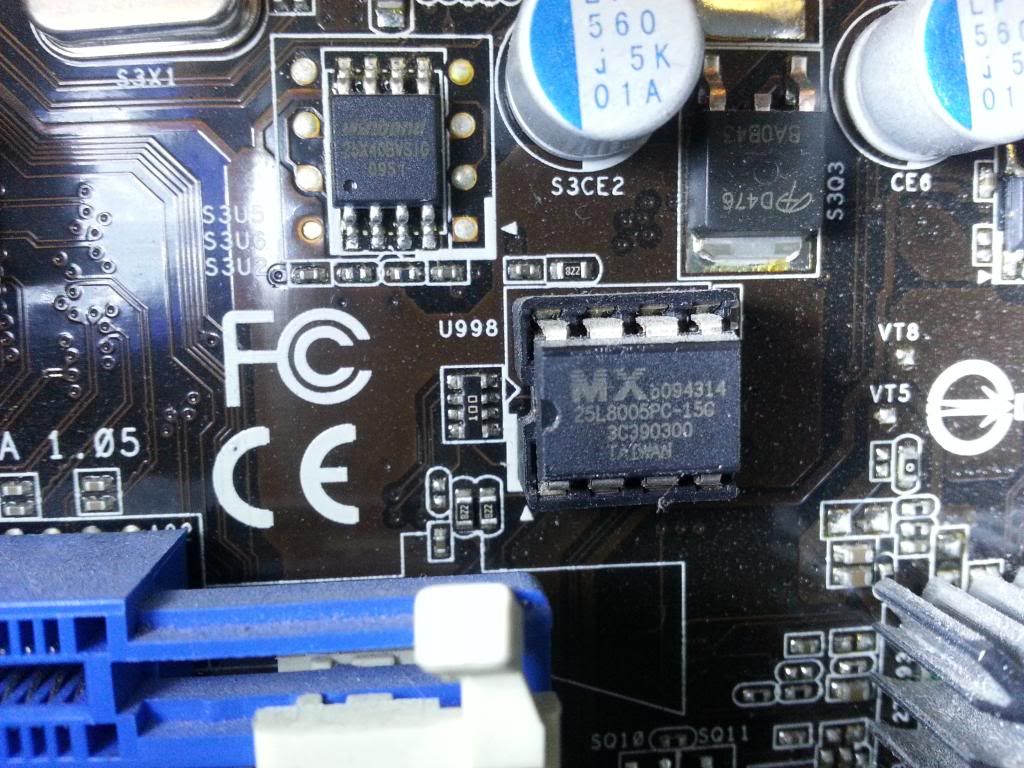
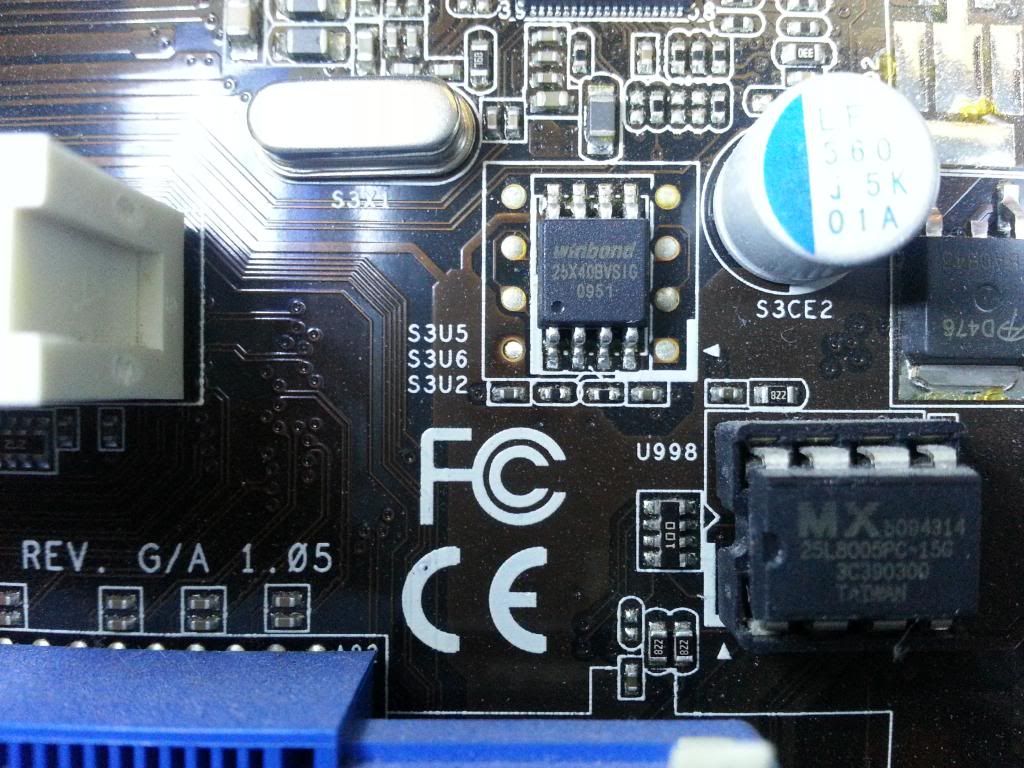
Any hint on how to go on? I tried to rebuild the flashable image to use with the GO.BAT tool found in Station-Drivers page by reverse engineering the dump from a working computer and comparing it with the same dump from my controller after the update to no avail.
I have no clue on how does the mvf_mag.exe flashing tool work, as it is not documented and I cannot reflash the dumped image.
Thanks!
What commands are you trying to use with mvf_mag.exe ? What is the output ?
I have a proper image with .1033 firmware, it is 232K, the image which you’re trying to flash is 232KB or 512KB ?
( the Winbond 25X40BVSIG chip holds the bios of the Marvell controller , similar to my Atmel AT26F004 )
The file I do have is 512kb, is the one dumped from another original MB using the Go.bat -r -v command.
I did not find the way to reflash it back, as the structure is not the same.
I have found a different firmware that I have used and I can now boot my computer from the Port 1, but cannot get the RAID setup to work, neither using ctrl+M or by options in the motherboard BIOS.
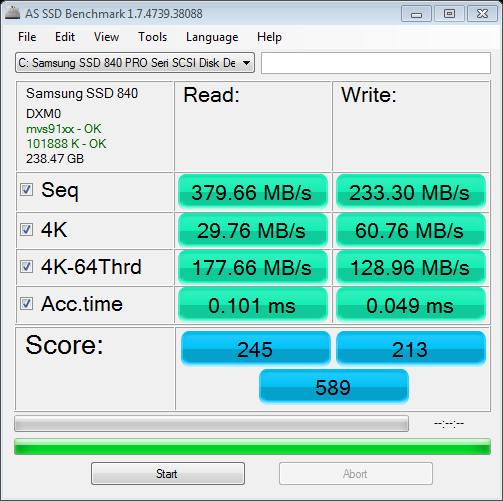
Though, the performance is quite good.
What are the versions contained in the flash you currently have?
Data from the dump from original BIOS is:
Image version: 1.0.0.1210
Autoload version: 2000604 - CPU_IDE_91A3
The one I have flashed (from Driver-Station) is:
Image version: 1.0.0.1808
Autoload version: 200060c - CPU_AHCI_9123_NDO
Is there any newer version that can work with the onboard RAID controller?
Thanks
The image files that the marvell tool can use are supposed to be around 232KB, the tool expands the imaghe in the BIOS IC and then you get the 512KB image file that you had. The structure is different as you said, so you have to use one of the various images found around.
If you still have access to the other original motherboard, you can use the Marvell storage utility ( from inside Windows) to dump an image from your controller, i think that this image should be the one used with mvf_mag.exe
If not, then the correct way is to use the mvf_mag.exe with the -r -v option to jjust dump the image.
To be honest , i havent seen any marvell firmware available online to have the RAID option enabled, i think all are versions from add-on Pci-E cards, maybe you can find a relevant RAID bios from highpoint ( rocketraid ) marvell cards, or the ones by IO-Sata.
All the other ones i’ve seen have CPU_AHCI fimware or CPU_IDE firmware.
Since you’re booting now, i would suggest to leave it as is, unless you don’t care experimenting.
Did ASRock support have the original controller bios? They’ve helped me many times with their boards.
I think the image generated using the go.bat -r is the same as you mentioned, as the bat passes the commands to the mvf_mag.exe.
I may try to contact again the user that provided me the image to re-dump the firmware using the tool as you mentioned.
I had no luck contacting ASRock. Have you got any support email you can provide me to send them an email?
Thanks!
Well, i’ve used the standard support form from the website.
I have changed 3-4 motherboards and they’ve always responded fast and without tricks, precise to problem solution and givin beta bioses when asked for a feature.
@Gaudi
Are you absolutely sure that your board has a 9123 controller? Because the support page of your mainboard mentions a 9128 with RAID capabilities. Start by looking into Device Manager for its DeviceID, but the definitive proof will come from visually inspecting the chip, like in this image.
As for your problem, the solution is to find the right autoload. If you can upload here the dump you took from a working computer, I can assemble some images for you: one for the mvf flasher and one for a programmer. It is also useful if you upload the firmware that restored boot, but disabled RAID.
Thanks for the reply.
You are absolutely right, the controller is 88SE9128 (see attached picture).
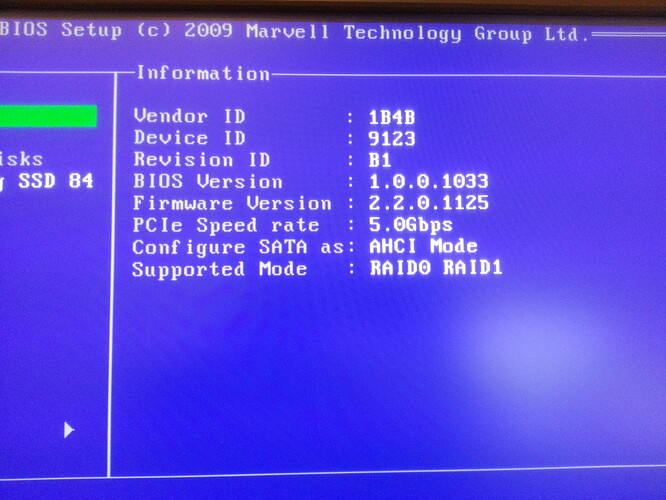
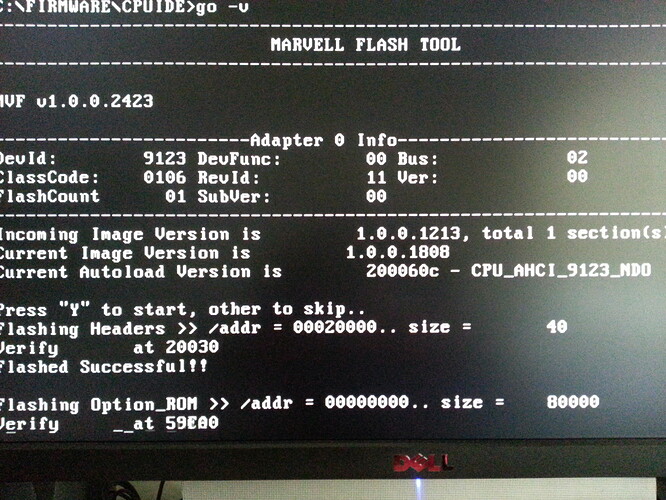
It is strange as the flash tool reports it as a 9123, also the Windows 7 Device Manager: PCI\VEN_1B4B&DEV_9123&SUBSYS_91231849&REV_11
See the attached screen captures: blue background is with the flashed bios that had RAID Manager setup enabled (http://www.station-drivers.com/download/…rivers.com).exe)
the other is while running the flash tool to dump the bios after the last flash (boot from SATA port 1 enabled, no RAID setup):
Attached files are:
Firmware MV-9123_9128 F5BJR.zip: Modded flash I found that enabled me to boot from SATA port 1, no RAID manager.
Firmware MV-9123_9128 F5BJR.zip (2.41 MB)
marvell_88se91xx_firmware_2.2.0.1125b(www.station-drivers.com).rar: Flash that broke boot from SATA 1, downloaded from Station-Drivers.
Dumps from mvf-mag.exe.rar contain two files:
IMAG_RB.BIN_Original_Backup.BIN: Dumped from a 100% functional motherboard, I guess it is the original Firmware that came with the board.
IMAG_RB_Upgraded_Fail.BIN: Dump after the initial flash with the 1125b firmware.
Hope the info is enough. Let me know if there is any other file you may need.
I do not have a programmer, so I will appreciate an image to flash using the mvf_mag.exe tool.
Regards
Dumps from mvf-mag.exe.rar (217 KB)
marvell_88se91xx_firmware_2.2.0.1125b(www.station-drivers.com).rar (279 KB)
@lordkag
I have just noticed that the last flash made the Marvell IDE Channels non functional (I have an IDE DVD Rom).
I am eager to test your images.
Thanks again!
@Gaudi
Just when I thought that Marvell couldn’t do any more mess. To continue what I started in this post, here is how the header of the image/firmware should look like:
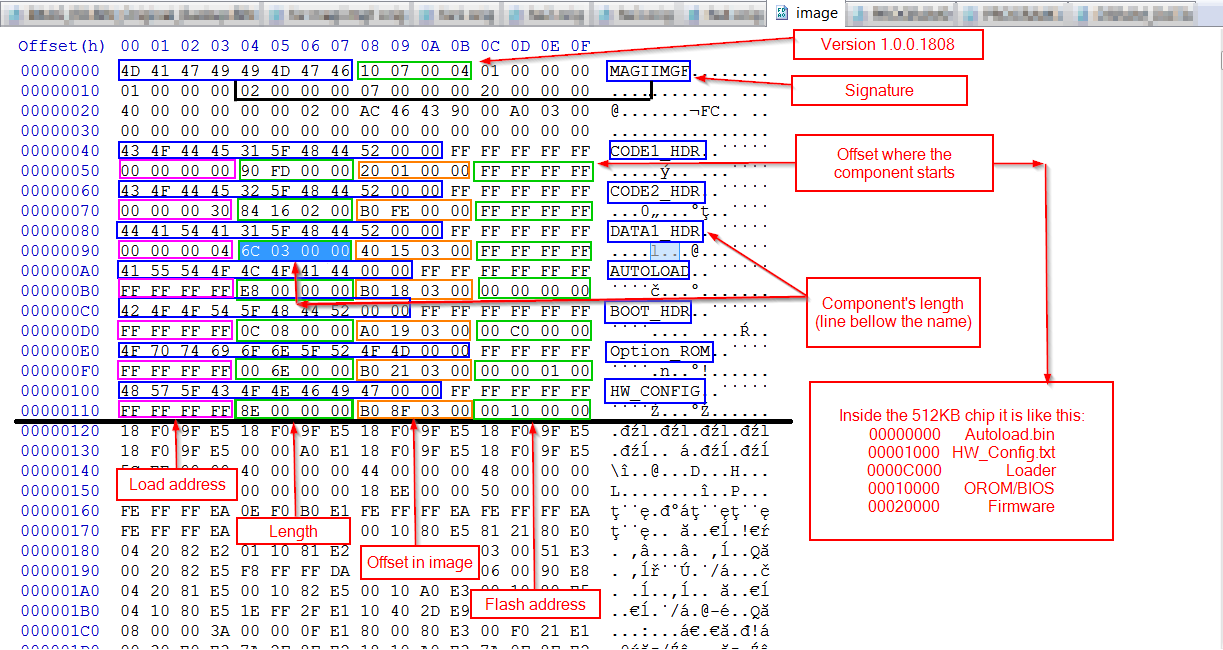
Between those components it should be just padding, plus some bytes at the end of the chip which I asumme are some sort of logging from the flasher. When I first looked at the original image you uploaded, I thought that I stumbled upon the first true RAID firmware, which would have made my work a lot harder. But splitting the image into components and connecting those out-of-order parts, it revealed that they were actually some leftovers from firmware 2.1.1.1407 (Dec/10/2009 10:55:28) instead of padding, while the actual firmware is 2.1.0.1410 (Jan/19/2010 16:31:25). How Asrock or Marvell managed to do that, one can only imagine. Luckily, you don’t have that on your chip, only the autoload is your concern.
For those looking to build an image: mostly everything in the header can be deduced, but it still needs a HMAC_SHA_256 Authentication in line 2, so using imgcreate is a must. Just avoid the image creator from last 91xx packages. It is bugged and cannot create a valid header for image, only for raw components. Use imgCreate.exe from the last 91xx package only for raw components, not for the whole image. Use imgCreate.exe from a 92xx package for creating a full image for the flasher, it creates a valid header while keeping the content intact.
Image = Autoload + BIOS + Firmware = (autoload.bin + hw_config.txt + loader) + (91xx.bin) + (Program0 + Program1 + DSRAM_Data) = (AUTOLOAD + HW_CONFIG + BOOT_HDR) + (Option_ROM) + (CODE1_HDR + CODE2_HDR + DATA1_HDR).
The original image = Image 1.0.0.1210 ; Autoload 2.0.0.0604 (ID 9123) ; BIOS 1.0.0.1014 (ID 91A3) ; Firmware 2.1.0.1410
Image from F5BJR = Image 1.0.0.1213 ; Autoload 2.0.0.0602 (ID 91A3, 91A4) ; BIOS 1.0.0.1027 (ID 91A3) ; Firmware 2.1.0.1413
Image from Station= Image 1.0.0.1808 ; Autoload 2.0.0.0612 (ID 9123) ; BIOS 1.0.0.1033 (ID 9123) ; Firmware 2.2.0.1125
Here are some test images. It is best to use them with BIOS 2.81 beta, it has a bugfix concerning Marvell controller. Also, the Autoload is a critical component involved in the boot sequence, so it is best to proceed with caution. Set Marvell somewhere in the end of the boot sequence and disconnect all other HDD/SSD, leave only the ones connected to Marvell. If the Autoload messes the boot, just use the USB to reflash the Marvell chip, or reset CMOS if all else fails. I cannot guarantee that a different Autoload will be just as benign as previous ones.
I can provide a combination of 4 Loaders and 6 autoload.bin, a total of 24 test images. But I will save you from this torture and only post 7 of them. Place the content on a bootable USB and type
cd bin
mvf_mag imagex -newImg (Edited)
…where imagex is image1 or image2 or whatever image you flash.
Image1 = autoload 2.0.0.0604 original, loader original, BIOS 1.0.0.1038 (ID 9128), firmware 2.2.0.1125
Image2 = autoload 2.0.0.0604 original, loader newest, BIOS 1.0.0.1038 (ID 9128), firmware 2.2.0.1125
Image3 = autoload 2.0.0.0617 (mod ID 9128), loader newest, BIOS 1.0.0.1038 (ID 9128), firmware 2.2.0.1125
Image4 = autoload 2.0.0.0612 (mod ID 9128), loader newest, BIOS 1.0.0.1038 (ID 9128), firmware 2.2.0.1125
Image5 = autoload 2.0.0.0611 (mod ID 9128), loader newest, BIOS 1.0.0.1038 (ID 9128), firmware 2.2.0.1125
Image6 = autoload 2.0.0.0610 (mod ID 9128), loader newest, BIOS 1.0.0.1038 (ID 9128), firmware 2.2.0.1125
Image7 = autoload 2.0.0.0612 external, loader newest, BIOS 1.0.0.1038 (ID 9128), firmware 2.2.0.1125
Image1 is the safest you can try, with original Autoload and Loader. The downside is that such an old version might be missing a few bugfixes. From there it is just testing until touchdown. I only recommend Image1, Image2 and Image3, the rest are provided in case those fails. Image7 is highly dangerous because it contains an Autoload from an external card, posted only as a last measure.
Gaudi test images.rar (900 KB)
@Gaudi
I have edited the previous message. It is only “mvf_mag imagex -newImg” without “-w”. The “-w” erases the chip, don’t know how I misread that.
Thank you very much for your work.
I will give the images a try and will post results.
Can you confirm if Image1 is the factory default for the controller?
Also, I have noticed that Image3 has the latest autoload, newest bios and also latest firmware, so my guess is that it would be the recommended choice if it works. Is that correct?
Have you got any idea why the flash tool shows the device ID as being 9123 (screen capture)?
Many thanks again!
PS: have acknowledged the correct syntax for flashing.
Image1 has the original Autoload, which will give you booting back, but also has BIOS updated from 1.0.0.1014 (ID 91A3) to 1.0.0.1038 (ID 9128) and Firmware updated from 2.1.0.1410 to 2.2.0.1125. Normally just the Autoload matters and has to be paired with the right ID, the BIOS and firmware can have other ID. If you want the original untouched image, it can be done, but you are missing the fixes from newer versions.
If you just want the latest image, go with Image3 → Image2 → Image1 order, then 4 → 5 → 6 → 7, until you find the right image. If you value safety, go with 1 → … ->7.
My guess is the tool shows the ID from the BIOS/OROM, which is 9123 for latest Station-Drivers and 91A3 for F5BJR.
