Update: 1. CPU microcodes. 2. EFI Intel RST for SATA - 13.1.0.2126 OROM Intel RST for SATA - 13.1.0.2126 (Trim) 3. EFI Marvell SATA AHCI - 1.1.0.1029 OROM Marvell 88SE9230 - 1.0.0.1027
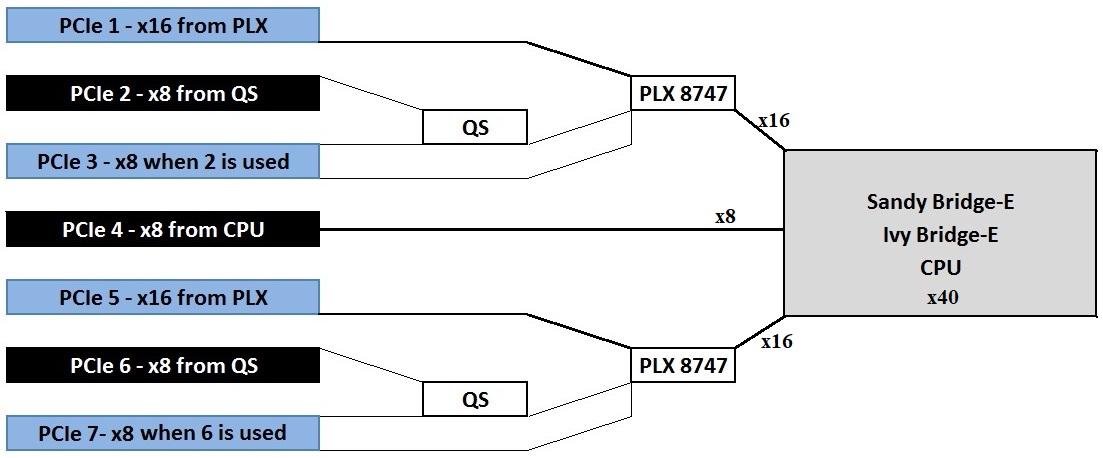
Added: 1. NvmExpressDxe_4.ffs for NVMe M.2 PCIe support 2. SAMSUNG_M2_DXE.ffs for ACHI M.2 PCIe support 3.Bifurcation for use with riser cards that split PCIe slots
For update use Asus BIOS Flashback. After update reset BIOS SETTINGS to optimal/default.
@MiG174 : Welcome to the Win-RAID Forum and congratulations for your successful implementation of the NVMe module into your mainboard BIOS and your impressing benchmark results!
I have moved your post into this better matching Sub-Forum, because you obviously want to offer your modded BIOS for other users with the same mainboard model.
Hi Guy’s, I just joined here after finding this link in the hope that I could run an NVMe drive on my motherboard, so I tried this Firmware on my system last night and it kept giving me a B.S.O.D. every time I rebooted, message was memory_management and to go to http://windows.com/stopcode which is hard when your systems is out. Anyway ran memtest86 overnight and no issues there. Ended up reflashing the firmware to original 1704 today and no problems since. I don’t know why the blue screen came up each time I rebooted, maybe a software glitch, as I am going on holidays in two days time I will try and redo it when i get back in 6 weeks and hopefully get it figured out.
Anybody else here have this problem? As @MiG174 has it working on his system it is quite likely something to do with mine.
Hi MiG174, thanks for your reply, what exactly is a MOD reset, is that a motherboard BIOS reset to defaults? 'cause if it is I think that I tried it after getting the BSOD, the only thing that got rid of the BSOD on boot up was reflashing to original 1704.
@MiG174 , you are awesome! Worked perfectly on my P9X79E-WS with an Intel 665P 1TB and a Siig SC-M20211-S1 M.2 M Key NVMe to PCIe adapter… once I realized that you HAVE TO use the FlashBack method ONLY that is! I first tried it with the ASUS DOS util from a USB boot drive and after failing miserably, and wasting a few hours, I read the post from agentx007 that MiG174 linked HERE - READ ME and realized the mistake I had made and viola… I used FlashBack with MiG174’s Modded 1704 BIOS and now the old girl is purring like a kitten. Many thanks and I am having a beer in honor of MiG174.
It may also be worth noting for some concerned users that I was able to use MiniTool Partition Wizard (paid version) to migrate my Win10 installation to the new NVMe without any issues and no reactivation nightmares… I was worried because the install was a Win7 to Win10 upgrade “Digital License” and I had read somewhere that you supposedly HAVE TO reactivate when migrating to an SSD and it would fail due to the hardware change resulting in my having to either buy a Key or start over at the Win7 install and upgrade again… but trying to install Win7 to the NVMe worried me (compatibility issues and workaround headaches) and I wasn’t looking forward to reinstalling all my apps even if that weren’t the case so I had basically resolved that I would be shelling out for a Win10 Pro Key if it didn’t work… thankfully it migrated trouble-free and no reactivation needed!
In summary, for anyone wanting a step by step, here is what I did that worked for me and was (I think) pretty “safe” in terms of undo-ability… 1. Make Macrium Backup Image of stable and totally up to date Win7 Pro system. 2. Make WinPE Tools Disk from MiniTool Partition Wizard (or equivalent), if you don’t already have one, on USB or DVD. 3. Upgrade Win7 Pro to Win10 Pro with Microsoft’s “Free” digital license upgrade offer (still worked as of January 2020). 4. Make sure all updates are done and computer boots properly 2 or 3 times in a row without any issues. 5. Make another Macrium Backup Image. 6. Convert MBR to GPT with MiniTool Partition Wizard (paid edition) or equivalent… in my case the process failed but they have top-notch support and got me going pretty quickly without much trouble (and no image restores or taking any backward steps in the process at all!). 7. Edit BIOS settings to UEFI then verify proper booting a couple of times and… make another image! 8. Save any custom BIOS settings such as overclock, etc. (I always hand type them in a TXT file that I keep on my backup drive just in case). 9. Backup Current BIOS. 10. Update BIOS (using FLASHBACK ONLY) with MiG174’s Modded 1704 BIOS. 11. Reboot into BIOS and re-apply any custom BIOS settings for overclock, etc. 12. Reboot and make sure the computer boots properly a few times then Shut Down completely. 13. Install NVMe (with an appropriate adapter card, I used the SIIG SC-M202110-S1 after reading reviews of all the various junk on NewEgg and Amazon until I was blue in the face). 14. After install, boot into the BIOS and now you should see the NVMe drive (simply called PATA) as an option under the boot settings… but don’t pick it yet… instead set to boot from the USB Drive or DVD depending on what you used to make the Partition Magic WinPE tools disk (or comparable) that you made earlier and reboot into that WinPE Tool. 15. After booting into the WinPE Tools disk, use the software you chose to migrate the System to the NVMe drive. 16. After the migration is completed, turn off the computer and unplug your original System Drive. 17. Now (finally) Boot into the BIOS again and edit the boot settings to boot from the Windows Boot Manager on the new NVMe drive name (In My case it was Windows Boot Manager - Intel etc, etc) DON’T Choose the PATA entry as that is not the UEFI option. 18. Make a final system image once it is all working! 19. Enjoy the wicked speed afforded by the NVMe and scoff at the notion of getting rid of the (still) awesome P9X79-E WS. 20. Say thanks to @MiG174 !
Work perfect! Any change to add support for registered ECC (buffered) as its mainly BIOS feature, i have 128gb od Samsung HYK0 8 dimms and code error on mobo is ‘E5’? Regards
I use Xeon E5 1680V2 OC to 4.6GHz and Samsung 960 Pro 2TB NVMe, work perfect just can’t run my registered ECC modules HYK0 32gb per module, total 128gb (Error E5 on mbo) Aguess that its only bios modification because Chinese mbos can run registered ECC modules. ECC enablind is hidden option in BIOS. I hope that someone can enable that option so I can run buffered ECC and OC it. Regards
Many thanks for this updated BIOS, @MiG174 - ASUS has studiously updated every BIOS in this motherboard series except for the P9X79-E WS, so the updated microcode is welcome, and the NVMe support is fantastic. Is there a possibility of modding TPM 2.0 support into the BIOS? I’m moving this machine into a server role and would like to swap the TPM 1.2 module for a 2.0 so I can enable memory integrity support in Windows.
Thank you for updating our beloved board! I would love to make a humble request since I do not know how to modify BIOS myself.
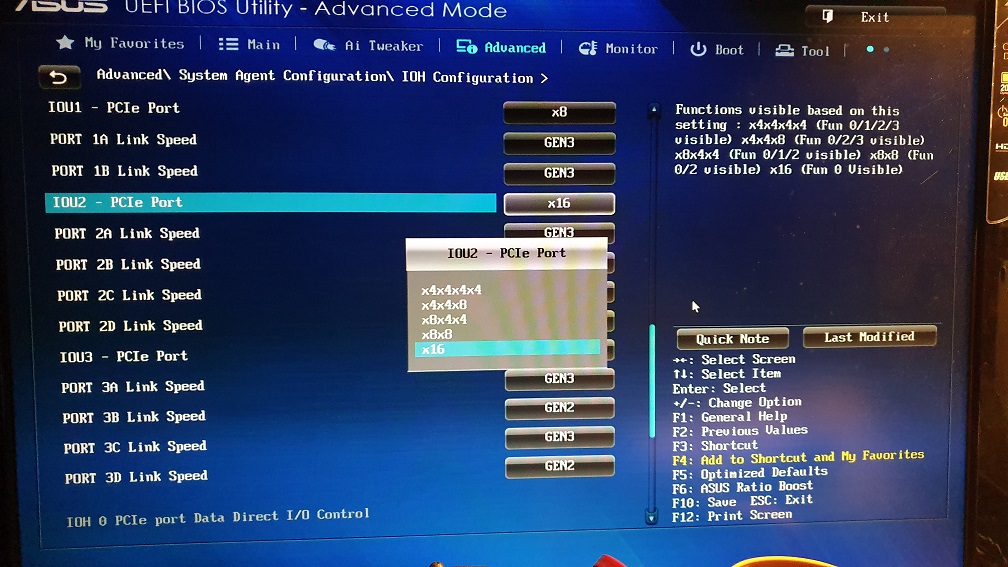
I have 4x 1080Ti in my workstation and in the event of a CMOS reset. The mobo refuses to boot since I guess the GPU’s are too new for the BIOS. The only way to get it to post is to plug in an older GPU and manually set PCIEX16 Link speed from Auto to GEN3. Is it possible to recompile the BIOS to where in the event of a CMOS reset, you can BIOS Flashback a BIOS with the PCIEX16 set to gen3 automatically?
@KarnbirR - I can mod BIOS to be that way if you end up needing it, let me know (and let me know which BIOS exact BIOS you want modified in this manner)
I understand, however in the event of CMOS reset, even with single 1080ti. The system will refuse to post.
The only way to get the bios to post is to use an older supported GPU such as 9XX series. Essentially this issue blocks the p9x79-e ws from being forward-compatible due to ASUS’s auto setting not working correctly with current and future gen video cards after CMOS reset or if the user does not have access to older compatible cards. ----------------------
Thank you for your offer! I would love to assist you if needed. I think this could help future-proof the p9x79-e ws for just a little longer Sent a PM with some questions!
 Bifurcation for use with riser cards that split PCIe slots
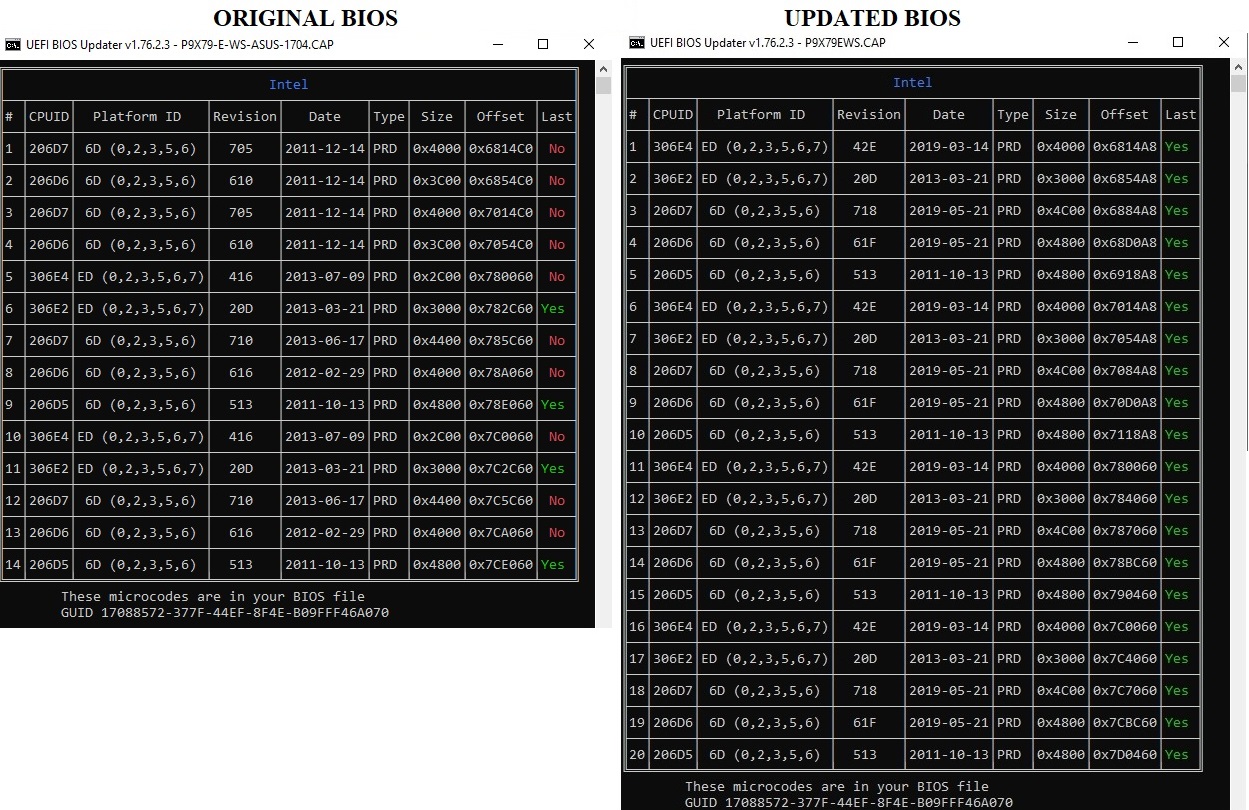
 Anyway ran memtest86 overnight and no issues there. Ended up reflashing the firmware to original 1704 today and no problems since. I don’t know why the blue screen came up each time I rebooted, maybe a software glitch, as I am going on holidays in two days time I will try and redo it when i get back in 6 weeks and hopefully get it figured out.