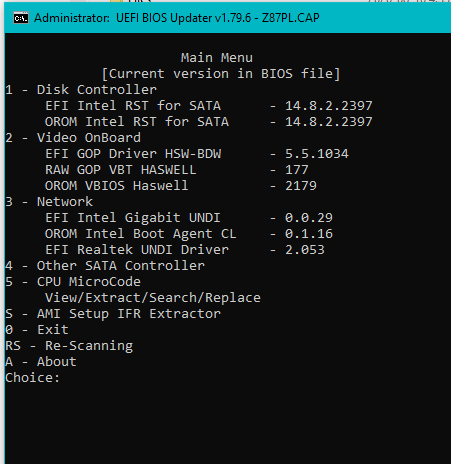
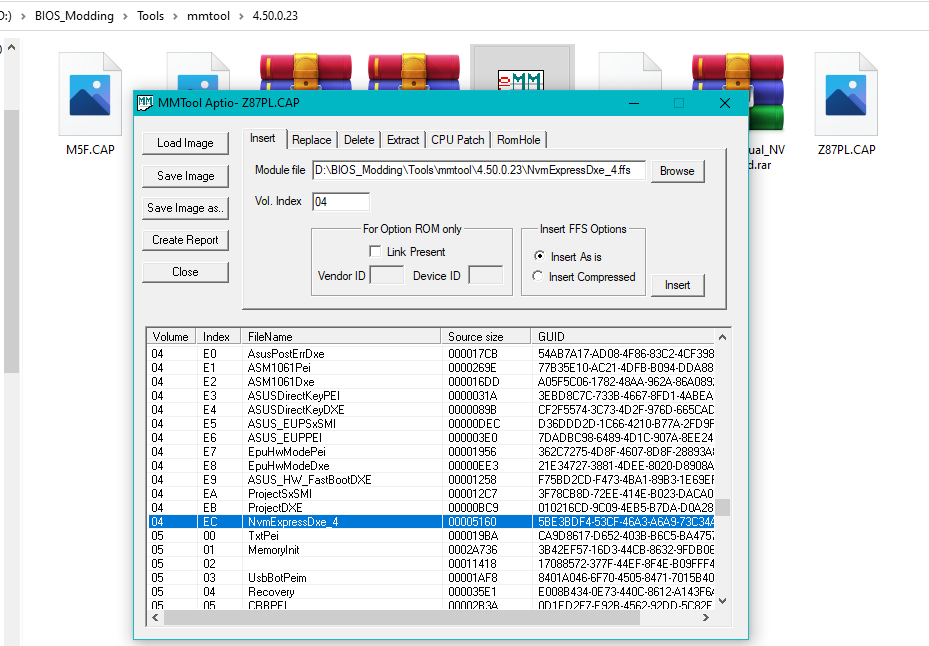
NVMe mod to run UEFI NVMe SSDs using module NvmExpressDxe_4.ffs dated 04/18/2018 All the rest is pretty standard ROM/EFI updates via manual mod with MMTool v4.50.0.23
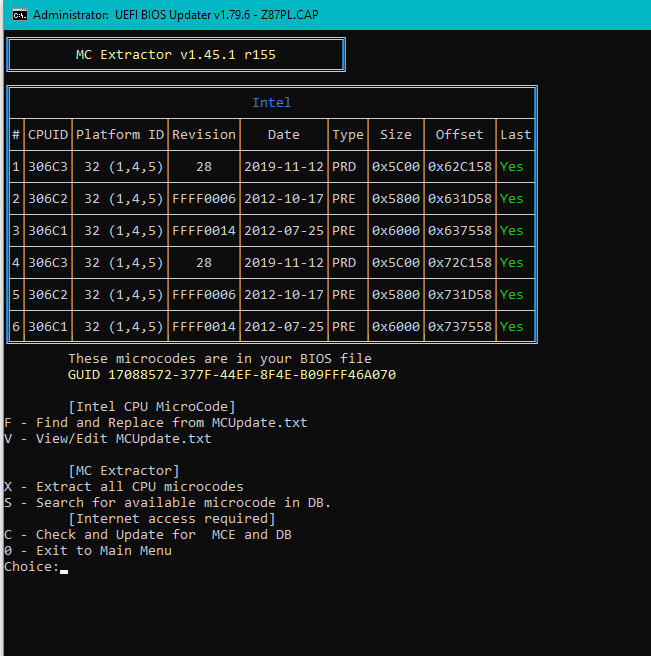
Enjoy your new NVMe capable modded bios with Meltdown/Spectre microcode updates.
By the way, does the Bios have to be flashed using the Flashback utility from Asus? Or will any method of flashing the Bios be fine?
Also, I currently have a dual boot system with Win 10 64bit and LinuxMint 18.3 64bit using the Grub 2 boot loader on my Sandisk 500GB SSD. Can I just clone that over to the NVMe SSD or should I start from scratch and reinstall Win 10?
If you know of a webpage with good instructions on how to go about the entire conversion over to the PCIe 4x card with an NVMe SSD, I’d really appreciate your pointing me to it.
see my post #323 & post #356 for info and pics. YOU WILL ACTUALLY HAVE TO READ CAREFULLY…
1. Back up all your important files and or drives!
To update your bios mod v2103 ONLY use the flashback method, well described in Fernando’s guides. Also check your manual for the flashback port.
2. Format the NVMe SSD drive for GPT. Only GPT formatted drives will show up in the UEFI. If you have any MBR drives you will need to transfer/convert them to GPT formatted drives. 3. When you hook up your NVMe SSD to a PCIe X4 adapter card or similar ensure that is the ONLY drive in the system. Hook up the other drives once Windows is up and running. 4. You will see “Windows Boot Manager” in the BIOS/UEFI that is where you want to install .
All the hair pulling has been done for you; you just need to read carefully and follow the instructions.
Is it possible to convert a MBR drive to GPT without destroying all the data? I’m a real newbie at monkeying around with formatting hard drives and don’t even know if my boot drive is GPT or MBR. It has the small 100 MB partition at the front of the drive with the boot info on it, so is that GPT? In my partition program (IM Magic Partition Resizer 3.6.0 Pro Edition) it says the 100 MB partition is “Basic MBR”, so I must guess that means I can’t just clone the SSD over to the NVMe.
Also, my 2 Seagate 2 GB storage drives are NTFS. One says it is GPT and the other says it is Basic MBR. Will they show up fine once the NVMe drive is properly booting? Or do both Seagates have to be GPT? And my Samsung 840 EVO says it is “Basic MBR” as well.
I guess I must do a fresh install of Windows 10 on the NVMe drive and forget about cloning my Sandisk 500GB drive over to the NVMe drive. There goes my Win 10/Linux dual boot with Grub 2, eh?
Sorry for all the questions! Hopefully I am not being a pain for you!
You’ll have to convert all your MBR drives to GPT or the UEFI won’t ‘see’ them. You will still be able to dual boot Linux AFTER Windoze 10 is all installed and updated; just know that [b]ALL your drives must be GPT[/b] if you want to see what is on them.
Like I said all the hair pulling has been done for you…
OK, my partition program allowed me to convert the MBR storage discs over to GPT, so that is all good now.
But I am supposing that converting the Sandisk 500GB boot disc from MBR to GPT will render it unbootable? Is there any way to do this or is it only possible by reinstalling Win 10?
If this is the case, then I might as well just wait until I have the new NVMe SSD and the PCIe controller card installed, and not try to do my current boot drive and then clone it over to the NVMe drive?
I have followed the method laid out by Fernando precisely. USB 2 8GB thumb drive, formatted Fat 32, nothing on the drive but the 2103 bios you prepared for me. (I already have the Asus regular 2103 bios installed on the PC, if that might be a problem I don’t know.) The USB 2 drive is plugged into the correct USB port, as it says it is the Flashback port right next to it. I shut down the PC and even turned off the power supply for a few minutes before turning the power supply back on, and also set the bios to default configuration. When I press the Flashback button it blinks 4 times and then on the fifth blink it just stays on solid green and doesn’t blink anymore at all. I let it stay that way for about half and hour before deciding it was not working correctly.
I have my Adata SX8200 Pro 500GB M.2 NVMe PCIe SSD installed on the PCIe3x4 adapter card and in the PC now.
Fortunately, the failed Flashback didn’t destroy the current bios. So I can boot into Win 10 and Linux Mint both without problems.
I don’t know what to do to get it to Flashback the bios. Any good ides or any obvious blunders I might have made?
The ASUS USB Flashback feature works perfectly with all properly modded BIOSes, but it is very picky regarding the used USB Flash Drive. My advice: Try another USB Flash Drive model.
@Todd_Sauve : You can try all your USB Flash Drives (the smaller sized, the higher is the chance, that it works), but the BIOS file has to be renamed according the ASUS Flashback rules and the USB device has to be FAT32 formatted and to be inserted it into the specific USB Flashback port. If you don’t have an USB Flash Drive, which works with the ASUS Flashback procedure, borrow one from another member of your family or from your friend/neighbour.
I dug the ancient USB 2 drive out of my SUV that I was using to play back MP3s in my car stereo and used it to do the Flashback–AND IT WORKED!!!
My Adata NVMe shows up in the bios boot order as PATA SS, just as hancor said it would!
Thanks a million Fernando and hancor! You two are real gems of the PC helper world and I don’t know if we appreciate you folks enough out here! There may be a few years left in my 2014 i4770k yet.
And I’ll remember to unhook all of my other hard drives when I go to install Win 10 again as a fresh copy.
Great you found good old USB Stick @Todd_Sauve - it’s picky sometimes, other times it’ll take any USB, hard to tell and probably board/BIOS specific too.
Yeah, I’m just glad I thought of my old Patriot 16GB USB 2 drive sitting in the SUV! Had a bunch of MP3s on it but they were easy enough to copy into a folder and then try on the Z87 board. Glad it worked! And it went very fast, too. Only took about 1.5 minutes and voila!
With this Adata SX8200 Pro 512GB SSD my PC is way faster! My old SSD was no slouch, being a Sandisk Ultra II 500GB. But the Adata reads at over 3GB/s and writes at about 2.4 GB/s, so you can imagine the quantum leap this has been. The PC boots much quicker now and programs and OSes install like greased lightning!
It was a lot of work, you wouldn’t believe some of the DUMB things that went wrong. For instance, the anchor screw that holds one end of the SSD down on the PCIe add in board pulled the screw in mechanism right out of the PCB. I finally ended up having to epoxy the end of the SSD to the PCB! Man, what a nightmare! But now that it’s running I’m one very happy guy! I have Win 10 and Linux Mint 19.1 dual booting with no problems whatsoever.
@Todd_Sauve - I’m surprised the 16GB one worked! I’ve seen 32GB work a time or two as well, but usually smaller is more compatible. You should epoxy that screw in mech back in place instead of SSD to PCB Good to hear all is running nice and fast now!
I did try to glue the screw and anchor back in place on the PCIe board but the Krazy Glue got all over my right index find and solidified! I could hardly do anything with my fingers and the stupid anchor just wouldn’t stay in place before the glue solidified. These two items are so small, you can hardly see them, let alone find them when they fall on the carpet!
Originally the factory just press fitted the anchor into the PCB and the flexing of the SSD popped it out. I was largely at my wits end when I decided to epoxy the end of the SSD to the PCB, and it was late in the evening and back was killing me.
Anyway, it is working quite happily now and if I need to use it in another build in the future, I’ll just have to pry it off the PCB or put it in a 4x expansion slot. Ha, ha!
I always get it on my fingers too! I’ve used tiny slits of double-sided 3M tape to hold SSD in place in tablets and laptops, so I know what you were going through there.