Hello folks, I need a bit of help here… Sorry for the long post!
I was attempting to downgrade the BIOS on my Z170-AR to see if the BCLK overclocking was present in previous BIOS iterations like it was in the Z170-A and other Asus Z170 boards, and something went wrong.
I was flashing with this command: afudos.exe bios.rom /GAN using a tutorial and tools provided here. It has you create a bootable USB drive with Rufus and places an autoexec that runs the flash command automatically. The tutorial didn’t mention backing up the BIOS before doing this, which I now know I should have. Too late, oh well!
One of the steps in the guide was to enable CSM before booting, but I forgot to. When I restarted the board with the flash drive in, I saw the mobo LEDs turn on briefly in succession, but I never saw any boot info or anything on screen. I realized at that point that I hadn’t remembered to set CSM, so I figured the board was not booting to the USB drive, so after a while, I manually powered down, since the screen just remained black. I pulled the USB drive, and tried to boot to BIOS, but got nothing at all. The mobo LED next to the CPU lights up, then flashes once, then stays lit, but no other mobo LEDs ever light up.
I now think that what actually happened was that my monitor didn’t detect the video signal for some reason related to swapping the HDMI cable between my working PC and the mobo I was flashing, even though I turned the monitor off, unplugged and re-plugged the HDMI, etc. I suspect that BIOS was being flashed when I powered down.
Realizing I had probably hosed my BIOS chip, I bought a CH431A “black edition” and grabbed software and drivers to try and flash the chip out of the board using CH341A Programmer v1.29. I’m running the tool as administrator. CH341A Programmer acts like it is erasing the chip, but errors on blank check with “Chip Main Memory are not null.” If I skip blank check and write the BIOS, it then fails during verification with the error "Chip Main Memory with the contents are in disagreement."
So what should I do now? Thanks in advance!
@fust - Use 1.30 or 1.34 - here >> http://s000.tinyupload.com/index.php?fil…257455007472602
Here, this will get you back up and running, once you find working software version and correct chip ID to use (Sometimes exact ID doesn’t work best/at all). What is the chip ID, look with magnifying glass and light if you need to use.
This finding correct version and chip ID, usually solved in the backup before you write process, which is another reason that’s best practice so you know what works before you try writing something and then it fails and you don’t know why it’s not working
This is stock BIOS, with unlocked FD and BIOS lock removed (So you can do rest of flashing later using FPT from windows)
http://s000.tinyupload.com/index.php?fil…096071864617688
Erase, blank check, then open file and write/verify
Since you already tried to write to the chip, UUID will be lost and need to be recreated with different details for some of it, Serial and LAN Mac you can fix from board stickers.
You should have dumped with your programmer before you did anything, and verified that and opened it in BIOS tools or had someone check it for you to make sure it wasn’t all FF or 00 (In those cases, usually means software version is not correct/software not working, try again)
Bricked BIOS is usually not blank, so should always be dumped and checked before writing anything, that way you can try to salvage UUID etc.
Did you dump before you wrote anything? If yes, please upload for me. If not, send me images of all the stickers on the board, don’t forget one on side of 24 pin and look for ones on top/bottom of PCI slots too (and back of board)
Bclk overclocking depends on ME and CPU microcodes, and what’s in the BIOS etc. So if you never saw on your board in old BIOS, setting may have been hidden from user. We’ll work on that later once your back up and running and have corrected your board details, I can unlock any setting for you once rest is sorted out.
Hello! Thanks so much for the prompt reply!!!
I did dump before I did anything further with the programmer, but no software is able to recognize the dump. I tried to attach the file here, but I get “Die Datei Hosed Bios.rom ist größer als 6 MB und kann deshalb nicht hochgeladen werden.” I don’t speak German, but I assume this means I can’t upload the file here because it’s too large. Can I be granted privileges to upload beyond 6Mb? If not, I can host elsewhere.
Thank you!
If you’re wondering what the chip is, it’s a Winbond W25Q128FVIQ. There is also a 1632 on the chip below the main designation.
The only stickers on the board are: on the 24 pin: 38D547ACC197, near the 8 pin: 0 0 0 825559 - 02646 - MB0N30 - BOB, and on a pcie slot: G9M0KC125590
OK so it may not have been the right thing to do yet, but I tried to flash the BIOS file you posted using CH341A Programmer v.1.34, and it still didn’t work (disagreement error). I have to go to work out of town soon, so I’ll be leaving this project for 24 hours-ish. Thanks again for all the help!
Also tried v.1.30. Blank check failed with "…are not null."
Did you try ASProgrammer 1.4 ?
When using the file Lost_N_BIOS provided and attempting to flash I get "Verification error on address: 0000001A"
Sounds like either you do not have the programmer connected properly, or you need a 1.8V adapter (I checked your chip ID, it’s not 1.8V), so that only leaves connected incorrectly. Is this a removable BIOS chip, or are you using SOIC8 cable?
Either way, please check this guide and make sure everything is connected properly, if it’s socketed BIOS treat pin1 like end of SOIC8 cable in this guide going into programmer, pin1 of chip needs to go in the middle on lever side (moon/divot of chip in middle facing back end of programmer)
[GUIDE] Flash BIOS with CH341A programmer
And thanks for chip ID, you need to use ASProgrammer instead, I tested these chips already. This thread is about 1.8V chip, not yours, but you can see I tested your exact chips and found only ASProgrammer was working (on next page, second link)
Query for MOD add bios CSM mode (LEGACY support) (3)
Query for MOD add bios CSM mode (LEGACY support) (4)
Wait, I tested those exact chips here and success with 1.29! Sorry about the above info, that was more about the 1.8v chips, but also my lack of luck is shown with 1.30-1.34 so leaving the above.
However, it’s not clear from that if read/write worked properly with 1.29, I will retest for you now and update this post once done
Xeon E3-1240 v5 working with MSI Z170-A PC MATE but with bios reset on boot (3)
*Edit - @fust - Tested using black/gold CH341A >> W25Q128FV (using exact ID and W25Q128BV) @ software 1.29 = erase OK, blank check OK, Auto - write/verify Fail (Re-tested with W25Q128BV-same) = so not an issue on your end, 1.29 also not working fully for these chips!
Tested 1.34 again to confirm previous findings using W25Q128FV and W25Q128BV = Fail
So as originally suggested above before editing this post, use ASProgrammer instead tested and working as shown below, select chip ID by name before starting
This program is SLOW! 24 min to write/verify, I see this is due to some trace needs connected or resistor added, mentioned on the creators forum post
Hello, thanks for all the help! I’m back home, and looking this over again.
I’m certain I have everything connected correctly. The chip is socketed, so I have it in the ZIF socket on the programmer. The programmer is not even detected by Windows 10 if the chip isn’t installed in it correctly, and Win10 detects it fine. The chip is also correctly identified by CH341A Programmer.
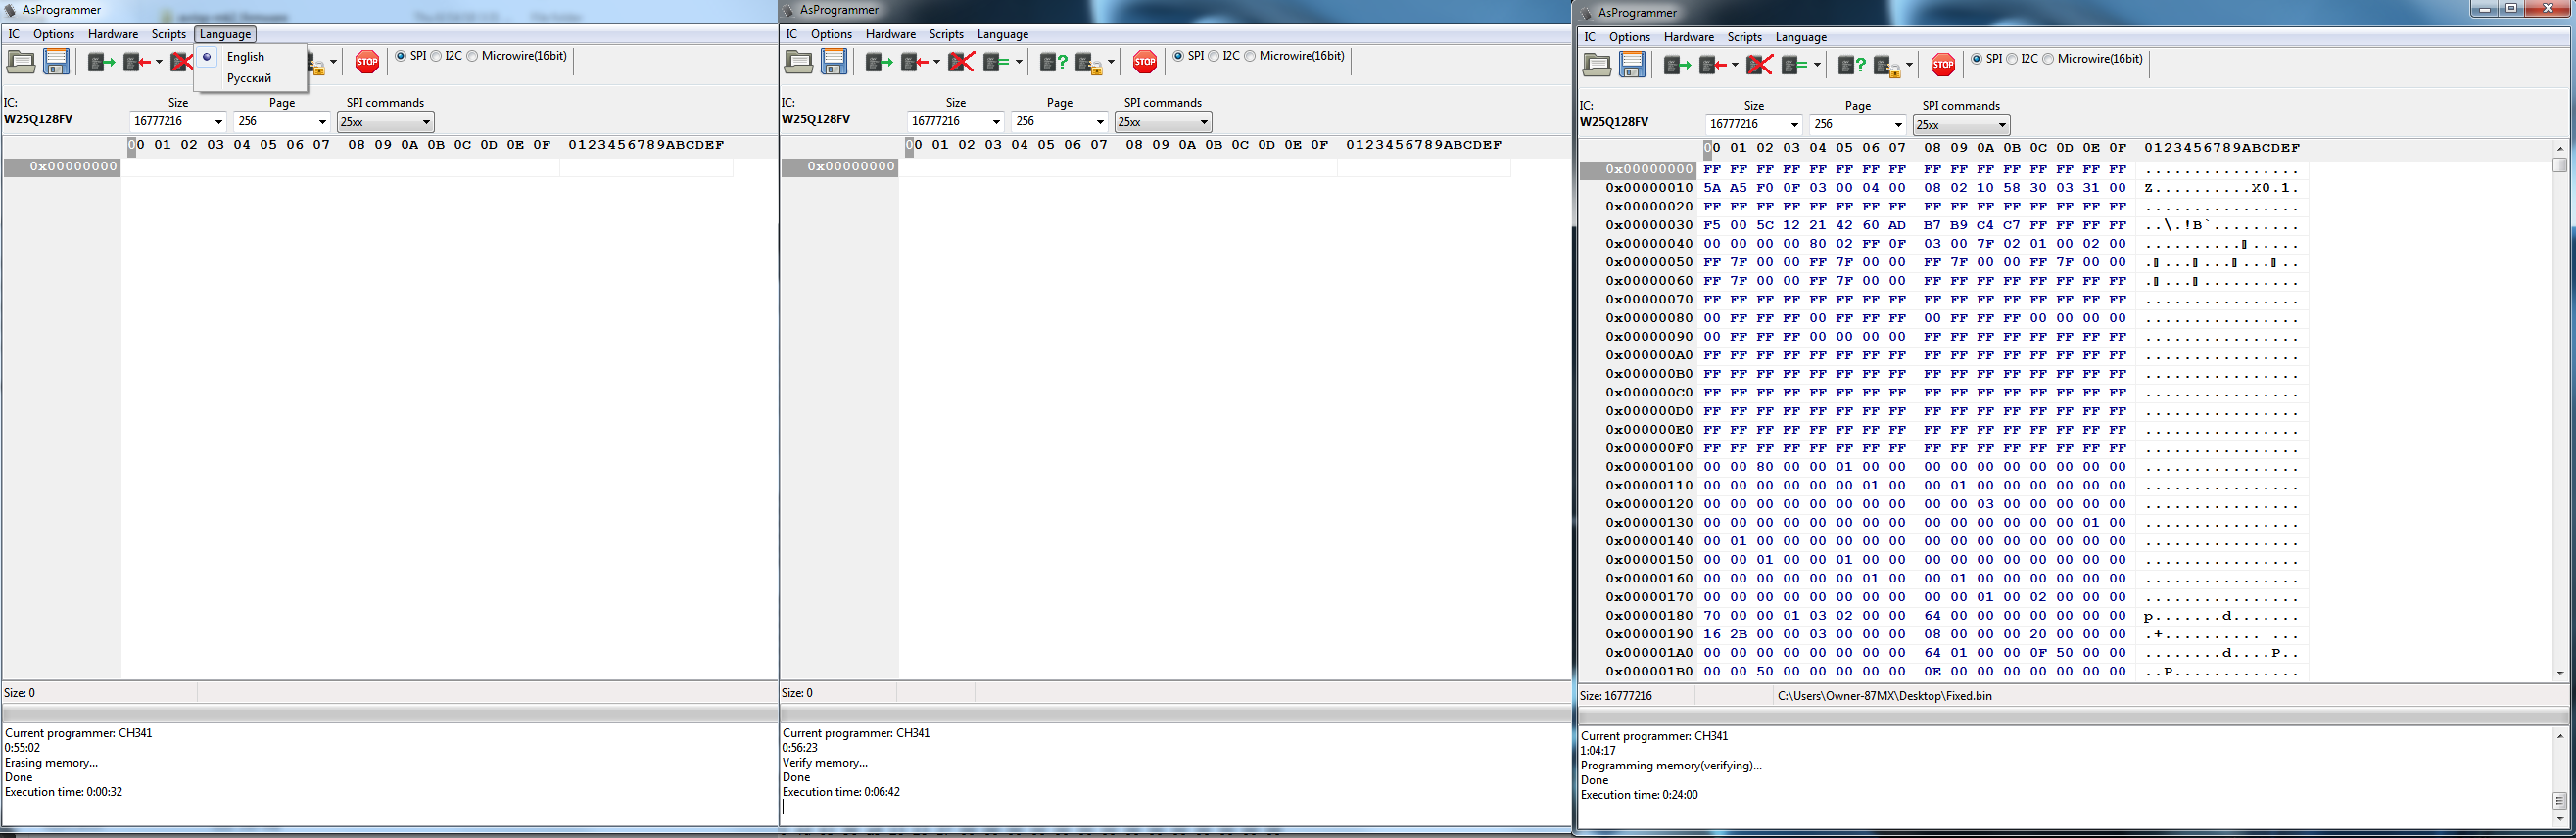
AsProgrammer with @Lost_N_BIOS bios file (thanks!):
Read -> OK
Blank -> OK
Blank Check -> OK
load BIOS file -> OK
write -> Verification error on address: 00000010
Could the chip have been damaged by powering it off while it was writing or erasing?
I doubt powering off while writing would damage it, but maybe? How as it powered off while writing? Is error same position every time?
Order a new chip ($2-3 on ebay, or maybe 8-10 for 3-5x chips and quicker shipping), or borrow one from another board if you are, that you aren’t using right now so it can wait for the replacement chip delivery.
This chip was bricked when I powered the system down because I believed it wasn’t booting, but really, the problem was my monitor not detecting the video signal. I was flashing with AFUdos with an autoexec.bat that started flashing the chip immediately upon boot (but I couldn’t see it happening).
The error is at the same position (address: 00000010) every time now, but before it was somewhere else (address: 0000001A).
Could also be a bad chip writer (cheap)
Already have a new chip on the way, will be here tomorrow.
That shouldn’t have shorted anything or broken the chip. New chip in a day, that’s fast, hope they didn’t charge you too much! Tomorrow we shall see if programmer or chip was the issue!
Yeah I already ordered it before the weekend in case that was the issue…
I have guests so I will turn to this later.
Cheers!
Try Flashrom and see if that gets you anywhere.
Guide here: [GUIDE] The Beginners Guide to Using a CH341A SPI Programmer/Flasher (With Pictures!)
Hi, sorry for the delay, my guest has left and I’m back from my weekend job.
@_haru I will put together a lunix boot drive soon, but another “handicap” I have is extremely slow (1.3 Mb) internet, which is shared with others, so downloading an iso will take some time.
Meanwhile, the BIOS chip that I bought came with the official v3801 BIOS for this board, so I’m able to boot into UEFI and DOS now. I tried to write ASUS official BIOS 8301 to the old chip with Asus EZ-Flash in UEFI by hot-swapping the chip, but even though the app reports the flash as successful, the board is still bricked with the old chip, even after removing the battery and power to re-set BIOS settings.
Further, if I try to hot-swap the chip and write that same BIOS as an extracted ROM with AFUDOS, I encountered these errors:
AFUDOS v3.04.03 (/GAN): appears to succeed, but board is still bricked even after a battery/power pull
AFUDOS v3.04.03 (/P /B /N /K /X): "22 - Error Problem allocating memory."
AFUDOS v3.07.01 (any switches): "35 - Error: Using the wrong AFU version, please use APTIO 5 AFU."
AFUDOS v5.0.07.01 (amy switches): "22 - Error Problem allocating memory."
AFUDOS v4.12 (any switches): "- error: BIOS is write-protected"
I just don’t know enough about this level of hardware to know if the chip is fried, or if there are things I’m not taking into account.
For example, are there other areas of the chip that can be written that may need to be re-flashed?
Thanks again to everyone!!
…Another thing, I’m still interested in unlocking BCLK on this board if possible, but I’m wary of flashing anything to the new BIOS chip since it’s working now. I’m also interested in solving the problem at hand, so I’m gonna order some blank chips to play with, and leave this bootable one clean for testing purposes. Unfortunately, unless I want to pay $15 again for another chip with a pre-flashed BIOS, I’m gonna have to order it on eBay direct from China, and we all know how long that will probably take…
Side note, I see that the new chip I got that’s bootable is a 25Q128FVIQ, sub number 1735 LH. The original chip is the same chip (25Q128FVIQ), but has sub number 1632 instead of 1735 LH. I have no idea if that makes any difference.
-fust
New attempt, I tried writing the stock BIOS in .CAP format, as follows:
AFUDOS v3.04.03 (/P /B /N /K): after “Erasing NCB Block … done”, I get: "44 - Error: Problem writting flash. 000000 (0%)"
AFUDOS v5.07.01 (/P /B /N /K): after “Updating NCB Block … 0x00000000 (0%)”, I get : "44 - Error: Problem writting flash."
Haven’t googled that yet, will get back when I do.
(note: I copied the error message exactly. “writing” is misspelled in the error message as “writting”)
Unable to find much regarding this error.
Tried with just /P /B /K, same result.
What is the "NCB Block" anyway?
Since you now have working chip with latest BIOS, back up the BIOS via dump with programmer (ASProgrammer)
You don’t need pre-programmed chips, just get another one that works better with CH341A and it’s normal software, since ASProgrammer is very slow without modifying your CH341A.
You can try this MCIX chip, it’s in the FD VSCC list >> MX25L128 / 25L12873F / mx25l12805d / mx25l12806e
You can also now program in the BIOS I sent you with BIOS Lock removed and unlocked FD, use ASProgrammer. Then we can work on mod BIOS and adding back in your system details, for that send me images of all stickers on your board, be sure to check side of 24 pin and top.bottom sides of PCI/PCIE Slots
No need to keep trying AFU stuff, AFU is terrible anyway. If you want to hotflash you already tried proper way (boot to BIOS, enter EZ Flash, remove new chip, insert old chip, flash).
That BIOS is broken, toss it out after making sure you’ve got a good dump from it via programmer (To try and get serial, UUID, DTS key, LAN MAC ID etc).
For NCB, this means Non-Critical Block, and it’s caused by using the /K switch (/K = Program all non-critical blocks and ROM Holes.)
Bclk should already be unlocked, you can’t see it in the BIOS when you set AI Tuner to manual? I can see it, but with empty setting option/entry. So board may not have external bclk controller anyway, so most you could give if visible was 3-5 bclk anyway.
I can fully unlock this BIOS for you, but for bclk, you need to find from threads/user comments etc which Asus Z170 board does have bclk working so I can look at it’s BIOS options to see if things can be ported over for you to attempt seeing if it works or not.