[Request] Bios Update to make work NVMe SSD on Sony Vaio 13 Pro

Now that the laptop is back to life after a year and more, I want to try to update the BIOS once again (with your help this time :)) in order to have my Sony Vaio 13 Pro - (model SVP132A1CM AKA SVP1321C5E 1.80GHz Intel(R) Core™ i7-4500U works with the new generation V-NAND SSD 970 EVO NVMe M.2
This should be a PCI ssd and it seems that my laptop works with that (in fact I remember when I was trying to make it works, that starting up with Windows 10 UEFI usb I could see the ssd device).

Now, how do I extract the BIOS file to be modified? I have just downloaded the updated BIOS from VAIO website at https://www.sony.co.uk/electronics/suppo…nloads/Z0001381
The file name is EP0000321606.exe and the system says that the actual firmware is the same and it doesn’t require update. Being an exe file I have sourced the folder where it extracted the file to be updated (which should be the same as mine) and I post it here. It’s a file CAP
Is this correct? I think I should use AFUWINGUIx64 to update the bios. I don’t remember all the aprameters to put on before flashing, if someone would be so kind to remind me… :slight_smile:
Thanks a lot for your help

V710440B.rar (3.44 MB)

Sorry for short copy/paste reply here, and I will answer your PM tonight when I get back, but no, please slow down now (for real this time)

Also, that is 2014 BIOS, is that the latest? If yes, OK, we can update some stuff later if you want.

You have flash programmer, connect it, dump the BIOS and send me that file. Here is main driver and software package, try 1.30 or 1.34
http://s000.tinyupload.com/index.php?fil…257455007472602

Here is guide on how to use
https://www.bios-mods.com/forum/Thread-G…341A-programmer << Same as one directly below, but with all images expanded/visible at once
[GUIDE] Flash BIOS with CH341A programmer

If you want to try first without a programmer, and cause yourself prolonged stress around this, please do the following

Check BIOS main page and see if ME FW version is shown, if not then download HWINFO64 and on the large window on left side, expand motherboard and find ME area, inside that get the ME Firmware version.
Once you have that, go to this thread and in the section “C” download the matching ME System Tools Package (ie if ME FW version = 10.x get V10 package, if 9.0-9.1 get V9.1 package, if 9.5 or above get V9.5 package etc)
Intel Management Engine: Drivers, Firmware & System Tools

Once downloaded, inside you will find Flash Programming Tool folder, and inside that a Windows or Win/Win32 folder. Select that Win folder, hold shift and press right click, choose open command window here (Not power shell).
At the command prompt type the following command and send me the created file to modify >> FPTw.exe -bios -d biosreg.bin

Right after you do that, try to write back the BIOS Region dump and see if you get any error, if you do show me image of the command entered and the error given >> FPTw.exe -bios -f biosreg.bin

If you are stuck on Win10 and cannot easily get command prompt, and method I mentioned above does not work for you, here is some links that should help
Or, copy all contents from the Flash Programming Tool \ DOS folder to the root of a USB Bootable disk and do the dump from DOS (FPT.exe -bios -d biosreg.bin)
https://www.windowscentral.com/how-add-c…creators-update
https://www.windowscentral.com/add-open-…menu-windows-10
https://www.laptopmag.com/articles/open-…ator-privileges

lol ok I’ll go step by step.
I’ll try to do that today from work. I’ll keep you posted Lost
Thanks a million!

---------------

Ciao Lost
ok I followed the easier way :slight_smile: using the flash hardware programmer. Please follow this link below. I have saved both the ROM and BIN file. The checking with HEX program showes numbers and othe letters beside FF :slight_smile: it should be ok
https://www.dropbox.com/s/8ashcsknb8e3uy…rammer.rar?dl=0

Keep me updated :slight_smile: grazie!

Somehow, I can’t find your old folder of BIOS we had going, but if I remember correctly, didn’t Paltek not only damage things hardware-wise, but did I also tell you they put on the wrong model BIOS and or only half a BIOS?
I think so, but I can’t find the folder I know I have for you/this! Finally, I found it!, forgot to put Sony in name of folder so it was just the EPxxxxxx

Please explain how you guys fixed it this time in regards to the BIOS and BIOS chips. Did you just fix the resistor, and properly solder on the BIOS as it was, and then boot to that BIOS that Paltek put on there, or did you swap BIOS chip from the other board to this one?
Anyway, asking about all this, so we can be sure to get on the correct BIOS, to avoid future hassle with stuff not working properly.

No need to make multiple files with different extension names, it’s all same from programmer and you can rename as needed And yes, confirmed hex match there, looks like OK valid BIOS
Also, please as we continue, if you send me stuff, put in zip, thanks. Which version software did you use, so we can keep track here?

So, you want NVME Mod, do you also want CPU microcodes updated, ME FW updated, and BIOS menu unlocked so you can see all hidden settings?
Or, just NVME Mod?

Yes you mentioned they wrongly re-flashed it. However remember when you made me try flash it again with correct software in order to see if that could have been the problem but then it didn’t work? so I guess the BIOS is working now because you made me flash it again.

We have just fixed the resistor and we have melted down the pond around the BIOS using that special dough you also mentioned in our PV messages. So after that I just turned it on as the BIOS was already properly flashed. At that time I send you the dump BIOS info and you said it was messed up so we fixed this point.
Also after trying to update the BIOS file I downloaded from SONY it says it has already that version so I guess the BIOS has the right info inside.
Well noted on the BIN and ROM eheh I didn’t know
Well noted on the ZIP/RAR file for future files
I’m quite sure I used CH341A v.1.34 :slight_smile:

I would like NVME Mod and all the other staff you said :slight_smile: that would be great. Just to understand what is CPU microcodes update (BIOS CPU?) and ME FW? to see hidden things would be great then eheh
Thanks a million Lost, u r d best!

Yes, I remember having you do that now, and I bet if BIOS was soldered in securely (resistor aside) then it may have worked.
So BIOS in there now is a corrected one I sent you, not what PalTek put in there, I was looking at that dump again the other day, it’s wrong model and only half a BIOS too, not sure what they thought they were doing?!

Special dough?? Low Melt Solder maybe? Or do you mean Flux?

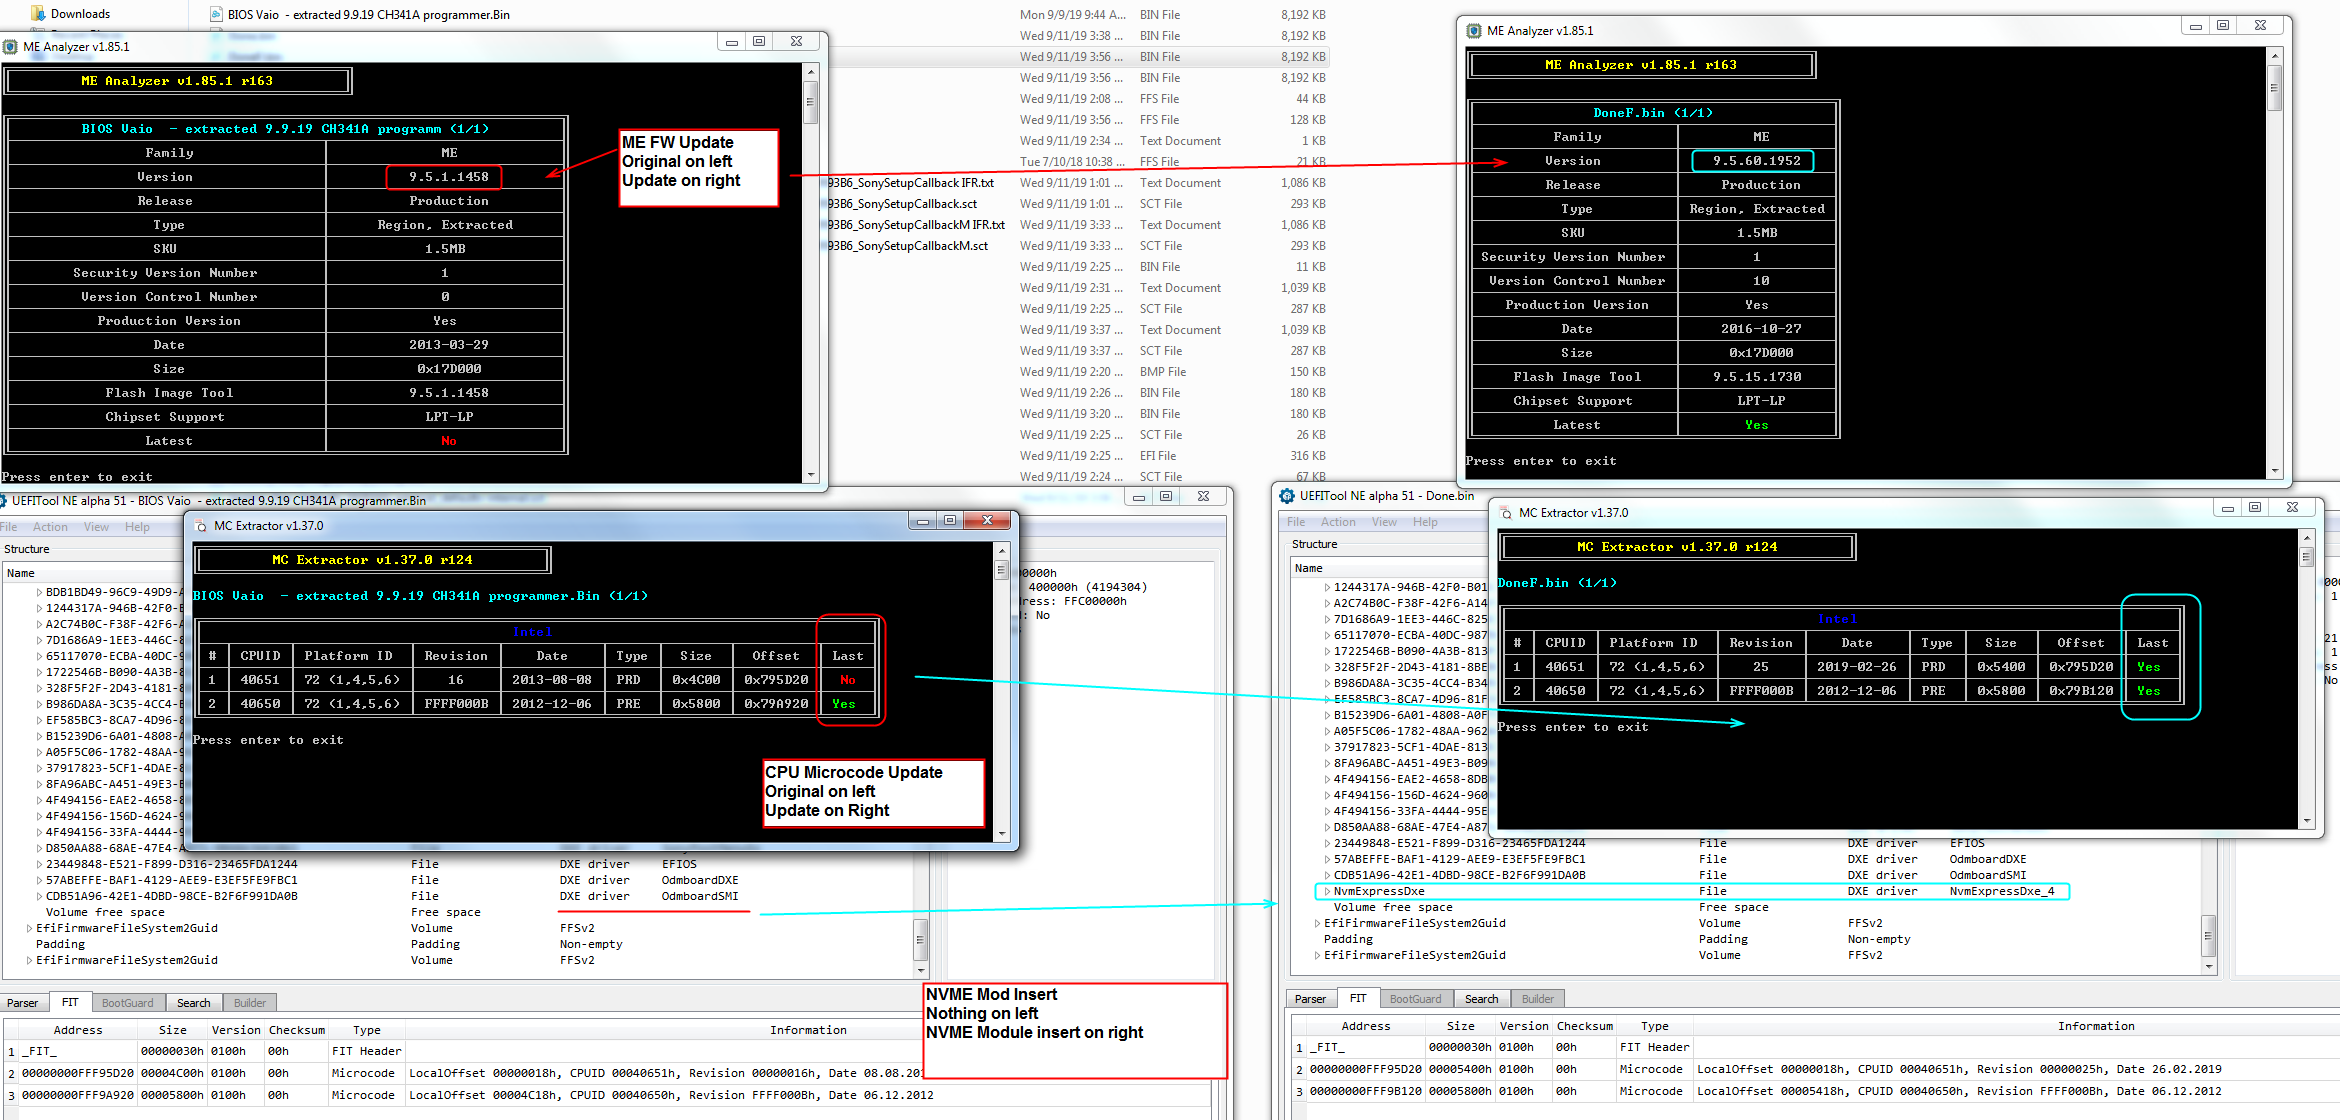
CPU microcodes contain security, errata and bug fixes from Intel. ME FW controls a lot of things, along with security too. It’s Intel Management Firmware
OK, for hidden BIOS settings, I may need to send you a few files to test at first, so we can find which way to unlock settings or menus (sometimes there’s 2-4 methods and it’s not easy to tell which work without testing, these tests no risk of bricking, only it works to reveal the setting or menu or doesn’t, so don’t worry)
For that, first I need to see images of each page of your BIOS and inside each submenu too. You may be able to F12 screenshot to USB, if not, use a camera and if you can, set camera to take small images (I only need to see for a second, no high rez necessary, so few 100KB per image is perfect)

Since I have your programmer dump BIOS now, that is good, we can always put on mod BIOS that way, but if you want, we can test, and then edit little if needed, to make it to where you can put that away for now and use FPT only. If you want?
If you want to do that, please download ME System tools V9.5 r6 from this page - Intel Management Engine: Drivers, Firmware & System Tools

Inside you will find Flash Programming Tool folder, and inside that a Win32 folder. Drop your BIOS backup (File below instead, after you program it in) into this Win32 folder, then back out of it and select the Win32 folder, hold shift and press right click, choose open command window here (Not power shell).
At the command prompt type the following command and if any error, show me image of command entered and error on same image >> FPTw.exe -f DoneF.bin (Rename your backup first, that name you have on there now is too long and has spaces etc)

Right after you do that, if success, then stop, all OK. If error, show me the error, then also try this, and same, if error on this show me command entered and error on same image
FPTw.exe -bios -f DoneF.bin

This will test two things, if BIOS as a whole can be flashed via FPT or not, and if not will show me what error/lock we need to remove, and second will test if we can flash BIOS region only via FPT and if not what lock we need to remove.
We don’t need to do any of this, but I thought it may be easier for you to flash this way vs using a programmer every time, especially since multiple flashes may need done as we unlock the BIOS menus.
But, if you want, programmer can be used every time, nothing wrong with that.

Actually, here, this is mod BIOS with NVME Mod, updated microcodes and ME FW + BIOS lock and SMI lock disabled using all methods at once. Program this in with programmer, then do the above test with this same file once you have it programmed in.
Once this is done programming in, remove all power from the board (battery if installed, and remove power cable from PSU), then press and hold the power on button for 10-15 seconds, then let the system sit for 1+ full minute without any power. This resets the ME FW state.
Then put back in main battery, connect PSU, boot to BIOS, load optimized defaults, save and reboot back to BIOS and make any other changes you usually make. Then, proceed with above FPT test

Mods.png


http://www.filedropper.com/pre-menu-update-unlock

We can even change this to something else too if you wanted

Logo.png

Ok Lost, talk to you in a month loooool just kidding :smiley: I’ll try to do that later today but I need sometime and nobody who comes in and out my room at work as it seems a bit complicate but maybe it is not. I keep you posted :* thanks for now dude

p.s. at Paltek they really didn’t know what they were doing. People are very disappointed on the web, they keep leaving bad reviews, of course…
ps2. special dough loool sorry I don’t really know the proper technical names. Yes I meant to say Flux I think, that thing you melt on it not to damage with heat
ps3. thanks for the explanation on microcode and ME FW, it is very interesting!!! and the idea to change the logo is super top :slight_smile: but for now I will keep it on unless I have sometime to create my own with photoshop and make a try :slight_smile:

Yes, see you in a month or two

Do it at home when you have free time to breath, it’s not something to rush through or get distracted in the middle of

Nice! More bad reviews for Paltek! Good, maybe they will shut down, or at least hire some people that know what they are doing!

Yes, Flux, it helps solder flow better and makes it only go where it should.

lol ok, 11.34pm now, let me see if I understand well the procedure. I’ll get back to you ASAP


EDIT: regarding your message “Since I have your programmer dump BIOS now, that is good, we can always put on mod BIOS that way, but if you want, we can test, and then edit little if needed, to make it to where you can put that away for now and use FPT only. If you want?” what do you mean with use FPT? What is that?


EDIT2: I see you are on line, hope you will see this before I go to sleep. Can I flash your file and then see if it works and then check with ME System tools? I guess FPT is the transfer mode with cable?

EDIT3: Ok then, I have erased my BIOS, flashed your file and removed the battery and all those stuff as you said. If I start windows it goes however I’m not able to access the BIOS using the ASSIST button on the very top of the keyboard. In order to get into the BIOS I have to start the laptop with recovery USB and get into UEFI (I tried F2, ESC, DEL… everything lol but nothing, it goes straight to Windows). In the BIOS I can see the version you mention in the MODS.PNG file (9.5.60…) and I can also see my original 256GB SSD, however if I remove my old disk and put the new 500GB NVMe, it says “none” so it doesn’t recognize it. I’m now cloning my old disk into the new one with EaseUS and I will try to start windows again. I’ll keep you posted with the 4th edit :smiley:

EDIT4: It doesn’t work. I have cloned the SSD but it is not recognized into the BIOS. i have tried to start into UEFI dos mode and I tried to DISKPART, SELECT DISK 0, LIST VOLUME but the only volume I see is the UEFI from USB.
I have got lost (eheh) about your explanation with downoading the ME system tool however I think it is not necessary right? I can use the programmer all the time to flash the new file as I use a different laptop

@leonmjj - FPT is software you use in windows to flash BIOS, once we have it all working to where you can use this only, then you can put system back together and wouldn’t have to use flash programmer anymore.
That is why I kept mentioning this, it’s far more convenient and safe too as your not risking shorting anything with programmer.

You need to go into BIOS and load optimized defaults, then set whatever you used to have set before, for everything you’ve changed. Not being able to enter the BIOS easily, sounds like “Fast Boot” or “Ultra Fast Boot” is enabled, find and disable this

You can’t clone your old system to NVME, well you can, but you have to do a lot more in depth editing and partition work.
It’s much easier to do a clean install, this is the standard for installing and using a NVME device, if you are going to boot from it. You must install from GPT partitioned USB installer, to RAW or GPT partitioned NVME, if using UEFI mode which is BIOS default.
You need to follow all steps exactly as mentioned at step #4 in the “This is what you should do” section - [Guide] How to get full NVMe support for all Systems with an AMI UEFI BIOS
Then once done, you can install your older drive again as secondary and copy over whatever you need to copy over.

What can you see the “Version” of in the BIOS? Unsure about this not able to enter BIOS stuff just yet, it may be a setting, or you need to load optimized, reboot first, and then change BIOS settings again. All will be much easier once I unlock the settings for you.

ME System tools package is only necessary if you want to use FPT software flashing as I mentioned, if you don’t want to do this and plan to use the programmer always (For now at least), let me know, I will make you new BIOS and undo all the changes I made to hopefully unlock that stuff in advance
Maybe some edit I made is messing with you entering BIOS, doubtful, but you never know, I may have been a byte off on a NVRAM edit or something

Ciao Lost
thanks for the above. As I anticipated to you in PV, the laptop is not starting anymore. Not sure if the programmer corrupted the BIOS pin or if any shorting occured :frowning: as you just mentioned above. So frustrated :frowning:
Last night I have tried to re-flash the old BIOS file and this AM I have put back yours and went through the procedure of the battery, long pressing push and so on… but it doesn’t start anymore. Even if I plug the AC the small led light is not showing on (before it did)… I don’t know what to do, I’m giving up :frowning: but I’ll cry first :’’’(

What!! It was booting after you put in the BIOS I gave you initially, correct? If yes, then how/when did it die again now?
Yes, this is why I was trying to get you to a point where we could use FPT, flash programmer isn’t ideal for many uses in a row all the time until you’re super familiar with using it often and even then it can still be a risk.

Battery/power thing was only needed when you put on my BIOS initially, due to the ME FW update, it’s not needed for anything else.

Due to your mention of LED’s not working that were before, sounds like you shorted something out, or something is currently shorting out (make sure it’s not sitting on something metal, nothing laying in there etc)

If, when you last programmed in a BIOS, it was success (ie buffer and chip match), then that BIOS is in there, no need to keep trying to write in a new one, this wont help anything.
You can confirm by dumping the current BIOS contents and then compare in hex to either of the two files you are writing and it should match one of them.
BIOS isn’t the issue, when LED’s aren’t coming on on the AC adapter this means something is shorted out or shorted now, stopping power from being applied

Did you at any time, see or smell magic smoke (Ozone)? Do you see any odd marks around the BIOS chip or resistors near it, or any traces going from it out to the board look bulged, lifted or darkened?

Why were you even messing with BIOS/Programmer again anyway right now? I assumed I’d come back to hear your success or still failure with the NVME Windows install, so was expecting to try and advise you more about that if needed.

Ok, 30 second to sit down. It has been a long day! So basically after I flashed your modified file it worked, loaded windows 10 but then before logging in I was getting the blue screen and it rebooted. Moreover when I pressed the power button the keybord lighted and after 2 seconds the computer shut down. I had to press the power button 2 or 3 times before getting the Windows screen. I thought I wanted to make a try and erase and re-flash the old BIOS as I thought that was the problem. The laptop was acting the same though then I went to sleep and took it to work the day after and found out it was no powering on anymore :frowning: I think the BIOS is not soldered correctly so next Friday I will meet that guy again and we will try to solder the BIOS properly or substitute it with the one on the “broken” motherboard. I will ask him to adjust the resistence as well but I don’t think that is the problem. The fact that I did the battery procedure again is becasue at work I tried to flash your modified BIOS again.
I have checked for anything in metal sitting on the motherboard but I didn’t see anything. It could be that the programmer crampon was pulled at a certain point due to the short wire and maybe it disconnected a BIOS pin…?
The buffer and chip matched though when I flashed in. If I shorted something do you think it is not fixable? I didn’t smell magic smoke at anytime or see any odd marks neither bulged, lifted or darkened. Does the battery supply the motherboard even if the laptop is off? should I remove it when I flash the BIOS?
I didn’t know the ssd cloning was not workable, I just thought that BIOS was not showing the SSD NVMe and so something didn’t go throuhg well. However, now that I think about, I haven’t load optimized defaults :frowning: I have missed that passage :frowning: do you think this is the reason why the BIOS didn’t show the ssd? This is the never ending story :slight_smile:

@leonmjj - Yes, maybe BIOS is still loose a little bit and you clipping onto it these few times made it loose all the way on one leg again.
Or, that trace/pad for one of those legs looked pretty bad from Paltek, damage may not be able to be overcome by simply remelting the solder, however maybe you are right and it’s just still a little bit loose.

Didn’t he reflow all the legs of the BIOS? If yes, it should be OK. Maybe that resistor didn’t get 100% connected, they’re so tiny I always try to use paste and hot air when I do those, but I have removed and replaced with solder gun too.
Resistance shouldn’t need adjusted, maybe put back on better or again etc. It was fine until you started messing with the BIOS and clip/programmer again correct? If yes, then probably BIOS solder connection still is the only issue.

Could be you damaged a BIOS leg, or bent and shorted one into another, or broke the solder connection from the leg or board if it was pulled. You’d have to inspect to see if you see anything like that
Some shorts are OK, and only blow the chip or a resistor, or the programmer itself. Other shorts can be bad and blow out a trace on the board, you’d see a burn mark or a broke path in a trace from the BIOS outward somewhere, where the PCB is blown up and a trace is melted or broken in half.

SSD cloning is not possible how you are thinking, at least not to NVME. As explained you need to do a clean install, to get the NVME driver installed as part of the setup, it’s the easiest and quickest way to do this.
If you want me to find you a clone guide, for SSD to NVME, I maybe can, but it will be heavily involved and you will first need to risk converting your current MBR Partition to GPT before the clone process.
BIOS will never show the NVME, only Windows Boot Manager as a disk choice, once you get windows installed.

@Fernando - if current OS is MBR, and user doesn’t want to boot UEFI/Secure Boot, can a SSD be easily cloned to NVME as MBR to MBR?
If yes, how does he get the NVME driver installed before the clone over?

@Lost_N_BIOS :
The NVMe BIOS module is only required for users, who want to boot off an NVMe SSD in UEFI mode.
As soon as the NVMe SSD has been properly connected to the mainboard, the in-use OS should detect the NVMe Controller and - if the OS is Win10 - automaticly install the generic MS NVMe driver (no matter whether the BIOS contains an NVMe EFI module or not).
That means, that it should be no problem for leonmjj to use the NVMe for storage purposes or even as location for the OS partition, provided that the bootsector is outside of the NVMe SSD.

@Fernando - sorry for any confusion, NVME storage use is not wanted here, main booting OS was what the questions were about.
I am also unsure if he is on MBR partition, only guessing, but I guess the same question from me would be posed either way, MBR or GPT current SSD, how to install the NVME driver and then clone to avoid clean install?
I assume that would be easier if the partition is MBR now and MBR is the plan moving forward too, that’s why I asked about MBR initially and assuming his current was MBR.

@Lost_N_BIOS :
To be honest I cannot really understand users, who want to replace their old SATA connected system drive by a new NVMe one, but are not willing to do a fresh OS installation onto the NVMe SSD in UEFI mode. This is not only the easiest and safest way, but additionally a wonderful opportunity to get rid of all the garbage the user got installed during the past years. By the way: A fresh Win10 installation inclusive doing the personal settings usually takes not more than 10-15 minutes.
For users, who nevertheless want to transfer the data of their previously used OS partition onto their NVMe SSD, I have written >here< a short guide, but I repeat: A clean OS install in UEFI mode onto the NVMe SSD is the by far better solution.

@Fernando - I agree, he hasn’t said straight up no, but was trying to clone so you know that assumes trying to save hassle of re-install customize etc.
I also agree, it’s the best thing to do, I do clean install often sometimes for no reason, keeps things running smoothly! Of course, I use updated WIM image each time, so no windows updates to install, and some of my usual apps already installed too.

Thank you for the guide link, hopefully he will do clean install, but in case he’d rather not hope he can follow along with your guide

Can you please clarify/answer my original question, which could still use your guide minus the partition switch.
Can you close MBR to MBR, never using UEFI/Secure Boot, and if yes, how do you insert the NVME driver into the OS pre-clone, or is that not necessary?

I am sorry, but I am not sure what you mean. If the question should be, whether it is possible to boot off an NVMe SSD in LEGACY mode (using the MBR as boot sector), my answer is "No!" (except the NVMe SSD is a Samsung 950 Pro).

If the OS is Win10 and the NVMe SSD has been detected by the source OS (located on the previously used SATA SSD), it is not necessary to install or load an NVMe driver (unless the user wants another driver than the MS Win10 in-box one).

Ciao Lost ciao Fernando
OMG you know what happened? when we first put back the resistor we haven’t pulled out the BIOS from the motherboard but we have done today (we anticipated as we were supposed to meet Friday). Look at the pictures…
https://www.dropbox.com/s/z2pjn8s6vpjuxgg/IMG_2591.JPG?dl=0
Paltek basically removed the pond that was supposed to be on the motherboard under the BIOS’s pin and so I guess when I used the clip I pressed the pin and being a very few pond around it, it lost the connection with the track. The guy told me he could put the pond back into the hole you can see in the picture however somehow he scratched the track and flexed the PIN toward the trackand then soldered. Now it is back to work :slight_smile: See the pic https://www.dropbox.com/s/6yt30nkwj2dj2mk/IMG_2593.JPG?dl=0

Now it works but Windows is compromised I think. I’m working on the old SSD the one that is supposed to work. The BIOS recognize it however when I start windows I get a bluescreen error with a stopcode like this

https://www.windowscentral.com/how-troub…rors-windows-10

I tried to run the recovery from the USB (also trying with the new NVME SSD) but it says that Windows is blocked or not recognized (if I do diskpart with the old SSD, it says 0 OS). Not sure what happened but I need to investigate and try to make it work. I have used a recovery USB I created while Windows 10 was still working on the old SSD but I removed a partition for mistake :frowning:
inside the USB I have–> Leo F: (the partition I have removed for mistake and renamed Leo - It’s 124MB not so big, any idea of what that could have been?)
SONYSYS H: (259MB but used only 20MB on which I have EFI)
Windows RE tools I: (1.43GB where I have lots of language folders and the bootmgr, bootmgr.efi and recovery.txt)
Leo J: (212GB where I have all my files)
Recovery K: (24GB almost full where I have sources folder in which you can find some Sony stuff including install.wim in 13.8GB).

What Fernando said is that I should have no problem in cloning the old disk into the new one and then try to load windows 10?


Thanks Fernando. I’ll try the fresh instalaltion however having no much time to spend on re-install all the programs, I thought a clone would have been the best.

-----------------

I’m quite sure all the partitions are GPT
---------------------------
Sorry for the multiple posts. The GPT post above was made by mistake, I didn’t properly quoted.
Glad to let you know that I was able to install Windows 10 in the NVMe :slight_smile: now, is there any chance I can try to clone the old ssd into NVMe disk? do you think I can recover the missing partition on the USB recovery disk from the old SSD?
Thanks for your help!