[OFFER] EVGA Z370 Classified K BIOS unlocked

[Edit] Latest BIOS update for v1.19 unlocked (changes from previous mod in bold and underlined);

• Improves boot time for legacy M.2 NVMe devices when enabling Resizable BAR support
• Above 4G Memory Assignment has been added by EVGA - thank you!
• Resizable BAR Support has been added by EVGA - thank you!
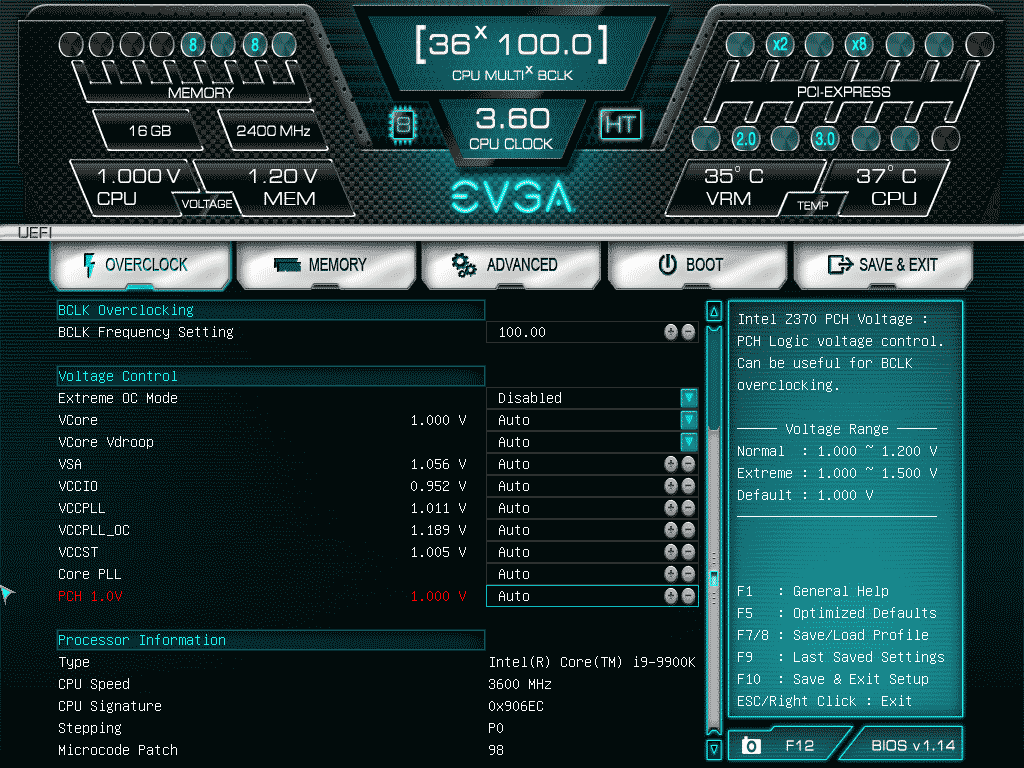
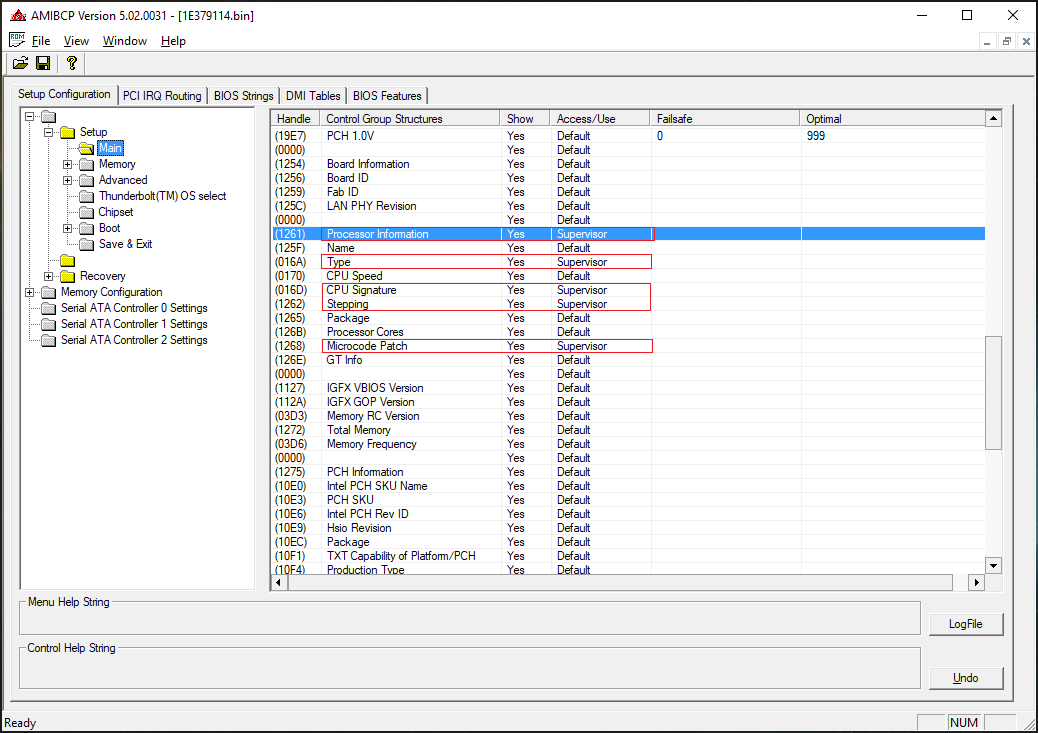
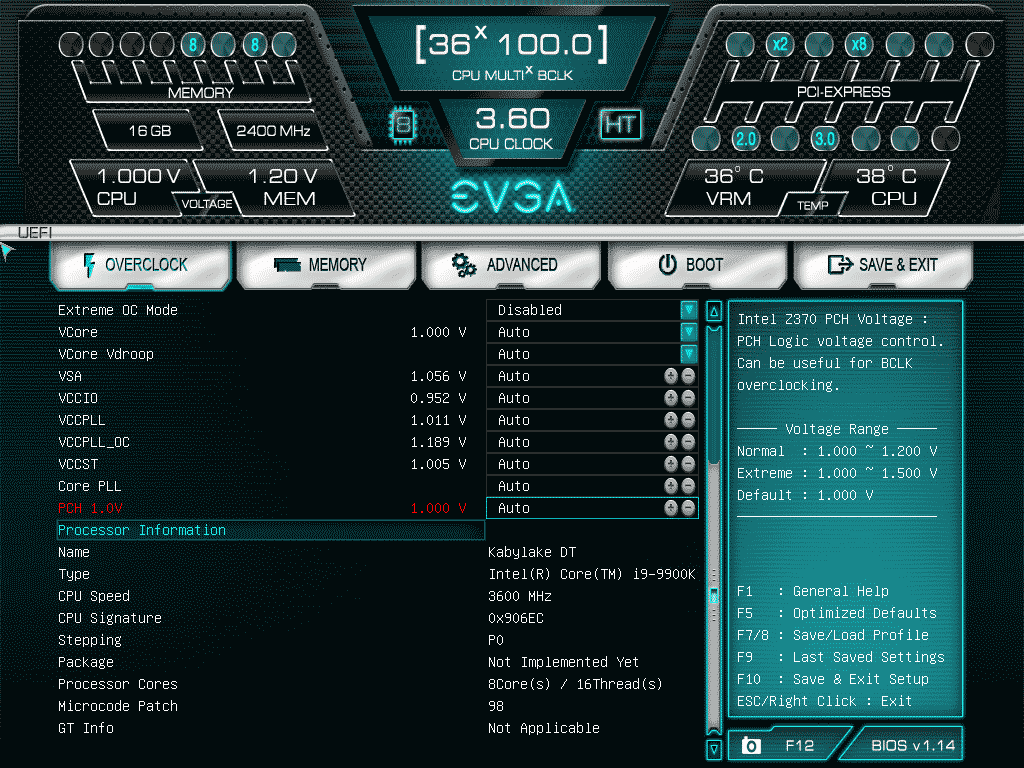
• CPU Type, Signature (CPUID), Stepping & µcode displayed on ‘Overclock’ page at the bottom
• Memory Training Algorithm for Round Trip Latency enabled
• Memory ‘RTL-IOL Configuration’ menu unlocked (read only)
• Advanced ‘Power & Performance’ menu unlocked
• Advanced ‘OverClocking Performance Menu’ unlocked
• Advanced ‘System Agent (SA) Configuration’ menu unlocked
• Advanced ‘PCH-IO Configuration’ menu unlocked
• HPET unlocked
• Speedshift enabled by default
• XTU Interface enabled (shows ‘Memory’ tuning option in Intel XTU)
• XTU ‘Real Time Memory’ timing unlocked in XTU (shows Secondary and Tertiary RAM timings - read only)
• PL4 limit increased to maximum 1023999
• IRST Premium & OPTANE enabled by default & set to UEFI mode
• Restore AC Power Loss set to off by default
• VBIOS updated to 1062 (VBT 209)
• GOP updated to 1112 (VBT 228)
• RAID OROM updated to 18.35.0.4635
• EFI RAID module updated to 18.31.51.5346
ME Firmware updated to 11.8.94.4494
• 906EA µcode downgraded to 70
• 906EB µcode downgraded to 72
• 906EC µcode downgraded to 84
• 906ED µcode downgraded to AA

1E379119_mod3.zip

WARNING: The user OneShot and myself have come across BIOS setting bugs (such as PL3 menu not accessible and freezing the PC) when applying a saved BIOS profile from an earlier BIOS. Therefore it is highly recommended to re-create your profile(s) manually if you experience a BIOS bug after updating to a newer BIOS and applying your previous profile.

[Edit] Note that this BIOS has earliest Coffee Lake microcodes to avoid performance penalties, if you want the latest microcodes for added security you can use UBU to update all of them at the same time.

[Edit2] In order to use the earliest microcodes with Windows 10/11 it is necessary to stop Windows from loading the file mcupdate_genuineintel.dll on boot as it will override the BIOS microcode to a newer version with spectre mitigations that may lower performance. See spoiler below to disable this file (WARNING: Do not do this on Windows Insider Canary builds 25xxx+ or your PC will go into an automatic repair boot loop until you put the file back);

Spoiler (click to reveal text)

You need to first take ownership of the file and then rename it to something like ‘mcupdate_genuineintel.bak’.

In order to change the file name though you will need to take ownership of the file and grant yourself full control permission of the file.

1. Navigate to the file using Windows File Explorer i.e. C:\Windows\System32\mcupdate_genuineintel.dll

2. Right click on the file and select “Properties”

3. Go to the “security” tab

4. Click the “Advanced” button

5. Near the top of the resulting window there should be an “Owner:” line and “TrustedInstaller” is likely going to be the currently listed owner.

6. Next to that click “Change”

7. In the resulting window there is a field “Enter the object name to select (examples):”; type your username in this window and click on the “Check Names” button. This should change the contents of the field to something with an underline. The format should be COMPUTERNAME\USERNAME.

8. Hit OK

9. Now back on the window titled “Advanced Security Settings for mcupdate_GenuineIntel.dll” click the “Add” button near the bottom left of the window.

10. Near the top of the resulting window click “Select a principal”

11. Same window as step 6, same thing needing to be done as well

12. Click OK to return to the “Premission Entry for mcupdate_GenuineIntel.dll”

13. Place a checkmark in the box labeled “Full Control” and then hit the “OK” button on the window.

14. On the “Advanced Security Settings for mcupdate_GenuineIntel.dll” window click the “OK” button

15. On “mcupdate_GenuineIntel.dll” click “OK”

16. Now you should be able to rename it. If you have UAC enabled it will give you two UAC prompts when you try, but you just need to click through them.

If it gives you an error after the two windows that you need permission from yourself or from TrustedInstaller then go back through the steps as you may have missed one.

Thanks to Kezika on Reddit for writing out the instructions in detail (you saved me a lot of time).
Note that a future Windows 10 update may reinstate the file and that every major update (i.e. new build) will also cause the file be updated or reinstated.

Also note that running sytem file check will also reinstate the file i.e sfc /scannow

[Edit3] If you are using Windows 11 (and bitlocker) please read the following warning:

Spoiler (click to reveal text)

On the EVGA Z370 Classified K the TPM device in Windows 11 is managed by Intel ME (Management Engine).

The TPM module effects ‘Windows Hello’ (logging in with a PIN or biometrics).

Flashing the BIOS or changing the BIOS chip that you boot from on the EVGA Classified K can cause the TPM device to fail to function properly, making you unable to login to Windows via your Microsoft account when using ‘Windows Hello’.

You will likely need to reset your PIN to log-in to Windows after a BIOS flash and also repair your TPM configuration.

If you use Windows Defender it may give you this warning when you login, “There is no TPM available. Please check your BIOS settings”

You can check the status of your TPM device in Windows 11 by typing tpm.msc to load the Management Console.

Under normal operation it should read “The TPM is ready for use”.

If you open the TPM console and it says “Compatible TPM cannot be found” you should check in Control Panel > Device Manager > Security Devices to see if the TPM device is either not present or has a yellow bang with a code 10 error.

If the TPM device is showing an error, right-click and uninstall the device then reboot and enter the BIOS and if there is no TPM device reboot and enter the BIOS.

In the BIOS go to Advanced > Trusted Computing and disable the security device, then hit F10 to save and reset and re-enter BIOS.

This time go to Advanced > Trusted Computing and enable the security device, hit F10 to save and reset and then boot into Windows.

The TPM device should now be working normally, check the status in the tpm.msc management console, it should say “The TPM is ready for use”.

You can now set a new PIN.

TPM FAQ

  1. Will clearing the TPM make BitLocker encrypted data unavailable?

A. Only if you don’t have the BitLocker recovery key.

If you clear the TPM, the encrypted drive will only be accessible using the recovery key.

  1. Is it safe to clear the TPM to reset the counter of wrong PIN attempts?

It should be ok to clear the TPM chip.

Afterwards, reboot and enter the recovery key.

**ORIGINAL POST IN SPOILER BELOW FOR THREAD CONTINUITY**

Spoiler (click to reveal text)

I have modified my BIOS to unlock all hidden menus but now it’s so cluttered it’s unusable.

I need help to hide some specific menus.

Motherboard = EVGA Z370 Classified K

Official BIOS 1.14

Unlocked/Modified BIOS 1.14

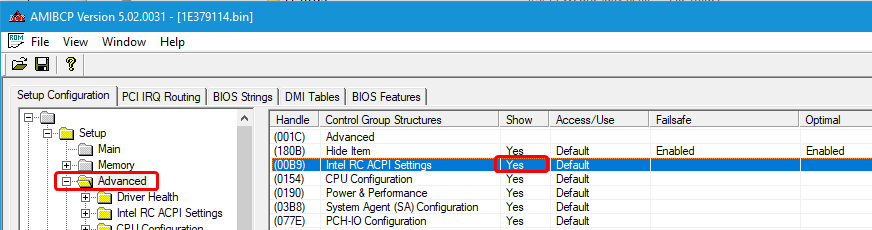
First I am hoping to declutter the Advanced Menu by hiding the following entries (disabling with AMIBCP v5.2.0.031 didn’t work);

Intel RC ACPI Settings
RTD3 Settings
Demo Board
Smart Settings
Intel BIOS Guard Technology
Intel TXT Information
SIO Configuration
PCI Subsystem Settings
Info Report Configuration
SDIO Configuration
Switchable Graphics
USB Configuration (Duplicate)
NVMe Information Page (Duplicate)

I would also like to remove some information from the Overclocking page such as ‘BIOS Information’, ‘Board Information’ and ‘PCH information’.

Here are some screenshots to show the differences for each;

Z370_Classified_K_1.14_Unlocked.zip

Z370_Classified_K_1.14_Official.zip

Thanks!

What do you mean Disable with AMIBCP didn’t work? Do you mean, you set each one at Root level to Show/Hide = No and that didn’t hide them? It should, maybe you didn’t do at root level of each item?
For one example see image below, this is where you would hide Intel RC ACPI submenu, root level of Advanced Menu - did you do that, and it didn’t hide?

Root-ADV-Hide.png


I do notice at the top of the Advanced section, you have “Disabled” the “Hide Item” setting, that may be causing your change as shown above to not work.
If you did make the change I showed above and it doesn’t work, then set this “Hide Item” setting back to default of enabled and see if that helps. This setting was suppressed by default, and I’ve never seen it before, so unsure what it’d intended function is.

As for Overclocking Page - I don’t see any of the items you listed showing in Overclocking submenu, can you please clarify where exactly you are seeing this info you want removed?
Ohh, I see in your images, and this “Overclock” area is actually “Main” in AMIBCP. Those you hide same as I showed above, but directly at each item you want to hide.

If we do find the Show/Hide in AMIBCP is not working at all, then each item’s Element will need to be located in AMITSE/SetupData and hidden on by one, which is what AMIBCP should be doing when you make this change.
They may also be hidden one by one with a “suppress if” in the setup module, but that is huge pain if there is not already a “suppress if” before the item.

For example, for Intel RC ACPI there already is -

Suppress If {0A 82}
QuestionId: 0x12 equals value 0x1 {12 06 12 00 01 00} << This points to the “Hide Item” I Mentioned above, and indicates this setting would be hidden if that “Hide Item” is set to 01 enabled, so set it back
Ref: Intel RC ACPI Settings, VarStoreInfo (VarOffset/VarName): 0xFFFF, VarStore: 0x0, QuestionId: 0x13, FormId: 0x2719 {0F 0F BB 00 BC 00 13 00 00 00 FF FF 00 19 27}
End If {29 02}

OR, you can change the above/similar on each setting you want to hide, if AMIBCP continues to fail to hide things, by changing the above to this instead (it’s not clean looking, but should work)
Suppress If {0A 82}
And {15 02}
Or {16 02}
True {46 02}
Ref: Intel RC ACPI Settings, VarStoreInfo (VarOffset/VarName): 0xFFFF, VarStore: 0x0, QuestionId: 0x13, FormId: 0x2719 {0F 0F BB 00 BC 00 13 00 00 00 FF FF 00 19 27}
End If {29 02}

This is done more cleanly, and should work as well (Something has to replace those original 6 bytes of >> QuestionId: 0x12 equals value 0x1 {12 06 12 00 01 00}), this cleanest way I can think of
Suppress If {0A 82}
End If {29 02}
Suppress If {0A 82}
True {46 02}
Ref: Intel RC ACPI Settings, VarStoreInfo (VarOffset/VarName): 0xFFFF, VarStore: 0x0, QuestionId: 0x13, FormId: 0x2719 {0F 0F BB 00 BC 00 13 00 00 00 FF FF 00 19 27}
End If {29 02}

Hi Lost_N_BIOS. thanks for looking into this for me!

Ok, some clarification on what I have tried after I set ‘Hide Item’ to disabled.

With AMIBCP setting the items(s) I don’t want hidden to show ‘No’ at root level (Advanced) and then also setting the individual items (further down the tree) had no effect (items still visible) e.g.

Setup → Advanced → Intel RC ACPI Settings (in the Advanced Folder) → Show → No

and also;

Setup → Advanced → Intel RC ACPI Settings (down the tree) → Intel RC ACPI Settings → Show → No

And doing each item on the ‘Intel RC ACPI Settings’ page individually also made no change to any of them.

Maybe it is better to look at it the other way - is there a better way to enable the individual items I want unhidden under ‘Advanced’? i.e.

Power & Performance
System Agent (SA) Configuration
PCH-IO Configuration
PCH-FW Configuration
Thermal Configuration
Overclocking Performance Menu
Intel ICC
Thunderbolt Configuration
Offboard SATA Controller Configuration
ACPI Settings
CPU Configuration
Network Stack Configuration

Using UEFITool NE A55 I searched for “899407D7-99FE-43D8-9A21-79EC328CAC21” and extracted the setup module but when I compared the setup from stock BIOS to the modified BIOS they were the same, so I wasn’t sure where the changes where being made.

I then used IFR extractor to look at the setup.bin but the text document was massive and I thought there might be another (better) way to hide them rather than going through each item one by one.

Also there were duplicates for some items and I don’t know which items are the ‘real’ items to be modified.

You’re welcome! Sorry, I’m still confused, that’s why I showed image, hoping you’d show one back if you were doing something differently.

To me, what you said (2 examples) appear to be same thing, but I’m not sure I get what you mean maybe? Setup → Advanced → Intel RC ACPI Settings (in the Advanced Folder) → Show → No / Setup → Advanced → Intel RC ACPI Settings (down the tree) → Intel RC ACPI Settings → Show → No
The above shown image I posted is the correct and only location to disable/enable view of the submenu entirely, all at once, if AMIBCP is going to do it for you. However, I think you need to set that “Hide Item” back to default first then this would be hidden by default I believe

I don’t know how you unlocked/unhide each item initially, but yes, this can be done several ways and it depends on BIOS which will work and which fail etc.
How did you unhide the items to begin with? If you simply revealed them with the “Hide Item” setting change, then change that back so all hidden again.
And then first try AMIBCP Access Level Super + Show Yes, if that fails, on each individual item null the suppress if in front of it via Hex/IFR edit on setup module (Actually, do this first, then AMIBCP edits if needed after). This way you can reveal each you want one at a time

Example, on setup IFR, to Null a suppress if >>
Suppress If {0A 82}
QuestionId: 0x12 equals value 0x1 {12 06 12 00 01 00} << Change that 01 to FF
Generic Setting Example name here
End If {29 02}

After the above edit, AMIBCP edit may or may not also be needed

Changes with AMIBCP are made at AMITSE/SetupData module - for what we are discussing here - AMIBCP changes values as described below at the AMITSE/SetupDate area.
Access Level / Show Yes/No - DEFAULT = 00/No - 01/Yes (08/No - 09/Yes) USER= 04/No - 05/Yes (or 0C/No - 0D/Yes) Supervisor= 06/No - 07/Yes (Or 0E/No - 0F/Yes)
Any of those may be used, depends on BIOS type - I would use “Supervisor + Yes or No” in hex or AMIBCP (Change Access Level to Super then Show Yes/Now also)
Pick one setting, change access level and Show Yes/No and save the BIOS. Then extract that mod BIOS AMITSE/SetupData module and compare in hex to stock BIOS AMITSE/SetupData module, then you will see these changes being made

Duplicates, pick where you want it to be and hide the other, some settings are duplicated throughout menus, in case some menu hidden or desired to be bundles in same area as other related settings.
So you pick which you want where, hide the other one (both control same, you change one you change them both in BIOS)

If you need me to do an edit for you, revealing only the menus shown at post #3, let me know and I will first sent you a set of test files and a question for you to tell me which of the test files does xxx, then I will make final unlock BIOS after you reply back with test results.
After having done that, I can also tell you which edit method was needed to make visible or hide etc. This how I usually do any mod for users, first make a few test BIOS to see which method reveals menu/submenus and or settings, have them test and let me know, then do the rest all at once.

Ok, so I have dumped AMIBCP for now as it does nothing at all.

I used the null ‘suppress if’ method by changing the following offsets and all changes were successful!

CPU Configuration (0x36EC0)
Power & Performance (0x36ED9)
System Agent (SA) Configuration (0x36EF2)
PCH-IO Configuration (0x36F0B)
PCH-FW Configuration (0x36F24)
Thermal Configuration (0x36F3D)
Overclocking Performance Menu (0x36FBD)
Intel ICC (0x36FD6)
Thunderbolt Configuration (0x36FEF)
Offboard SATA Controller Configuration (0x37008)
ACPI Settings (0x37021)
Network Stack Configuration (0x37207)

So thank you for setting me on the right track!

Now there is just one more thing I would like to fix on the Overclock or ‘Main’ page.

I nulled a ‘suppress if’ at 0x361D9 but this enables Board Information, Processor Information and PCH Information all at the same time.

I would prefer to only see the ‘Processor Information’ title and these text fields if possible;

Type
CPU Signature
Stepping
Microcode Patch

Is there a similar way of doing this?

Great you got it! And you’re welcome! So, did you have to set that one “Hide Setting” back to default first, to hide them, then null the suppress?
If you did not change that back, do that now, so all the stuff on Main/OC is hidden, then try AMIBCP Super + Show/Yes on the Processor Info settings and see if that makes them visible or not (If not, try User+Show/Yes).
Undo that Nulled Suppress if edit you made first, before you do this AMIBCP test. I think AMIBCP should work (Or manual change of correct bytes if AMIBCP is not doing that), just some combo of you enabling/disabling that “Hide Items” Setting from the get go is messing with things here I think.

If not, I will figure out how to fix the stuff for you using IFR/Hex. It’s tricky to move those things around and keep same exact bytes, but basically you would want to move things around in there and make it so only what you want is unsuppressed.
You may need to add/remove suppress if’s or end if’s, or possibly completely remove some entry so you have it’s bytes to add new suppress if/end if etc. And that first Suppress if encompasses that whole block too, so it will be tricky to get it just right and keep stuff you don’t want suppressed.
This is a pain to do, and keep same exact bytes, much easier to do with AMIBCP instead

If you can’t get it, tonight I will send you some AMIBCP edited test files to try first, before I try to figure it out the harder way.
These will only be test, made from stock BIOS, don’t worry about how anything else looks other than what we will test, it’s only to figure out your current items issue, then we apply that same change to your current mod BIOS.

Yep, I set “Hide Setting” to default before I nulled all of the ‘suppress if’ variables for each menu item.

Anything that I do with AMIBCP to show/hide menus or information has no effect.

Modifying the default ‘Optimal’ parameters does work though e.g. setting speedshift to be enabled by default.

If it’s a big headache to hide the Board Information and PCH Information then I guess I’ll just leave it all visible, as it is below the settings I use often (you have to scroll down to even see it).

Mainly I just wanted to be able to see the microcode information so I can easily tell when my BIOS mods/updates have worked and which BIOS chip I have loaded from.

Thanks for all of your time and help :slight_smile:

Thanks for further details. So, did you check before/after of AMITSE/SetupData of a change to single setting Super+Show-Yes/No, to see if it’s actually making those changes? If it is, then we’ll have to do the other way, but if it’s not making the proper changes this may be why (possibly BIOS not 100% compatible with AMIBCP)
I will check this tonight, if you are unsure how to spot these changes. And don’t worry, you know me, I hate being beat by a BIOS, so I will get it sorted out for you the other way if that’s how it has to be done

If you really ONLY need Microcode Patch shown, but everything else in that section hidden, that may be a bit easier to sort out.
You can cut/paste (move) items around in there, so it may be easy to move this outside of the suppress if constraints, or leave that entire section hidden and move that item over to another section you did want visible (or that’s already visible by default on that page)
For example, you could cut it from Processor info area and move to where ME FW info/SKU info is instead.

If you think this might be OK, and want me to show you how to do, please put the board/CPU/PCH info back to hidden, and then show me image of that page, and I will look and see best place to move Microcode Patch to and show you how to do it.

You’re welcome, happy to help of course

Ok so I used AMIBCP to try once again to change the five items I want unhidden to ‘Supervisor’ with ‘Show’ set to ‘Yes’ and then extracted the setup module but it is unchanged (i.e. same checksum as the unmodified setup).

1.14_mod_Supervisor.png


The changes are being saved to the BIOS somewhere because when I re-open the BIOS they are still set to Supervisor (and the BIOS checksum changes) but they have no effect (I have flashed the modified BIOS to be 100% sure).

I will require your help to get those five items to display.

AMIBCP Changes are not made in setup (Except for textual changes), they are made at AMITSE/SetupData module (SubGUID - FE612B72-203C-47B1-8560-A66D946EB371)
Is your above test, with the “Hide Item” setting enabled or disabled, and did you try both ways?

Changes should be similar to these below, but could be different for your BIOS I haven’t looked myself yet, these are the common values used.
Access Level / Show Yes/No - DEFAULT = 00/No - 01/Yes (08/No - 09/Yes) USER= 04/No - 05/Yes (or 0C/No - 0D/Yes) Supervisor= 06/No - 07/Yes (Or 0E/No - 0F/Yes)
I checked, your BIOS is set to 01 by default (Default/Show=Yes), and changes to Super Yes/No are 06 or 07 - so AMIBCP is changing it properly.
But, this may be overridden by that Hide Item setting, this why I mentioned to test two BIOS with same setting of Super/Show=yes here + Hide Item enabled and disabled.
And, I guess it’s best to leave that enabled by default anyway, so all that other stuff isn’t automatically visible (more to hide that way, how you started this thread)

Some BIOS do not use this module that AMIBCP changes, but rely on setup module instead, all depends on how they set it up.
This is why I send out a few BIOS at first to users to test, before I do unlocks, I make BIOS with same change in multiple ways to see which is used, sounds like we need to do that here and if we find AMITSE/Setupdata is ignored then we’ll have to do it in setup

You only really need “Microcode Patch” visible on that page, I mean stock + this item is all you really wanted there correct?
If yes, I’m sure I can move it to the “ME Info” area and just enabled that, this way you can see ME FW/SKU + Microcode version and not have all the rest showing.
If I do move to PCH and hide everything else, I will rename that ME & uCode info. That or I can figure it out how to do manually just that one item in that section and still hide the rest

I’ll figure it out in setup, I think you can do with AMIBCP, but that Hide Item thing is the issue, if you disable that then it enables too much like you originally had, so best we do manually via setup

* Edit @chinobino - What is the exact way you are extracting setup (module as-is whole, body as-is whole, PE32 as-is or body etc)?
I ask because no matter how I extract it trying to guess the way you did, I cannot find the exact suppress if you mention at 0x361D9, and there is several right in this area so I need to see the exact one you are editing that’s enabling to much there.
You can simply show me the exact one in an image of IFR too, that would be fine!

Actually, with the BIOS how you had it at post #5, where you first nulled that suppress if for this section, you should then be able to set AMIBCP Show/No (Default or super both should be OK) for the items you want to then hide.

** Edit 2 - @chinobino - Here, please test, flash then load optimized, reboot and check. Does this show the “Board Information” section by default now? If yes, OK, I will remove the items you didn’t want, and leave only the few you wanted
This is a move edit, I moved that entire section outside that main suppress if, check IFR and you’ll now see the board info before that first suppress if. To remove items you don’t want, if this worked, I will move those back into some other area below that you plan to leave hidden.
http://s000.tinyupload.com/index.php?fil…347087086017537

Sorry for the multiple tags here, only did that in case you were reading, so you’d hopefully refresh and see the edits.


When I use a stock BIOS (completely unmodified) and set the five items to Supervisor then the AMITSE/SetupData module (SubGUID - FE612B72-203C-47B1-8560-A66D946EB371) does change but you don’t see any change visually.


Enabled (Default)

If "Hide Item" is set to disabled then everything becomes visible as per the screenshots in the first post.


1. Super/Show=Yes + Hide Item = Enabled = no change, not visible

2. Super/Show=Yes Hide Item = Disabled = everything visible (as per screenshots in first post)


I 100% agree.


No, I want these visible as well;

CPU Configuration
Power & Performance
System Agent (SA) Configuration
PCH-IO Configuration
PCH-FW Configuration
Thermal Configuration
Overclocking Performance Menu
Intel ICC
Thunderbolt Configuration
Offboard SATA Controller Configuration
ACPI Settings
Network Stack Configuration


I only disabled ‘Hide Item’ in the first post - every BIOS modded after that was stock (default) with it enabled (hidden).


Module as-is whole using UEFITool NE A55.


With the way I extracted the setup module (as-is whole) I assume there is a header present that is throwing the offsets off.

Using AMIBCP I tried to hide the other items under Board Information, Processor Information and PCH Information but it had no effect - all of the items were still visible.


I flashed MoveTest.bin and it worked, only Processor information was shown (see screenshot) which is good.

The only 1 small negative thing is that there is no space before ‘Processor Information’. It’s a very minor issue and if it’s a massive PITA to try to insert then you can leave it as is.


Following what you suggested - this means that you only need to (re)move Name, CPU Speed, Package, Processor Cores and GT Info.

To make your job easier I have linked a modified BIOS that already has the ‘Advanced’ items I want unhidden.

1E379114_mod2.zip

Multiple edits to your post is no problem, I usually have the browser window open and hit F5 occasionally, thanks in advance!

Thanks, I will sort through this tonight when I have more time. I thikn I tried as-is whole, but still didn’t look right, maybe we use different IFR app or something? I always extract setup as PE32 as-is and I use the 0.7 version IFR extractor tool.

Good to see that BIOS I sent you was OK, I think space can be added, or I can choose somewhere better etc. I only did that as a quick test to see if that stuff would be visible or not, without the Hide Item setting enabled.
Can you, with that test BIOS, now using AMIBCP set one of those items I made visible here to show = no and then it’s hidden? If yes, I can move everything there outside of the suppress if constraint and then we can control it this way instead.

Yes, I knew you wanted all that other stuff visible too, but was focusing on sorting out this Microcode Patch thing first by itself and then we can know how to do the rest better.
So, in the BIOS you attached above, I only need to hide Process Name, CPU Speed, Package, Processor Cores and GT Info. And maybe try to get a space between Microcode patch?


I am using a different IFR app, I use Universal IFR Extractor (release v0.3.6) but I also have Universal IFR Extractor v0.7 and they make the same text file (apart from the addition of language code en-us with v0.7 which doesn’t effect the offsets).

The different offsets must be due to the way I am extracting the setup as-is whole.

If I extract setup as PE32 as-is the offsets are now;

CPU Configuration (0x36E48)
Power & Performance (0x36E61)
System Agent (SA) Configuration (0x36E7A)
PCH-IO Configuration (0x36E93)
PCH-FW Configuration (0x36EAC)
Thermal Configuration (0x36EC5)
Overclocking Performance Menu (0x36F45)
Intel ICC (0x36F5E)
Thunderbolt Configuration (0x36F77)
Offboard SATA Controller Configuration (0x36F90)
ACPI Settings (0x36FA9)
Network Stack Configuration (0x3718F )

And

Entire Block for Board Information, Processor Information and PCH Information (0x36161)

Does this now match what you’re seeing?


Setting show = no for Name, CPU Speed, Package, Processor Cores and GT Info on MoveTest.bin with AMIBCP has no effect.


Correct :slight_smile:


Not quite, if possible it should be like this;

PCH 1.0V
<SPACE>
Processor Information
Type
CPU Signature
Stepping
Microcode Patch

Thanks!

@chinobino I was only lost when trying to find which exact suppress if you changed a while back, but it doesn’t matter now. I use that 0.3.6 sometimes too, but only when 0.7 is failing (@ Insyde BIOS mostly)
Did you test show=no + Super (And then also User, instead of default)? All that needs tested, in case one of those can easily do this… Or, I think we’ll get it below, but if you want other edits, probably best to test all this out too so you know what all does and doesn’t work

But, here, I think I understood you above, using your mod BIOS from #11, you wanted the following
PCH 1.0V
<SPACE>
Processor Information
Type
CPU Signature
Stepping
Microcode Patch

^^ Removing all the other stuff I made visible before that. Hopefully that’s what you meant? Sorry, it’s hard to jump in mid-mod + with an oddly controlled BIOS too
Ohh, never mind, I see that mod BIOS you linked does not have those changes I made before (Good, easier to redo how you wanted anyway)

New BIOS should look like this now

Numeric: PCH 1.0V, VarStoreInfo (VarOffset/VarName): 0x1104, VarStore: 0x1, QuestionId: 0x281A, Size: 2, Min: 0x3E7, Max 0xFF03, Step: 0x1 {07 94 E9 19 EA 19 1A 28 01 00 04 11 14 11 E7 03 03 FF 01 00}
Default: DefaultId: 0x0, Value (16 bit): 0x3E7 {5B 07 00 00 01 E7 03}
End {29 02}
Subtitle: Statement.Prompt: , Flags: 0x0 {02 87 02 00 00 00 00} << here is the "Space"
End {29 02}
Subtitle: Statement.Prompt: Processor Information, Flags: 0x0 {02 87 63 12 00 00 00}
End {29 02}
Text: Statement.Prompt: Type, TextTwo: N/A {03 08 6C 01 6D 01 6E 01}
Text: Statement.Prompt: CPU Speed, TextTwo: N/A {03 08 72 01 74 01 73 01}
Text: Statement.Prompt: CPU Signature, TextTwo: {03 08 6F 01 71 01 70 01}
Text: Statement.Prompt: Stepping, TextTwo: Unknown {03 08 64 12 66 12 65 12}
Text: Statement.Prompt: Microcode Patch, TextTwo: Not loaded {03 08 6A 12 6C 12 6B 12}

http://s000.tinyupload.com/index.php?fil…309497333352257

Arrr! I just realized you didn’t want “CPU Speed” in there After you check this, if it’s all proper except for that, I’ll remove CPU Speed in next edit
I’d do now, but want to wait until you check and be sure it’s all OK aside from that first


@Lost_N_BIOS Sorry, yes Super has no effect I forgot to say that in my last post above.

Setting Super + show = no for Name, CPU Speed, Package, Processor Cores and GT Info on MoveTest.bin with AMIBCP has no effect.


Correct!

1E379114_mod2M.rom looks great;


Just need to remove ‘CPU speed’ and we’re done! :smiley:

Nice Here you go - http://s000.tinyupload.com/index.php?fil…955233414397025

If you check the setup IFR from that BIOS, you should be able to see how that was done
Basically, edit moves the things you wanted to be outside that first “Suppress If” directly following PCH 1.0V

Success!

Thank you kindly sir.

Now I can start fine tuning

Great to hear it! You’re welcome, and thank you for all the help you give when I tag you and ask as well

Good luck on the tweaking and fine tuning


Hi, can I see your settings for overclocking 9900K at 4.9 MHz?
and is it the latest modification? EVGA Z370 Classified K
does your processor pass tests at 4.9 MHz prime95, OCCT ?

@OneShot I use an AVX offset of -2 for all AVX/AVX2 loads, which results in 4.7 GHz all core frequency.

[Edit] Non-AVX loads I can run at 4.9 GHz all core @ ~1.35 V and 5.0 GHz @ ~1.40 V - note that extra vcore is required when running 4 DIMMs at high speed i.e. 4000+

I have run up to 5.1 GHz (non-AVX) but it is hard to pass 3DMark Sky Diver Physics (CPU) test due to the high Vcore voltage required (1.45 V) and thermal limit being hit.

I am limited to 4.7 GHz when using AVX in Prime95, OCCT and 3DMark Time Spy Extreme CPU Test (AVX2) as I hit the Z370 Tjunction max of 100°C (the CPU throttles) when running 4.8 GHz all core and higher.

On my Gigabyte Z390 I can use the Tjunction offset to allow up to 110°C which allows AVX tests to run at 4.8 GHz without throttling.

I am using air cooling too btw (Noctua NH-U12-A).