Preamble
A good range of Dell laptops (such as XPSs 9360/9350/9343 and likely a few other Dell ranges too) have their OPI link limited to 2 GT/s, unlike some newer ones such the XPS 9370/9380/7390/9300 and a few Inspirons where full OPI link speed is enabled (4 GT/s) - resulting in double the throughput for SSDs and eGPU interfaces.
These issues are well-known and have been raised elsewhere in the past, such as here, here and here.
After some experimentation, I’ve found a method to unlock full HDD and eGPU speed on the limited machines starting with the XPS 9360 but the process should be similar for all models. The trade-off in power and heat consumption is truly minimal, so it’s definitely worth exploring in earlier models. However the process is long, convoluted, risky and involves a lot of fiddling, particularly in cases such as the XPS 9360 where the BIOS is fitted with a WSON chip instead of the usual SOIC package.
1. Obtaining a full dump of the Winbond BIOS chip
The safest and surest way to dump is to use FPT (dos or windows), but in order to do that the full chip needs to be visible for read-access.
The most reliable way to do this in laptops such as the Dell XPS 9360 is to use CodeRush’s IFR dump to find the UEFI variable (Local ME FW re-flash), which in the 9360’s case is 0x67A.
There are quite a few ways to boot into a UEFI shell though my favourite is CLOVER EFI with a special terminal that enables setup_var which you can download from here
Once you drop into a UEFI shell, type the following:
setup_var 0x67a 01
reboot into Dos/Windows immediately to dump the full flash as follows
FPT.exe -D FULLDUMP.BIN
Make a few dumps and MD5 them just to be safe (you’ll need them, trust me). Next reboot will disable read access of the full chip.
2. Unlocking the flash descriptor on the BIOS dump
The most reliable way of unlocking the FD is using coreboot’s ifdtool. You can compile this manually by cloning the repo here or download a binary for your OS.
Unlocking is simple as follows:
ifdtool -u FULLDUMP.BIN
A new file FULLDUMP.BIN.new is created
3. Flashing the full dump back to the chip
This is the hardest and riskiest part, and it is likely you will need to make a few copies of the FULLDUMP.BIN before you get this right.
The only way for a full flash on this machine (without flash descriptor r/w) is via a hardware programmer. The Raspberry Pi 2/3/4 can do this but check that you have a stable 3v3 line coming out of the device. You will also need a very good quality test clip - either the Pomona 5250, or (as in my case) if it doesn’t read the chip, a specialised WSON test probe clip from AliExpress
There are many ways to set up the RasPI with flashrom and described elsewhere on this forum. My preferred method is using Arch Linux, which can be built and deployed using the method outlined here
The wiring and pin layouts for the XPS 9360’s Winbond chip is identical to the other Winbond chips, as follows:
2
3
4
5
6
7
8
9
Flash IC Pin	PIN	Raspberry Pi GPIO Pin	PIN
Vcc	8	3.3v	17
GND	4	Ground	25
/CS	1	SPI0_CE0_N	24
CLK	6	SPI_CLK	23
DO	2	SPI_MISO	21
DI	5	SPI_MOSI	19
/WP (IO2)	3	GPIO_GEN4	16
/HOLD (IO3)	7	GPIO_GEN5	18
Assuming you’ve got flashrom compiled and ready, test connectivity using this method:
# flashrom -p linux_spi:dev=/dev/spidev0.0,spispeed=24000
I’ve found that a clock speed of 24MHz is the fastest supported for the W25Q256.V, but you can flash using lower speeds. Be prepared for longer wait times though, which can become an issue if you’re physically holding the clip to the board.
If the clip is properly aligned with the pins, you should see the following:
2
3
Using clock_gettime for delay loops (clk_id: 1, resolution: 1ns).
Found Winbond flash chip "W25Q256.V” (32768 kB, SPI) on linux_spi.
No operations were specified.
It is highly unlikely you will see this on the first attempt, given how finicky the actual connections are. Be patient and try again. Once you get a persistent connection, try the following:
# flashrom -p linux_spi:dev=/dev/spidev0.0,spispeed=24000 -r backup_rom1.bin && flashrom -p linux_spi:dev=/dev/spidev0.0,spispeed=24000 -r backup_rom2.bin && flashrom -p linux_spi:dev=/dev/spidev0.0,spispeed=24000 -r backup_rom3.bin
If all the three dumps above are identical (using cmp or diff), then now’s the time to flash back the modified rom from above
# flashrom -p linux_spi:dev=/dev/spidev0.0,spispeed=24000 -w FULLDUMP.BIN.new
Assuming the flash and verify steps are successful, you will then need to unplug and replug both batteries on the board.
If for whatever reason the flashing operation above is unsuccessful, or the laptop POSTS with an error (usually two amber, two white flashes) then the chip needs to be refreshed. Do not despair - I’ve bricked the machine many times and always brought it back to life with this method, it just requires time and patience.
4. Changing the OPI link speed
Assuming the above is completed successfully, the rest is now easy. You’ll need to boot into Windows, and first verify that the flash descriptor is unlocked using FPTW64.exe -i
You’ll then need the latest copy of Intel’s Flash Image Tool, which can be downloaded from the system tools here
Unrar and unzip, and run the Flash Image Utility. Try and load the FULLDUMP.BIN.new file now.
If you encounter any errors, you will first need to prepare the utility to work with a clean ME image, as is described here
Assuming all works well, you will then need to modify the OPI Link speed. Go to PCH Straps -> OPI Link Speed and change it from 2 GT/s to 4 GT/s. Save the image and create a new flash. Do *not* flash the whole image back.
Close FIT, and re-open it. Load the newly generated image file (outimage.bin) and go to its new dump folder. You should find a 4k DESC file which contains the modded OPI link speed. Flash this back to the descriptor using the command:
FPTW64.exe -DESC -F DescImage.bin
Shutdown, and reboot. Your OPI link is now running at full speed :)
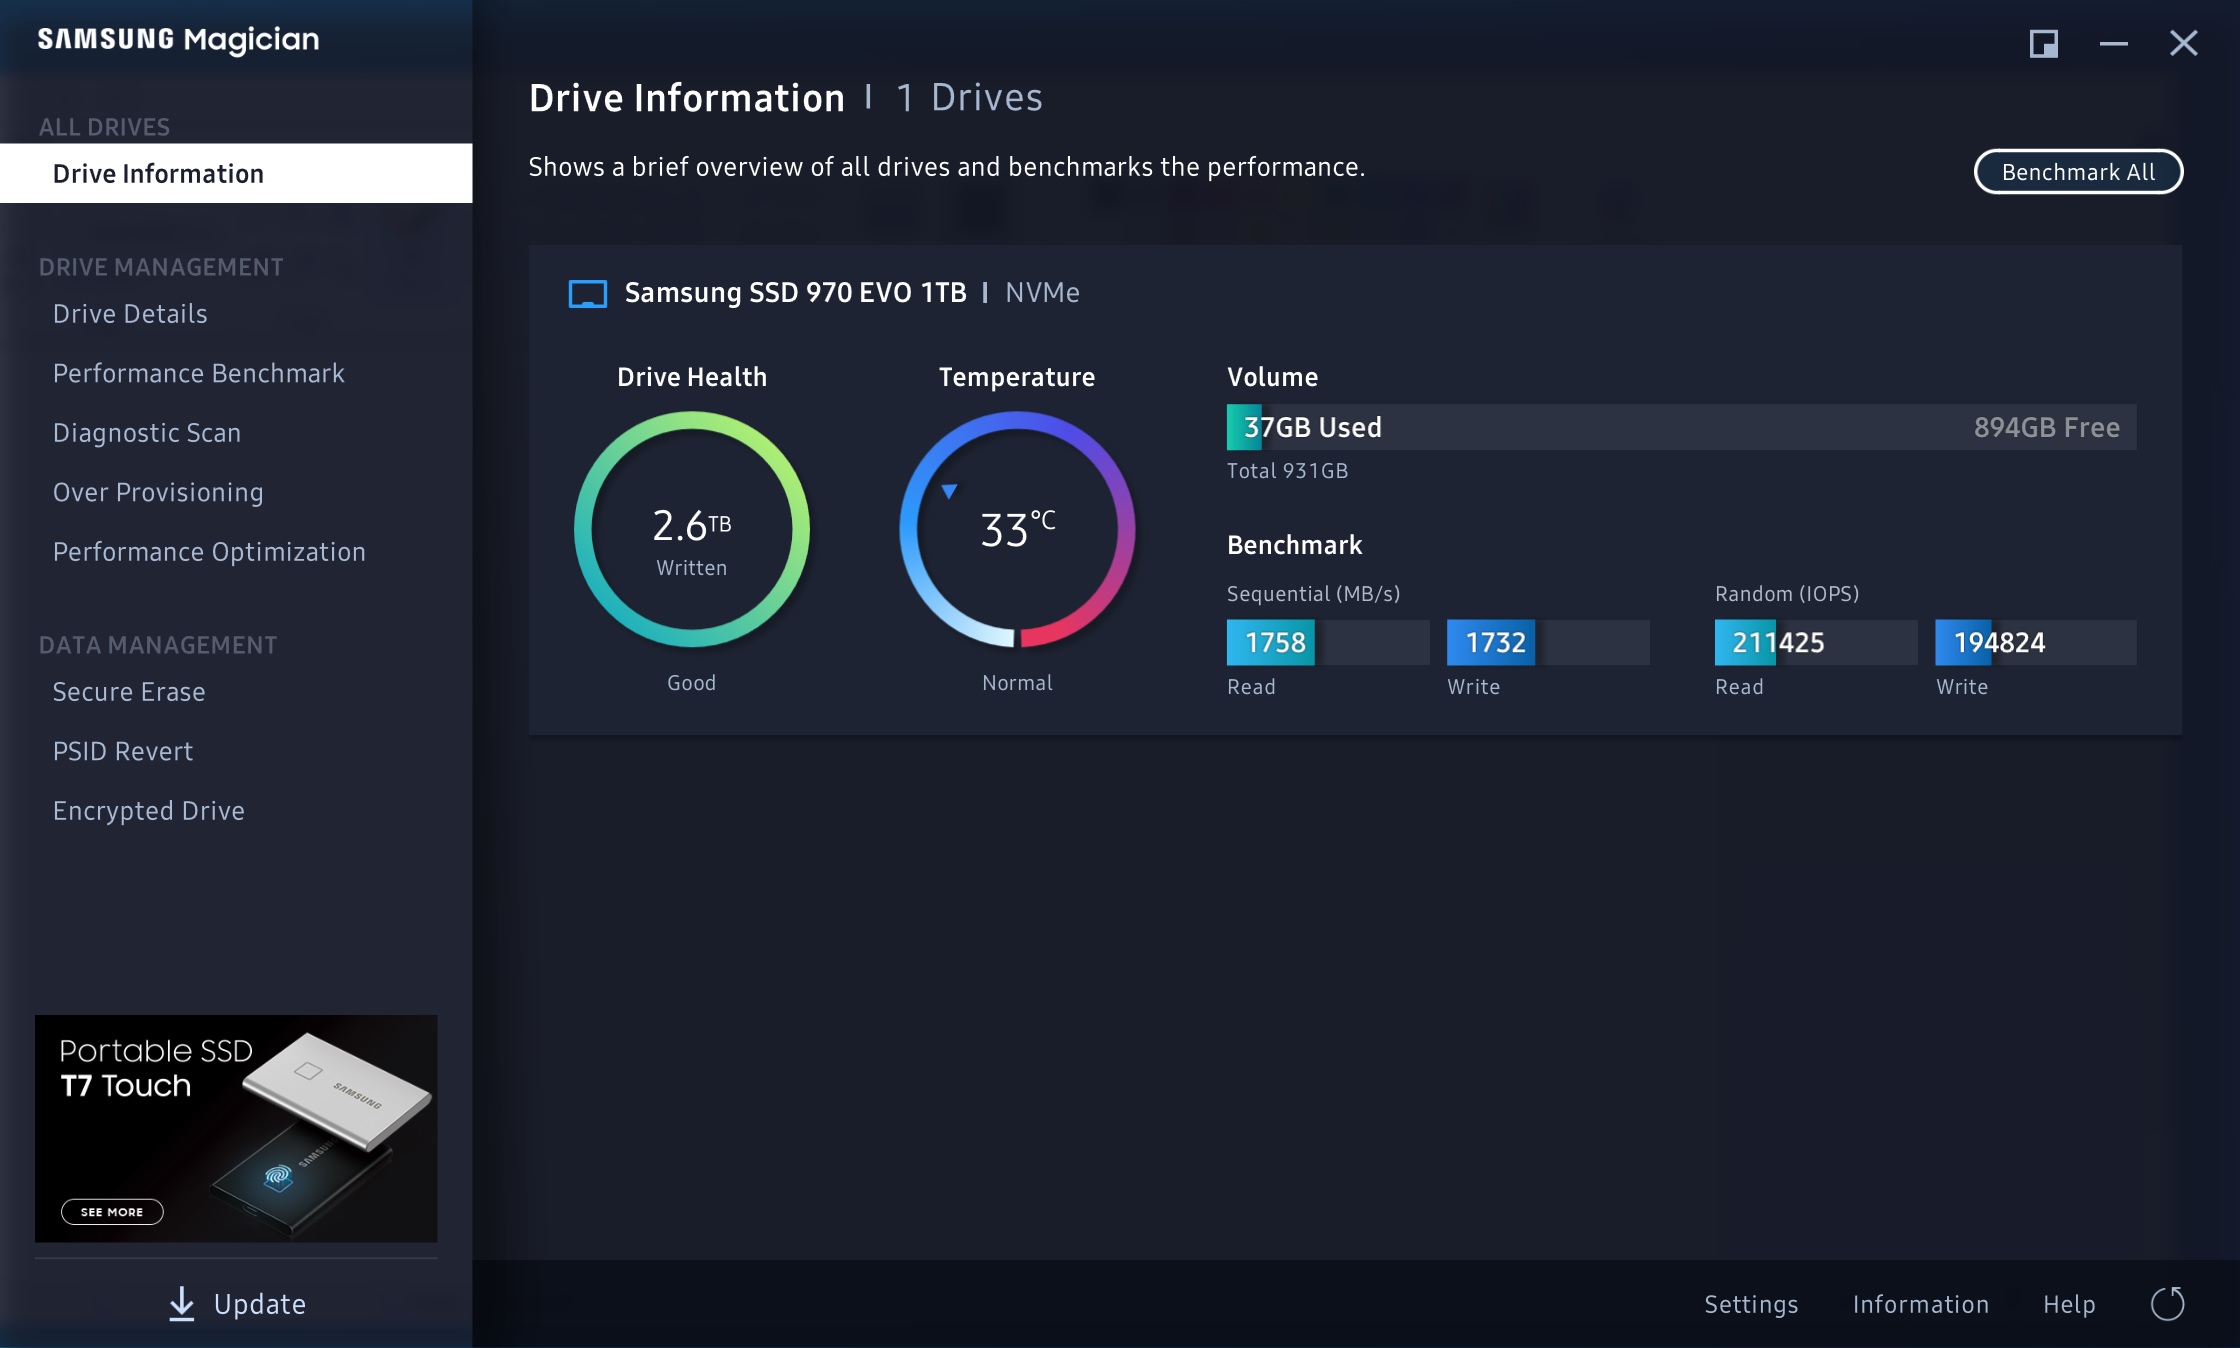
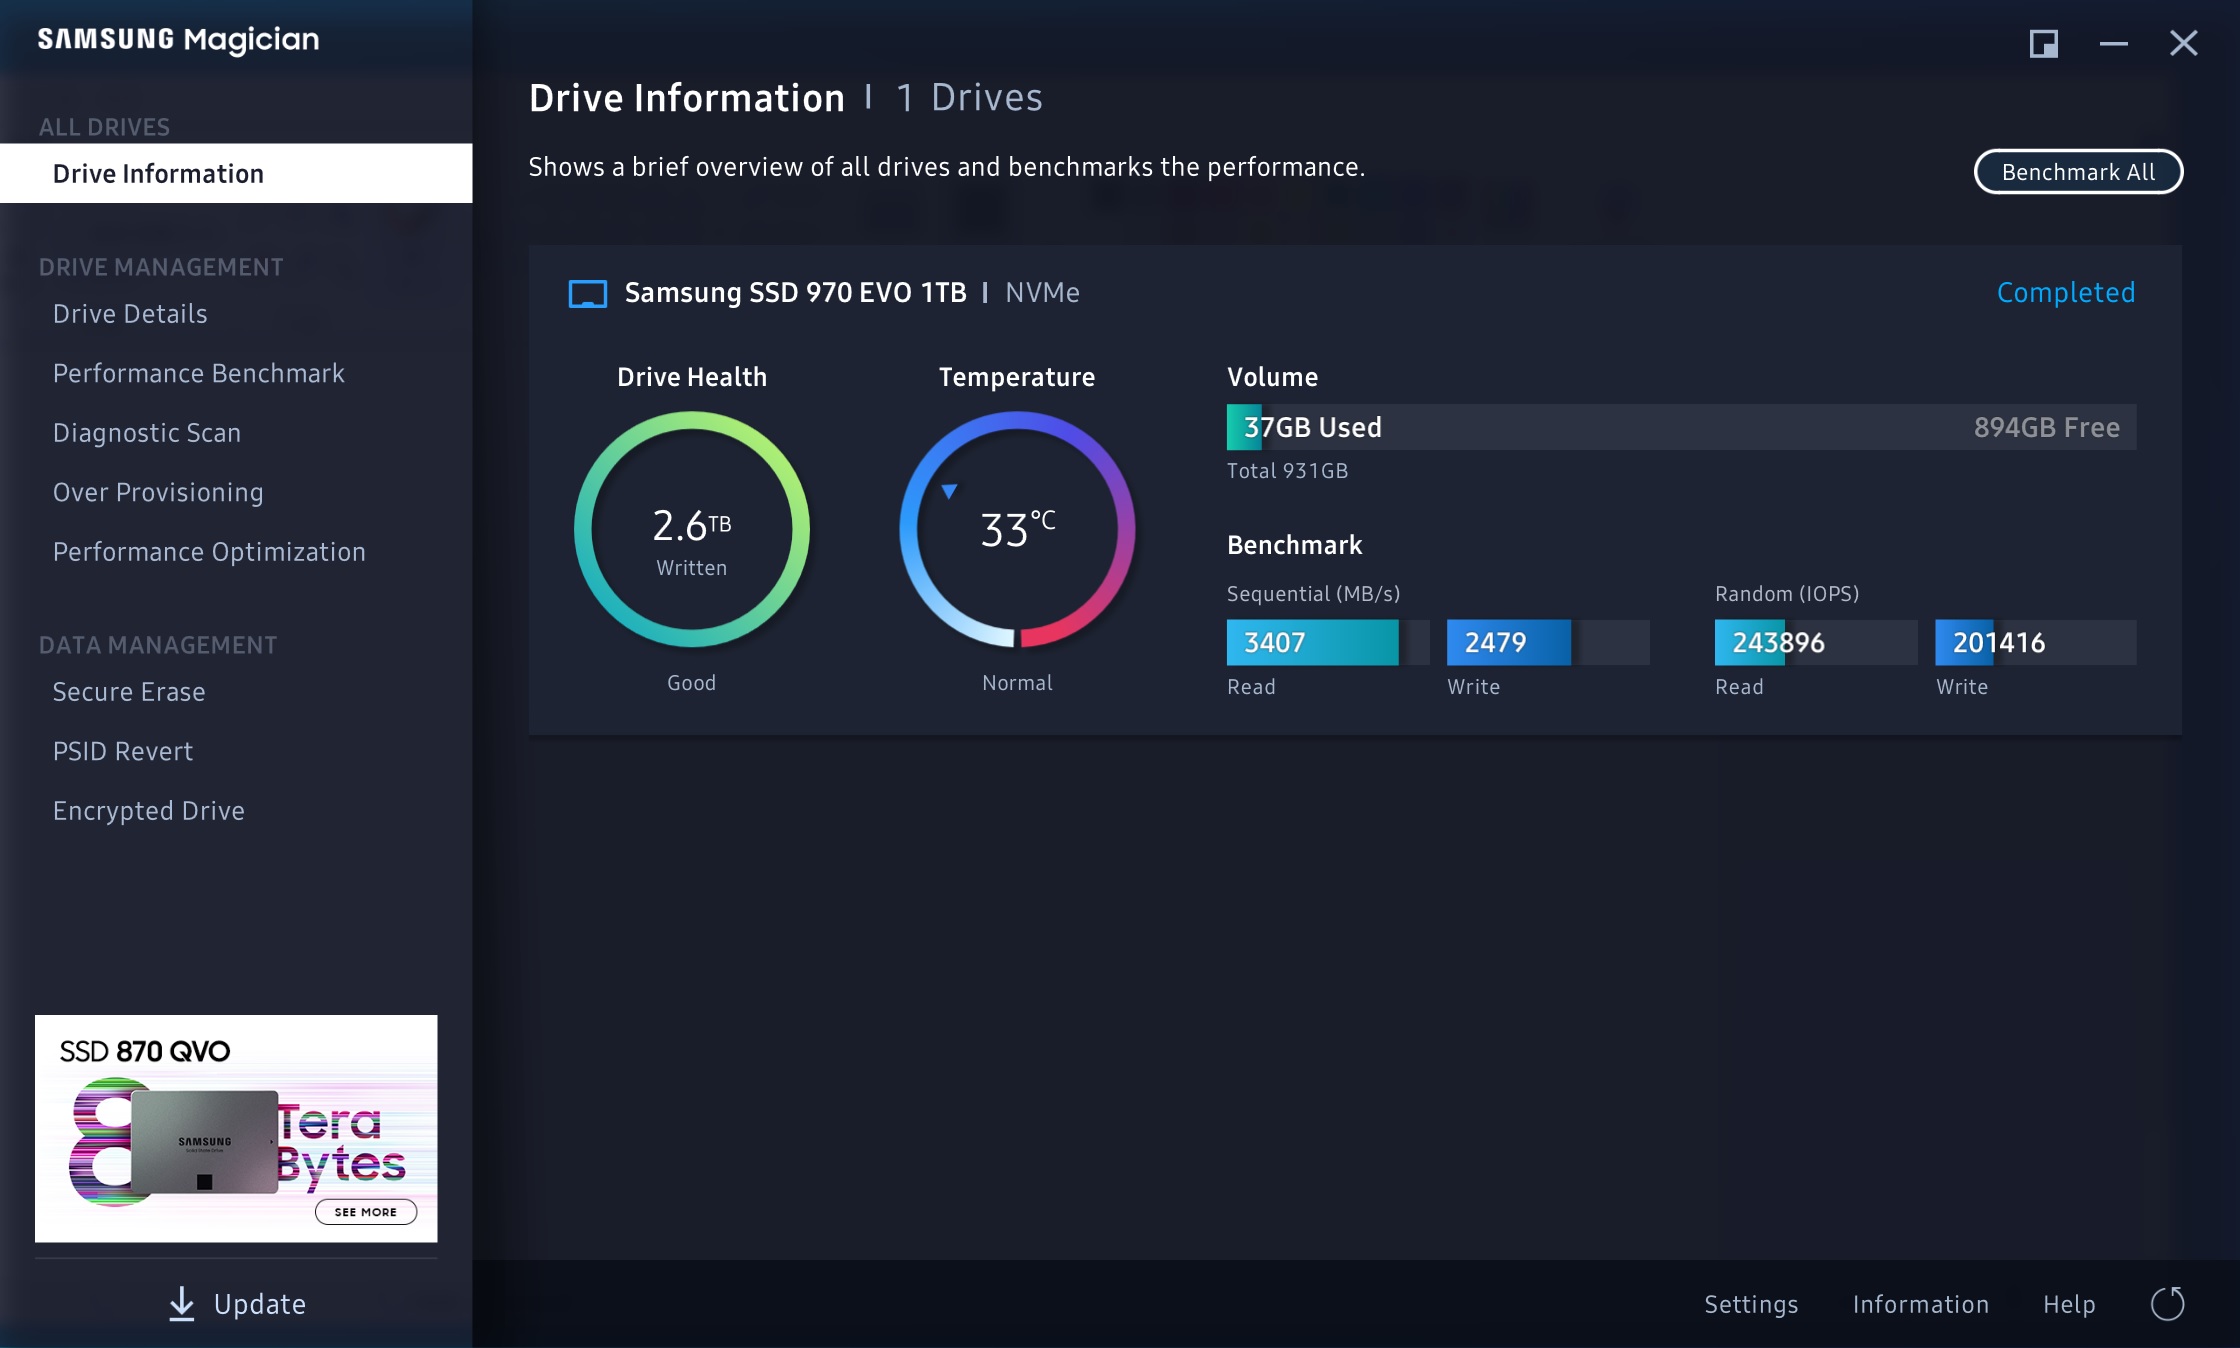
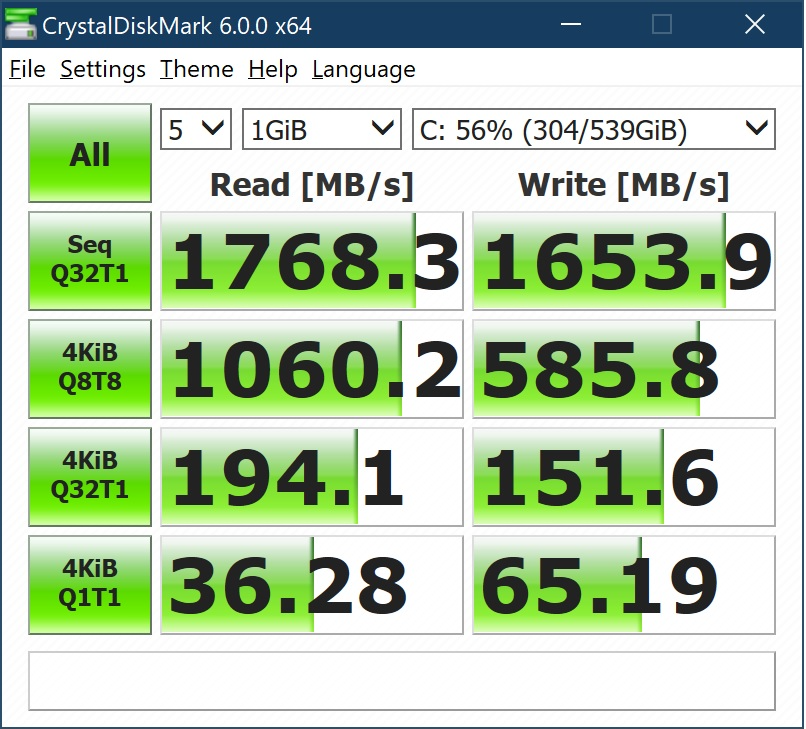
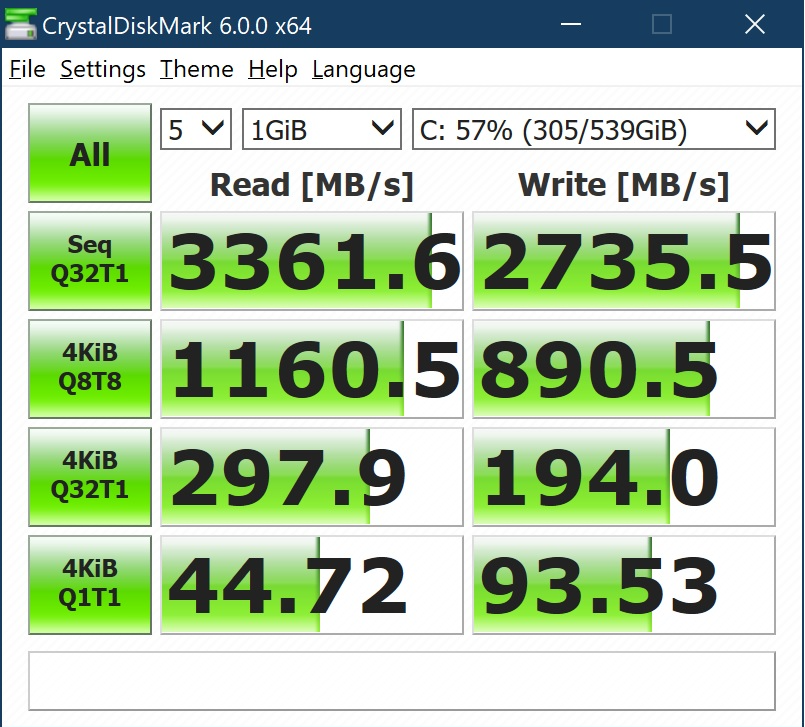
The two screenshots show the performance of my Sabrent 2TB NVMe drive before and after the modification. As can be seen, the new OPI mod lets the drive work to the limits of its manufactured throughput.
Special thanks to the following:
1. Plutomaniac for the excellent guide how to build a new BIOS image and clean it.
2. Espionage724 for proving that the XPS 9360 can be flashed using a Raspberry Pi